Cluster API is a Kubernetes sub-project focused on providing declarative APIs and tooling to simplify provisioning, upgrading, and operating multiple Kubernetes clusters.
Kubernetes is a complex system that relies on several components being configured correctly to have a working cluster. Recognizing this as a potential stumbling block for users, the community focused on simplifying the bootstrapping process. Today, over 100 Kubernetes distributions and installers have been created, each with different default configurations for clusters and supported infrastructure providers. SIG Cluster Lifecycle saw a need for a single tool to address a set of common overlapping installation concerns and started kubeadm.
However, while kubeadm and other bootstrap providers reduce installation complexity, they don’t address how to manage a cluster day-to-day or a Kubernetes environment long term. You are still faced with several questions when setting up a production environment, including:
SIG Cluster Lifecycle began the Cluster API project as a way to address these gaps by building declarative, Kubernetes-style APIs, that automate cluster creation, configuration, and management. Using this model, Cluster API can also be extended to support any infrastructure provider (AWS, Azure, vSphere, etc.) or bootstrap provider (kubeadm is default) you need. See the growing list of available providers .
Cluster API is developed in the open, and is constantly being improved by our users, contributors, and maintainers. It is because of you that we are able to automate cluster lifecycle management for the community. Join us!
If you have questions or want to get the latest project news, you can connect with us in the following ways:
In this tutorial we’ll cover the basics of how to use Cluster API to create one or more Kubernetes clusters.
There are two major quickstart paths: Using clusterctl or the Cluster API Operator.
The clusterctl command line interface is specifically designed for providing a simple “day 1 experience” and a quick start with Cluster API. It automates fetching the YAML files defining provider components and installing them.
Additionally it encodes a set of best practices in managing providers, that helps the user in avoiding mis-configurations or in managing day 2 operations such as upgrades.
The Cluster API Operator is a Kubernetes Operator built on top of clusterctl and designed to empower cluster administrators to handle the lifecycle of Cluster API providers within a management cluster using a declarative approach. It aims to improve user experience in deploying and managing Cluster API, making it easier to handle day-to-day tasks and automate workflows with GitOps. Visit the CAPI Operator quickstart if you want to experiment with this tool.
Cluster API requires an existing Kubernetes cluster accessible via kubectl. During the installation process the
Kubernetes cluster will be transformed into a management cluster by installing the Cluster API provider components , so it
is recommended to keep it separated from any application workload.
It is a common practice to create a temporary, local bootstrap cluster which is then used to provision
a target management cluster on the selected infrastructure provider .
The clusterctl CLI tool handles the lifecycle of a Cluster API management cluster.
Now that we’ve got clusterctl installed and all the prerequisites in place, let’s transform the Kubernetes cluster
into a management cluster by using clusterctl init.
The command accepts as input a list of providers to install; when executed for the first time, clusterctl init
automatically adds to the list the cluster-api core provider, and if unspecified, it also adds the kubeadm bootstrap
and kubeadm control-plane providers.
Feature gates can be enabled by exporting environment variables before executing clusterctl init.
For example, the ClusterTopology feature, which is required to enable support for managed topologies and ClusterClass,
can be enabled via:
Depending on the infrastructure provider you are planning to use, some additional prerequisites should be satisfied
before getting started with Cluster API. See below for the expected settings for common providers.
Once the management cluster is ready, you can create your first workload cluster.
Depending on the infrastructure provider you are planning to use, some additional prerequisites should be satisfied
before configuring a cluster with Cluster API. Instructions are provided for common providers below.
For the purpose of this tutorial, we’ll name our cluster capi-quickstart.
The file can be eventually modified using your editor of choice.
When ready, run the following command to apply the cluster manifest.
The cluster will now start provisioning. You can check status with:
You can also get an “at glance” view of the cluster and its resources by running:
Calico is used here as an example.
Delete workload cluster.
This section provides a quickstart guide for using the Cluster API Operator to create a Kubernetes cluster.
To use the clusterctl quickstart path, visit this quickstart guide .
This is a quickstart guide for getting Cluster API Operator up and running on your Kubernetes cluster.
For more detailed information, please refer to the full documentation.
Instead of using environment variables as clusterctl does, Cluster API Operator uses Kubernetes secrets to store credentials for cloud providers. Refer to provider documentation on which credentials are required.
This example uses AWS provider, but the same approach can be used for other providers.
Deploy Cluster API components with docker provider using a single command during operator installation
Deploy Cluster API AWS provider with specific version, custom manager options and flags:
Similar to how you can use StatefulSets or Deployments in Kubernetes to manage a group of Pods, in Cluster API you can use custom resources like KubeadmControlPlane (a control plane implementation) to manage a set of control plane Machines, or you can use MachineDeployments to manage a group of worker Machines, each one of them representing a host server and the corresponding Kubernetes Node.
Extensibility is at the core of Cluster API and Cluster API providers like Cluster API provider VSphere, AWS, GCP etc. can be used
to deploy Cluster API managed Clusters to your preferred infrastructure, as well as to configure many other parts of the system.
A Kubernetes cluster where Cluster API and one or more Cluster API providers run, and that can be used to manage the lifecycle of your Kubernetes Cluster via a set of custom resources such as Cluster or Machines .
A “Cluster” is a custom resource that represent a Kubernetes cluster whose lifecycle is managed by Cluster API, usually also referred to as workload cluster.
Common properties such as network CIDRs are modeled as fields on the Cluster’s spec. Any information that is provider-specific is part of the custom resources
referenced via infrastructureRef or controlPlaneRef and is not portable between different providers.
In most recent versions of Cluster API, the Cluster object can be used as a single point of control for the entire cluster.
See ClusterClass
A “Machine” is a custom resource providing the declarative spec for infrastructure hosting a Kubernetes Node (for example, a VM).
Common fields such as the Kubernetes version are modeled as fields on the Machine’s spec. Any information that is provider-specific is part of the custom resources
referenced via infrastructureRef or bootstrap.configRef and is not portable between different providers.
If a new Machine object is created, a provider-specific controller will provision and install a new host to register as a new Node matching the Machine spec. If a Machine object is deleted, its underlying infrastructure and corresponding Node will be deleted.
Like for Pods in Kubernetes, also for Machines in Cluster API it is more convenient to not manage single Machines directly. Instead you should use resources like KubeadmControlPlane (a control plane implementation), MachineDeployments or MachinePools to manage a group of Machines.
From the perspective of Cluster API, all Machines are immutable: once they are created, they are never updated (except for labels, annotations and status), only deleted.
For this reason, MachineDeployments are preferable. MachineDeployments handle changes to machines by replacing them, in the same way core Deployments handle changes to Pod specifications.
Over time several improvement have been applied to Cluster API in oder to perform machine rollout only when necessary and
for minimizing risks and impact of this operation on users workloads.
Starting from Cluster API v1.12, users can intentionally trade off some of the benefits that they get of Machine immutability by
using Cluster API extensions points to add the capability to perform in-place updates under well-defined circumstances.
Notably, the Cluster API user experience will remain the same no matter of the in-place update feature is enabled
or not, because ultimately users should care ONLY about the desired state.
Cluster API is responsible to choose the best strategy to achieve desired state, and with the introduction of
update extensions, Cluster API is expanding the set of tools that can be used to achieve the desired state.
A component responsible for the provisioning of infrastructure/computational resources required by the Cluster or by Machines (e.g. VMs, networking, etc.).
For example, cloud Infrastructure Providers include AWS, Azure, and Google, and bare metal Infrastructure Providers include VMware, MAAS, and metal3.io.
When there is more than one way to obtain resources from the same Infrastructure Provider (such as AWS offering both EC2 and EKS), each way is referred to as a variant.
A component responsible for the provisioning and for the management of the control plane of your Kubernetes Cluster, like e.g. the KubeadmControlPlane provider.
Control plane providers can take different approach on how to manage the control plane;
A component responsible for turning a server into a Kubernetes node as well as for:
Boostrap provider achieve this goal by generating BootstrapData, which contains the Machine or Node role-specific initialization data (usually cloud-init). The bootstrap data is used by the Infrastructure Provider to bootstrap a Machine into a Node.
The KubeadmControlPlane is a custom resource that is provided by the Kubeadm provider, and that allows to manage a set of Machines hosting control plane Nodes created with kubeadm.
Other control plane providers implement similar resources as well.
A MachineDeployment provides declarative updates for Machines and MachineSets.
A MachinePool is a declarative spec for a group of Machines. It is similar to a MachineDeployment, but is specific to a particular Infrastructure Provider. For more information, please check out MachinePool .
A MachineSet’s purpose is to maintain a stable set of Machines running at any given time.
A MachineHealthCheck defines the conditions when a Node should be considered missing or unhealthy.
If the Node matches these unhealthy conditions for a given user-configured time, the MachineHealthCheck initiates remediation of the Node. Remediation of Nodes is performed by replacing the corresponding Machine.
MachineHealthChecks will only remediate Nodes if they are owned by a MachineSet. This ensures that the Kubernetes cluster does not lose capacity, since the MachineSet will create a new Machine to replace the failed Machine.
This document would hopefully provide valuable context for all users, contributors and companies investing in this project,
as well as act as compass for all reviewers and maintainers currently working on it.
The Cluster API community is the foundation for this project’s past, present and future.
The project will continue to encourage and praise active participation and contribution.
The Cluster API community is an active part of Kubernetes SIG Cluster Lifecycle, of the broader Kubernetes community
and of the CNCF.
CNCF provides the core values this project recognizes and contributes to.
The Kubernetes community provides most of the practices and policies this project abides to or is inspired by.
Nowadays, like at the beginning of the project, some concepts from the above statement deserve further clarification.
The Cluster API project motto is “Kubernetes all the way down”, and this boils down to two elements.
The target state of a cluster can be defined using Kubernetes declarative APIs.
The project also implements controllers – Kubernetes reconcile loops – ensuring that desired and current state of the
cluster will remain consistent over time.
The combination of those elements, declarative APIs and controllers, defines “how” this project aims to make Kubernetes
and Cluster API a stable, reliable and consistent platform that just works to enable higher order business value
supported by cloud-native applications.
Kubernetes Cluster lifecycle management is a complex problem space, especially if you consider doing this across so
many different types of infrastructures.
Hiding this complexity behind a simple declarative API is “why” the Cluster API project ultimately exists.
The project is strongly committed to continue its quest in defining a set of common API primitives working consistently
across all infrastructures (one API to rule them all).
Working towards graduating our API to v1 will be the next step in this journey.
While doing so, the project should be inspired by Tim Hockin’s talk, and continue to move forward without increasing
operational and conceptual complexity for Cluster API’s users.
Like Kubernetes, also the Cluster API project claims the right to remain unfinished, because there is still a strong,
foundational need to continuously evolve, improve and adapt to the changing needs of Cluster API’s users and to the
growing Cloud Native ecosystem.
What is important to notice, is that being a project that is “continuously evolving” is not in contrast with another
request from Cluster API’s users, which is about the project being stable, as expected by a system that has “crossed the chasm”.
Those two requests from Cluster API’s users are two sides of the same coin, a reminder that Cluster API must
“evolve responsibly” by ensuring upgrade paths and avoiding (or at least minimizing) disruptions for users.
The Cluster API project will continue to “evolve responsibly” by abiding to the same guarantees that Kubernetes offers
for its own API resources, and by cleanly defining the guarantees offered for the public go modules and packages.
Also ensuring a continuous and obsessive focus on CI signal, test coverage and test flakes, a predictable release calendar,
and clear documentation of the release support policies and of the compatibility matrix for each release
are part of the continuous effort to “evolve responsibly”.
There is a finite amount of complexity that a project can absorb over a certain amount of time;
when the complexity budget runs out, bad things happen, quality decreases, we can’t fix bugs timely etc.
Since the beginning of the Cluster API project, its maintainers intuitively handled the complexity budget by following
this approach:
“We’ve got to say no to things today, so we can afford to do interesting things tomorrow”.
This is something that is never done lightly, and it is always the result of an open discussion considering the status
of the codebase, the status of the project CI signal, the complexity of the new feature etc. .
Being very pragmatic, also the resources committed to implement and to maintain a feature over time must be considered
when doing such an evaluation, because a model where everything falls on the shoulders of a small set of core
maintainers is not sustainable.
On the other side of this coin, Cluster API maintainer’s also claim the right to reconsider new ideas or ideas
previously put on hold whenever there are the conditions and the required community consensus to work on it.
Probably the most well-known case of this is about Cluster API maintainers repeatedly deferring on change requests
about nodes mutability in the initial phases of the project, while starting to embrace some mutable behavior in recent releases.
The Cluster API project is committed to keep working with the broader CAPI community – all the Cluster API providers –
as a single team in order to continuously improve and expand the capability of this solution.
As we learned the hard way, the extensibility model implemented by CAPI to support so many providers requires a
complementary effort to continuously explore new ways to offer a cohesive solution, not a bag of parts.
It is important to continue and renew efforts to make it easier to bootstrap and operate a system composed of many
components, to ensure consistent APIs and behaviors, to ensure quality across the board.
This effort lays its foundation in all the provider maintainers being committed to this goal, while the Cluster API project
will be the venue where common guidelines are discussed and documented, as well as the place of choice where common
components or utilities are developed and hosted.
This section provides details for some of the operations that need to be performed
when managing clusters.
This section details some tasks related to certificate management.
Cluster API expects certificates and keys used for bootstrapping to follow the below convention. CABPK generates new certificates using this convention if they do not already exist.
When using Kubeadm Control Plane provider (KCP) it is possible to configure automatic certificate rotations. KCP does this by triggering a rollout when the certificates on the control plane machines are about to expire.
If configured, the certificate rollout feature is available for all new and existing control plane machines.
This section provides details about bootstrap providers.
Cluster API bootstrap provider Kubeadm (CABPK) is a component responsible for generating a cloud-init script to
turn a Machine into a Kubernetes Node. This implementation uses kubeadm
for Kubernetes bootstrap.
CABPK supports multiple control plane machines initing at the same time.
The generation of cloud-init scripts of different machines is orchestrated in order to ensure a cluster
bootstrap process that will be compliant with the correct Kubeadm init/join sequence. More in detail:
CAPBK has several ways to configure kubelet.
This method is easy to replace the whole kubelet configuration generated by kubeadm, but it is not easy to replace only a part of the kubelet configuration.
This method is useful when you want to set kubelet flags that are not configurable via the KubeletConfiguration file, however, it is not recommended to use this method to set flags that are configurable via the KubeletConfiguration file.
This method is useful when you want to change the kubelet configuration file partially on specific nodes. For example, you can deploy a partially patched kubelet configuration file on specific nodes based on the default configuration used for kubeadm init or kubeadm join.
Cluster API bootstrap provider MicroK8s (CABPM) is a component responsible for generating a cloud-init script to turn a Machine into a Kubernetes Node. This implementation uses MicroK8s for Kubernetes bootstrap.
A control plane manifest section includes the Kubernetes version, the replica number as well as the MicroK8sConfig:
The main purpose of the MicroK8s bootstrap provider is to translate the users needs to a number of cloud-init files applicable for each type of cluster nodes. There are three types of cloud-inits:
The cloud-init scripts are saved as secrets that then the infrastructure provider uses during the machine creation. For more information on cloud-init options, see cloud config examples .
In addition, you must always upgrade between Kubernetes minor versions in sequence, e.g. if you need to upgrade from
Kubernetes v1.17 to v1.19, you must first upgrade to v1.18.
For kubeadm based clusters, infrastructure providers require a “machine image” containing pre-installed, matching
versions of kubeadm and kubelet, ensure that relevant infrastructure machine templates reference the appropriate
image for the Kubernetes version.
The high level steps to fully upgrading a cluster are to first upgrade the control plane and then upgrade
the worker machines.
The next step will trigger a rolling update of the control plane using the new values found in the new MachineTemplate.
Note that this field can only be used for triggering a rollout, not for delaying one. Specifically,
a rollout can also happen before the time specified in spec.rollout.after if any changes are made to
the spec before that time.
Upgrades are not limited to just the control plane. This section is not related to Kubeadm control plane specifically,
but is the final step in fully upgrading a Cluster API managed cluster.
Cluster API Bootstrap Provider Kubeadm supports using an external etcd cluster for your workload Kubernetes clusters.
Before getting started you should be aware of the expectations that come with using an external etcd cluster.
To use this, you will need to create an etcd cluster and generate an apiserver-etcd-client certificate and private key. This behaviour can be tested using kubeadmetcdadm
CA certificates are required to setup etcd cluster. If you already have a CA then the CA’s crt and key must be copied to /etc/kubernetes/pki/etcd/ca.crt and /etc/kubernetes/pki/etcd/ca.key.
This certificate and private key are used to sign etcd server and peer certificates as well as other client certificates (like the apiserver-etcd-client certificate or the etcd-healthcheck-client certificate). More information on how to setup external etcd with kubeadm can be found here .
Once the etcd cluster is setup, you will need the following files from the etcd cluster:
You’ll use these files to create the necessary Secrets on the management cluster (see the “Creating the required Secrets” section).
You’ll use these files in the next section to create the necessary Secrets on the management cluster.
Regardless of the method used to bootstrap the etcd cluster, you will need to use the certificates copied from the etcd cluster to create some Kubernetes Secrets on the management cluster.
First, you will need to create a Secret containing the API server etcd client certificate and key. This command assumes the certificate and private key are in the current directory; adjust your command accordingly if they are not:
Next, create a Secret for the etcd cluster’s CA certificate. The kubectl create secret tls command requires both a certificate and a key, but the key isn’t needed by CAPI. Instead, use the kubectl create secret generic command, and note that the file containing the CA certificate must be named tls.crt:
Alternatively you can base64 encode the files and put them in two secrets. The secrets must be formatted as follows and the cert material must be base64 encoded:
Once the Secrets are in place on the management cluster, the rest of the process leverages standard kubeadm configuration. Configure your ClusterConfiguration for the workload cluster as follows:
Create your workload cluster as normal. The new workload cluster should use the configured external etcd nodes instead of creating co-located etcd Pods on the control plane nodes.
In the overlay directories, the “base” (unmodified) Cluster API configuration (perhaps generated using
clusterctl generate cluster) would be referenced as a resource in kustomization.yaml using ../../base.
In general, it’s recommended to upgrade to the latest version of Cluster API to take advantage of bug fixes, new
features and improvements.
If moving between different API versions, there may be additional tasks that you need to complete. See below for
detailed instructions.
Ensure that the version of Cluster API is compatible with the Kubernetes version of the management cluster.
This section provides details about control plane providers.
Using the Kubeadm control plane type to manage a control plane provides several ways to upgrade control plane machines.
KCP will generate and manage the admin Kubeconfig for clusters. The client certificate for the admin user is created
with a valid lifespan of a year, and will be automatically regenerated when the cluster is reconciled and has less than
6 months of validity remaining.
We don’t suggest running workloads on control planes, and highly encourage avoiding it unless absolutely necessary.
However, in the case the user wants to run non-control plane workloads on control plane machines they
are ultimately responsible for ensuring the proper functioning of those workloads, given that KCP is not
aware of the specific requirements for each type of workload (e.g. preserving quorum, shutdown procedures etc.).
In order to do so, the user could leverage on the same assumption that applies to all the
Cluster API Machines:
Changes to the following fields of KubeadmControlPlane are propagated in-place to the Machines and do not trigger a full rollout:
Changes to the following fields of KubeadmControlPlane are propagated in-place to the InfrastructureMachine and KubeadmConfig:
Note: Changes to these fields will not be propagated to Machines, InfraMachines and KubeadmConfigs that are marked for deletion (example: because of scale down).
Cluster API MicroK8s control plane provider (CACPM) is a component responsible for managing the control plane of the provisioned clusters. This implementation uses MicroK8s for cluster provisioning and management.
Currently the CACPM does not expose any functionality. It serves however the following purposes:
The correct process for modifying an infrastructure machine template is as follows:
Once the new infrastructure machine template has been persisted, users may modify
the object that was referencing the infrastructure machine template. For example,
to modify the infrastructure machine template for the KubeadmControlPlane object,
users would modify the spec.infrastructureTemplate.name field. For a MachineDeployment, users would need to modify the spec.template.spec.infrastructureRef.name
field and the controller would orchestrate the upgrade by managing MachineSets pointing to the new and old references. In the case of a MachineSet with no MachineDeployment owner, if its template reference is changed, it will only affect upcoming Machines.
Once the new bootstrap template has been persisted, users may modify
the object that was referencing the bootstrap template. For example,
to modify the bootstrap template for the MachineDeployment object,
users would modify the spec.template.spec.bootstrap.configRef.name field.
The name field should be updated to point to the newly-modified
bootstrap template. This will trigger a rolling update.
Follow the quickstart setup guide for your provider but ensure that CAAPH is installed via including the addon=helm with either:
This will automatically install ArgoCD in the ArgoCD namespace and the guestbook application into the guestbook namespace. Adding or labeling additional clusters with argoCDChart: enabled and guestbook: enabled will automatically install the ArgoCD agent and the guestbook application and there is no need to create additional CAAPH HelmChartProxy entries.
The ArgoCD console can be viewed by connecting to the workload cluster and then doing the following:
The Guestbook application deployment can be seen once logged into the ArgoCD console. Since the GitOps agent points to the git repository, any changes to the repository will automatically update the workload cluster. The git repository could be configured to utilize the App of Apps pattern to install all platform requirements for the cluster. The App of Apps pattern is a single application that installs all other applications and configurations for the cluster.
This section details some tasks related to automated Machine management.
This section applies only to worker Machines. You can add or remove compute capacity for your cluster workloads by creating or removing Machines. A Machine expresses intent to have a Node with a defined form factor.
Machines can be owned by scalable resources i.e. MachineSet and MachineDeployments.
You can scale MachineSets and MachineDeployments in or out by expressing intent via .spec.replicas or updating the scale subresource e.g kubectl scale machinedeployment foo --replicas=5.
When you delete a Machine directly or by scaling down, the same process takes place in the same order:
This section applies only to worker Machines. Cluster Autoscaler is a tool that automatically adjusts the size of the Kubernetes cluster based
on the utilization of Pods and Nodes in your cluster. For more general information about the
Cluster Autoscaler, please see the
project documentation .
The following instructions are a reproduction of the Cluster API provider specific documentation
from the Autoscaler project documentation .
The cluster-api provider requires Kubernetes v1.16 or greater to run the
v1alpha3 version of the API.
To enable the Cluster API provider, you must first specify it in the command
line arguments to the cluster autoscaler binary. For example:
Please note, this example only shows the cloud provider options, you will
most likely need other command line flags. For more information you can invoke
cluster-autoscaler --help to see a full list of options.
You must configure node group auto discovery to inform cluster autoscaler which cluster in which to find for scalable node groups.
Limiting cluster autoscaler to only match against resources in the blue namespace
Limiting cluster autoscaler to only match against resources belonging to Cluster test1
Limiting cluster autoscaler to only match against resources matching the provided labels
These can be mixed and matched in any combination, for example to only match resources
in the staging namespace, belonging to the purple cluster, with the label owner=jim:
You will also need to provide the path to the kubeconfig(s) for the management
and workload cluster you wish cluster-autoscaler to run against. To specify the
kubeconfig path for the workload cluster to monitor, use the --kubeconfig
option and supply the path to the kubeconfig. If the --kubeconfig option is
not specified, cluster-autoscaler will attempt to use an in-cluster configuration.
To specify the kubeconfig path for the management cluster to monitor, use the
--cloud-config option and supply the path to the kubeconfig. If the
--cloud-config option is not specified it will fall back to using the kubeconfig
that was provided with the --kubeconfig option.
Use in-cluster config for workload cluster, specify kubeconfig for management cluster:
Use in-cluster config for management cluster, specify kubeconfig for workload cluster:
To enable the automatic scaling of components in your cluster-api managed
cloud there are a few annotations you need to provide. These annotations
must be applied to either MachineSet , MachineDeployment , or MachinePool
resources depending on the type of cluster-api mechanism that you are using.
The Cluster API community has defined an opt-in method for infrastructure
providers to enable scaling from zero-sized node groups in the
Opt-in Autoscaling from Zero enhancement .
As defined in the enhancement, each provider may add support for scaling from
zero to their provider, but they are not required to do so. If you are expecting
built-in support for scaling from zero, please check with the Cluster API
infrastructure providers that you are using.
If your Cluster API provider does not have support for scaling from zero, you
may still use this feature through the capacity annotations. You may add these
annotations to your MachineDeployments, or MachineSets if you are not using
MachineDeployments (it is not needed on both), to instruct the cluster
autoscaler about the sizing of the nodes in the node group. At the minimum,
you must specify the CPU and memory annotations, these annotations should
match the expected capacity of the nodes created from the infrastructure.
For example, if my MachineDeployment will create nodes that have “16000m” CPU,
“128G” memory, “100Gi” ephemeral disk storage, 2 NVidia GPUs, and can support
200 max pods, the following annotations will instruct the autoscaler how to
expand the node group from zero replicas:
If you are using the opt-in support for scaling from zero as defined by the
Cluster API infrastructure provider, you will need to add the infrastructure
machine template types to your role permissions for the service account
associated with the cluster autoscaler deployment. The service account will
need permission to get, list, and watch the infrastructure machine
templates for your infrastructure provider.
Taints for scale from zero can be configured in two ways, listed below in
order of precedence (highest first):
To provide CSI driver information for scale from zero, the optional
capacity annotation may be supplied as a comma separated list of driver name
and volume limit key/value pairs, as demonstrated in the example below:
Custom autoscaling options per node group (MachineDeployment/MachinePool/MachineSet) can be specified as annoations with a common prefix:
Users of single-arch non-amd64 clusters who are using scale from zero
support should also set the CAPI_SCALE_ZERO_DEFAULT_ARCH environment variable
to set the architecture of the nodes they want to default the node group templates to.
The autoscaler will default to amd64 if it is not set, and the node
group templates may not match the nodes’ architecture, specifically when
the workload triggering the scale-up uses a node affinity predicate checking
for the node’s architecture.
By default all Kubernetes resources consumed by the Cluster API provider will
use the group cluster.x-k8s.io, with a dynamically acquired version. In
some situations, such as testing or prototyping, you may wish to change this
group variable. For these situations you may use the environment variable
CAPI_GROUP to change the group that the provider will use.
When determining the group version for the Cluster API types, by default the autoscaler
will look for the latest version of the group. For example, if MachineDeployments
exist in the cluster.x-k8s.io group at versions v1alpha1 and v1beta1, the
autoscaler will choose v1beta1.
In some cases it may be desirable to specify which version of the API the cluster
autoscaler should use. This can be useful in debugging scenarios, or in situations
where you have deployed multiple API versions and wish to ensure that the autoscaler
uses a specific version.
If the replica field is unset in the Cluster definition Autoscaling can be enabled as described above
As with other providers, if the device plugin on nodes that provides GPU
resources takes some time to advertise the GPU resource to the cluster, this
may cause Cluster Autoscaler to unnecessarily scale out multiple times.
The Cluster Autoscaler feature to enable balancing similar node groups
(activated with the --balance-similar-node-groups flag) is a powerful and
popular feature. When enabled, the Cluster Autoscaler will attempt to create
new nodes by adding them in a manner that balances the creation between
similar node groups. With Cluster API, these node groups correspond directly
to the scalable resources associated (usually MachineDeployments and MachineSets)
with the nodes in question. In order for the nodes of these scalable resources
to be considered similar by the Cluster Autoscaler, they must have the same
capacity, labels, and taints for the nodes which will be created from them.
To help assist the Cluster Autoscaler in determining which node groups are
similar, the command line flags --balancing-ignore-label and
--balancing-label are provided. For an expanded discussion about balancing
similar node groups and the options which are available, please see the
Cluster Autoscaler FAQ .
Because Cluster API can address many different cloud providers, it is important
to configure the balancing labels to ignore provider-specific labels which
are used for carrying zonal information on Kubernetes nodes. The Cluster
Autoscaler implementation for Cluster API does not assume any labels (aside from
the well-known Kubernetes labels )
to be ignored when running. Users must configure their Cluster Autoscaler deployment
to ignore labels which might be different between nodes, but which do not
otherwise affect node behavior or size (for example when two MachineDeployments
are the same except for their deployment zones). The Cluster API community has
decided not to carry cloud provider specific labels in the Cluster Autoscaler
to reduce the possibility for labels to clash between providers. Additionally,
the community has agreed to promote documentation and the use of the --balancing-ignore-label
flag as the preferred method of deployment to reduce the extended need for
maintenance on the Cluster Autoscaler when new providers are added or updated.
For further context around this decision, please see the
Cluster API Deep Dive into Cluster Autoscaler Node Group Balancing discussion from 2022-09-12 .
The following table shows some of the most common labels used by cloud providers
to designate regional or zonal information on Kubernetes nodes. It is shared
here as a reference for users who might be deploying on these infrastructures.
A MachineHealthCheck is a resource within the Cluster API which allows users to define conditions under which Machines within a Cluster should be considered unhealthy.
A MachineHealthCheck is defined on a management cluster and scoped to a particular workload cluster.
When defining a MachineHealthCheck, users specify a timeout for each of the conditions that they define to check on the Machine’s Node.
If any of these conditions are met for the duration of the timeout, the Machine will be remediated.
By default, the action of remediating a Machine should trigger a new Machine to be created to replace the failed one, but providers are allowed to plug in more sophisticated external remediation solutions.
Use the following example as a basis for creating a MachineHealthCheck for worker nodes:
Use this example as the basis for defining a MachineHealthCheck for control plane nodes managed via
the KubeadmControlPlane:
KubeadmControlPlane allows to control how remediation happen by defining an optional remediation;
this feature can be used for preventing unnecessary load on infrastructure provider e.g. in case of quota problems,or for allowing the infrastructure provider to stabilize in case of temporary problems.
To ensure that MachineHealthChecks do not perform excessive remediation of Machines,
short-circuiting is implemented to prevent further remediation via the remediation.triggerIf field within the MachineHealthCheck spec.
These values are independent of how many Machines are being checked by the MachineHealthCheck.
Note, when the percentage is not a whole number, the allowed number is rounded down.
Note, the above example had 10 machines as sample set. But, this would work the same way for any other number.
This is useful for dynamically scaling clusters where the number of machines keep changing frequently.
There are scenarios where remediation for a machine may be undesirable (eg. during cluster migration using clusterctl move). For such cases, MachineHealthCheck skips marking a Machine for remediation if:
Before deploying a MachineHealthCheck, please familiarise yourself with the following limitations and caveats:
This page describes how Cluster API deletes Machines.
Note: There are cases where Node drain, wait for volume detach and Node deletion is skipped. For these please take a look at the
implementation of the isDeleteNodeAllowed function
This section describes details of the Node drain process in Cluster API. Cluster API implements Node drain aligned
with kubectl drain. One major difference is that the Cluster API controller does not actively wait during Reconcile
until all Pods are drained from the Node. Instead it continuously evicts Pods and requeues after 20s until all relevant
Pods have been drained from the Node or until the Machine.spec.nodeDrainTimeout is reached (if configured).
Per default all Pods are drained at the same time. But with MachineDrainRules it’s also possible to define a drain order
for Pods with behavior Drain (Pods with WaitCompleted have a hard-coded order of 0). The Machine controller will drain
Pods in batches based on their order, lowest order first . Pods that don’t match any rule have a default order of 0, so a
rule with a negative order will drain its pods before unmatched pods, and a rule with a positive order will drain its pods after.
To determine which Pods are blocking the drain and why you can take a look at the DrainingSucceeded condition on the Machine, e.g.:
If this doesn’t happen, please take a closer at the logs to determine which Pods still have to be evicted or haven’t gone away yet
(i.e. deletionTimestamp is set but the Pod objects still exist).
Users can enable/disable features by setting OS environment variables before running clusterctl init, e.g.:
As an alternative to environment variables, it is also possible to set variables in the clusterctl config file located at $XDG_CONFIG_HOME/cluster-api/clusterctl.yaml, e.g.:
In case a variable is defined in both the config file and as an OS environment variable, the environment variable takes precedence.
For more information on how to set variables for clusterctl, see clusterctl Configuration File
One way is to set experimental variables on the clusterctl config file. For CAPI, these configs are under ./test/e2e/config/... such as docker.yaml:
Another way is to set them as environmental variables before running e2e tests.
To enable/disable features on existing management clusters, users can edit the corresponding controller manager
deployments, which will then trigger a restart with the requested features. E.g. for the CAPI controller manager
deployment:
Following controller manager deployments have to be edited in order to enable/disable their respective experimental features:
Cluster API (CAPI) manages Kubernetes worker nodes primarily through Machine, MachineSet, and MachineDeployment objects. These primitives manage nodes individually (Machines), and have served well across a wide variety of providers.
However, many infrastructure providers already offer first-class abstractions for groups of compute instances (AWS: Auto Scaling Groups (ASG), Azure: Virtual Machine Scale Sets (VMSS), or GCP: Managed Instance Groups (MIG)). These primitives natively support scaling, rolling upgrades, and health management.
MachinePool brings these provider features into Cluster API by introducing a higher-level abstraction for managing a group of machines as a single unit.
A MachinePool is a Cluster API resource representing a group of worker nodes. Instead of reconciling each machine individually, CAPI delegates lifecycle management to the infrastructure provider.
The MachinePool controller coordinates between the Cluster API core and provider-specific implementations:
Most cloud providers already manage scaling, instance replacement, and health monitoring at the group level. MachinePool lets CAPI delegate lifecycle operations instead of duplicating that logic.
This provides more predictable, cloud-native semantics compared to reconciling many individual Machine objects.
MachinePool integrates with the Cluster Autoscaler in the same way that MachineDeployments do. In practice, the autoscaler treats a MachinePool as a node group, enabling scale-up and scale-down decisions based on cluster load.
Both MachineDeployment and MachinePool are valid options for managing worker nodes in Cluster API. The right choice depends on your infrastructure provider’s capabilities and your operational requirements.
Starting from Cluster API v1.7, MachinePool is enabled by default. No additional configuration is needed.
The following Cluster API infrastructure providers have implemented support for MachinePools:
When a MachineSet creates machines under certain circumstances, the operation fails or leads to a new machine that will be deleted and recreated in a short timeframe,
leading to unwanted Machine churn. Some of these circumstances include, but not limited to, creating a new Machine when Kubernetes version skew could be violated or
joining a Machine when the Control Plane is upgrading leading to failure because of mixed kube-apiserver version or due to the cluster load balancer delays in adapting
to the changes.
Per default all preflight checks are enabled for all MachineSets including new and existing MachineSets.
The enabled preflight checks can be overwritten with the --machineset-preflight-checks command-line flag.
It is also possible to opt-out of one or all of the preflight checks on a per MachineSet basis by specifying a
comma-separated list of the preflight checks via the machineset.cluster.x-k8s.io/skip-preflight-checks annotation
on the MachineSet or on the corresponding BootstrapConfigTemplate (annotation on the MachineSet has higher priority).
The ClusterClass feature introduces a new way to create clusters which reduces boilerplate and enables flexible and powerful customization of clusters.
ClusterClass is a powerful abstraction implemented on top of existing interfaces and offers a set of tools and operations to streamline cluster lifecycle management while maintaining the same underlying API.
A ClusterClass becomes more useful and valuable when it can be used to create many Cluster of a similar
shape. The goal of this document is to explain how ClusterClasses can be written in a way that they are
flexible enough to be used in as many Clusters as possible by supporting variants of the same base Cluster shape.
The following example shows a basic ClusterClass. It contains templates to shape the control plane,
infrastructure and workers of a Cluster. When a Cluster is using this ClusterClass, the templates
are used to generate the objects of the managed topology of the Cluster.
The following example shows a Cluster using this ClusterClass. In this case a KubeadmControlPlane
with the corresponding DockerMachineTemplate, a DockerCluster and a MachineDeployment with
the corresponding KubeadmConfigTemplate and DockerMachineTemplate will be created. This basic
ClusterClass is already very flexible. Via the topology on the Cluster the following can be configured:
ClusterClass also supports MachinePool workers. They work very similar to MachineDeployments. MachinePools
can be specified in the ClusterClass template under the workers section like so:
As shown above, basic ClusterClasses are already very powerful. But there are cases where
more powerful mechanisms are required. Let’s assume you want to manage multiple Clusters
with the same ClusterClass, but they require different values for a field in one of the
referenced templates of a ClusterClass.
A concrete example would be to deploy Clusters with different registries. In this case,
every cluster needs a Cluster-specific value for .spec.kubeadmConfigSpec.clusterConfiguration.imageRepository
in KubeadmControlPlane. Use cases like this can be implemented with ClusterClass patches.
The following example shows how variables can be defined in the ClusterClass.
A variable definition specifies the name and the schema of a variable and if it is
required. The schema defines how a variable is defaulted and validated. It supports
a subset of the schema of CRDs. For more information please see the godoc .
The variable can then be used in a patch to set a field on a template referenced in the ClusterClass.
The selector specifies on which template the patch should be applied. jsonPatches specifies which JSON
patches should be applied to that template. In this case we set the imageRepository field of the
KubeadmControlPlaneTemplate to the value of the variable imageRepository. For more information
please see the godoc .
After creating a ClusterClass with a variable definition, the user can now provide a value for
the variable in the Cluster as in the example below.
The controller needs to generate names for new objects when a Cluster is getting created
from a ClusterClass. These names have to be unique for each namespace. The naming
strategy enables this by concatenating the cluster name with a random suffix.
It is possible to provide a custom template for the name generation of ControlPlane, MachineDeployment
and MachinePool objects.
This section will explain more advanced features of ClusterClass patches.
If you want to use many variations of MachineDeployments in Clusters, you can either define
a MachineDeployment class for every variation or you can define patches and variables to
make a single MachineDeployment class more flexible. The same applies for MachinePools.
In addition to variables specified in the ClusterClass, the following builtin variables can be
referenced in patches:
Builtin variables can be used to dynamically calculate image names. The version used in the patch
will always be the same as the one we set in the corresponding MachineDeployment or MachinePool
(works the same way with .builtin.controlPlane.version).
Variables can also be objects, maps and arrays. An object is specified with the type object and
by the schemas of the fields of the object. A map is specified with the type object and the schema
of the map values. An array is specified via the type array and the schema of the array items.
Objects, maps and arrays can be used in patches either directly by referencing the variable name,
or by accessing individual fields. For example:
Complex variables can be used to make references in templates configurable, e.g. the identityRef used in AzureCluster.
Of course it’s also possible to only make the name of the reference configurable, including restricting the valid values
to a pre-defined enum.
Even if OpenAPI schema allows defining free form objects, e.g.
User should be aware that the lack of the validation of users provided data could lead to problems
when those values are used in patch or when the generated templates are created (see e.g.
6135 ).
As a consequence we recommend avoiding this practice while we are considering alternatives to make
it explicit for the ClusterClass authors to opt in this feature, thus accepting the implied risks.
We already saw above that it’s possible to use variable values in JSON patches. It’s also
possible to calculate values via Go templating or to use hard-coded values.
Templates can be used to implement defaulting behavior during JSON patch value calculation. This can be used if the simple
constant default value which can be specified in the schema is not enough.
Patches can also be conditionally enabled. This can be done by configuring a Go template via enabledIf.
The patch is then only applied if the Go template evaluates to true. In the following example the httpProxy
patch is only applied if the httpProxy variable is set (and not empty).
Hard-coded values can be used to test the impact of a patch during development, gradually roll out patches, etc. .
A boolean variable can be used to enable/disable a patch (or “feature”). This can have opt-in or opt-out behavior
depending on the default value of the variable.
Of course the same is possible by adding a boolean variable to a configuration object.
Builtin variables can be leveraged to apply a patch only for a specific Kubernetes version.
In some cases the ClusterClass authors want a patch to be computed according to the Kubernetes version in use.
While this is not a problem “per se” and it does not differ from writing any other patch, it is important
to keep in mind that there could be different Kubernetes version in a Cluster at any time, all of them
accessible via built in variables:
This info should provide the bases for developing version-aware patches, allowing the patch author to determine when a
patch should adapt to the new Kubernetes version by choosing one of the above variables. In practice the
following rules applies to the most common use cases:
Sometimes users need to define variables to be used by version-aware patches, and in this case it is important
to keep in mind that there could be different Kubernetes versions in a Cluster at any time.
A simple approach to solve this problem is to define a map of version-aware variables, with the key of each item
being the Kubernetes version. Patch could then use the proper builtin variables as a lookup entry to fetch
the corresponding values for the Kubernetes version in use by each object.
As a consequence ClusterClass authors should pay special attention when the following
conditions apply in order to prevent errors when a patch is applied:
A workaround in this particular case is to create the array in the patch instead of adding to the non-existing one.
When creating the slice, existing values would be overwritten so this should only be used when it does not exist.
The following example shows both cases to consider while writing a patch for adding a value to a slice.
This patch targets to add a file to the files slice of a KubeadmConfigTemplate which has omitempty set.
When planning a change to a ClusterClass, users should always take into consideration
how those changes might impact the existing Clusters already using the ClusterClass, if any.
There are two strategies for defining how a ClusterClass change rolls out to existing Clusters:
The first strategy is the recommended choice for people starting with ClusterClass; it
requires the users to create a new ClusterClass with the expected changes, and then
rebase each Cluster to use the newly created ClusterClass.
By splitting the change to the ClusterClass and its rollout
to Clusters into separate steps the user will reduce the risk of introducing unexpected
changes on existing Clusters, or at least limit the blast radius of those changes
to a small number of Clusters already rebased (in fact it is similar to a canary deployment).
The second strategy listed above instead requires changing a ClusterClass “in place”, which can
be simpler and faster than creating a new ClusterClass. However, this approach
means that changes are immediately propagated to all the Clusters already using the
modified ClusterClass. Any operation involving many Clusters at the same time has intrinsic risks,
and it can impact heavily on the underlying infrastructure in case the operation triggers
machine rollout across the entire fleet of Clusters.
However, regardless of which strategy you are choosing to implement your changes to a ClusterClass,
please make sure to:
Templates are an integral part of a ClusterClass, and thus the same considerations
described in the previous paragraph apply. When changing
a template referenced in a ClusterClass users should also always plan for how the
change should be propagated to the existing Clusters and choose the strategy that best
suits expectations.
Rebasing is an operational practice for transitioning a Cluster from one ClusterClass to another,
and the operation can be triggered by simply changing the value in Cluster.spec.topology.class.
When changing a ClusterClass, the system validates the required changes according to
a set of compatibility rules to prevent changes which would lead to a non-functional
Cluster, e.g. changing the InfrastructureProvider from AWS to Azure.
If the proposed changes are evaluated as dangerous, the operation is rejected.
Some general notes that can help you to understand what you should
expect when planning your ClusterClass changes:
The following table documents the effects each ClusterClass change can have on a Cluster;
Similar considerations apply to changes introduced by changes in Cluster.Topology or by
changes introduced by patches.
NOTE: for people used to operating Cluster API without Cluster Class, it could also help to keep in mind that the
underlying objects like control plane and MachineDeployment act in the same way with and without a ClusterClass.
The topology reconciler enforces values defined in the ClusterClass templates into the topology
owned objects in a Cluster.
A corollary of the behaviour described above is that it is technically possible to change fields in the object
which are not derived from the templates and patches, but we advise against using the possibility
or making ad-hoc changes in generated objects unless otherwise needed for a workaround. It is always
preferable to improve ClusterClasses by supporting new Cluster variants in a reusable way.
Using a managed topology the operation to upgrade a Kubernetes cluster is a one-touch operation.
Let’s assume we have created a CAPD cluster with ClusterClass and specified Kubernetes v1.21.2 (as documented in the Quick Start guide ). Specifying the version is done when running clusterctl generate cluster. Looking at the cluster, the version of the control plane and the MachineDeployments is v1.21.2.
The upgrade will take some time to roll out as it will take place machine by machine with older versions of the machines only being removed after healthy newer versions come online.
After a few minutes the upgrade will be complete and the output will be similar to:
When using a managed topology scaling of MachineDeployments, both up and down, should be done through the Cluster topology.
Assume we have created a CAPD cluster with ClusterClass and Kubernetes v1.23.3 (as documented in the Quick Start guide ). Initially we should have a MachineDeployment with 3 replicas. Running
We can scale up or down this MachineDeployment through the Cluster object by changing the replicas field under /spec/topology/workers/machineDeployments/0/replicas
The 0 in the path refers to the position of the target MachineDeployment in the list of our Cluster topology. As we only have one MachineDeployment we’re targeting the first item in the list under /spec/topology/workers/machineDeployments/.
As well as scaling a MachineDeployment, Cluster operators can edit the labels and annotations applied to a running MachineDeployment using the Cluster topology as a single point of control.
MachineDeployments in a managed Cluster are defined in the Cluster’s topology. Cluster operators can add a MachineDeployment to a living Cluster by adding it to the cluster.spec.topology.workers.machineDeployments field.
Assume we have created a CAPD cluster with ClusterClass and Kubernetes v1.23.3 (as documented in the Quick Start guide ). Initially we should have a single MachineDeployment with 3 replicas. Running
A new MachineDeployment can be added to the Cluster by adding a new MachineDeployment spec under /spec/topology/workers/machineDeployments/. To do so we can patch our Cluster with:
When using a managed topology scaling of ControlPlane Machines, where the Cluster is using a topology that includes ControlPlane MachineInfrastructure, should be done through the Cluster topology.
As well as scaling a ControlPlane, Cluster operators can edit the labels and annotations applied to a running ControlPlane using the Cluster topology as a single point of control.
A ClusterClass can use variables and patches in order to allow flexible customization of Clusters derived from a ClusterClass. Variable definition allows two or more Cluster topologies derived from the same ClusterClass to have different specs, with the differences controlled by variables in the Cluster topology.
Assume we have created a CAPD cluster with ClusterClass and Kubernetes v1.23.3 (as documented in the Quick Start guide ). Our Cluster has a variable etcdImageTag as defined in the ClusterClass. The variable is not set on our Cluster. Some variables, depending on their definition in a ClusterClass, may need to be specified by the Cluster operator for every Cluster created using a given ClusterClass.
In order to specify the value of a variable all we have to do is set the value in the Cluster topology.
In order to run a different version of etcd in new ControlPlane machines - the part of the spec this variable sets - change the value using the below patch:
Note: Changing the etcd version may have unintended impacts on a running Cluster. For safety the cluster should be reapplied after running the above variable patch.
To perform more significant changes using a Cluster as a single point of control, it may be necessary to change the ClusterClass that the Cluster is based on. This is done by changing the class referenced in /spec/topology/class.
Users should always aim at ensuring the stability of the Cluster and of the applications hosted on it while
using spec.topology as a single point of control for making changes to the objects that are part of the Cluster.
There are some special considerations for ClusterClass regarding Cluster API upgrades when the upgrade includes a bump
of the apiVersion of infrastructure, bootstrap or control plane provider CRDs.
The recommended approach is to first upgrade Cluster API and then update the apiVersions in the ClusterClass references afterwards.
By following above steps, there won’t be any disruptions of the reconciliation as the Cluster topology controller is able to reconcile the Cluster
even with the old apiVersions in the ClusterClass.
Note: The apiVersions in ClusterClass cannot be updated before Cluster API because the new apiVersions don’t exist in
the management cluster before the Cluster API upgrade.
In general the Cluster topology controller always uses exactly the versions of the CRDs referenced in the ClusterClass.
This means in the following example the Cluster topology controller will always use v1beta1 when reconciling/applying
patches for the infrastructure ref, even if the DockerClusterTemplate already has a v1beta2 apiVersion.
The Runtime SDK feature provides an extensibility mechanism that allows systems, products, and services built on top of Cluster API to hook into a workload cluster’s lifecycle.
As a developer building systems on top of Cluster API, if you want to hook into the Cluster’s lifecycle via
a Runtime Hook, you have to implement a Runtime Extension handling requests according to the
OpenAPI specification for the Runtime Hook you are interested in.
Runtime Extensions by design are very powerful and flexible, however given that with great power comes
great responsibility, a few key consideration should always be kept in mind (more details in the following sections):
Please note that following similar practices is already commonly accepted in the Kubernetes ecosystem for
Kubernetes API server admission webhooks. Runtime Extensions share the same foundation and most of the same
considerations/concerns apply.
As mentioned above as a developer building systems on top of Cluster API, if you want to hook in the Cluster’s
lifecycle via a Runtime Extension, you have to implement an HTTPS server handling a discovery request and a set
of additional requests according to the OpenAPI specification for the Runtime Hook you are interested in.
The following shows a minimal example of a Runtime Extension server implementation:
Please note that a Runtime Extension server can serve multiple Runtime Hooks (in the example above
BeforeClusterCreate and BeforeClusterUpgrade) at the same time. Each of them are handled at a different path, like the
Kubernetes API server does for different API resources. The exact format of those paths is handled by the server
automatically in accordance to the OpenAPI specification of the Runtime Hooks.
Please note that Cluster API is only able to enforce the correct request and response types as defined by a Runtime Hook version.
Developers are fully responsible for all other elements of the design of a Runtime Extension implementation, including:
When using Golang the Runtime Extension developer can benefit from the following packages (provided by the
sigs.k8s.io/cluster-api module) as shown in the example above:
While writing a Runtime Extension the following important guidelines must be considered:
Runtime Extension processing adds to reconcile durations of Cluster API controllers. They should respond to requests
as quickly as possible, typically in milliseconds. Runtime Extension developers can decide how long the Cluster API Runtime
should wait for a Runtime Extension to respond before treating the call as a failure (max is 30s) by returning the timeout
during discovery. Of course a Runtime Extension can trigger long-running tasks in the background, but they shouldn’t block
synchronously.
Runtime Extension failure could result in errors in handling the workload clusters lifecycle, and so the implementation
should be robust, have proper error handling, avoid panics, etc. Failure policies can be set up to mitigate the
negative impact of a Runtime Extension on the Cluster API Runtime, but this option can’t be used in all cases
(see Error Management ).
A Runtime Hook can be defined as “blocking” - e.g. the BeforeClusterUpgrade hook allows a Runtime Extension
to prevent the upgrade from starting. A Runtime Extension registered for the BeforeClusterUpgrade hook
can block by returning a non-zero retryAfterSeconds value. Following consideration apply:
Detailed description of what “blocking” means for each specific Runtime Hooks is documented case by case
in the hook-specific implementation documentation (e.g. Implementing Lifecycle Hook Runtime Extensions ).
It is recommended that Runtime Extensions should avoid side effects if possible, which means they should operate
only on the content of the request sent to them, and not make out-of-band changes. If side effects are required,
rules defined in the following sections apply.
An idempotent Runtime Extension is able to succeed even in case it has already been completed before (the Runtime
Extension checks current state and changes it only if necessary). This is necessary because a Runtime Extension
may be called many times after it already succeeded because other Runtime Extensions for the same hook may not
succeed in the same reconcile.
A practical example that explains why idempotence is relevant is the fact that extensions could be called more
than once for the same lifecycle transition, e.g.
Each Runtime Extension should accomplish its task without depending on other Runtime Extensions. Introducing
dependencies across Runtime Extensions makes the system fragile, and it is probably a consequence of poor
“Separation of Concerns” between extensions.
A deterministic Runtime Extension is implemented in such a way that given the same input it will always return
the same output.
Some Runtime Hooks, e.g. like external patches, might explicitly request for corresponding Runtime Extensions
to support this property. But we encourage developers to follow this pattern more generally given that it fits
well with practices like unit testing and generally makes the entire system more predictable and easier to troubleshoot.
RuntimeExtension authors should be aware that error messages might be surfaced as conditions in Kubernetes resources
and recorded in Cluster API controller’s logs. As a consequence:
To register your runtime extension apply the ExtensionConfig resource in the management cluster, including your CA
certs, ClusterIP service associated with the app and namespace, and the target namespace for the given extension. Once
created, the extension will detect the associated service and discover the associated Hooks. For clarification, you can
check the status of the ExtensionConfig. Below is an example of ExtensionConfig -
Settings can be added to the ExtensionConfig object in the form of a map with string keys and values. These settings are
sent with each request to hooks registered by that ExtensionConfig. Extension developers can implement behavior in their
extensions to alter behavior based on these settings. Settings should be well documented by extension developers so that
ClusterClass authors can understand usage and expected behaviour.
Settings can be provided for individual external patches by providing them in the ClusterClass .spec.patches[*].external.settings.
This can be used to overwrite settings at the ExtensionConfig level for that patch.
In case a Runtime Extension returns an error, the error will be handled according to the corresponding failure policy
defined in the response of the Discovery call.
Additional considerations about errors that apply only to a specific Runtime Hook will be documented in the hook-specific
implementation documentation.
Make sure to add the ExtensionConfig object to the YAML manifest used to deploy the runtime extensions (see Extensionsconfig for more details).
After you implemented and deployed a Runtime Extension you can manually test it by sending HTTP requests.
This can be for example done via kubectl:
Notably, the Cluster API user experience remains the same as of today no matter of the in-place update feature is enabled
or not e.g. in order to trigger a MachineDeployment rollout, you have to rotate a template, etc.
Users should care ONLY about the desired state (as of today).
Cluster API is responsible to choose the best strategy to achieve desired state, and with the introduction of
update extensions, Cluster API is expanding the set of tools that can be used to achieve the desired state.
If external update extensions can not cover the totality of the desired changes, CAPI will fall back to Cluster API’s default,
immutable rollouts.
Cluster API will be also responsible to determine which Machine/MachineSet should be updated, as well as to handle rollout
options like MaxSurge/MaxUnavailable. With this regard:
In summary, Runtime Extensions are components that should be designed, written and deployed with great caution given
that they can affect the proper functioning of the Cluster API runtime. A poorly implemented Runtime Extension could
potentially block updates.
For additional details about the OpenAPI spec of the upgrade plan hooks, please download the runtime-sdk-openapi.yamlSwagger UI .
This hook is called by KCP when performing the “can update in-place” for a control plane machine.
This hook is called by the MachineDeployment controller when performing the “can update in-place” for all the Machines controlled by
a MachineSet.
This hook is called by the Machine controller when performing the in-place updates for a Machine.
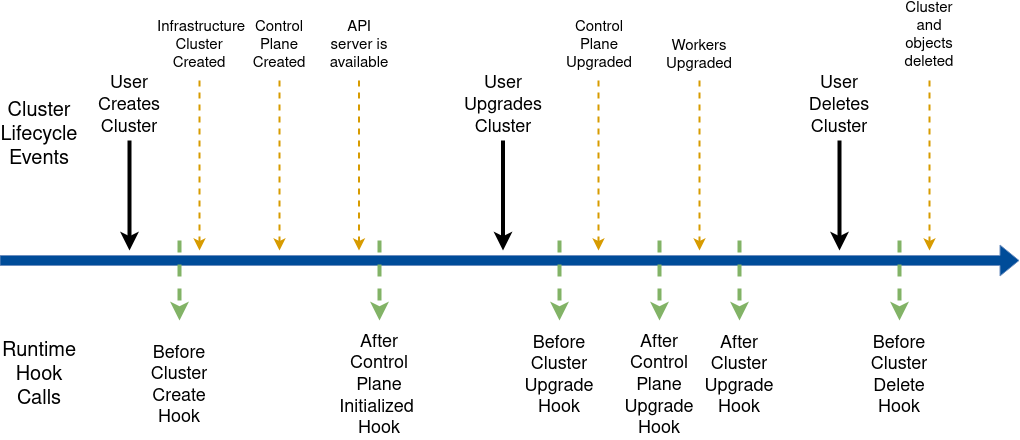
The lifecycle hooks allow hooking into the Cluster lifecycle. The following diagram provides an overview:
In summary, Runtime Extensions are components that should be designed, written and deployed with great caution given
that they can affect the proper functioning of the Cluster API runtime. A poorly implemented Runtime Extension could
potentially block lifecycle transitions from happening.
For additional details about the OpenAPI spec of the lifecycle hooks, please download the runtime-sdk-openapi.yamlSwagger UI .
This hook is called after the Cluster object has been created by the user, immediately before all the objects which
are part of a Cluster topology(*) are going to be created. Runtime Extension implementers can use this hook to
determine/prepare add-ons for the Cluster and block the creation of those objects until everything is ready.
(*) The objects which are part of a Cluster topology are the infrastructure Cluster, the Control Plane, the
MachineDeployments and the templates derived from the ClusterClass.
This hook is called after the Control Plane reports that the control plane is initialized, which means the API server can accept requests.
This usually happens sometime during the first CP machine provisioning or immediately thereafter.
Runtime Extension implementers can use this hook to execute tasks, for example component installation on workload clusters, that are only
possible once the Control Plane is available. This hook does not block any further changes to the Cluster.
Note: While the upgrade is blocked changes made to the Cluster Topology will be delayed propagating to the underlying
objects while the object is waiting for upgrade. Example: modifying ControlPlane/MachineDeployments (think scale up),
or creating new MachineDeployments will be delayed until the target ControlPlane/MachineDeployment is ready to pick up the upgrade.
This ensures that the ControlPlane and MachineDeployments do not perform a rollout prematurely while waiting to be rolled out again
for the version upgrade (no double rollouts).
This also ensures that any version specific changes are only pushed to the underlying objects also at the correct version.
This hook is called before a new version is propagated to the control plane object, which happens as many times
as defined by the upgrade plan.
Runtime Extension implementers can use this hook to execute pre-upgrade add-on tasks and block upgrades of the ControlPlane.
This hook is called after the control plane has been upgraded to the version specified in spec.topology.version
or to an intermediate version in the upgrade plan and:
Runtime Extension implementers can use this hook to execute post-upgrade add-on tasks and block upgrades to the next
version of the control plane or to workers until everything is ready.
Note: While the MachineDeployments upgrade is blocked changes made to existing MachineDeployments and creating new MachineDeployments
will be delayed while the object is waiting for upgrade. Example: modifying MachineDeployments (think scale up),
or creating new MachineDeployments will be delayed until the target MachineDeployment is ready to pick up the upgrade.
This ensures that the MachineDeployments do not perform a rollout prematurely while waiting to be rolled out again for the version upgrade (no double rollouts).
This also ensures that any version specific changes are only pushed to the underlying objects also at the correct version.
This hook is called before a new version is propagated to workers. Runtime Extension implementers
can use this hook to execute pre-upgrade add-on tasks and block upgrades of Workers.
This hook is called after all the workers have been upgraded to the version specified in spec.topology.version
or to an intermediate version in the upgrade plan, and:
This hook is called after the Cluster, control plane and workers have been upgraded to the version specified in
spec.topology.version. Runtime Extensions implementers can use this hook to execute post-upgrade add-on tasks.
This hook blocks new upgrades to start until it is completed.
This hook is called after the Cluster deletion has been triggered by the user and immediately before the topology
of the Cluster is going to be deleted. Runtime Extension implementers can use this hook to execute
cleanup tasks for the add-ons and block deletion of the Cluster and descendant objects until everything is ready.
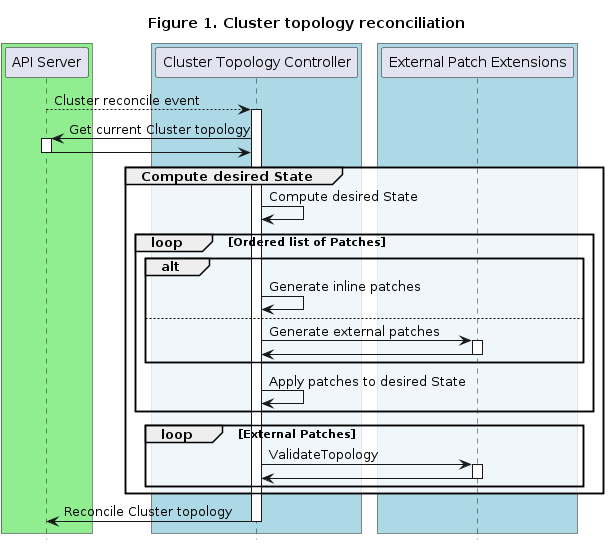
Three different hooks are called as part of Topology Mutation - two in the Cluster topology reconciler and one in the ClusterClass reconciler.
In summary, Runtime Extensions are components that should be designed, written and deployed with great caution given
that they can affect the proper functioning of the Cluster API runtime. A poorly implemented Runtime Extension could
potentially block topology reconcile from happening.
For additional details about the OpenAPI spec of the topology mutation hooks, please download the runtime-sdk-openapi.yamlSwagger UI .
The DiscoverVariables hook can be used to supply variable definitions for use in external patches. These variable definitions are added to
the status of any applicable ClusterClasses. Clusters using the ClusterClass can then set values for those variables.
External variable definitions are discovered by calling the DiscoverVariables runtime hook. This hook is called from the ClusterClass reconciler.
Once discovered the variable definitions are validated and stored in ClusterClass status.
Variable definitions can be inline in the ClusterClass or from any number of external DiscoverVariables hooks. The source
of a variable definition is recorded in the from field in ClusterClass .status.variables.
Variables that are defined by an external DiscoverVariables hook will have the name of the patch they are associated with as the value of from.
Variables that are defined in the ClusterClass .spec.variables will have inline as the value of from.
Note: inline is a reserved name for patches. It cannot be used as the name of an external patch to avoid conflicts.
If all variables that share a name have equivalent schemas the variable definitions are not in conflict. The CAPI components will
consider variable definitions to be equivalent when they share a name and their schema is exactly equal. If variables are in conflict
the VariablesReconciled will be set to false and the conflict has to be resolved. While there are variable conflicts, corresponding
Clusters will not be reconciled .
Note: We enforce that variable conflicts have to be resolved by ClusterClass authors, so that defining Cluster topology is as simply as possible for end users.
Variables that are defined with external variable definitions can be set like regular variables in Cluster .spec.topology.variables.
For general Runtime Extension developer guidelines please refer to the guidelines in Implementing Runtime Extensions .
This section outlines considerations specific to Topology Mutation hooks.
A GeneratePatches call generates patches for the entire Cluster topology. Accordingly the request contains all
templates, the global variables and the template-specific variables. The response contains generated patches.
We are considering to introduce a library to facilitate development of External Patch Extensions. It would provide capabilities like:
If you are interested in contributing to this library please reach out to the maintainer team or
feel free to open an issue describing your idea or use case.
A ValidateTopology call validates the topology after all patches have been applied. The request contains all
templates of the Cluster topology, the global variables and the template-specific variables. The response
contains the result of the validation.
A DiscoverVariables call returns definitions for one or more variables.
There are some special considerations regarding Cluster API upgrades when the upgrade includes a bump
of the apiVersion of infrastructure, bootstrap or control plane provider CRDs.
When calling external patches the Cluster topology controller is always sending the templates in the apiVersion of the references
in the ClusterClass.
While inline patches are always referring to one specific apiVersion, external patch implementations are more flexible. They can
be written in a way that they are able to handle multiple apiVersions of a CRD. This can be done by calculating patches differently
depending on which apiVersion is received by the external patch implementation.
Variant 1: External patch implementation supporting two apiVersions at the same time
Variant 2: Deploy an additional instance of the external patch implementation which can handle the new apiVersion
According to the proposal, there are two ways to provide Cluster API the information required to compute the upgrade plan:
This document defines the hook for the second option and provides recommendations on how to implement it.
In summary, Runtime Extensions are components that should be designed, written and deployed with great caution given
that they can affect the proper functioning of the Cluster API runtime. A poorly implemented Runtime Extension could
potentially block upgrades.
For additional details about the OpenAPI spec of the upgrade plan hooks, please download the runtime-sdk-openapi.yamlSwagger UI .
The GenerateUpgradePlan hook is called every time Cluster API is required to compute the upgrade plan.
Notably, during an upgrade, the upgrade plan is recomputed several times, ideally once each time the upgrade plan completes
a step, but the number of calls might be higher depending on e.g. the duration of the upgrade.
Note: in this case the system will infer the list of intermediate version for workers from the list of control plane versions, taking
care of performing the minimum number of workers upgrade by taking into account the Kubernetes version skew policy .
Implementers of this runtime extension can also address more sophisticated use cases by computing the response in different ways, e.g.
Note: in this case the system will infer the list of intermediate version for workers from the list of control plane versions, taking
care of performing the minimum number of workers upgrade by taking into account the Kubernetes version skew policy .
Cluster API requires that each Runtime Extension must be deployed using an endpoint accessible from the Cluster API
controllers. The recommended deployment model is to deploy a Runtime Extension in the management cluster by:
There are a set of important guidelines that must be considered while choosing the deployment method:
It is recommended that Runtime Extensions should leverage some form of load-balancing, to provide high availability
and performance benefits. You can run multiple Runtime Extension servers behind a Kubernetes Service to leverage the
load-balancing that services support.
The security model for each Runtime Extension should be carefully defined, similar to any other application deployed
in the Cluster. If the Runtime Extension requires access to the apiserver the deployment must use a dedicated service
account with limited RBAC permission. Otherwise no service account should be used.
On top of that, the container image for the Runtime Extension should be carefully designed in order to avoid
privilege escalation (e.g using distroless base images).
The Pod spec in the Deployment manifest should enforce security best practices (e.g. do not use privileged pods).
Alternative deployment methods can be used as long as the HTTPs endpoint is accessible, like e.g.:
In those cases recommendations about availability and identity and access management still apply.
This guide explains how to deploy an AWS workload cluster using Ignition.
Before workload clusters can be deployed, Cluster API components must be deployed to the management cluster.
This could take a while. When the control plane is initialized, the INITIALIZED field should be true:
Ignition support will be added to more providers in the future.
Cluster API supports running multiple infrastructure/bootstrap/control plane providers on the same management cluster. It’s highly recommended to rely on
clusterctl init command in this case. clusterctl will help ensure that all providers support the same
API Version of Cluster API (contract).
With CAPI v1.6 we introduced new flags to allow serving metrics, the pprof endpoint and an endpoint to dynamically change log levels securely in production.
As soon as the feature is enabled the metrics endpoint is served via https and protected via authentication and authorization. This works the same way as
metrics in core Kubernetes components: Metrics in Kubernetes .
A ServiceAccount token is now required to scrape metrics. The corresponding ServiceAccount needs permissions on the /metrics path.
This can be achieved e.g. by following the Kubernetes documentation .
With the Prometheus Helm chart it is as easy as using the following config for the Prometheus job scraping the Cluster API controllers:
Then let’s open a port-forward, create a ServiceAccount token and scrape the metrics:
Parca can be used to continuously scrape profiles from CAPI providers. For more details please see our Parca
development setup: parca
Then let’s open a port-forward, create a ServiceAccount token and scrape the profile:
Then let’s open a port-forward, create a ServiceAccount token and change the log level to 8:
Suppose you want to automatically install the relevant external cloud provider on all workload clusters.
This can be accomplished by labeling the clusters with the specific cloud (e.g. AWS, GCP or OpenStack) and then creating a ClusterResourceSet for each.
For example, you could have the following for OpenStack:
By adding the following variables and patches Pod Security Standards can be added to every ClusterClass which references a Kubeadm based control plane .
The following snippet contains the patch to be added to the ClusterClass.
After adding the variables and patches the Pod Security Standards would be applied by default.
It is also possible to disable this patch or configure different levels for the configuration
using variables.
This document compiles security best practices for using Cluster API. These guidelines are based on the Cluster API Security Self-Assessment conducted by the Kubernetes SIG Security. We recommend that organizations adapt these guidelines to their specific infrastructure and security requirements to ensure safe operations.
To ensure comprehensive auditing, the following components require audit configuration:
After configuring these audit sources, centralize the logs using aggregation tools and implement real-time monitoring and alerting to detect suspicious activities and security incidents.
To minimize security risks related to cloud provider access, create dedicated cloud credentials that have only the necessary permissions to manage the lifecycle of a cluster. Avoid using administrative or root accounts for Cluster API operations, and use separate credentials for different purposes such as management cluster versus workload clusters.
Implement access restrictions to protect cluster infrastructure.
Disable or restrict SSH access to nodes in a cluster to prevent unauthorized modifications and access to sensitive files.
Implement a review process where at least two people must approve privileged actions such as creating, deleting, or updating clusters. GitOps provides an effective way to enforce this requirement through pull request workflows, where changes to cluster configurations must be reviewed and approved by another team member before being merged and applied to the infrastructure.
Configure alerts in the centralized audit log system to detect security incidents and resource anomalies.
Implement multiple layers of isolation to prevent privilege escalation from workload clusters to management cluster.
Separate workload clusters into different AWS accounts or Azure subscriptions, and use dedicated accounts for management cluster and production workloads. This approach provides a strong security boundary at the cloud provider level.
Separate workload and management clusters at the network level through VPC boundaries. Use dedicated VPC/VNet for each cluster type to prevent lateral movement between clusters.
Do not build a chain of trust for cluster CAs. Each cluster must have its own independent CA to ensure that workload cluster CA compromise does not provide access to the management cluster. See Kubernetes PKI certificates and requirements for best practices.
Implement controls to prevent tampering of machine images at runtime. Disable or restrict updates to machine images at runtime and prevent unauthorized modifications through SSH access restrictions. Following immutable infrastructure practices ensures that any changes require deploying new images rather than modifying running systems.
Additionally it encodes a set of best practices in managing providers, that helps the user in avoiding
mis-configurations or in managing day 2 operations such as upgrades.
While using providers hosted on GitHub, clusterctl is calling GitHub API which are rate limited; for normal usage free tier is enough but when using clusterctl extensively users might hit the rate limit.
See the provider documentation for more details.
To access provider specific information, such as the components YAML to be used for installing a provider,
clusterctl init accesses the provider repositories , that are well-known places where the release assets for
a provider are published.
Providers can use variables in the components YAML published in the provider’s repository.
While doing init, clusterctl checks if there is a version of cert-manager already installed. If not, clusterctl will
install a default version (currently cert-manager v1.21.0). See clusterctl configuration for
available options to customize this operation.
Then, the file can be modified using your editor of choice; when ready, run the following command
to apply the cluster manifest.
In case there is more than one infrastructure provider, the following syntax can be used to select which infrastructure
provider to use for the workload cluster:
The infrastructure provider authors can provide different types of cluster templates, or flavors; use the --flavor flag
to specify which flavor to use; e.g.
Please refer to the providers documentation for more info about available flavors.
clusterctl uses the provider’s repository as a primary source for cluster templates; the following alternative sources
for cluster templates can be used as well:
If the selected cluster template expects some environment variables, the user should ensure those variables are set in advance.
E.g. if the AWS_CREDENTIALS variable is expected for a cluster template targeting the aws infrastructure, you
should ensure the corresponding environment variable to be set before executing clusterctl generate cluster.
Please refer to the providers documentation for more info about the required variables or use the
clusterctl generate cluster --list-variables flag to get a list of variables names required by a cluster template.
Generate templates for provider components.
clusterctl fetches the provider components from the provider repository and performs variable substitution.
Variable values are either sourced from the clusterctl config file or
from environment variables
The intent of this command is to allow users who may have specific templates
to leverage clusterctl’s yaml processor for variable substitution. For
example, this command can be leveraged in local and CI scripts or for
development purposes.
clusterctl ships with a simple yaml processor that performs variable
substitution that takes into account default values.
Under the hood, clusterctl’s yaml processor uses
drone/envsubst to replace variables and uses the defaults if
necessary.
Variable values are either sourced from the clusterctl config file or
from environment variables.
This command prints the kubeconfig of an existing workload cluster into stdout.
This functionality is available in clusterctl v0.3.9 or newer.
Get the kubeconfig of a workload cluster named foo.
The “at a glance” view is based on the idea that clusterctl should avoid overloading the user with information,
but instead surface problems, if any.
If this is not the case, and machines have different states, the visualization is going to use different lines:
You might also notice that the visualization does not represent the infrastructure machine or the
bootstrap object linked to a machine, unless their state differs from the machine’s state.
It is also possible to force the visualization to show all the conditions for an object (instead of showing
only the ready condition). e.g. with --show-conditions KubeadmControlPlane you get:
Please note that this option is flexible, and you can pass a comma separated list of kind or kind/name for
which the command should show all the object’s conditions (use ‘all’ to show conditions for everything).
To move the Cluster API objects existing in the current namespace of the source management cluster; in case if you want
to move the Cluster API objects defined in another namespace, you can use the --namespace flag.
Pivoting is a process for moving the provider components and declared Cluster API resources from a source management
cluster to a target management cluster.
The pivot process can be bounded with the creation of a temporary bootstrap cluster
used to provision a target Management cluster.
The output contains the latest release available for each Cluster API contract version.
available at the moment.
After choosing the desired option for the upgrade, you can run the following
command to upgrade all the providers in the management cluster. This upgrades
all the providers to the latest stable releases.
Please note that clusterctl does not upgrade Cluster API objects (Clusters, MachineDeployments, Machine etc.); upgrading
such objects are the responsibility of the provider’s controllers.
It is also possible to explicitly upgrade one or more components to specific versions.
Cluster API publishes nightly versions of the project components’ manifests from the main branch to a Google storage bucket for user consumption. The syntax for the URL is: https://storage.googleapis.com/k8s-staging-cluster-api/components/nightly_main_<YYYYMMDD>/<COMPONENT_NAME>-components.yaml.
Please note that these files are deleted after a certain period, at the time of this writing 60 days after file creation.
For example, to retrieve the core component manifest published April 25, 2024, the following URL can be used: https://storage.googleapis.com/k8s-staging-cluster-api/components/nightly_main_20240425/core-components.yaml.
The clusterctl delete command deletes the provider components from the management cluster.
The operation is designed to prevent accidental deletion of user created objects. For example:
clusterctl delete --infrastructure aws
This command deletes the AWS infrastructure provider components, while preserving
the namespace where the provider components are hosted and the provider’s CRDs.
If you want to delete the namespace where the provider components are hosted, you can use the --include-namespace flag.
Be aware that this operation deletes all the object existing in a namespace, not only the provider’s components.
If you want to delete the provider’s CRDs, and all the components related to CRDs like e.g. the ValidatingWebhookConfiguration etc.,
you can use the --include-crd flag.
Be aware that this operation deletes all the objects of Kind’s defined in the provider’s CRDs, e.g. when deleting
the aws provider, it deletes all the AWSCluster, AWSMachine etc.
If you want to delete all the providers in a single operation, you can use the --all flag.
clusterctl delete --all
The clusterctl completion command outputs shell completion code for the
specified shell (bash or zsh). The shell code must be evaluated to provide
interactive completion of clusterctl commands.
To install bash-completion on macOS, use Homebrew:
brew install bash-completion
Once installed, bash_completion must be evaluated. This can be done by adding
the following line to the ~/.bash_profile.
[[ -r "$(brew --prefix)/etc/profile.d/bash_completion.sh" ]] && . "$(brew --prefix)/etc/profile.d/bash_completion.sh"
If bash-completion is not installed on Linux, please install the
‘bash-completion’ package via your distribution’s package manager.
You now have to ensure that the clusterctl completion script gets sourced in
all your shell sessions. There are multiple ways to achieve this:
The clusterctl completion script for Zsh can be generated with the command
clusterctl completion zsh.
If shell completion is not already enabled in your environment you will need to
enable it. You can execute the following once:
echo "autoload -U compinit; compinit" >> ~/.zshrc
To load completions for each session, execute once:
clusterctl completion zsh > "${fpath[1]}/_clusterctl"
You will need to start a new shell for this setup to take effect.
The clusterctl alpha rollout command manages the rollout of a Cluster API resource. It consists of several sub-commands which are documented below.
Currently, only the following Cluster API resources are supported by the rollout command:
kubeadmcontrolplanes
machinedeployments
Use the restart sub-command to force an immediate rollout. Note that rollout refers to the replacement of existing machines with new machines using the desired rollout strategy (default: rolling update). For example, here the MachineDeployment my-md-0 will be immediately rolled out:
clusterctl alpha rollout restart machinedeployment/my-md-0
Use the pause sub-command to pause a Cluster API resource. The command is a NOP if the resource is already paused. Note that internally, this command sets the Paused field within the resource spec (e.g. MachineDeployment.Spec.Paused) to true.
clusterctl alpha rollout pause machinedeployment/my-md-0
Use the resume sub-command to resume a currently paused Cluster API resource. The command is a NOP if the resource is currently not paused.
clusterctl alpha rollout resume machinedeployment/my-md-0
Paused resources will not be reconciled by a controller. By resuming a resource, we allow it to be reconciled again.
Display the list of providers and their repository configurations.
clusterctl ships with a list of known providers; if necessary, edit
$XDG_CONFIG_HOME/cluster-api/clusterctl.yaml file to add a new provider or to customize existing ones.
Help provides help for any command in the application.
Simply type clusterctl help [command] for full details.
Print clusterctl version.
Lists the container images required for initializing the management cluster.
The clusterctl config file is located at $XDG_CONFIG_HOME/cluster-api/clusterctl.yaml.
It can be used to:
Customize the list of providers and provider repositories.
Provide configuration values to be used for variable substitution when installing providers or creating clusters.
Define image overrides for air-gapped environments.
The clusterctl CLI is designed to work with providers implementing the clusterctl Provider Contract .
Each provider is expected to define a provider repository, a well-known place where release assets are published.
By default, clusterctl ships with providers sponsored by SIG Cluster
Lifecycle. Use clusterctl config repositories to get a list of supported
providers and their repository configuration.
Users can customize the list of available providers using the clusterctl configuration file, as shown in the following example:
providers:
# add a custom provider
- name: "my-infra-provider"
url: "https://github.com/myorg/myrepo/releases/latest/infrastructure-components.yaml"
type: "InfrastructureProvider"
# override a pre-defined provider
- name: "cluster-api"
url: "https://github.com/myorg/myforkofclusterapi/releases/latest/core-components.yaml"
type: "CoreProvider"
# add a custom provider on a self-hosted GitLab (host should start with "gitlab.")
- name: "my-other-infra-provider"
url: "https://gitlab.example.com/api/v4/projects/myorg%2Fmyrepo/packages/generic/myrepo/v1.2.3/infrastructure-components.yaml"
type: "InfrastructureProvider"
# override a pre-defined provider on a self-hosted GitLab (host should start with "gitlab.")
- name: "kubeadm"
url: "https://gitlab.example.com/api/v4/projects/external-packages%2Fcluster-api/packages/generic/cluster-api/v1.1.3/bootstrap-components.yaml"
type: "BootstrapProvider"
See provider contract for instructions about how to set up a provider repository.
Note : It is possible to use the ${HOME} and ${CLUSTERCTL_REPOSITORY_PATH} environment variables in url.
When installing a provider clusterctl reads a YAML file that is published in the provider repository. While executing
this operation, clusterctl can substitute certain variables with the ones provided by the user.
The same mechanism also applies when clusterctl reads the cluster templates YAML published in the repository, e.g.
when injecting the Kubernetes version to use, or the number of worker machines to create.
The user can provide values using OS environment variables, but it is also possible to add
variables in the clusterctl config file:
# Values for environment variable substitution
AWS_B64ENCODED_CREDENTIALS: XXXXXXXX
The format of keys should always be UPPERCASE_WITH_UNDERSCORE for both OS environment variables and in the clusterctl
config file (NOTE: this limitation derives from Viper , the library we are using internally to retrieve variables).
In case a variable is defined both in the config file and as an OS environment variable,
the environment variable takes precedence.
While doing init, clusterctl checks if there is a version of cert-manager already installed. If not, clusterctl will
install a default version.
By default, cert-manager will be fetched from https://github.com/cert-manager/cert-manager/releases; however, if the user
wants to use a different repository, it is possible to use the following configuration:
cert-manager:
url: "/Users/foo/.config/cluster-api/dev-repository/cert-manager/latest/cert-manager.yaml"
Note : It is possible to use the ${HOME} and ${CLUSTERCTL_REPOSITORY_PATH} environment variables in url.
Similarly, it is possible to override the default version installed by clusterctl by configuring:
cert-manager:
...
version: "v1.1.1"
For situations when resources are limited or the network is slow, the cert-manager wait time to be running can be customized by adding a field to the clusterctl config file, for example:
cert-manager:
...
timeout: 15m
The value string is a possibly signed sequence of decimal numbers, each with optional fraction and a unit suffix, such as “300ms”, “-1.5h” or “2h45m”. Valid time units are “ns”, “us” (or “µs”), “ms”, “s”, “m”, “h”.
If no value is specified, or the format is invalid, the default value of 10 minutes will be used.
Please note that the configuration above will be considered also when doing clusterctl upgrade plan or clusterctl upgrade apply.
For situations when you are using your own cert-manager installation, you can tell clusterctl init that cert-manager is already installed by adding a field to the clusterctl config file, for example:
cert-manager:
...
externallyProvisioned: true
timeout: 15m
...
If the externallyProvisioned flag is set, clusterctl will not install cert-manager but only test if it is proper working. If cert-manager is not working the test will be repeated until timeout expires; after that clusterctl int will stop and report an error.
You may want to migrate to a user-managed cert-manager further down the line, after initialising cert-manager on the management cluster through clusterctl.
clusterctl looks for the label clusterctl.cluster.x-k8s.io/core=cert-manager on all api resources in the cert-manager namespace. If it finds the label, clusterctl will manage the cert-manager deployment. You can list all the resources with that label by running:
kubectl api-resources --verbs=list -o name | xargs -n 1 kubectl get --show-kind --ignore-not-found -A --selector=clusterctl.cluster.x-k8s.io/core=cert-manager
If you want to manage and install your own cert-manager, you’ll need to remove this label from all API resources.
Cluster API has a direct dependency on cert-manager. It’s possible you could encounter issues if you use a different version to the Cluster API default version.
Follow this
Overrides only provide file replacements; instead, provider version resolution is based only on the actual repository structure.
clusterctl uses an overrides layer to read in injected provider components,
cluster templates and metadata. By default, it reads the files from
$XDG_CONFIG_HOME/cluster-api/overrides.
The directory structure under the overrides directory should follow the
template:
<providerType-providerName>/<version>/<fileName>
For example,
├── bootstrap-kubeadm
│ └── v1.1.5
│ └── bootstrap-components.yaml
├── cluster-api
│ └── v1.1.5
│ └── core-components.yaml
├── control-plane-kubeadm
│ └── v1.1.5
│ └── control-plane-components.yaml
└── infrastructure-aws
└── v0.5.0
├── cluster-template-dev.yaml
└── infrastructure-components.yaml
For developers who want to generate the overrides layer, see
Build artifacts locally .
Once these overrides are specified, clusterctl will use them instead of
getting the values from the default or specified providers.
One example usage of the overrides layer is that it allows you to deploy
clusters with custom templates that may not be available from the official
provider repositories.
For example, you can now do:
clusterctl generate cluster mycluster --flavor dev --infrastructure aws:v0.5.0 -v5
The -v5 provides verbose logging which will confirm the usage of the
override file.
Using Override="cluster-template-dev.yaml" Provider="infrastructure-aws" Version="v0.5.0"
Another example, if you would like to deploy a custom version of CAPA, you can
make changes to infrastructure-components.yaml in the overrides folder and
run,
clusterctl init --infrastructure aws:v0.5.0 -v5
...
Using Override="infrastructure-components.yaml" Provider="infrastructure-aws" Version="v0.5.0"
...
If you prefer to have the overrides directory at a different location (e.g.
/Users/foobar/workspace/dev-releases) you can specify the overrides
directory in the clusterctl config file as
overridesFolder: /Users/foobar/workspace/dev-releases
Note : It is possible to use the ${HOME} and ${CLUSTERCTL_REPOSITORY_PATH} environment variables in overridesFolder.
Image override is an advanced feature and wrong configuration can easily lead to non-functional clusters.
It’s strongly recommended to test configurations on dev/test environments before using this functionality in production.
This feature must always be used in conjunction with
version tag when executing clusterctl commands.
When working in air-gapped environments, it’s necessary to alter the manifests to be installed in order to pull
images from a local/custom image repository instead of public ones (e.g. gcr.io, or quay.io).
The clusterctl configuration file can be used to instruct clusterctl to override images automatically.
This can be achieved by adding an images configuration entry as shown in the example:
images:
all:
repository: myorg.io/local-repo
Please note that the image override feature allows for more fine-grained configuration, allowing to set image
overrides for specific components, for example:
images:
all:
repository: myorg.io/local-repo
cert-manager:
tag: v1.5.3
In this example we are overriding the image repository for all the components and the image tag for
all the images in the cert-manager component.
If required to alter only a specific image you can use:
images:
all:
repository: myorg.io/local-repo
cert-manager/cert-manager-cainjector:
tag: v1.5.3
Additionally, you can override the image name itself. This is useful when images
have been mirrored with different names:
images:
all:
repository: myorg.io/local-repo
cluster-api:
name: mirrored-cluster-api-controller
This would transform registry.k8s.io/cluster-api/cluster-api-controller:v1.10.6 into
myorg.io/local-repo/mirrored-cluster-api-controller:v1.10.6.
Or you can specify all three fields to completely override the image:
images:
cluster-api:
repository: myorg.io/local-repo
name: mirrored-cluster-api-controller
tag: v1.10.6
This would transform registry.k8s.io/cluster-api/cluster-api-controller:v1.8.0 into
myorg.io/local-repo/mirrored-cluster-api-controller:v1.10.6, replacing both the image location and version.
To have more verbose logs you can use the -v flag when running the clusterctl and set the level of the logging verbose with a positive integer number, ie. -v 3.
If you do not want to use the flag every time you issue a command you can set the environment variable CLUSTERCTL_LOG_LEVEL or set the variable in the clusterctl config file located by default at $XDG_CONFIG_HOME/cluster-api/clusterctl.yaml.
clusterctl automatically checks for new versions every time it is used. If you do not want clusterctl to check for new updates you can set the environment variable CLUSTERCTL_DISABLE_VERSIONCHECK to "true" or set the variable in the clusterctl config file located by default at $XDG_CONFIG_HOME/cluster-api/clusterctl.yaml.
This document describes how to use clusterctl during the development workflow.
A Cluster API development setup (go, git, kind v0.9 or newer, Docker v19.03 or newer etc.)
A local clone of the Cluster API GitHub repository
A local clone of the GitHub repositories for the providers you want to install
From the root of the local copy of Cluster API, you can build the clusterctl binary by running:
make clusterctl
The output of the build is saved in the bin/ folder; In order to use it you have to specify
the full path, create an alias or copy it into a folder under your $PATH.
Clusterctl by default uses artifacts published in the providers repositories ;
during the development workflow you may want to use artifacts from your local workstation.
There are two options to do so:
Use the overrides layer , when you want to override a single published artifact with a local one.
Create a local repository, when you want to avoid using published artifacts and use the local ones instead.
If you want to create a local artifact, follow these instructions:
In order to build artifacts for the CAPI core provider, the kubeadm bootstrap provider, the kubeadm control plane provider and the Docker infrastructure provider:
make docker-build REGISTRY=gcr.io/k8s-staging-cluster-api PULL_POLICY=IfNotPresent
Next, create a clusterctl-settings.json file and place it in your local copy
of Cluster API. This file will be used by create-local-repository.py . Here is an example:
{
"providers": ["cluster-api","bootstrap-kubeadm","control-plane-kubeadm", "infrastructure-aws", "infrastructure-docker"],
"provider_repos": ["../cluster-api-provider-aws"]
}
providers (Array[]String, default=[]): A list of the providers to enable.
See available providers for more details.
provider_repos (Array[]String, default=[]): A list of paths to all the providers you want to use. Each provider must have
a clusterctl-settings.json file describing how to build the provider assets.
Run the create-local-repository hack from the root of the local copy of Cluster API:
cmd/clusterctl/hack/create-local-repository.py
The script reads from the source folders for the providers you want to install, builds the providers’ assets,
and places them in a local repository folder located under $XDG_CONFIG_HOME/cluster-api/dev-repository/.
Additionally, the command output provides you the clusterctl init command with all the necessary flags.
The output should be similar to:
clusterctl local overrides generated from local repositories for the cluster-api, bootstrap-kubeadm, control-plane-kubeadm, infrastructure-docker, infrastructure-aws providers.
in order to use them, please run:
clusterctl init \
--core cluster-api:v0.3.8 \
--bootstrap kubeadm:v0.3.8 \
--control-plane kubeadm:v0.3.8 \
--infrastructure aws:v0.5.0 \
--infrastructure docker:v0.3.8 \
--config $XDG_CONFIG_HOME/cluster-api/dev-repository/config.yaml
As you might notice, the command is using the $XDG_CONFIG_HOME/cluster-api/dev-repository/config.yaml config file,
containing all the required setting to make clusterctl use the local repository (it fallbacks to $HOME if $XDG_CONFIG_HOME
is not set on your machine).
You must pass --config ... to all the clusterctl commands you are running during your dev session.
The above config file changes the location of the overrides layer folder thus ensuring
you dev session isn’t hijacked by other local artifacts.
With the exceptions of the Docker provider, the local repository folder does not contain cluster templates,
so the clusterctl generate cluster command will fail if you don’t copy a template into the local repository.
if you want to run your tests using a Cluster API nightly build, you can run the hack passing the nightly build folder
(change the date at the end of the bucket name according to your needs):
cmd/clusterctl/hack/create-local-repository.py https://storage.googleapis.com/k8s-staging-cluster-api/components/nightly_main_20240425
Note: this works only with core Cluster API nightly builds.
The following providers are currently defined in the script:
cluster-apibootstrap-kubeadmcontrol-plane-kubeadminfrastructure-docker
More providers can be added by editing the clusterctl-settings.json in your local copy of Cluster API;
please note that each provider_repo should have its own clusterctl-settings.json describing how to build the provider assets, e.g.
{
"name": "infrastructure-aws",
"config": {
"componentsFile": "infrastructure-components.yaml",
"nextVersion": "v0.5.0"
}
}
kind can provide a Kubernetes cluster to be used as a management cluster.
See Install and/or configure a Kubernetes cluster for more information.
Before running clusterctl init, you must ensure all the required images are available in the kind cluster.
This is always the case for images published in some image repository like Docker Hub or gcr.io, but it can’t be
the case for images built locally; in this case, you can use kind load to move the images built locally. e.g.
kind load docker-image gcr.io/k8s-staging-cluster-api/cluster-api-controller-amd64:dev
kind load docker-image gcr.io/k8s-staging-cluster-api/kubeadm-bootstrap-controller-amd64:dev
kind load docker-image gcr.io/k8s-staging-cluster-api/kubeadm-control-plane-controller-amd64:dev
kind load docker-image gcr.io/k8s-staging-cluster-api/capd-manager-amd64:dev
to make the controller images available for the kubelet in the management cluster.
When the kind cluster is ready and all the required images are in place, run
the clusterctl init command generated by the create-local-repository.py
script.
Optionally, you may want to check if the components are running properly. The
exact components are dependent on which providers you have initialized. Below
is an example output with the Docker provider being installed.
kubectl get deploy -A | grep "cap\|cert"
capd-system capd-controller-manager 1/1 1 1 25m
capi-kubeadm-bootstrap-system capi-kubeadm-bootstrap-controller-manager 1/1 1 1 25m
capi-kubeadm-control-plane-system capi-kubeadm-control-plane-controller-manager 1/1 1 1 25m
capi-system capi-controller-manager 1/1 1 1 25m
cert-manager cert-manager 1/1 1 1 27m
cert-manager cert-manager-cainjector 1/1 1 1 27m
cert-manager cert-manager-webhook 1/1 1 1 27m
When selecting the --kubernetes-version, ensure that the kindest/node
image is available.
For example, assuming that on docker hub there is no
image for version vX.Y.Z, therefore creating a CAPD workload cluster with
--kubernetes-version=vX.Y.Z will fail. See issue 3795 for more details.
For Docker Desktop on macOS, Linux or Windows use kind to retrieve the kubeconfig.
kind get kubeconfig --name capi-quickstart > capi-quickstart.kubeconfig
Docker Engine for Linux works with the default clusterctl approach.
clusterctl get kubeconfig capi-quickstart > capi-quickstart.kubeconfig
When retrieving the kubeconfig using clusterctl with Docker Desktop on macOS or Windows or Docker Desktop (Docker Engine works fine) on Linux, you’ll need to take a few extra steps to get the kubeconfig for a workload cluster created with the Docker provider.
clusterctl get kubeconfig capi-quickstart > capi-quickstart.kubeconfig
To fix the kubeconfig run:
# Point the kubeconfig to the exposed port of the load balancer, rather than the inaccessible container IP.
sed -i -e "s/server:.*/server: https:\/\/$(docker port capi-quickstart-lb 6443/tcp | sed "s/0.0.0.0/127.0.0.1/")/g" ./capi-quickstart.kubeconfig
You can extend clusterctl with plugins, similar to kubectl. Please refer to the kubectl plugin documentation for more information,
as clusterctl plugins are implemented in the same way, with the exception of plugin distribution.
To install a clusterctl plugin, place the plugin’s executable file in any location on your PATH.
No plugin installation or pre-loading is required. Plugin executables inherit the environment from the clusterctl binary. A plugin determines the command it implements based on its name.
For example, a plugin named clusterctl-foo provides the clusterctl foo command. The plugin executable should be installed in your PATH.
Example plugin
#!/bin/bash
# optional argument handling
if [[ "$1" == "version" ]]
then
echo "1.0.0"
exit 0
fi
# optional argument handling
if [[ "$1" == "example-env-var" ]]
then
echo "$EXAMPLE_ENV_VAR"
exit 0
fi
echo "I am a plugin named clusterctl-foo"
To use a plugin, make the plugin executable:
sudo chmod +x ./clusterctl-foo
and place it anywhere in your PATH:
sudo mv ./clusterctl-foo /usr/local/bin
You may now invoke your plugin as a clusterctl command:
clusterctl foo
I am a plugin named clusterctl-foo
All args and flags are passed as-is to the executable:
clusterctl foo version
1.0.0
All environment variables are also passed as-is to the executable:
export EXAMPLE_ENV_VAR=example-value
clusterctl foo example-env-var
example-value
EXAMPLE_ENV_VAR=another-example-value clusterctl foo example-env-var
another-example-value
Additionally, the first argument that is passed to a plugin will always be the full path to the location where it was invoked ($0 would equal /usr/local/bin/clusterctl-foo in the example above).
A plugin determines the command path it implements based on its filename. Each sub-command in the path is separated by a dash (-). For example, a plugin for the command clusterctl foo bar baz would have the filename clusterctl-foo-bar-baz.
Cluster API is made up of many components, all of which need to be running for correct operation.
For example, if you wanted to use Cluster API with AWS , you’d need to install both the cluster-api manager and the aws manager .
Cluster API includes a built-in provisioner, Docker , that’s suitable for using for testing and development.
This guide will walk you through getting that daemon, known as CAPD , up and running.
Other providers may have additional steps you need to follow to get up and running.
Iterating on the cluster API involves repeatedly building Docker containers.
You’ll need the docker daemon v19.03 or newer available.
On MacOS systems using Lima is a viable alternative to Docker Desktop.
You’ll likely want an existing cluster as your management cluster .
The easiest way to do this is with kind v0.9 or newer, as explained in the quick start.
Make sure your cluster is set as the default for kubectl.
If it’s not, you will need to modify subsequent kubectl commands below.
If you’re using kind , you’ll need a way to push your images to a registry so they can be pulled.
You can instead side-load all images, but the registry workflow is lower-friction.
Most users test with GCR , but you could also use something like Docker Hub .
If you choose not to use GCR, you’ll need to set the REGISTRY environment variable.
You’ll need to install kustomize .
There is a version of kustomize built into kubectl, but it does not have all the features of kustomize v3 and will not work.
You’ll need to install kubebuilder .
You’ll need envsubst
The GNU gettext version of envsubst does not support default values, so you must use the drone/envsubst version.
go install github.com/drone/envsubst/v2/cmd/envsubst@latest
You’ll need to deploy cert-manager components on your management cluster , using kubectl
kubectl apply -f https://github.com/cert-manager/cert-manager/releases/download/v1.21.0/cert-manager.yaml
Ensure the cert-manager webhook service is ready before creating the Cluster API components.
This can be done by following instructions for manual verification
from the cert-manager web site.
Note: make sure to follow instructions for the release of cert-manager you are installing.
Tilt is a tool for quickly building, pushing, and reloading Docker containers as part of a Kubernetes deployment.
Many of the Cluster API engineers use it for quick iteration. Please see our Tilt instructions to get started.
# Build all the images
make docker-build
# Push images
make docker-push
# Apply the manifests
kustomize build config/default | ~/go/bin/envsubst | kubectl apply -f -
kustomize build bootstrap/kubeadm/config/default | ~/go/bin/envsubst | kubectl apply -f -
kustomize build controlplane/kubeadm/config/default | ~/go/bin/envsubst | kubectl apply -f -
kustomize build test/infrastructure/docker/config/default | ~/go/bin/envsubst | kubectl apply -f -
Cluster API has a number of test suites available for you to run. Please visit the testing page for more
information on each suite.
Now you can create CAPI objects !
To test another iteration, you’ll need to follow the steps to build, push, update the manifests, and apply.
CAPI components and architecture
Additional ClusterAPI KubeCon talks
Tutorials
Code walkthroughs
Let’s chat about ...
We are currently hosting “Let’s chat about ...” sessions where we are talking about topics relevant to
contributors and users of the Cluster API project. For more details and an up-to-date list of recordings of past sessions please
see Let’s chat about ... .
CAPI e2e Deep Dive *
These are Deep-dive sessions with the CI team to investigate failing and flaking tests.
This section of the book is about developing “core” Cluster API.
With “core” Cluster API we refer to the common set of API and controllers that are required to run
any Cluster API provider.
Please note that in the Cluster API code base, side by side of “core” Cluster API components there
is also a limited number of in-tree providers:
Kubeadm bootstrap provider (CAPBK)
Kubeadm control plane provider (KCP)
Docker infrastructure provider (CAPD) - The Docker provider is not designed for production use and is intended for development & test only.
Please refer to Developing providers for documentation about in-tree providers (and out of tree providers too).
This document describes how to use kind and Tilt for a simplified
workflow that offers easy deployments and rapid iterative builds.
Docker : v19.03 or newer (on MacOS e.g. via Lima )kind : v0.32.0 or newerTilt : v0.33.18 or newerkustomize : provided via make kustomizehelm : v3.7.1 or newerClone the Cluster API repository
locally
Clone the provider(s) you want to deploy locally as well
This guide offers instructions for using the following CAPI infrastructure providers for running a
development environment without using real machines or cloud resources:
CAPD - uses Docker containers as workload cluster nodesCAPK - uses KubeVirt VMs as workload cluster nodes
CAPD is the default as it’s more lightweight and requires less setup. KubeVirt is useful when
Docker isn’t suitable for whatever reason. Other infrastructure providers may be enabled as well
(see below ).
Docker KubeVirt
To create a kind cluster along with a local Docker registry and the correct mounts to run CAPD, run
the following:
make kind-cluster
To create a kind cluster with CAPK, run the following:
make kind-cluster-kubevirt
KubeVirt uses container disks to create VMs inside pods. These are special container images which
need to be pulled from a registry. To support pulling container disks from private registries as
well as avoid getting rate-limited by Docker Hub (if used), the CAPK script mounts your Docker
config file inside the kind cluster to let the Kubelet access your credentials.
The script looks for the Docker config file at $HOME/.docker/config.json by default. To specify
a different path, set the following variable before running Make above:
export DOCKER_CONFIG_FILE="/foo/config.json"
The CAPK script uses MetalLB to expose the API servers of workload clusters
on the local machine. The API servers are exposed as LoadBalancer services handled by MetalLB. For
this to work, MetalLB needs to figure out your container runtime IP prefix. The script assumes
Docker is used and figures the IP prefix out automatically. In case a different runtime is used,
specify your container runtime’s IP prefix manually (the first two octets only):
export CAPI_METALLB_IP_PREFIX="172.20"
The script uses 255.200-255.250 in the last two octets to set the range MetalLB should use to
allocate IPs to LoadBalancer services. For example, for 172.20 the resulting IP range is
172.20.255.200-172.20.255.250.
You can see the status of the cluster with:
kubectl cluster-info --context kind-capi-test
Next, create a tilt-settings.yaml file and place it in your local copy of cluster-api.
Here are some examples:
Other infrastructure providers may be added to the cluster using local clones and a configuration similar to the following:
default_registry: gcr.io/your-project-name-here
provider_repos:
- ../cluster-api-provider-aws
enable_providers:
- aws
- kubeadm-bootstrap
- kubeadm-control-plane
If you prefer JSON, you can create a tilt-settings.json file instead. YAML will be preferred if both files are present.
allowed_contexts (Array, default=[]): A list of kubeconfig contexts Tilt is allowed to use. See the Tilt documentation on
allow_k8s_contexts for more details.
default_registry (String, default=[]): The image registry to use if you need to push images. See the Tilt
documentation for more details.
Please note that, in case you are not using a local registry, this value is required; additionally, the Cluster API
Tiltfile protects you from accidental push on gcr.io/k8s-staging-cluster-api.
build_engine (String, default=”docker”): The engine used to build images. Can either be docker or podman.
NB: the default is dynamic and will be “podman” if the string “Podman Engine” is found in docker version (or in podman version if the command fails).
kind_cluster_name (String, default=”capi-test”): The name of the kind cluster to use when preloading images.
provider_repos (Array[]String, default=[]): A list of paths to all the providers you want to use. Each provider must have a
tilt-provider.yaml or tilt-provider.json file describing how to build the provider.
enable_providers (Array[]String, default=[‘docker’]): A list of the providers to enable. See available providers
for more details.
enable_core_provider (bool, default=true): By default, the core provider is enabled. This allows to disable it.
preload_images (bool, default=true): By default, images are preloaded into the kind cluster. This works on most platforms but can fail on Apple Silicon or Docker v29+. Set this to false to skip preloading and let the kubelet pull images on demand.
template_dirs (Map{String: Array[]String}, default={”docker”: [
“./test/infrastructure/docker/templates”]}): A map of providers to directories containing cluster templates. An example of the field is given below. See Deploying a workload cluster for how this is used.
template_dirs:
docker:
- ./test/infrastructure/docker/templates
- <other-template-dir>
azure:
- <azure-template-dir>
aws:
- <aws-template-dir>
gcp:
- <gcp-template-dir>
kustomize_substitutions (Map{String: String}, default={}): An optional map of substitutions for ${}-style placeholders in the
provider’s yaml. These substitutions are also used when deploying cluster templates. See Deploying a workload cluster .
Note : When running E2E tests locally using an existing cluster managed by Tilt, the following substitutions are required for successful tests:
kustomize_substitutions:
CLUSTER_TOPOLOGY: "true"
EXP_KUBEADM_BOOTSTRAP_FORMAT_IGNITION: "true"
EXP_RUNTIME_SDK: "true"
EXP_MACHINE_SET_PREFLIGHT_CHECKS: "true"
deploy_observability ([string], default=[]): If set, installs on the dev cluster one of more observability
tools.
Important! This feature requires the helm command to be available in the user’s path.
Supported values are:
grafana*: To create dashboards and query loki, prometheus and tempo.kube-state-metrics: For exposing metrics for Kubernetes and CAPI resources to prometheus.loki: To receive and store logs.metrics-server: To enable kubectl top node/pod.prometheus*: For collecting metrics from Kubernetes.alloy: For providing pod logs to loki.parca*: For visualizing profiling data.tempo: To store traces.visualizer*: Visualize Cluster API resources for each cluster, provide quick access to the specs and status of any resource.headlamp*: A Kubernetes web UI with the Cluster API plugin for browsing and managing CAPI resources.
*: Note: the UI will be accessible via a link in the tilt console
additional_kustomizations (map[string]string, default={}): If set, install the additional resources built using kustomize to the cluster.
Example:
additional_kustomizations:
capv-metrics: ../cluster-api-provider-vsphere/config/metrics
debug (Map{string: Map} default{}): A map of named configurations for the provider. The key is the name of the provider.
Supported settings:
port (int, default=0 (disabled)): If set to anything other than 0, then Tilt will run the provider with delve
and port forward the delve server to localhost on the specified debug port. This can then be used with IDEs such as
Visual Studio Code, Goland and IntelliJ.
continue (bool, default=true): By default, Tilt will run delve with --continue, such that any provider with
debugging turned on will run normally unless specifically having a breakpoint entered. Change to false if you
do not want the controller to start at all by default.
profiler_port (int, default=0 (disabled)): If set to anything other than 0, then Tilt will enable the profiler with
--profiler-address and set up a port forward. A “profiler” link will be visible in the Tilt Web UI for the controller.
metrics_port (int, default=0 (disabled)): If set to anything other than 0, then Tilt will port forward to the
default metrics port. A “metrics” link will be visible in the Tilt Web UI for the controller.
race_detector (bool, default=false) (Linux amd64 only): If enabled, Tilt will compile the specified controller with
cgo and statically compile in the system glibc and enable the race detector. Currently, this is only supported when
building on Linux amd64 systems. You must install glibc-static or have libc.a available for this to work.
Example: Using the configuration below:
debug:
core:
continue: false
port: 30000
profiler_port: 40000
metrics_port: 40001
When using the example above, the core CAPI controller can be debugged in Visual Studio Code using the following launch configuration:
{
"version": "0.2.0",
"configurations": [
{
"name": "Core CAPI Controller",
"type": "go",
"request": "attach",
"mode": "remote",
"remotePath": "",
"port": 30000,
"host": "127.0.0.1",
"showLog": true,
"trace": "log",
"logOutput": "rpc"
}
]
}
With the above example, you can configure a Go Remote run/debug
configuration
pointing at port 30000.
deploy_cert_manager (Boolean, default=true): Deploys cert-manager into the cluster for use for webhook registration.
trigger_mode (String, default=auto): Optional setting to configure if tilt should automatically rebuild on changes.
Set to manual to disable auto-rebuilding and require users to trigger rebuilds of individual changed components through the UI.
extra_args (Object, default={}): A mapping of provider to additional arguments to pass to the main binary configured
for this provider. Each item in the array will be passed in to the manager for the given provider.
Example:
extra_args:
kubeadm-bootstrap:
- --logging-format=json
With this config, the respective managers will be invoked with:
manager --logging-format=json
To create a pre-configured kind cluster (if you have not already done so) and launch your development environment, run
make tilt-up
This will open the command-line HUD as well as a web browser interface. You can monitor Tilt’s status in either
location. After a brief amount of time, you should have a running development environment, and you should now be able to
create a cluster. There are example worker cluster
configs available.
These can be customized for your specific needs.
After your kind management cluster is up and running with Tilt, you can deploy a workload clusters in the Tilt web UI based off of YAML templates from the directories specified in
the template_dirs field from the tilt-settings.yaml file (default ./test/infrastructure/docker/templates).
Templates should be named according to clusterctl conventions:
template files must be named cluster-template-{name}.yaml; those files will be accessible in the Tilt web UI under the label grouping {provider-label}.templates, i.e. CAPD.templates.
cluster class files must be named clusterclass-{name}.yaml; those file will be accessible in the Tilt web UI under the label grouping {provider-label}.clusterclasses, i.e. CAPD.clusterclasses.
By selecting one of those items in the Tilt web UI set of buttons will appear, allowing to create - with a dropdown for customizing variable substitutions - or delete clusters.
Custom values for variable substitutions can be set using kustomize_substitutions in tilt-settings.yaml, e.g.
kustomize_substitutions:
NAMESPACE: "default"
KUBERNETES_VERSION: "v1.36.1"
CONTROL_PLANE_MACHINE_COUNT: "1"
WORKER_MACHINE_COUNT: "3"
# Note: kustomize substitutions expects the values to be strings. This can be achieved by wrapping the values in quotation marks.
After stopping Tilt, you can clean up your kind cluster and development environment by running
make clean-kind
To remove all generated files, run
make clean
Note that you must run make clean or make clean-charts to fetch new versions of charts deployed using deploy_observability in tilt-settings.yaml.
When the worker cluster has been created using tilt, clusterctl should not be used for management
operations; this is because tilt doesn’t initialize providers on the management cluster like clusterctl init does, so
some of the clusterctl commands like clusterctl config won’t work.
This limitation is an acceptable trade-off while executing fast dev-test iterations on controllers logic. If instead
you are interested in testing clusterctl workflows, you should refer to the
clusterctl developer instructions .
The following providers are currently defined in the Tiltfile:
core : cluster-api itselfkubeadm-bootstrap : kubeadm bootstrap providerkubeadm-control-plane : kubeadm control-plane providerdocker : Docker infrastructure providerin-memory : In-memory infrastructure providertest-extension : Runtime extension used by CAPI E2E tests
Additional providers can be added by following the procedure described in following paragraphs:
A provider must supply a tilt-provider.yaml file describing how to build it. Here is an example:
name: aws
config:
image: "gcr.io/k8s-staging-cluster-api-aws/cluster-api-aws-controller"
live_reload_deps: ["main.go", "go.mod", "go.sum", "api", "cmd", "controllers", "pkg"]
label: CAPA
If you prefer JSON, you can create a tilt-provider.json file instead. YAML will be preferred if both files are present.
image : the image for this provider, as referenced in the kustomize files. This must match; otherwise, Tilt won’t
build it.
live_reload_deps : a list of files/directories to watch. If any of them changes, Tilt rebuilds the manager binary
for the provider and performs a live update of the running container.
version : allows to define the version to be used for the Provider CR. If empty, a default version will
be used.
additional_docker_helper_commands (String, default=””): Additional commands to be run in the helper image
docker build. e.g.
RUN wget -qO- https://dl.k8s.io/v1.21.2/kubernetes-client-linux-amd64.tar.gz | tar xvz
RUN wget -qO- https://get.docker.com | sh
additional_docker_build_commands (String, default=””): Additional commands to be appended to
the dockerfile.
The manager image will use docker-slim, so to download files, use additional_helper_image_commands. e.g.
COPY --from=tilt-helper /usr/bin/docker /usr/bin/docker
COPY --from=tilt-helper /go/kubernetes/client/bin/kubectl /usr/bin/kubectl
kustomize_folder (String, default=config/default): The folder where the kustomize file for a provider
is defined; the path is relative to the provider root folder.
kustomize_options ([]String, default=[]): Options to be applied when running kustomize for generating the
yaml manifest for a provider. e.g. "kustomize_options": [ "--load-restrictor=LoadRestrictionsNone" ]
apply_provider_yaml (Bool, default=true): Whether to apply the provider yaml.
Set to false if your provider does not have a ./config folder or you do not want it to be applied in the cluster.
go_main (String, default=”main.go”): The go main file if not located at the root of the folder
label (String, default=provider name): The label to be used to group provider components in the tilt UI
in tilt version >= v0.22.2 (see https://blog.tilt.dev/2021/08/09/resource-grouping.html); as a convention,
provider abbreviation should be used (CAPD, KCP etc.).
additional_resources ([]string, default=[]): A list of paths to yaml file to be loaded into the tilt cluster;
e.g. use this to deploy an ExtensionConfig object for a RuntimeExtension provider.
additional_uncategorized_resources ([]string, default=[]): A list of paths to yaml file to be loaded into the tilt cluster;
e.g. use this to deploy CustomResourceDefinitions. The difference compared to additional_resources is that it is deployed
as part of uncategorized and accordingly not re-created together with providers.
resource_deps ([]string, default=[]): A list of tilt resource names to be installed before the current provider;
e.g. set this to [“capi_controller”] to ensure that this provider gets installed after Cluster API.
If you need to customize Tilt’s behavior, you can create files in cluster-api’s tilt.d directory. This file is ignored
by git so you can be assured that any files you place here will never be checked in to source control.
These files are included after the providers map has been defined and after all the helper function definitions. This
is immediately before the “real work” happens.
At a high level, the Tiltfile performs the following actions:
Read tilt-settings.yaml
Configure the allowed Kubernetes contexts
Set the default registry
Define the providers map
Include user-defined Tilt files
Deploy cert-manager
Enable providers (core + what is listed in tilt-settings.yaml)
Build the manager binary locally as a local_resource
Invoke docker_build for the provider
Invoke kustomize for the provider’s config/ directory
Each provider in the providers map has a live_reload_deps list. This defines the files and/or directories that Tilt
should monitor for changes. When a dependency is modified, Tilt rebuilds the provider’s manager binary on your local
machine , copies the binary to the running container, and executes a restart script. This is significantly faster
than rebuilding the container image for each change. It also helps keep the size of each development image as small as
possible (the container images do not need the entire go toolchain, source code, module dependencies, etc.).
For IntelliJ, Syntax highlighting for the Tiltfile can be configured with a TextMate Bundle. For instructions, please see:
Tiltfile TextMate Bundle .
For VSCode the Bazel plugin can be used, it provides
syntax highlighting and auto-formatting. To enable it for Tiltfile a file association has to be configured via user settings:
"files.associations": {
"Tiltfile": "starlark",
},
Podman can be used instead of Docker by following these actions:
Enable the podman unix socket:
on Linux/systemd: systemctl --user enable --now podman.socket
on macOS: create a podman machine with podman machine init
Set build_engine to podman in tilt-settings.yaml (optional, only if both Docker & podman are installed)
Define the env variable DOCKER_HOST to the right socket:
on Linux/systemd: export DOCKER_HOST=unix:///run/user/$(id -u)/podman/podman.sock
on macOS: export DOCKER_HOST=$(podman machine inspect <machine> | jq -r '.[0].ConnectionInfo.PodmanSocket.Path') where <machine> is the podman machine name
Run tilt up
NB: The socket defined by DOCKER_HOST is used only for the hack/tools/internal/tilt-prepare command, the image build is running the podman build/podman push commands.
Lima can be used instead of Docker Desktop. Please note that especially with CAPD the rootless template of Lima does not work.
The following command creates a working Lima machine for developing Cluster API with CAPD:
limactl start template://docker-rootful --name "docker" --tty=false \
--set '.provision += {"mode":"system","script":"#!/bin/bash\nset -eux -o pipefail\ncat << EOF > \"/etc/sysctl.d/99-capi.conf\"\nfs.inotify.max_user_watches = 1048576\nfs.inotify.max_user_instances = 8192\nEOF\nsysctl -p \"/etc/sysctl.d/99-capi.conf\""}' \
--set '.mounts[0] = {"location": "~", "writable": true}' \
--memory 12 --cpus 10 --disk 64 \
--vm-type vz --rosetta=true
After creating the Lima machine we need to set DOCKER_HOST to the correct path:
export DOCKER_HOST=$(limactl list "docker" --format 'unix://{{.Dir}}/sock/docker.sock')
Sometimes tilt looks stuck when it’s waiting on connections.
Ensure that docker/podman is up and running and your kubernetes cluster is reachable.
Ensure the cluster in the default context is reachable by running kubectl cluster-info
Switch to the right context with kubectl config use-context
Ensure the context is allowed, see allowed_contexts field
Ensure the docker daemon is running ;) or for podman see Using Podman
If a DOCKER_HOST is specified:
check that the DOCKER_HOST has the correct prefix (usually unix://)
ensure docker/podman is listening on $DOCKER_HOST using fuser / lsof / netstat -u
Ensure the default_registry field
By default all registries except localhost:5000 are accessed via HTTPS.
If you run a HTTP registry you may have to configure the registry in docker/podman.
For example, in podman a localhost:5001 registry configuration should be declared in /etc/containers/registries.conf.d with this content:
[[registry]]
location = "localhost:5001"
insecure = true
NB: on macOS this configuration should be done in the podman machine by running podman machine ssh <machine>.
You may try manually to load images in kind by running:
kind load docker-image --name=<kind_cluster> <image>
If you are running podman, you may have hit this bug: https://github.com/kubernetes-sigs/kind/issues/2760
The workaround is to create a docker symlink to your podman executable and try to load the images again.
This page covers the repository structure and details about the directories in Cluster API.
cluster-api
└───.github
└───api
└───bootstrap
└───cmd
│ │ clusterctl
└───config
└───controllers
└───controlplane
└───dev
└───docs
└───errors
└───exp
└───feature
└───hack
└───internal
└───logos
└───scripts
└───test
└───util
└───version
└───webhooks
└───main.go
└───Makefile
~/.github
Contains GitHub workflow configuration and templates for Pull requests, bug reports etc.
~/api
This folder is used to store types and their related resources present in CAPI core. It includes things like API types, spec/status definitions, condition types, simple webhook implementation, autogenerated, deepcopy and conversion files. Some examples of Cluster API types defined in this package include Cluster, ClusterClass, Machine, MachineSet, MachineDeployment and MachineHealthCheck.
API folder has subfolders for each supported API version.
~/bootstrap
This folder contains Cluster API bootstrap provider Kubeadm (CABPK) which is a reference implementation of a Cluster API bootstrap provider. This folder contains the types and controllers responsible for generating a cloud-init or ignition configuration to turn a Machine into a Kubernetes Node. It is built and deployed as an independent provider alongside the Cluster API controller manager.
~/controlplane
This folder contains a reference implementation of a Cluster API Control Plane provider - KubeadmControlPlane. This package contains the API types and controllers required to instantiate and manage a Kubernetes control plane. It is built and deployed as an independent provider alongside the Cluster API controller manager.
~/test/infrastructure/docker
This folder contains a reference implementation of an infrastructure provider for the Cluster API project using Docker. This provider is intended for development purposes only.
~/cmd/clusterctl
This folder contains Clusterctl, a CLI that can be used to deploy Cluster API and providers, generate cluster manifests, read the status of a cluster, and much more.
~/config
This is a Kubernetes manifest folder containing application resource configuration as kustomize YAML definitions. These are generated from other folders in the repo using make generate-manifests
Some of the subfolders are:
~/config/certmanager - It contains manifests like self-signed issuer CR and certificate CR useful for cert manager.
~/config/crd - It contains CRDs generated from types defined in api folder
~/config/manager - It contains manifest for the deployment of core Cluster API manager.
~/config/rbac - Manifests for RBAC resources generated from kubebuilder markers defined in controllers.
~/config/webhook - Manifest for webhooks generated from the markers defined in the web hook implementations present in api folder.
Note: Additional config containing manifests can be found in the packages for KubeadmControlPlane , KubeadmBootstrap and Cluster API Provider Docker .
~/internal
This folder contains resources which are not meant to be used directly by users of Cluster API e.g. the implementation of controllers is present in ~/internal/controllers directory so that we can make changes in controller implementation without breaking users. This allows us to keep our api surface smaller and move faster.
~/controllers
This folder contains reconciler types which provide access to CAPI controllers present in ~/internal/controllers directory to our users. These types can be used by users to run any of the Cluster API controllers in an external program.
~/docs
This folder is a place for proposals, developer release guidelines and the Cluster API book.
~/logos
Cluster API related logos and artwork
~/hack
This folder has scripts used for building, testing and developer workflow.
~/scripts
This folder consists of CI scripts related to setup, build and e2e tests. These are mostly called by CI jobs.
~/dev
This folder has example configuration for integrating Cluster API development with tools like IDEs.
~/util
This folder contains utilities which are used across multiple CAPI package. These utils are also widely imported in provider implementations and by other users of CAPI.
~/feature
This package provides feature gate management used in Cluster API as well as providers. This implementation of feature gates is shared across all providers.
~/errors
This is a place for defining errors returned by CAPI. Error types defined here can be used by users of CAPI and the providers.
~/exp
This folder contains experimental features of CAPI. Experimental features are unreliable until they are promoted to the main repository. Each experimental feature is supposed to be present in a subfolder of ~/exp folder e.g. ClusterResourceSet is present inside ~/exp/addons folder. Historically, machine pool resources are not present in a sub-directory. Migrating them to a subfolder like ~/exp/machinepools is still pending as it can potentially break existing users who are relying on existing folder structure.
CRDs for experimental features are present outside ~/exp directory in ~/config folder. Also, these CRDs are deployed in the cluster irrespective of the feature gate value. These features can be enabled and disabled using feature gates supplied to the core Cluster API controller.
The api folder contains webhooks consisting of validators and defaults for many of the types in Cluster API.
~/internal/webhooks
This directory contains the implementation of some of the Cluster API webhooks. The internal implementation means that the methods supplied by this package cannot be imported by external code bases.
~/webhooks
This folder exposes the custom webhooks present in ~internal/webhooks to the users of CAPI.
Note: Additional webhook implementations can be found in the API packages for KubeadmControlPlane , KubeadmBootstrap and Cluster API Provider Docker .
This section of the book provides an overview about “core” controllers in Cluster API.
While we put a great effort in ensuring a good documentation for Cluster API, we also recognize that some
part of the documentation are more prone to miss details or become outdated.
Unfortunately, this section is one of those parts, because things in Cluster API change fast and the
complexity of core controllers keeps growing.
Please feel free to open issues or even better send PRs with improvement that can make this documentation
even more valuable for the readers that will follow you.
The Cluster controller is responsible for reconciling the Cluster resource.
In order to allow Cluster provisioning on different type of infrastructure, The Cluster resource references
an InfraCluster object, e.g. AWSCluster, GCPCluster etc.
The InfraCluster resource contract defines a set of rules a provider is expected to comply with in order to allow
the expected interactions with the Cluster controller.
Among those rules:
Similarly, in order to support different solutions for control plane management, The Cluster resource references
an ControlPlane object, e.g. KubeadmControlPlane, EKSControlPlane etc.
Among those rules:
Considering all the info above, the Cluster controller’s main responsibilities are:
Setting an OwnerReference on the infrastructure object referenced in Cluster.spec.infrastructureRef.
Setting an OwnerReference on the control plane object referenced in Cluster.spec.controlPlaneRef.
Keeping the Cluster’s status in sync with the InfraCluster and ControlPlane’s status.
If no ControlPlane object is referenced, create a kubeconfig secret for workload clusters .
Cleanup of all owned objects so that nothing is dangling after deletion.
In order to create a kubeconfig secret, it is required to have a certificate authority (CA) for the cluster.
If you are using the kubeadm bootstrap provider you do not have to provide any Cluster API secrets. It will generate
all necessary CAs for you.
As alternative users can provide custom CA as described in Using Custom Certificates .
Last option, is to entirely bypass Cluster API kubeconfig generation by providing a kubeconfig secret
formatted as described below.
Secret name Field name Content
<cluster-name>-kubeconfigvaluebase64 encoded kubeconfig
Notes:
Also renewal of the above certificate should be taken care out of band.
This option does not prevent from providing a cluster CA which is required also for other purposes.
The ClusterTopology controller reconciles the managed topology of a Cluster, as
shown in the following diagram.
Its main responsibilities are to:
Reconcile Clusters based on templates defined in a ClusterClass and managed topology.
Create, update, delete managed topologies by continuously reconciling the topology managed resources.
Reconcile Cluster-specific customizations of a ClusterClass
The high level workflow of ClusterTopology reconciliation is shown below.
The ClusterResourceSet provides a mechanism for applying resources - e.g. pods, deployments, daemonsets, secrets, configMaps - to a cluster once it is created.
Its main responsibility is to automatically apply a set of resources to newly-created and existing Clusters. Resources will be applied only once.
A MachineDeployment orchestrates deployments over a fleet of MachineSets.
Its main responsibilities are:
Adopting matching MachineSets not assigned to a MachineDeployment
Adopting matching MachineSets not assigned to a Cluster
Managing the Machine deployment process
Scaling up new MachineSets when changes are made
Scaling down old MachineSets when newer MachineSets replace them
Updating the status of MachineDeployment objects
Changes to the following fields of the MachineDeployment are propagated in-place to the MachineSet and do not trigger a full rollout:
.annotations.spec.deletion.order.spec.template.metadata.labels.spec.template.metadata.annotations.spec.template.spec.minReadySeconds.spec.template.spec.deletion.nodeDrainTimeout.spec.template.spec.deletion.nodeDeletionTimeout.spec.template.spec.deletion.nodeVolumeDetachTimeout
Note: In cases where changes to any of these fields are paired with rollout causing changes, the new values are propagated only to the new MachineSet.
A MachineSet is an abstraction over Machines.
Its main responsibilities are:
Adopting unowned Machines that aren’t assigned to a MachineSet
Adopting unmanaged Machines that aren’t assigned a Cluster
Booting a group of N machines
Monitoring the status of those booted machines
Changes to the following fields of MachineSet are propagated in-place to the Machine without needing a full rollout:
.spec.template.metadata.labels.spec.template.metadata.annotations.spec.template.spec.nodeDrainTimeout.spec.template.spec.nodeDeletionTimeout.spec.template.spec.nodeVolumeDetachTimeout
Changes to the following fields of MachineSet are propagated in-place to the InfrastructureMachine and BootstrapConfig:
.spec.template.metadata.labels.spec.template.metadata.annotations
Note: Changes to these fields will not be propagated to Machines that are marked for deletion (example: because of scale down).
The Machine controller is responsible for reconciling the Machine resource.
In order to allow Machine provisioning on different type of infrastructure, The Machine resource references
an InfraMachine object, e.g. AWSMachine, GCMachine etc.
The InfraMachine resource contract defines a set of rules a provider is expected to comply with in order to allow
the expected interactions with the Machine controller.
Among those rules:
InfraMachine MUST report a provider ID for the Machine
InfraMachine SHOULD take into account the failure domain where machines should be placed in
InfraMachine SHOULD surface machine’s addresses to help operators when troubleshooting issues
InfraMachine MUST report when Machine’s infrastructure is fully provisioned
InfraMachine SHOULD report conditions
InfraMachine SHOULD report terminal failures
Similarly, in order to support different machine bootstrappers, The Machine resource references
a BootstrapConfig object, e.g. KubeadmBootstrapConfig etc.
The BootstrapConfig resource contract defines a set of rules a provider is expected to comply with in order to allow
the expected interactions with the Machine controller.
Among those rules:
Considering all the info above, the Machine controller’s main responsibilities are:
Setting an OwnerReference on the infrastructure object referenced in Machine.spec.infrastructureRef.
Setting an OwnerReference on the bootstrap object referenced in Machine.spec.bootstrap.configRef.
Keeping the Machine’s status in sync with the InfraMachine and BootstrapConfig’s status.
Finding Kubernetes nodes matching the expected providerID in the workload cluster.
Setting NodeRefs to be able to associate machines and Kubernetes nodes.
Monitor Kubernetes nodes and propagate labels to them.
Cleanup of all owned objects so that nothing is dangling after deletion.
Drain nodes and wait for volumes being detached by CSI plugins.
After the machine controller sets the OwnerReferences on the associated objects, it waits for the bootstrap
and infrastructure objects referenced by the machine to have the Status.initialization.dataSecretCreated field set to true. When
the infrastructure object reports Status.initialization.provisioned, the machine controller will attempt to read its Spec.ProviderID and
copy it into Machine.Spec.ProviderID.
The machine controller uses the kubeconfig for the new workload cluster to watch new nodes coming up.
When a node appears with Node.Spec.ProviderID matching Machine.Spec.ProviderID, the machine controller
transitions the associated machine into the Running state.
The following schema goes through machine phases and interactions with InfraMachine and BootstrapConfig
happening at each step.
📖 For conceptual information about MachinePools, when to use them, and how they compare to MachineDeployments , see the MachinePool Guide .
The MachinePool controller’s main responsibilities are:
Setting an OwnerReference on each MachinePool object to:
The associated Cluster object.
The associated BootstrapConfig object.
The associated InfrastructureMachinePool object.
Copy data from BootstrapConfig.Status.DataSecretName to MachinePool.Spec.Template.Spec.Bootstrap.DataSecretName if
MachinePool.Spec.Template.Spec.Bootstrap.DataSecretName is empty.
Setting NodeRefs on MachinePool instances to be able to associate them with Kubernetes nodes.
Deleting Nodes in the target cluster when the associated MachinePool instance is deleted.
Keeping the MachinePool’s Status object up to date with the InfrastructureMachinePool’s Status object.
Finding Kubernetes nodes matching the expected providerIDs in the workload cluster.
After the machine pool controller sets the OwnerReferences on the associated objects, it waits for the bootstrap
and infrastructure objects referenced by the machine to have the Status.Ready field set to true. When
the infrastructure object is ready, the machine pool controller will attempt to read its Spec.ProviderIDList and
copy it into MachinePool.Spec.ProviderIDList.
The machine pool controller uses the kubeconfig for the new workload cluster to watch new nodes coming up.
When a node appears with a Node.Spec.ProviderID in MachinePool.Spec.ProviderIDList, the machine pool controller
increments the number of ready replicas. When all replicas are ready and the infrastructure ref is also
Ready, the machine pool controller marks the machine pool as Running.
Cluster associations are made via labels.
what label value meaning
MachinePool cluster.x-k8s.io/cluster-name<cluster-name>Identify a machine pool as belonging to a cluster with the name <cluster-name>
The BootstrapConfig object must have a status object.
The CRD name must have the format produced by sigs.k8s.io/cluster-api/util/contract.CalculateCRDName(Group, Kind).
To override the bootstrap provider, a user (or external system) can directly set the MachinePool.Spec.Bootstrap.DataSecretName
field. This will mark the machine as ready for bootstrapping and no bootstrap data secret name will be copied from the
BootstrapConfig object.
The status object must have several fields defined:
ready - a boolean field indicating the bootstrap config data is generated and ready for use.dataSecretName - a string field referencing the name of the secret that stores the generated bootstrap data.
The status object may define several fields that do not affect functionality if missing:
failureReason - a string field explaining why a fatal error has occurred, if possible.failureMessage - a string field that holds the message contained by the error.
Note: once any of failureReason or failureMessage surface on the machine pool who is referencing the bootstrap config object,
they cannot be restored anymore (it is considered a terminal error; the only way to recover is to delete and recreate the machine pool).
Example:
kind: MyBootstrapProviderConfig
apiVersion: bootstrap.cluster.x-k8s.io/v1alpha3
status:
ready: true
dataSecretName: "MyBootstrapSecret"
The InfrastructureMachinePool object must have both spec and status objects.
The CRD name must have the format produced by sigs.k8s.io/cluster-api/util/contract.CalculateCRDName(Group, Kind).
The spec object must have at least one field defined:
providerIDList - the list of cloud provider IDs identifying the instances.
The status object must have at least one field defined:
ready - a boolean field indicating if the infrastructure is ready to be used or not.
The status object may define several fields that do not affect functionality if missing:
failureReason - is a string that explains why a fatal error has occurred, if possible.failureMessage - is a string that holds the message contained by the error.infrastructureMachineKind - the kind of the InfraMachines. This should be set if the InfrastructureMachinePool plans to support MachinePool Machines.
Note: once any of failureReason or failureMessage surface on the machine pool who is referencing the InfrastructureMachinePool object,
they cannot be restored anymore (it is considered a terminal error; the only way to recover is to delete and recreate the machine pool).
Note: Infrastructure providers can support MachinePool Machines by having the InfraMachinePool set the infrastructureMachineKind to the kind of their InfrastructureMachines. The InfrastructureMachinePool will be responsible for creating InfrastructureMachines as the MachinePool is scaled up, and the MachinePool controller will create Machines for each InfrastructureMachine and set the ownerRef. The InfrastructureMachinePool will be responsible for deleting the Machines as the MachinePool is scaled down in order for the Machine deletion workflow to function properly. In addition, the InfrastructureMachines must also have the following labels set by the InfrastructureMachinePool: cluster.x-k8s.io/cluster-name and cluster.x-k8s.io/pool-name. The MachinePoolNameLabel must also be formatted with capilabels.MustFormatValue() so that it will not exceed character limits.
Example
kind: MyMachinePool
apiVersion: infrastructure.cluster.x-k8s.io/v1beta1
spec:
providerIDList:
- cloud:////my-cloud-provider-id-0
- cloud:////my-cloud-provider-id-1
status:
ready: true
infrastructureMachineKind: InfrastructureMachine
A provider may implement an InfrastructureMachinePool that is externally managed by an autoscaler. For example, if you are using a Managed Kubernetes provider, it may include its own autoscaler solution. To indicate this to Cluster API, you would decorate the MachinePool object with the following annotation:
"cluster.x-k8s.io/replicas-managed-by": ""
Cluster API treats the annotation as a “boolean”, meaning that the presence of the annotation is sufficient to indicate external replica count management, with one exception: if the value is "false", then that indicates to Cluster API that replica enforcement is nominal, and managed by Cluster API.
Providers may choose to implement the cluster.x-k8s.io/replicas-managed-by annotation with different values (e.g., external-autoscaler, or karpenter) that may inform different provider-specific behaviors, but those values will have no effect upon Cluster API.
The effect upon Cluster API of this annotation is that during autoscaling events (initiated externally, not by Cluster API), when more or fewer MachinePool replicas are observed compared to the Spec.Replicas configuration, it will update its Status.Phase property to the value of "Scaling".
Example:
kind: MyMachinePool
apiVersion: infrastructure.cluster.x-k8s.io/v1alpha3
spec:
providerIDList:
- cloud:////my-cloud-provider-id-0
- cloud:////my-cloud-provider-id-1
- cloud:////my-cloud-provider-id-2
replicas: 1
status:
ready: true
phase: Scaling
infrastructureMachineKind: InfrastructureMachine
It is the provider’s responsibility to update Cluster API’s Spec.Replicas property to the value observed in the underlying infra environment as it changes in response to external autoscaling behaviors. Once that is done, and the number of providerID items is equal to the Spec.Replicas property, the MachinePools’s Status.Phase property will be set to Running by Cluster API.
The machine pool controller will use a secret in the following format:
secret name field name content
<cluster-name>-kubeconfigvaluebase64 encoded kubeconfig that is authenticated with the workload cluster
A MachineHealthCheck is responsible for remediating unhealthy Machines.
Its main responsibilities are:
Checking the health of Nodes in the workload clusters against a list of unhealthy conditions
Remediating Machine’s for Nodes determined to be unhealthy
The Cluster API project is committed to improving the SRE/developer experience when troubleshooting issues, and logging
plays an important part in this goal.
In Cluster API we strive to follow three principles while implementing logging:
Logs are for SRE & developers, not for end users!
Whenever an end user is required to read logs to understand what is happening in the system, most probably there is an
opportunity for improvement of other observability in our API, like e.g. conditions and events.Navigating logs should be easy :
We should make sure that SREs/Developers can easily drill down logs while investigating issues, e.g. by allowing to
search all the log entries for a specific Machine object, eventually across different controllers/reconciler logs.Cluster API developers MUST use logs!
As Cluster API contributors you are not only the ones that implement logs, but also the first users of them. Use it!
Provide feedback!
Kubernetes defines a set of logging conventions ,
as well as tools and libraries for logging.
Cluster API should align to those guidelines and use those tools as much as possible.
The foundational items of Cluster API logging are:
Support for structured logging in all the Cluster API controllers (see log format ).
Using contextual logging (see contextual logging ).
Adding a minimal set of key/value pairs in the logger at the beginning of each reconcile loop, so all the subsequent
log entries will inherit them (see key value pairs ).
Starting from the above foundations, then the long tail of small improvements will consist of following activities:
Improve consistency of additional key/value pairs added by single log entries (see key value pairs ).
Improve log messages (see log messages ).
Improve consistency of log levels (see log levels ).
Controllers MUST provide support for structured logging
and for the JSON output format ;
quoting the Kubernetes documentation, these are the key elements of this approach:
Separate a log message from its arguments.
Treat log arguments as key-value pairs.
Be easily parsable and queryable.
Cluster API uses all the tooling provided by the Kubernetes community to implement structured logging: Klog , a
logr wrapper that works with controller runtime, and other utils for exposing flags
in the controller’s main.go.
Ideally, in a future release of Cluster API we will make JSON output format the default format for all the Cluster API
controllers (currently the default is still text format).
Contextual logging
is the practice of using a log stored in the context across the entire chain of calls of a reconcile
action. One of the main advantages of this approach is that key value pairs which are added to the logger at the
beginning of the chain are then inherited by all the subsequent log entries created down the chain.
Contextual logging is also embedded in controller runtime; In Cluster API we use contextual logging via controller runtime’s
LoggerFrom(ctx) and LoggerInto(ctx, log) primitives and this ensures that:
The logger passed to each reconcile call has a unique reconcileID, so all the logs being written during a single
reconcile call can be easily identified (note: controller runtime also adds other useful key value pairs by default).
The logger has a key value pair identifying the objects being reconciled,e.g. a Machine Deployment, so all the logs
impacting this object can be easily identified.
Cluster API developer MUST ensure that:
The logger has a set of key value pairs identifying the hierarchy of objects the object being reconciled belongs to,
e.g. the Cluster a Machine Deployment belongs to, so it will be possible to drill down logs for related Cluster API
objects while investigating issues.
One of the key elements of structured logging is key-value pairs.
Having consistent key value pairs is a requirement for ensuring readability and for providing support for searching and
correlating lines across logs.
A set of good practices for defining key value pairs is defined in the Kubernetes Guidelines , and
one of the above practices is really important for Cluster API developers
Developers MUST use klog.KObj or klog.KRef functions when logging key value pairs for Kubernetes objects, thus
ensuring a key value pair representing a Kubernetes object is formatted consistently in all the logs.
Developers MUST use consistent log keys:
kinds should be written in upper camel case, e.g. MachineDeployment, MachineSet
Note: we cannot use lower camel case for kinds consistently because there is no way to
automatically calculate the correct log key for provider CRDs like AWSCluster
all other keys should use lower camel case, e.g. resourceVersion, oldReplicas to align to Kubernetes log conventions
Please note that, in order to ensure logs can be easily searched it is important to ensure consistency for the following
key value pairs (in order of importance):
Key value pairs identifying the object being reconciled, e.g. a MachineDeployment.
Key value pairs identifying the hierarchy of objects being reconciled, e.g. the Cluster a MachineDeployment belongs
to.
Key value pairs identifying side effects on other objects, e.g. while reconciling a MachineDeployment, the controller
creates a MachineSet.
Other Key value pairs.
Notably, over time in CAPI we are also standardizing usage of other key value pairs to improve consistency when reading
logs, e.g.
key reason MUST be used when adding details about WHY a change happened.
key diff MUST be used when documenting the diff in an object that either lead to a change, or that is resulting from a change.
A Message MUST always start with a capital letter.
Period at the end of a message MUST be omitted.
Always prefer logging before the action, so in case of errors there will be an immediate, visual correlation between
the action log and the corresponding error log; While logging before the action, log verbs should use the -ing form.
Ideally log messages should surface a different level of detail according to the target log level (see log levels
for more details).
If Kubernetes resource name is used in log messages, it MUST be used as is, For example Reconciling DockerMachineTemplate
If an API field name is used in log messages, the entire path MUST be used and field names MUST capitalized like in the
API (not as in the golang type). For example Waiting for spec.providerID to be set
If a log message is about a controlled or a referenced object, e.g. Machine controller performing an action on MachineSet,
the message MUST contain the Kind of the controlled/referenced object and its namespace/name, for example Created MachineSet default/foo-bar
The controlled/referenced object MUST also be added as a key value pair (see guidelines above)
Kubernetes provides a set of recommendations
for log levels; as a small integration on the above guidelines we would like to add:
Logs at the lower levels of verbosity (<=3) are meant to document “what happened” by describing how an object status
is being changed by controller/reconcilers across subsequent reconciliations; as a rule of thumb, it is reasonable
to assume that a person reading those logs has a deep knowledge of how the system works, but it should not be required
for those persons to have knowledge of the codebase.
Logs at higher levels of verbosity (>=4) are meant to document “how it happened”, providing insight on thorny parts of
the code; a person reading those logs usually has deep knowledge of the codebase.
Don’t use verbosity higher than 5.
We are using log level 2 as a default verbosity for all core Cluster API
controllers as recommended by the Kubernetes guidelines.
When developing logs there are operational trade-offs to take into account, e.g. verbosity vs space allocation, user
readability vs machine readability, maintainability of the logs across the code base.
A reasonable approach for logging is to keep things simple and implement more log verbosity selectively and only on
thorny parts of code. Over time, based on feedback from SRE/developers, more logs can be added to shed light where necessary.
Our Tilt setup offers a batteries-included log suite based on alloy , Loki and Grafana .
We are working to continuously improving this experience, allowing Cluster API developers to use logs and improve them as part of their development process.
For the best experience exploring the logs using Tilt:
Set --logging-format=json.
Set a high log verbosity, e.g. v=5.
Enable alloy, Loki, and Grafana under deploy_observability.
A minimal example of a tilt-settings.yaml file that deploys a ready-to-use logging suite looks like:
deploy_observability:
- alloy
- loki
- grafana
enable_providers:
- docker
- kubeadm-bootstrap
- kubeadm-control-plane
extra_args:
core:
- "--logging-format=json"
- "--v=5"
docker:
- "--v=5"
- "--logging-format=json"
kubeadm-bootstrap:
- "--v=5"
- "--logging-format=json"
kubeadm-control-plane:
- "--v=5"
- "--logging-format=json"
The above options can be combined with other settings from our Tilt setup. Once Tilt is up and running with these settings users will be able to browse logs using the Grafana Explore UI.
This will normally be available on localhost:3000. To explore logs from Loki, open the Explore interface for the DataSource ‘Loki’. This link should work as a shortcut with the default Tilt settings.
In the Log browser the following queries can be used to browse logs by controller, and by specific Cluster API objects. For example:
{app="capi-controller-manager"} | json
Will return logs from the capi-controller-manager which are parsed in json. Passing the query through the json parser allows filtering by key-value pairs that are part of nested json objects. For example .cluster.name becomes cluster_name.
{app="capi-controller-manager"} | json | Cluster_name="my-cluster"
Will return logs from the capi-controller-manager that are associated with the Cluster my-cluster.
{app="capi-controller-manager"} | json | Cluster_name="my-cluster" | v <= 2
Will return logs from the capi-controller-manager that are associated with the Cluster my-cluster with log level <= 2.
{app="capi-controller-manager"} | json | Cluster_name="my-cluster" reconcileID="6f6ad971-bdb6-4fa3-b803-xxxxxxxxxxxx"
Will return logs from the capi-controller-manager, associated with the Cluster my-cluster and the Reconcile ID 6f6ad971-bdb6-4fa3-b803-xxxxxxxxxxxx. Each reconcile loop will have a unique Reconcile ID.
{app="capi-controller-manager"} | json | Cluster_name="my-cluster" reconcileID="6f6ad971-bdb6-4fa3-b803-ef81c5c8f9d0" controller="cluster" | line_format "{{ .msg }}"
Will return logs from the capi-controller-manager, associated with the Cluster my-cluster and the Reconcile ID 6f6ad971-bdb6-4fa3-b803-xxxxxxxxxxxx it further selects only those logs which come from the Cluster controller. It will then format the logs so only the message is displayed.
{app=~"capd-controller-manager|capi-kubeadm-bootstrap-controller-manager|capi-kubeadm-control-plane-controller-manager"} | json | Cluster_name="my-cluster" Machine_name="my-cluster-linux-worker-1" | line_format "{{.controller}} {{.msg}}"
Will return the logs from four CAPI providers - the Core provider, Kubeadm Control Plane provider, Kubeadm Bootstrap provider and the Docker infrastructure provider. It filters by the cluster name and the machine name and then formats the log lines to show just the source controller and the message. This allows us to correlate logs and see actions taken by each of these four providers related to the machine my-cluster-linux-worker-1.
For more information on formatting and filtering logs using Grafana and Loki see:
Cluster API providers are developed by independent teams, and each team is free to define their own processes and
conventions.
However, given that SRE/developers looking at logs are often required to look both at logs from core CAPI and providers,
we encourage providers to adopt and contribute to the guidelines defined in this document.
It is also worth noting that the foundational elements of the approach described in this document are easy to achieve
by leveraging default Kubernetes tooling for logging.
This document presents testing guidelines and conventions for Cluster API.
IMPORTANT: improving and maintaining this document is a collaborative effort, so we are encouraging constructive
feedback and suggestions.
Unit tests focus on individual pieces of logic - a single func - and don’t require any additional services to execute. They should
be fast and great for getting the first signal on the current implementation, but unit tests have the risk of
allowing integration bugs to slip through.
In Cluster API most of the unit tests are developed using go test , gomega and the fakeclient ; however using
fakeclient is not suitable for all the use cases due to some limitations in how it is implemented. In some cases
contributors will be required to use envtest . See the quick reference below for more details.
In some cases when writing tests it is required to mock external API, e.g. etcd client API or the AWS SDK API.
This problem is usually well scoped in core Cluster API, and in most cases it is already solved by using fake
implementations of the target API to be injected during tests.
Instead, mocking is much more relevant for infrastructure providers; in order to address the issue
some providers can use simulators reproducing the behaviour of a real infrastructure providers (e.g CAPV);
if this is not possible, a viable solution is to use mocks (e.g CAPA).
When writing tests core Cluster API contributors should ensure that the code works with any providers, and thus it is required
to not use any specific provider implementation. Instead, the so-called generic providers e.g. “GenericInfrastructureCluster”
should be used because they implement the plain Cluster API contract. This prevents tests from relying on assumptions that
may not hold true in all cases.
Please note that in the long term we would like to improve the implementation of generic providers, centralizing
the existing set of utilities scattered across the codebase, but while details of this work will be defined do not
hesitate to reach out to reviewers and maintainers for guidance.
Integration tests are focused on testing the behavior of an entire controller or the interactions between two or
more Cluster API controllers.
In Cluster API, integration tests are based on envtest and one or more controllers configured to run against
the test cluster.
With this approach it is possible to interact with Cluster API almost like in a real environment, by creating/updating
Kubernetes objects and waiting for the controllers to take action. See the quick reference below for more details.
Also in case of integration tests, considerations about mocking external APIs and usage of generic providers apply.
Fuzzing tests automatically inject randomly generated inputs, often invalid or with unexpected values, into functions to discover vulnerabilities.
Two different types of fuzzing are currently being used on the Cluster API repository:
Cluster API uses Kubernetes’ conversion-gen to automate the generation of functions to convert our API objects between versions. These conversion functions are tested using the FuzzTestFunc util in our conversion utils package .
For more information about these conversions see the API conversion code walkthrough in our video walkthrough series .
Parts of the CAPI code base are continuously fuzzed through the OSS-Fuzz project . Issues found in these fuzzing tests are reported to Cluster API maintainers and surfaced in issues on the repo for resolution.
To read more about the integration of Cluster API with OSS Fuzz see the 2022 Cluster API Fuzzing Report .
Tests are an integral part of the project codebase.
Cluster API maintainers and all the contributors should be committed to help in ensuring that tests are easily maintainable,
easily readable, well documented and consistent across the code base.
In light of continuing improving our practice around this ambitious goal, we are starting to introduce a shared set of:
Builders (sigs.k8s.io/cluster-api/util/test/builder), allowing to create test objects in a simple and consistent way.
Matchers (sigs.k8s.io/controller-runtime/pkg/envtest/komega), improving how we write test assertions.
Each contribution in growing this set of utilities or their adoption across the codebase is more than welcome!
Another consideration that can help in improving test maintainability is the idea of testing “by layers”; this idea could
apply whenever we are testing “higher-level” functions that internally uses one or more “lower-level” functions;
in order to avoid writing/maintaining redundant tests, whenever possible contributors should take care of testing
only the logic that is implemented in the “higher-level” function, delegating the test function called internally
to a “lower-level” set of unit tests.
A similar concern could be raised also in the case whenever there is overlap between unit tests and integration tests,
but in this case the distinctive value of the two layers of testing is determined by how test are designed:
unit test are focused on code structure: func(input) = output, including edge case values, asserting error conditions etc.
integration test are user story driven: as a user, I want express some desired state using API objects, wait for the
reconcilers to take action, check the new system state.
Run make test to execute all unit and integration tests.
Integration tests use the envtest test framework. The tests need to know the location of the executables called by the framework. The make test target installs these executables, and passes this location to the tests as an environment variable.
When testing individual packages, you can speed up the test execution by running the tests with a local kind cluster.
This avoids spinning up a testenv with each test execution. It also makes it easier to debug, because it’s straightforward
to access a kind cluster with kubectl during test execution. For further instructions, run: ./hack/scripts/dev/kind-create-for-envtest.sh.
When running individual tests, it could happen that a testenv is started if this is required by the suite_test.go file.
However, if the tests you are running don’t require testenv (i.e. they are only using fake client), you can skip the testenv
creation by setting the environment variable CAPI_DISABLE_TEST_ENV (to any non-empty value).
To debug testenv unit tests it is possible to use:
CAPI_TEST_ENV_KUBECONFIG to write out a kubeconfig for the testenv to a file location.CAPI_TEST_ENV_SKIP_STOP to skip stopping the testenv after test execution.
Your IDE needs to know the location of the executables called by the framework, so that it can pass the location to the tests as an environment variable.
If you see this error when running a test in your IDE, the test uses the envtest framework, and probably does not know the location of the envtest executables.
E0210 16:11:04.222471 132945 server.go:329] controller-runtime/test-env "msg"="unable to start the controlplane" "error"="fork/exec /usr/local/kubebuilder/bin/etcd: no such file or directory" "tries"=0
The following files are an example configuration that integrates VSCode with the envtest framework. To use it, simply
create the files in the .vscode directory in the repository, and restart VSCode.
settings.json
{
"go.testEnvFile": "${workspaceFolder}/.vscode/test.env"
}
tasks.json
{
// See https://go.microsoft.com/fwlink/?LinkId=733558
// for the documentation about the tasks.json format
"version": "2.0.0",
"tasks": [
{
"type": "shell",
"label": "sigs.k8s.io/cluster-api: Prepare vscode to run envtest-based tests",
"detail": "Install envtest and configure the vscode-go test environment.",
"group": {
"kind": "test",
"isDefault": true
},
"command": [
"echo $(make setup-envtest) > ${workspaceFolder}/.vscode/test.env",
],
"presentation": {
"echo": true,
"reveal": "silent",
"focus": true,
"panel": "shared",
"showReuseMessage": true,
"clear": false
},
"runOptions": {
"runOn": "folderOpen",
"instanceLimit": 1,
},
"promptOnClose": true,
}
]
}
The configuration works as follows: Whenever the project is opened in VSCode, a VSCode task runs that installs the executables, and writes the location to a file. A setting tells vscode-go to initialize the environment from this file.
The end-to-end tests are meant to verify the proper functioning of a Cluster API management cluster
in an environment that resemble a real production environment.
The following guidelines should be followed when developing E2E tests:
See e2e development for more information on developing e2e tests for CAPI and external providers.
Usually the e2e tests are executed by Prow, either pre-submit (on PRs) or periodically on certain branches
(e.g. the default branch). Those jobs are defined in the kubernetes/test-infra repository in config/jobs/kubernetes-sigs/cluster-api .
For development and debugging those tests can also be executed locally.
make docker-build-e2e will build the images for all providers that will be needed for the e2e tests.
To run a test locally via the command line, you should look at the Prow Job configuration for the test you want to run and then execute the same commands locally.
For example to run pull-cluster-api-e2e-main
just execute:
GINKGO_LABEL_FILTER="PR-Blocking" ./hack/scripts/ci/ci-e2e.sh
make test-e2e will run e2e tests by using whatever provider images already exist on disk.
After running make docker-build-e2e at least once, make test-e2e can be used for a faster test run, if there are no
provider code changes. If the provider code is changed, run make docker-build-e2e to update the images.
It’s also possible to run the tests via an IDE which makes it easier to debug the test code by stepping through the code.
First, we have to make sure all prerequisites are fulfilled, i.e. all required images have been built (this also includes
kind images). This can be done by executing the ./scripts/ci-e2e.sh script.
# Notes:
# * You can cancel the script as soon as it starts the actual test execution via `make test-e2e`.
# * If you want to run other tests (e.g. upgrade tests), make sure all required env variables are set (see the Prow Job config).
GINKGO_LABEL_FILTER="PR-Blocking" ./hack/scripts/ci/ci-e2e.sh
Now, the tests can be run in an IDE. The following describes how this can be done in IntelliJ IDEA and VS Code. It should work
roughly the same way in all other IDEs. We assume the cluster-api repository has been checked
out into /home/user/code/src/sigs.k8s.io/cluster-api.
Create a new run configuration and fill in:
Test framework: gotest
Test kind: Package
Package path: sigs.k8s.io/cluster-api/test/e2e
Pattern: ^\QTestE2E\E$
Working directory: /home/user/code/src/sigs.k8s.io/cluster-api/test/e2e
Environment: ARTIFACTS=/home/user/code/src/sigs.k8s.io/cluster-api/_artifacts
Program arguments: -e2e.config=/home/user/code/src/sigs.k8s.io/cluster-api/test/e2e/config/docker.yaml -ginkgo.focus="\[PR-Blocking\]"
Add the launch.json file in the .vscode folder in your repo:
{
"version": "0.2.0",
"configurations": [
{
"name": "Run e2e test",
"type": "go",
"request": "launch",
"mode": "test",
"program": "${workspaceRoot}/test/e2e/e2e_suite_test.go",
"env": {
"ARTIFACTS":"${workspaceRoot}/_artifacts"
},
"args": [
"-e2e.config=${workspaceRoot}/test/e2e/config/docker.yaml",
"-ginkgo.focus=\\[PR-Blocking\\]",
"-ginkgo.v=true"
],
"trace": "verbose",
"buildFlags": "-tags 'e2e'",
"showGlobalVariables": true
}
]
}
Execute the run configuration with Debug.
The e2e tests create a new management cluster with kind on each run. To avoid this and speed up the test execution the tests can
also be run against a management cluster created by tilt :
# Prereqs for e2e testing with tilt
make tilt-e2e-prerequisites
# Create a kind cluster and start tilt
make tilt-up
Now you can start the e2e test via IDE as described above but with the additional -e2e.use-existing-cluster=true flag.
Note : This can also be used to debug controllers during e2e tests as described in Developing Cluster API with Tilt .
The e2e tests also create a local clusterctl repository. After it has been created on a first test execution this step can also be
skipped by setting -e2e.clusterctl-config=<ARTIFACTS>/repository/clusterctl-config.yaml. This also works with a clusterctl repository created
via Create the local repository .
Feature gates : E2E tests often use features which need to be enabled first. Make sure to enable the feature gates in the tilt settings file:
kustomize_substitutions:
CLUSTER_TOPOLOGY: "true"
EXP_KUBEADM_BOOTSTRAP_FORMAT_IGNITION: "true"
EXP_RUNTIME_SDK: "true"
To run a subset of tests the GINKGO_LABEL_FILTER env variable can be set. See Ginkgo Spec Labels v2 for complete syntax documentation.
Each of these can be used to match tests, for example:
PR-Blocking => Sanity tests run before each PR mergeK8s-Upgrade => Tests which verify k8s component version upgrades on workload clustersConformance => Tests which run the k8s conformance suite on workload clustersClusterClass => Tests which use a ClusterClass to create a workload cluster/When testing KCP.*/ => Tests which start with When testing KCP
For example:
GINKGO_LABEL_FILTER="PR-Blocking" make test-e2e can be used to run the sanity E2E tests
GINKGO_LABEL_FILTER="!K8s-Upgrade" make test-e2e can be used to skip the upgrade E2E tests
The following env variables can be set to customize the test execution:
GINKGO_LABEL_FILTER to set ginkgo label filter (default empty - all tests)GINKGO_NODES to set the number of ginkgo parallel nodes (default to 1)E2E_CONF_FILE to set the e2e test config file (default to ${REPO_ROOT}/test/e2e/config/docker.yaml)ARTIFACTS to set the folder where test artifact will be stored (default to ${REPO_ROOT}/_artifacts)SKIP_RESOURCE_CLEANUP to skip resource cleanup at the end of the test (useful for problem investigation) (default to false)USE_EXISTING_CLUSTER to use an existing management cluster instead of creating a new one for each test run (default to false)GINKGO_NOCOLOR to turn off the ginkgo colored output (default to false)
Furthermore, it’s possible to overwrite all env variables specified in variables in test/e2e/config/docker.yaml.
Logs of e2e tests can be analyzed with our development environment by pushing logs to Loki and then
analyzing them via Grafana.
Start the development environment as described in Developing Cluster API with Tilt .
Make sure to deploy Loki and Grafana via deploy_observability.
If you only want to see imported logs, don’t deploy alloy (via deploy_observability).
If you want to drop all logs from Loki, just delete the Loki Pod in the observability namespace.
You can then import logs via the Import Logs button on the top right of the Loki resource page .
Just click on the downwards arrow, enter either a ProwJob URL, a GCS path or a local folder and click on Import Logs.
This will retrieve the logs and push them to Loki. Alternatively, the logs can be imported via:
go run ./hack/tools/internal/log-push --log-path=<log-path>
ProwJob URL: https://prow.k8s.io/view/gs/kubernetes-jenkins/pr-logs/pull/kubernetes-sigs_cluster-api/6189/pull-cluster-api-e2e-main/1496954690603061248
GCS path: gs://kubernetes-jenkins/pr-logs/pull/kubernetes-sigs_cluster-api/6189/pull-cluster-api-e2e-main/1496954690603061248
Local folder: ./_artifacts
Now the logs are available:
Make sure you query the correct time range via Grafana or logcli.
The logs are currently uploaded by using now as the timestamp, because otherwise it would
take a few minutes until the logs show up in Loki. The original timestamp is preserved as original_ts.
As alternative to loki, JSON logs can be visualized with a human readable timestamp using jq:
Browse the ProwJob artifacts and download the wanted logfile.
Use jq to query the logs:
cat manager.log \
| grep -v "TLS handshake error" \
| jq -r '(.ts / 1000 | todateiso8601) + " " + (. | tostring)'
The (. | tostring) part could also be customized to only output parts of the JSON logline.
E.g.:
(.err) to only output the error message part.(.msg) to only output the message part.(.controller + " " + .msg) to output the controller name and message part.
Cluster API repositories use Moby Buildkit to speed up image builds.
BuildKit does not currently work on SELinux .
Use sudo setenforce 0 to make SELinux permissive when running e2e tests.
envtest is a testing environment that is provided by the controller-runtime project. This environment spins up a
local instance of etcd and the kube-apiserver. This allows tests to be executed in an environment very similar to a
real environment.
Additionally, in Cluster API there is a set of utilities under [internal/envtest] that helps developers in setting up
a envtest ready for Cluster API testing, and more specifically:
With the required CRDs already pre-configured.
With all the Cluster API webhook pre-configured, so there are enforced guarantees about the semantic accuracy
of the test objects you are going to create.
This is an example of how to create an instance of envtest that can be shared across all the tests in a package;
by convention, this code should be in a file named suite_test.go:
var (
env *envtest.Environment
ctx = ctrl.SetupSignalHandler()
)
func TestMain(m *testing.M) {
// Setup envtest
...
// Run tests
os.Exit(envtest.Run(ctx, envtest.RunInput{
M: m,
SetupEnv: func(e *envtest.Environment) { env = e },
SetupIndexes: setupIndexes,
SetupReconcilers: setupReconcilers,
}))
}
Most notably, envtest provides not only a real API server to use during testing, but it offers the opportunity
to configure one or more controllers to run against the test cluster, as well as creating informers index.
func TestMain(m *testing.M) {
// Setup envtest
setupReconcilers := func(ctx context.Context, mgr ctrl.Manager) {
if err := (&MyReconciler{
Client: mgr.GetClient(),
Log: log.NullLogger{},
}).SetupWithManager(mgr, controller.Options{MaxConcurrentReconciles: 1}); err != nil {
panic(fmt.Sprintf("Failed to start the MyReconciler: %v", err))
}
}
setupIndexes := func(ctx context.Context, mgr ctrl.Manager) {
if err := index.AddDefaultIndexes(ctx, mgr); err != nil {
panic(fmt.Sprintf("unable to setup index: %v", err))
}
// Run tests
...
}
By combining pre-configured validation and mutating webhooks and reconcilers/indexes it is possible
to use envtest for developing Cluster API integration tests that can mimic how the system
behaves in real Cluster.
Please note that, because envtest uses a real kube-apiserver that is shared across many test cases, the developer
should take care in ensuring each test runs in isolation from the others, by:
Creating objects in separated namespaces.
Avoiding object name conflict.
Developers should also be aware of the fact that the informers cache used to access the envtest
depends on actual etcd watches/API calls for updates, and thus it could happen that after creating
or deleting objects the cache takes a few milliseconds to get updated. This can lead to test flakes,
and thus it always recommended to use patterns like create and wait or delete and wait; Cluster API env
test provides a set of utils for this scope.
However, developers should be aware that in some ways, the test control plane will behave differently from “real”
clusters, and that might have an impact on how you write tests.
One common example is garbage collection; because there are no controllers monitoring built-in resources, objects
do not get deleted, even if an OwnerReference is set up; as a consequence, usually test implements code for cleaning up
created objects.
This is an example of a test implementing those recommendations:
func TestAFunc(t *testing.T) {
g := NewWithT(t)
// Generate namespace with a random name starting with ns1; such namespace
// will host test objects in isolation from other tests.
ns1, err := env.CreateNamespace(ctx, "ns1")
g.Expect(err).ToNot(HaveOccurred())
defer func() {
// Cleanup the test namespace
g.Expect(env.DeleteNamespace(ctx, ns1)).To(Succeed())
}()
obj := &clusterv1.Cluster{
ObjectMeta: metav1.ObjectMeta{
Name: "test",
Namespace: ns1.Name, // Place test objects in the test namespace
},
}
// Actual test code...
}
In case of object used in many test case within the same test, it is possible to leverage on Kubernetes GenerateName;
For objects that are shared across sub-tests, ensure they are scoped within the test namespace and deep copied to avoid
cross-test changes that may occur to the object.
func TestAFunc(t *testing.T) {
g := NewWithT(t)
// Generate namespace with a random name starting with ns1; such namespace
// will host test objects in isolation from other tests.
ns1, err := env.CreateNamespace(ctx, "ns1")
g.Expect(err).ToNot(HaveOccurred())
defer func() {
// Cleanup the test namespace
g.Expect(env.DeleteNamespace(ctx, ns1)).To(Succeed())
}()
obj := &clusterv1.Cluster{
ObjectMeta: metav1.ObjectMeta{
GenerateName: "test-", // Instead of assigning a name, use GenerateName
Namespace: ns1.Name, // Place test objects in the test namespace
},
}
t.Run("test case 1", func(t *testing.T) {
g := NewWithT(t)
// Deep copy the object in each test case, so we prevent side effects in case the object changes.
// Additionally, thanks to GenerateName, the objects gets a new name for each test case.
obj := obj.DeepCopy()
// Actual test case code...
}
t.Run("test case 2", func(t *testing.T) {
g := NewWithT(t)
obj := obj.DeepCopy()
// Actual test case code...
}
// More test cases.
}
fakeclient is another utility that is provided by the controller-runtime project. While this utility is really
fast and simple to use because it does not require to spin-up an instance of etcd and kube-apiserver, the fakeclient
comes with a set of limitations that could hamper the validity of a test, most notably:
it does not properly handle a set of fields which are common in the Kubernetes API objects (and Cluster API objects as well)
like e.g. creationTimestamp, resourceVersion, generation, uid
fakeclient operations do not trigger defaulting or validation webhooks, so there are no enforced guarantees about the semantic accuracy
of the test objects.the fakeclient does not use a cache based on informers/API calls/etcd watches, so the test written in this way
can’t help in surfacing race conditions related to how those components behave in real cluster.
there is no support for cache index/operations using cache indexes.
Accordingly, using fakeclient is not suitable for all the use cases, so in some cases contributors will be required
to use envtest instead. In case of doubts about which one to use when writing tests, don’t hesitate to ask for
guidance from project maintainers.
Ginkgo is a Go testing framework built to help you efficiently write expressive and comprehensive tests using Behavior-Driven Development (“BDD”) style.
While Ginkgo is widely used in the Kubernetes ecosystem, Cluster API maintainers found the lack of integration with the
most used golang IDE somehow limiting, mostly because:
it makes interactive debugging of tests more difficult, since you can’t just run the test using the debugger directly
it makes it more difficult to only run a subset of tests, since you can’t just run or debug individual tests using an IDE,
but you now need to run the tests using make or the ginkgo command line and override the focus to select individual tests
In Cluster API you MUST use ginkgo only for E2E tests, where it is required to leverage the support for running specs
in parallel; in any case, developers MUST NOT use the table driven extension DSL (DescribeTable, Entry commands)
which is considered unintuitive.
Gomega is a matcher/assertion library. It is usually paired with the Ginkgo BDD test framework, but it can be used with
other test frameworks too.
More specifically, in order to use Gomega with go test you should
func TestFarmHasCow(t *testing.T) {
g := NewWithT(t)
g.Expect(f.HasCow()).To(BeTrue(), "Farm should have cow")
}
In Cluster API all the test MUST use Gomega assertions.
go test testing provides support for automated testing of Go packages.
In Cluster API Unit and integration test MUST use go test .
E2E tests are meant to verify the proper functioning of a Cluster API management
cluster in an environment that resembles a real production environment.
The following guidelines should be followed when developing E2E tests:
The Cluster API test framework provides you a set of helper methods for getting your test in place
quickly. The test E2E package provides examples of how this can be achieved and reusable
test specs for the most common Cluster API use cases.
Each E2E test requires a set of artifacts to be available:
Binaries & Docker images for Kubernetes, CNI, CRI & CSI
Manifests & Docker images for the Cluster API core components
Manifests & Docker images for the Cluster API infrastructure provider; in most cases
machine images are also required (AMI, OVA etc.)
Credentials for the target infrastructure provider
Other support tools (e.g. kustomize, gsutil etc.)
The Cluster API test framework provides support for building and retrieving the manifest
files for Cluster API core components and for the Cluster API infrastructure provider
(see Setup ).
For the remaining tasks you can find examples of
how this can be implemented e.g. in CAPA E2E tests and CAPG E2E tests .
In order to run E2E tests it is required to create a Kubernetes cluster with a
complete set of Cluster API providers installed. Setting up those elements is
usually implemented in a BeforeSuite function, and it consists of two steps:
Defining an E2E config file
Creating the management cluster and installing providers
The E2E config file provides a convenient and flexible way to define common tasks for
setting up a management cluster.
Using the config file it is possible to:
Define the list of providers to be installed in the management cluster. Most notably,
for each provider it is possible to define:
One or more versions of the providers manifest (built from the sources, or pulled from a
remote location).
A list of additional files to be added to the provider repository, to be used e.g.
to provide cluster-templates.yaml files.
Define the list of variables to be used when doing clusterctl init or
clusterctl generate cluster.
Define a list of intervals to be used in the test specs for defining timeouts for the
wait and Eventually methods.
Define the list of images to be loaded in the management cluster (this is specific to
management clusters based on kind).
An example E2E config file can be found here.
In order to run Cluster API E2E tests, you need a Kubernetes cluster. The NewKindClusterProvider gives you a
type that can be used to create a local kind cluster and pre-load images into it. Existing clusters can
be used if available.
Once you have a Kubernetes cluster, the InitManagementClusterAndWatchControllerLogs method provides a convenient
way for installing providers.
This method:
Runs clusterctl init using the above local repository.
Waits for the providers controllers to be running.
Creates log watchers for all the providers
A typical test spec is a sequence of:
Creating a namespace to host in isolation all the test objects.
Creating objects in the management cluster, wait for the corresponding infrastructure to be provisioned.
Exec operations like e.g. changing the Kubernetes version or clusterctl move, wait for the action to complete.
Delete objects in the management cluster, wait for the corresponding infrastructure to be terminated.
The CreateNamespaceAndWatchEvents method provides a convenient way to create a namespace and setup
watches for capturing namespaces events.
There are two possible approaches for creating objects in the management cluster:
Create object by object: create the Cluster object, then AwsCluster, Machines, AwsMachines etc.
Apply a cluster-templates.yaml file thus creating all the objects this file contains.
The first approach leverages the controller-runtime Client and gives you full control, but it comes with
some drawbacks as well, because this method does not directly reflect real user workflows, and most importantly,
the resulting tests are not as reusable with other infrastructure providers. (See writing portable tests ).
We recommend using the ClusterTemplate method and the Apply method for creating objects in the cluster.
This methods mimics the recommended user workflows, and it is based on cluster-templates.yaml files that can be
provided via the E2E config file , and thus easily swappable when changing the target infrastructure provider.
If you need control over object creation but want to preserve portability, you can create many templates
files each one creating only a small set of objects (instead of using a single template creating a full cluster).
After creating objects in the cluster, use the existing methods in the Cluster API test framework to discover
which object were created in the cluster so your code can adapt to different cluster-templates.yaml files.
Once you have object references, the framework includes methods for waiting for the corresponding
infrastructure to be provisioned, e.g. WaitForClusterToProvision , WaitForKubeadmControlPlaneMachinesToExist .
You can use Cluster API test framework methods to modify Cluster API objects, as a last option, use
the controller-runtime Client .
The Cluster API test framework also includes methods for executing clusterctl operations, like e.g.
the ClusterTemplate method , the ClusterctlMove method etc.. In order to improve observability,
each clusterctl operation creates a detailed log.
After using clusterctl operations, you can rely on the Get and on the Wait methods
defined in the Cluster API test framework to check if the operation completed successfully.
You can categorize the test with a custom label that can be used to filter a category of E2E tests to be run. Currently, the cluster-api codebase has these labels which are used to run a focused subset of tests.
After a test completes/fails, it is required to:
Collect all the logs for the Cluster API controllers
Dump all the relevant Cluster API/Kubernetes objects
Cleanup all the infrastructure resources created during the test
Those tasks are usually implemented in the AfterSuite, and again the Cluster API test framework provides
you useful methods for those tasks.
Please note that despite the fact that test specs are expected to delete objects in the management cluster and
wait for the corresponding infrastructure to be terminated, it can happen that the test spec
fails before starting object deletion or that objects deletion itself fails.
As a consequence, when scheduling/running a test suite, it is required to ensure all the generated
resources are cleaned up. In Kubernetes, this is implemented by the boskos project.
A portable E2E test is a test that can run with different infrastructure providers by simply
changing the test configuration file.
The following recommendations should be followed to write portable E2E tests:
As of today there is no a well-defined suite of E2E tests that can be used as a
baseline for Cluster API conformance.
However, creating such a suite is something that can provide a huge value for the
long term success of the project.
The test E2E package provides examples of how this can be achieved by implementing a set of reusable
test specs for the most common Cluster API use cases.
When tuning controllers, both for scalability, performance or for reducing their footprint, following suggestions can make your work simpler and much more effective.
You need the right tools for the job: without logs, metrics, traces and profiles tuning is hardly possible. Also, given that tuning is an iterative work, having a setup that allows you to experiment and improve quickly could be a huge boost in your work.
Only optimize if there is clear evidence of an issue. This evidence is key for you to measure success and it can provide the necessary context for developing, validating, reviewing and approving the fix. On the contrary, optimizing without evidence can be not worth the effort or even make things worse.
Cluster API provides a full stack of tools for tuning its own controllers as well as controllers for all providers if developed using controller runtime. As a bonus, most of this tooling can be used with any other controller runtime based controllers.
With tilt, you can easily deploy a full observability stack with Grafana, Loki, alloy, Prometheus, kube-state-metrics, Parca and Tempo.
All tools are preconfigured, and most notably kube-state-metrics already collects CAPI metrics and Grafana is configured with a set of dashboards that we used in previous rounds of CAPI tuning. Overall, the CAPI dev environment offers a considerable amount of expertise, free to use and to improve for the entire community. We highly recommend to invest time in looking into those tools, learn and provide feedback.
Additionally, Cluster API includes CAPD with support for both Docker and in-memory backend. Both allow you to quickly create development clusters with the limited resources available on a developer workstation, however:
CAPD with docker backend gives you a fully functional cluster running in containers; scalability and performance are limited by the size of your machine.
CAPD with the inmemory backend gives you a fake cluster running in memory; you can scale more easily but the clusters do not support any Kubernetes feature other than what is strictly required for CAPI, CABPK and KCP to work.
Maintainers are continuously working on improving Cluster API developer environment and tooling; any help is more than welcome and with the community contribution we can make this happen sooner!
With regards to this document, following areas could benefit from community help:
Controller runtime currently has a limited set of metrics for client-go, making it more complex to observe phenomenon like client-go rate limiting; we should start a discussion with the controller runtime-team about how to get those metrics, even if only temporarily during bottleneck investigation.
Cluster API metrics still exists only as a dev tool, and work is required to automate metrics config generation and/or to improve consumption from kube-state-metrics; when this work will be completed it will be much more easier for other providers/other controllers to implement metrics and for user to get access to them. See #7158 .
Tracing in Cluster API is not yet implemented; this will make much more easier to investigate slowness in reconcile loops as well as provide a visual and intuitive representation of Cluster API reconcile loops. See #3760 .
Please reach out to maintainers if you are interested in helping us to make progress in this area.
Tuning controllers and finding performance bottlenecks can vary depending on the issues you are dealing with, so please consider following guidelines as collection of suggestions, not as a strict process to follow.
Before looking at data, it usually helps to have a clear understanding of:
What are the requirements and constraints of the use case you are looking at, e.g.:
Use a management cluster with X cpu, Y memory
Create X cluster, with concurrency Y
Each cluster must have X CP nodes, Y workers
What does it mean for you if the system is working well, e.g.:
All machines should be provisioned in less than X minutes
All controllers should reconcile in less than Y ms
All controllers should allocate less than Z Gb memory
Once you know the scenario you are looking at and what you are tuning for, you can finally look at data, but given that the amount of data available could be overwhelming, you probably need a strategy to navigate all the available metrics, traces, etc. .
Among the many possible strategies, one usually very effective is to look at the KPIs you are aiming for, and then, if the current system performance is not good enough, start looking at other metrics trying to identify the biggest factor that is impacting the results. Usually by removing a single, performance bottleneck the behaviour of the system changes in a significant way; after that you can decide if the performance is now good enough or you need another round of tuning.
Let’s try to make this more clear by using an example, machine provisioning time is degrading when running CAPI at scale (machine provisioning time can be seen in the Cluster API Performance dashboard ).
When running at scale, one of the first things to take care of is the client-go rate limiting, which is a mechanism built inside client-go that prevents a Kubernetes client from being accidentally too aggressive to the API server.
However this mechanism can also limit the performance of a controller when it actually requires to make many calls to the API server.
So one of the first data point to look at is the rate limiting metrics; given that upstream CR doesn’t have metric for that we can only look for logs containing “client-side throttling” via Loki (Note: this link should be open while tilt is running).
If rate limiting is not your issue, then you can look at the controller’s work queue. In an healthy system reconcile events are continuously queued, processed and removed from the queue. If the system is slowing down at scale, it could be that some controllers are struggling to keep up with the events being added in the queue, thus leading to slowness in reconciling the desired state.
So then the next step after looking at rate limiting metrics, is to look at the “work queue depth” panel in the Controller-Runtime dashboard .
Assuming that one controller is struggling with its own work queue, the next step is to look at why this is happening. It might be that the average duration of each reconcile is high for some reason. This can be checked in the “Reconcile Duration by Controller” panel in the Controller-Runtime dashboard .
If this is the case, then it is time to start looking at traces, looking for the longer spans in average (or total). Unfortunately traces are not yet implemented in Cluster API, so alternative approaches must be used, like looking at condition transitions or at logs to figure out what the slowest operations are.
And so on.
Please note that there are also cases where CAPI controllers are just idle waiting for something else to happen on the infrastructure side. In this case investigating bottlenecks requires access to a different set of metrics. Similar considerations apply if the issue is slowness of the API server or of the network.
Cluster API offers a set of options that can be set on the controller deployment at runtime, without the need of changing the CAPI code.
Client-go rate limiting; by increasing the client-go rate limits we allow a controller to make more API server calls per second (--kube-api-qps) or to have a bigger burst to handle spikes (--kube-api-burst). Please note that these settings must be increased carefully, because being too aggressive on the API server might lead to different kind of problems.
Controller concurrency (e.g. via --kubeadmcontrolplane-concurrency); by increasing the number of concurrent reconcile loops for each controller it is possible to help the system in keeping the work queue clean, and thus reconciling to the desired state faster. Also in this case, trade-offs should be considered, because by increasing concurrency not only the controller footprint is going to increase, but also the number of API server calls is likely going to increase (see previous point).
Resync period (--sync-period); this setting defines the interval after which reconcile events for all current objects will be triggered. Historically this value in Cluster API is much lower than the default in controller runtime (10m vs. 10h). This has some advantages, because e.g. it is a fallback in case controller struggle to pick up events from external infrastructure. But it also has impact at scale when a controller gets a sudden spike of events at every resync period. This can be mitigated by increasing the resync period.
As a general rule, you should tune those parameters only if you have evidence supported by data that you are hitting a bottleneck of the system. Similarly, another sample of data should be analyzed after tuning the parameter to check the effects of the change.
Performance is usually a moving target, because things can change due the evolution of the use cases, of the user needs, of the codebase and of all the dependencies Cluster API relies on, starting from Kubernetes and the infrastructure we are using.
That means that no matter of the huge effort that has been put into making CAPI performant, more work will be required to preserve the current state or to improve performance.
Also in this case, most of the considerations really depend on the issue your are dealing with, but some suggestions are worth to be considered for the majority of the use cases.
The best optimization that can be done is to avoid any work at all for controllers. E.g instead of re-queuing every few seconds when a controller is waiting for something to happen, which leads to the controller to do some work to check if something changed in the system, it is always better to watch for events, so the controller is going to do the work only once when it is actually required. When implementing watches, non-relevant changes should be filtered out whenever possible.
Same considerations apply also for the actual reconcile implementation, if you can avoid API server calls or expensive computations under certain conditions, it is always better and faster than any optimization you can do to that code.
However, when work from the controllers is required, it is necessary to make sure that expensive operations are limited as much as possible.
A common example for an expensive operation is the generation of private keys for certificates, or the creation of a Kubernetes client, but the most frequent expensive operations that each controller does are API server calls.
Luckily controller runtime does a great job in helping to address this by providing a delegating client per default that reads from a cache that is maintained by client-go shared informers. This is a huge boost of performance (microseconds vs. seconds) that everyone gets at the cost of some memory allocation and the need of considering stale reads when writing code.
As a rule of thumbs it is always better to deal with stale reads/memory consumption than disabling caching. Even if stale reads could be a concern under certain circumstances, e.g when reading an object right after it has been created.
Also, please be aware that some API server read operations are not cached by default, e.g. reads for unstructured objects, but you can enable caching for those operations when creating the controller runtime client.
But at some point some API server calls must be done, either uncached reads or write operations.
When looking at unchached reads, some operation are more expensive than others, e.g. a list call with a label selector degrades according to the number of object in the same namespace and the number of the items in the result set.
Whenever possible, you should avoid uncached list calls, or make sure they happen only once in a reconcile loop and possibly only under specific circumstances.
When looking at write operations, you can rely on some best practices developed in CAPI. Like for example use a defer call to patch the object with the patch helper to make a single write at the end of the reconcile loop (and only if there are actual changes).
In order to complete this overview, there is another category of operations that can slow down CAPI controllers, which are network calls to other services like e.g. the infrastructure provider.
Some general recommendations apply also in those cases, like e.g re-using long lived clients instead of continuously re-creating new ones, leverage on async callback and watches whenever possible vs. continuously checking for status, etc. .
Up until v1alpha3, the need of supporting multiple credentials was addressed by running multiple
instances of the same provider, each one with its own set of credentials while watching different namespaces.
However, running multiple instances of the same provider proved to be complicated for several reasons:
Complexity in packaging providers: CustomResourceDefinitions (CRD) are global resources, these may have a reference
to a service that can be used to convert between CRD versions (conversion webhooks). Only one of these services should
be running at any given time, this requirement led us to previously split the webhooks code to a different deployment
and namespace.
Complexity in deploying providers, due to the requirement to ensure consistency of the management cluster, e.g.
controllers watching the same namespaces.
The introduction of the concept of management groups in clusterctl, with impacts on the user experience/documentation.
Complexity in managing co-existence of different versions of the same provider while there could be only
one version of CRDs and webhooks. Please note that this constraint generates a risk, because some version of the provider
de-facto were forced to run with CRDs and webhooks deployed from a different version.
Nevertheless, we want to make it possible for users to choose to deploy multiple instances of the same providers,
in case the above limitations/extra complexity are acceptable for them.
In order to make it possible for users to deploy multiple instances of the Cluster API controller following
flags are provided:
Providers MUST support the --namespace flag in their controllers.
Providers MUST support the --watch-filter flag in their controllers.
Giving the increasingly complex task that is to manage multiple instances of the same controllers,
the Cluster API community may only provide best effort support for users that choose this model.
Cluster API (incl. every provider managed under kubernetes-sigs) won’t release a specialized components file
supporting the scenario described above; however, users should be able to create such deployment model from
the /config folder.
Cluster API (incl. every provider managed under kubernetes-sigs) testing infrastructure won’t run test cases
with multiple instances of the same provider.
This section of the book is about developing Cluster API providers.
This is a getting started guide to demonstrate how to develop a new Cluster API provider.
The guide focus on setting up a new project for implementing the provider and creating:
API types and corresponding CustomResourceDefinition (CRD).
Webhooks, responsible to default and validate above resources.
Controllers, responsible of reconciling above resources.
We will use kubebuilder to create an example infrastructure provider; for more information on kubebuilder
and CRDs in general we highly recommend reading the Kubebuilder Book .
Much of the information here was adapted directly from it.
Also worth to notice that suggestion in this guide are only intended to help first time provider implementers to get started,
but this is not an exhaustive guide of all the intricacies of developing Kubernetes controllers.
Please refer to the Kubebuilder Book and to Cluster API videos and tutorials
for more information.
If you already know how kubebuilder works, if you know how to write Kubernetes controllers, or if you are planning
to use something different than kubebuilder to develop your own Cluster API provider, you can skip this guide entirely.
While we put a great effort in ensuring a good documentation for Cluster API, we also recognize that some
part of the documentation are more prone to become outdated.
Unfortunately, this guide is one of those parts, simply because Cluster API maintainers do not create new providers very often,
while things in Cluster API and in the Kubernetes ecosystem change fast.
This is why we need your help to identify outdated part of this guide as well as any improvement that can make it
even more valuable for the newcomers that will follow you.
The naming convention for new Cluster API provider repositoriescluster-api-provider-${env}, where ${env} is a,
possibly short, name for the environment in question. For example
cluster-api-provider-gcp is an implementation for the Google Cloud Platform,
and cluster-api-provider-aws is one for Amazon Web Services. Note that an
environment may refer to a cloud, bare metal, virtual machines, or any other
infrastructure hosting Kubernetes. Finally, a single environment may include
more than one variant cluster-api-provider-aws may include both an implementation based on EC2 as
well as one based on their hosted EKS solution.
For the purposes of this guide we will create an infrastructure provider for a
service named mailgun . Therefore the name of the repository will be
cluster-api-provider-mailgun.
Please note that other naming conventions/best practices applies, e.g. for
API types (continue to this guide to get more info).
Because these names end up being so long, developers of Cluster API frequently refer to providers by acronyms.
Cluster API itself becomes CAPI , pronounced “Cappy.”
cluster-api-provider-aws is CAPA , pronounced “KappA.”
cluster-api-provider-gcp is CAPG , pronounced “Cap Gee,” and so on .
mkdir -p src/sigs.k8s.io/cluster-api-provider-mailgun
cd src/sigs.k8s.io/cluster-api-provider-mailgun
git init
You’ll then need to set up go modules
go mod init github.com/liztio/cluster-api-provider-mailgun
go: creating new go.mod: module github.com/liztio/cluster-api-provider-mailgun
kubebuilder init --domain cluster.x-k8s.io
kubebuilder init will create the basic repository layout, including a simple containerized manager.
It will also initialize the external go libraries that will be required to build your project.
A few considerations about --domain cluster.x-k8s.io:
Every Kubernetes resource has a Group , Version and Kind that uniquely identifies it.
The resource Group is similar to package in a language; it disambiguates different APIs that may happen to have identically named Kind s.
Groups often contain a domain name, such as k8s.io.
The domain for Cluster API resources is cluster.x-k8s.io, and infrastructure providers generally use infrastructure.cluster.x-k8s.io.
Commit your changes so far:
git add .
git commit -m "Generate scaffolding."
A Cluster API infrastructure provider usually has two main API types, one modeling the infrastructure to get the
Cluster working (e.g. LoadBalancer), and one modeling the infrastructure for one machine/VM.
When creating an API, the resource Kind should be the name of the objects we’ll be creating and modifying.
In this case it’s MailgunMachine and MailgunCluster.
The resource Version defines the stability of the API and its backward compatibility guarantees.
Examples include v1alpha1, v1beta1, v1, etc. and are governed by the Kubernetes API Deprecation Policy .
Your provider should expect to abide by the same policies.
Also, please note that the API version of Cluster API and the version of your provider do not need to be in sync.
Instead, prefer choosing a version that matches the stability of the provider API and its backward compatibility guarantees.
Once Kind and Version , are defined, you can run.
kubebuilder create api --group infrastructure --version v1alpha1 --kind MailgunCluster
kubebuilder create api --group infrastructure --version v1alpha1 --kind MailgunMachine
Here you will be asked if you want to generate resources and corresponding reconciler in the controller.
You’ll want both of them (you are going to need them later in the guide):
Create Resource under pkg/apis [y/n]?
y
Create Controller under pkg/controller [y/n]?
y
And regenerate the CRDs:
make manifests
Commit your changes
git add .
git commit -m "Generate Cluster and Machine resources."
The cluster API CRDs should be further customized, please refer to provider contracts .
The API generated by Kubebuilder is just a shell. Your actual API will likely have more fields defined on it.
Kubernetes has a lot of conventions and requirements around API design.
The Kubebuilder docs have some helpful hints on how to design your types.
Let’s take a look at what was generated for us:
// MailgunClusterSpec defines the desired state of MailgunCluster
type MailgunClusterSpec struct {
// INSERT ADDITIONAL SPEC FIELDS - desired state of cluster
// Important: Run "make" to regenerate code after modifying this file
}
// MailgunClusterStatus defines the observed state of MailgunCluster
type MailgunClusterStatus struct {
// INSERT ADDITIONAL STATUS FIELD - define observed state of cluster
// Important: Run "make" to regenerate code after modifying this file
}
Our API is based on Mailgun, so you’re going to have some email based fields:
type Priority string
const (
// PriorityUrgent means do this right away
PriorityUrgent = Priority("Urgent")
// PriorityUrgent means do this immediately
PriorityExtremelyUrgent = Priority("ExtremelyUrgent")
// PriorityBusinessCritical means you absolutely need to do this now
PriorityBusinessCritical = Priority("BusinessCritical")
)
// MailgunClusterSpec defines the desired state of MailgunCluster
type MailgunClusterSpec struct {
// INSERT ADDITIONAL STATUS FIELD - define observed state of cluster
// Important: Run "make" to regenerate code after modifying this file
// Priority is how quickly you need this cluster
Priority Priority `json:"priority"`
// Request is where you ask extra nicely
Request string `json:"request"`
// Requester is the email of the person sending the request
Requester string `json:"requester"`
}
// MailgunClusterStatus defines the observed state of MailgunCluster
type MailgunClusterStatus struct {
// INSERT ADDITIONAL STATUS FIELD - define observed state of cluster
// Important: Run "make" to regenerate code after modifying this file
// MessageID is set to the message ID from Mailgun when our message has been sent
MessageID *string `json:"response"`
}
As the comments request, run make manager manifests to regenerate some of the generated data files afterwards.
git add .
git commit -m "Added cluster types"
To enable clients to encode and decode your API, your types must be able to be registered within a scheme .
By default, Kubebuilder will provide you with a scheme builder (likely in api/v1alpha1/groupversion_info.go) like:
import (
"k8s.io/apimachinery/pkg/runtime/schema"
"sigs.k8s.io/controller-runtime/pkg/scheme"
)
var (
// GroupVersion is group version used to register these objects.
GroupVersion = schema.GroupVersion{Group: "infrastructure.cluster.x-k8s.io", Version: "v1alpha1"}
// SchemeBuilder is used to add go types to the GroupVersionKind scheme.
SchemeBuilder = &scheme.Builder{GroupVersion: GroupVersion}
// AddToScheme adds the types in this group-version to the given scheme.
AddToScheme = SchemeBuilder.AddToScheme
)
and scheme registration (likely in api/v1alpha1/*_types.go) that looks like:
func init() {
SchemeBuilder.Register(&MailgunCluster{}, &MailgunClusterList{})
}
This pattern introduces a dependency on controller-runtime to your API types, which is discouraged for
API packages as it makes it more difficult for consumers of your API to import your API types.
In general, you should minimise the imports within the API folder of your package to allow your API types
to be imported cleanly into other projects.
To mitigate this, use the following schemebuilder pattern:
import (
metav1 "k8s.io/apimachinery/pkg/apis/meta/v1"
"k8s.io/apimachinery/pkg/runtime"
"k8s.io/apimachinery/pkg/runtime/schema"
)
var (
// GroupVersion is group version used to register these objects.
GroupVersion = schema.GroupVersion{Group: "infrastructure.cluster.x-k8s.io", Version: "v1alpha1"}
// SchemeBuilder is used to add go types to the GroupVersionKind scheme.
schemeBuilder = runtime.NewSchemeBuilder(addKnownTypes)
// AddToScheme adds the types in this group-version to the given scheme.
AddToScheme = schemeBuilder.AddToScheme
objectTypes = []runtime.Object{}
)
func addKnownTypes(scheme *runtime.Scheme) error {
scheme.AddKnownTypes(GroupVersion, objectTypes...)
metav1.AddToGroupVersion(scheme, GroupVersion)
return nil
}
and register types as below:
func init() {
objectTypes = append(objectTypes, &MailgunCluster{}, &MailgunClusterList{})
}
This pattern reduces the number of dependencies being introduced into the API package within your project.
The webhooks in our mailgun provider are offered through tools in Controller Runtime and Controller Tools,
which are the building blocks Kubebuilder relies on.
At high level, in order to add webhooks to the mailgun provider it is required to implement interfaces defined in Controller Runtime,
while generation of manifests for the corresponding MutatingWebhookConfiguration and ValidatingWebhookConfiguration
can be done using Controller Tools via Makefile targets generated by Kubebuilder.
Before taking a look at this in detail, let’s get an overview of the types of web hooks supported by Controller Runtime.
Validating webhooks are an implementation of a Kubernetes validating webhook .
A validating webhook allows developers to test whether values supplied by users are valid. e.g. the Cluster webhook ensures
the Infrastructure reference supplied at the Cluster’s .spec.infrastructureRef is in the same namespace as the Cluster itself
and rejects the object creation or update if not.
Defaulting webhooks are an implementation of a Kubernetes mutating webhook .
A defaulting webhook allows developers to set default values for a type before they are placed in etcd, the Kubernetes data store.
e.g. the Cluster webhook will set the Infrastructure reference namespace to equal the Cluster namespace if .spec.infrastructureRef.namespace is empty.
Conversion webhooks are also an implementation of a Kubernetes mutating webhook .
Conversion webhooks are what allow Cluster API to work with multiple API version of the same API type.
It does this by converting the incoming version to a Hub version which is used internally by the controllers.
To read more about conversion see the Kubebuilder documentation
For a walkthrough on implementing conversion webhooks see the video in the Developer Guide
The Kubebuilder book provide detailed
description about how to implement interfaces defined in Controller Runtime for each of the above webhook types.
Webhook manifests instead are generated by Controller Tools via Makefile targets implemented by Kubebuilder.
In order to do so, it is required to add tags to API types in the codebase.
Below, for example, are the tags on the the Cluster webhook :
// +kubebuilder:webhook:verbs=create;update;delete,path=/validate-cluster-x-k8s-io-v1beta1-cluster,mutating=false,failurePolicy=fail,matchPolicy=Equivalent,groups=cluster.x-k8s.io,resources=clusters,versions=v1beta1,name=validation.cluster.cluster.x-k8s.io,sideEffects=None,admissionReviewVersions=v1
// +kubebuilder:webhook:verbs=create;update,path=/mutate-cluster-x-k8s-io-v1beta1-cluster,mutating=true,failurePolicy=fail,matchPolicy=Equivalent,groups=cluster.x-k8s.io,resources=clusters,versions=v1beta1,name=default.cluster.cluster.x-k8s.io,sideEffects=None,admissionReviewVersions=v1
// Cluster implements a validating and defaulting webhook for Cluster.
type Cluster struct {
Client client.Reader
}
A detailed guide on the purpose of each of these tags is here .
Right now, you can create objects with your API types, but those objects don’t make any impact on your mailgun infrastructure.
Let’s fix that by implementing controllers and reconciliation for your API objects.
From the kubebuilder book :
Controllers are the core of Kubernetes, and of any operator.
It’s a controller’s job to ensure that, for any given object, the actual state of the world (both the cluster state, and potentially external state like running containers for Kubelet or loadbalancers for a cloud provider) matches the desired state in the object.
Each controller focuses on one root Kind, but may interact with other Kinds.
We call this process reconciling.
Also in this case, controllers and reconcilers generated by Kubebuilder are just a shell.
It is up to you to fill it with the actual implementation.
Kubebuilder has created our first controller in controllers/mailguncluster_controller.go. Let’s take a look at what got generated:
// MailgunClusterReconciler reconciles a MailgunCluster object
type MailgunClusterReconciler struct {
client.Client
Scheme *runtime.Scheme
}
// +kubebuilder:rbac:groups=infrastructure.cluster.x-k8s.io,resources=mailgunclusters,verbs=get;list;watch;create;update;patch;delete
// +kubebuilder:rbac:groups=infrastructure.cluster.x-k8s.io,resources=mailgunclusters/status,verbs=get;update;patch
func (r *MailgunClusterReconciler) Reconcile(ctx context.Context, req ctrl.Request) (ctrl.Result, error) {
_ = logf.FromContext(ctx)
// TODO(user): your logic here
return ctrl.Result{}, nil
}
Before looking at (add) your logic here, lets focus for a moment on the markers before the Reconcile func.
The // +kubebuilder... lines tell kubebuilder to generate RBAC roles so the manager we’re writing can access its own managed resources. These should already exist in controllers/mailguncluster_controller.go:
// +kubebuilder:rbac:groups=infrastructure.cluster.x-k8s.io,resources=mailgunclusters,verbs=get;list;watch;create;update;patch;delete
// +kubebuilder:rbac:groups=infrastructure.cluster.x-k8s.io,resources=mailgunclusters/status,verbs=get;update;patch
We also need to add rules that will let it retrieve (but not modify) Cluster objects.
So we’ll add another annotation for that, right below the other lines:
// +kubebuilder:rbac:groups=cluster.x-k8s.io,resources=clusters;clusters/status,verbs=get;list;watch
If any resource sets another resource as the owner with blockOwnerDeletion set, additional RBAC to update finalizers on the owner resource is required:
// +kubebuilder:rbac:groups=cluster.x-k8s.io,resources=clusters/finalizers,verbs=update
Make sure to add this/these annotation to MailgunClusterReconciler.
Also, for our MailgunMachineReconciler, access to Cluster API Machine object is needed, so you must add this annotation in controllers/mailgunmachine_controller.go:
// +kubebuilder:rbac:groups=cluster.x-k8s.io,resources=machines;machines/status,verbs=get;list;watch
Regenerate the RBAC roles after you are done:
make manifests
Let’s focus on the MailgunClusterReconciler struct first.
First, a word of warning: no guarantees are made about parallel access, both on one machine or multiple machines.
That means you should not store any important state in memory: if you need it, write it into a Kubernetes object and store it.
We’re going to be sending mail, so let’s add a few extra fields:
// MailgunClusterReconciler reconciles a MailgunCluster object
type MailgunClusterReconciler struct {
client.Client
Scheme *runtime.Scheme
Mailgun mailgun.Mailgun
Recipient string
}
Now it’s time for our Reconcile function.
Reconcile is only passed a name, not an object, so let’s retrieve ours.
Here’s a naive example:
func (r *MailgunClusterReconciler) Reconcile(ctx context.Context, req ctrl.Request) (ctrl.Result, error) {
ctx := context.Background()
_ = ctrl.LoggerFrom(ctx)
var cluster infrav1.MailgunCluster
if err := r.Get(ctx, req.NamespacedName, &cluster); err != nil {
return ctrl.Result{}, err
}
return ctrl.Result{}, nil
}
By returning an error, you request that our controller will get Reconcile() called again.
That may not always be what you want - what if the object’s been deleted? So let’s check that:
var mailgunCluster infrav1.MailgunCluster
if err := r.Get(ctx, req.NamespacedName, &mailgunCluster); err != nil {
// import apierrors "k8s.io/apimachinery/pkg/api/errors"
if apierrors.IsNotFound(err) {
return ctrl.Result{}, nil
}
return ctrl.Result{}, err
}
Now that we have our own cluster object (MailGunCluster) that represents all the
infrastructure provider specific details for our cluster, we also need to retrieve
the upstream Cluster object that is defined by Cluster API itselfprovides a helper for us .
First, you’ll need to import the cluster-api package into our project if you haven’t done so yet:
# In your Mailgun repository's root directory
go get sigs.k8s.io/cluster-api
go mod tidy
Now we can add in a call to the GetOwnerCluster function to retrieve the cluster object:
// import sigs.k8s.io/cluster-api/util
cluster, err := util.GetOwnerCluster(ctx, r.Client, mailgunCluster.ObjectMeta)
if err != nil {
return ctrl.Result{}, err
}
If our cluster was just created, the Cluster API controller may not have set the ownership reference on our object yet, so we’ll have to return here and wait to do more with our cluster object until then. We can leave a log message noting that we’re waiting for the main Cluster API controller to set the ownership reference. Here’s what our Reconcile() function looks like now:
func (r *MailgunClusterReconciler) Reconcile(ctx context.Context, req ctrl.Request) (ctrl.Result, error) {
// We change the _ to `log` since we're going to log something now
log = ctrl.LoggerFrom(ctx)
var mailgunCluster infrav1.MailgunCluster
if err := r.Get(ctx, req.NamespacedName, &mailgunCluster); err != nil {
// import apierrors "k8s.io/apimachinery/pkg/api/errors"
if apierrors.IsNotFound(err) {
return ctrl.Result{}, nil
}
return ctrl.Result{}, err
}
// import sigs.k8s.io/cluster-api/util
cluster, err := util.GetOwnerCluster(ctx, r.Client, mailgunCluster.ObjectMeta)
if err != nil {
return ctrl.Result{}, err
}
if cluster == nil {
log.Info("Waiting for Cluster Controller to set OwnerRef on MailGunCluster")
return ctrl.Result{}, nil
}
More Documentation: The Kubebuilder Book has some excellent documentation on many things, including how to write good controllers!
Now that you have all the objects you care about, it’s time to do something with them!
This is where your provider really comes into its own.
In our case, let’s try sending some mail:
subject := fmt.Sprintf("[%s] New Cluster %s requested", mailgunCluster.Spec.Priority, cluster.Name)
body := fmt.Sprintf("Hello! One cluster please.\n\n%s\n", mailgunCluster.Spec.Request)
msg := r.mailgun.NewMessage(mailgunCluster.Spec.Requester, subject, body, r.Recipient)
_, _, err = r.Mailgun.Send(msg)
if err != nil {
return ctrl.Result{}, err
}
But wait, this isn’t quite right.
Reconcile() gets called periodically for updates, and any time any updates are made.
That would mean we’re potentially sending an email every few minutes!
This is an important thing about controllers: they need to be idempotent. This means a controller must be able to repeat actions on the same inputs without changing the effect of those actions.
So in our case, we’ll store the result of sending a message, and then check to see if we’ve sent one before.
if mailgunCluster.Status.MessageID != nil {
// We already sent a message, so skip reconciliation
return ctrl.Result{}, nil
}
subject := fmt.Sprintf("[%s] New Cluster %s requested", mailgunCluster.Spec.Priority, cluster.Name)
body := fmt.Sprintf("Hello! One cluster please.\n\n%s\n", mailgunCluster.Spec.Request)
msg := r.Mailgun.NewMessage(mailgunCluster.Spec.Requester, subject, body, r.Recipient)
_, msgID, err := r.Mailgun.Send(msg)
if err != nil {
return ctrl.Result{}, err
}
// patch from sigs.k8s.io/cluster-api/util/patch
helper, err := patch.NewHelper(&mailgunCluster, r.Client)
if err != nil {
return ctrl.Result{}, err
}
mailgunCluster.Status.MessageID = &msgID
if err := helper.Patch(ctx, &mailgunCluster); err != nil {
return ctrl.Result{}, errors.Wrapf(err, "couldn't patch cluster %q", mailgunCluster.Name)
}
return ctrl.Result{}, nil
Usually, the Status field should only be values that can be computed from existing state .
Things like whether a machine is running can be retrieved from an API, and cluster status can be queried by a healthcheck.
The message ID is ephemeral, so it should properly go in the Spec part of the object.
Anything that can’t be recreated, either with some sort of deterministic generation method or by querying/observing actual state, needs to be in Spec.
This is to support proper disaster recovery of resources.
If you have a backup of your cluster and you want to restore it, Kubernetes doesn’t let you restore both spec & status together.
We use the MessageID as a Status here to illustrate how one might issue status updates in a real application.
Since you added fields to the MailgunClusterReconciler, it is now required to update main.go to set those fields when
our reconciler is initialized.
Right now, it probably looks like this:
if err = (&controllers.MailgunClusterReconciler{
Client: mgr.GetClient(),
Scheme: mgr.GetScheme(),
}).SetupWithManager(mgr); err != nil {
setupLog.Error(err, "Unable to create controller", "controller", "MailgunCluster")
os.Exit(1)
}
Let’s add our configuration.
We’re going to use environment variables for this:
domain := os.Getenv("MAILGUN_DOMAIN")
if domain == "" {
setupLog.Info("missing required env MAILGUN_DOMAIN")
os.Exit(1)
}
apiKey := os.Getenv("MAILGUN_API_KEY")
if apiKey == "" {
setupLog.Info("missing required env MAILGUN_API_KEY")
os.Exit(1)
}
recipient := os.Getenv("MAIL_RECIPIENT")
if recipient == "" {
setupLog.Info("missing required env MAIL_RECIPIENT")
os.Exit(1)
}
mg := mailgun.NewMailgun(domain, apiKey)
if err = (&controllers.MailgunClusterReconciler{
Client: mgr.GetClient(),
Scheme: mgr.GetScheme(),
Mailgun: mg,
Recipient: recipient,
}).SetupWithManager(mgr); err != nil {
setupLog.Error(err, "Unable to create controller", "controller", "MailgunCluster")
os.Exit(1)
}
If you have some other state, you’ll want to initialize it here!
kubebuilder generates most of the YAML you’ll need to deploy your controller into Kubernetes by using a Deployment.
You just need to modify it to add the MAILGUN_DOMAIN, MAILGUN_API_KEY and MAIL_RECIPIENT environment variables
introduced in the previous steps.
First, let’s add our environment variables as a patch to the manager yaml.
config/manager/manager_config.yaml:
apiVersion: apps/v1
kind: Deployment
metadata:
name: controller-manager
namespace: system
spec:
template:
spec:
containers:
- name: manager
env:
- name: MAILGUN_API_KEY
valueFrom:
secretKeyRef:
name: mailgun-secret
key: api_key
- name: MAILGUN_DOMAIN
valueFrom:
configMapKeyRef:
name: mailgun-config
key: mailgun_domain
- name: MAIL_RECIPIENT
valueFrom:
configMapKeyRef:
name: mailgun-config
key: mail_recipient
And then, we have to add that patch to config/kustomization.yaml
patches:
- path: manager_image_patch.yaml
- path: manager_config.yaml
As you might have noticed, we are reading variable values from a ConfigMap and a Secret.
You now have to add those to the manifest, but how to inject configuration in production?
The convention many Cluster-API projects use is environment variables.
config/manager/credentials.yaml
---
apiVersion: v1
kind: Secret
metadata:
name: mailgun-config
namespace: system
type: Opaque
stringData:
api_key: ${MAILGUN_API_KEY}
---
apiVersion: v1
kind: ConfigMap
metadata:
name: mailgun-config
namespace: system
data:
mailgun_domain: ${MAILGUN_DOMAIN}
mail_recipient: ${MAILGUN_RECIPIENT}
And add this to config/manager/kustomization.yaml
resources:
- manager.yaml
- credentials.yaml
You can now (hopefully) generate your yaml!
kustomize build config/default
A tool like direnv can be used to help manage environment variables.
kustomize does not handle replacing those ${VARIABLES} with actual values.
For that, we use envsubst
You’ll need to have those environment variables (MAILGUN_API_KEY, MAILGUN_DOMAIN, MAILGUN_RECIPIENT) in your environment when you generate the final yaml file.
Change Makefile to include the call to envsubst:
- $(KUSTOMIZE) build config/default | kubectl apply -f -
+ $(KUSTOMIZE) build config/default | envsubst | kubectl apply -f -
To generate the manifests, call envsubst in line, like so:
kustomize build config/default | envsubst
Or to build and deploy the CRDs and manifests directly:
make install deploy
The IMG variable is used to build the Docker image and push it to a registry. The default value is controller:latest, which is a local image. You can change it to a remote image if you want to push it to a registry.
make docker-push IMG=ghcr.io/your-org/your-repo:dev
Before you can deploy the infrastructure controller, you’ll need to deploy Cluster API itself to the management cluster.
Follow the quick start guide up to and including the step of creating the management cluster . We will proceed presuming you created a cluster with kind and initalized cluster-api with clusterctl init.
Check the status of the manager to make sure it’s running properly:
kubectl describe -n capi-system pod | grep -A 5 Conditions
Conditions:
Type Status
PodReadyToStartContainers True
Initialized True
Ready True
ContainersReady True
In this guide, we are building an infrastructure provider . We must tell cluster-api and its developer tooling which type of provider it is. Edit config/default/kustomization.yaml and add the following common label. The prefix infrastructure- is used to detect the provider type.
labels:
- includeSelectors: true
pairs:
cluster.x-k8s.io/provider: infrastructure-mailgun
If you’re using kind for your management cluster, you can use the following command to build and push your image to the kind cluster’s local registry. We need to use the IMG variable to override the default controller:latest image name with a specific version like controller:0.1 to avoid having kubernetes try to pull the latest version of controller from docker hub.
cd cluster-api-provider-mailgun
# Build the Docker image
make docker-build IMG=controller:dev
# Load the Docker image into the kind cluster
kind load docker-image controller:dev
Now you can apply your provider as well:
cd cluster-api-provider-mailgun
# Install CRD and controller to current kubectl context
make install deploy IMG=controller:dev
kubectl describe -n cluster-api-provider-mailgun-system pod | grep -A 5 Conditions
Conditions:
Type Status
PodReadyToStartContainers True
Initialized True
Ready True
ContainersReady True
Cluster API development requires a lot of iteration, and the “build, tag, push, update deployment” workflow can be very tedious.
Tilt makes this process much simpler by watching for updates, then automatically building and deploying them.
See Developing Cluster API with Tilt on all details how to develop both Cluster API and your provider at the same time. In short, you need to perform these steps for a basic Tilt-based development environment:
Create file tilt-provider.yaml in your provider directory:
name: mailgun
config:
image: controller:latest # change to remote image name if desired
label: CAPM
live_reload_deps: ["main.go", "go.mod", "go.sum", "api", "controllers", "pkg"]
go_main: cmd/main.go # kubebuilder puts main.go under the cmd directory
Create file tilt-settings.yaml in the cluster-api directory:
default_registry: "" # change if you use a remote image registry
provider_repos:
# This refers to your provider directory and loads settings
# from `tilt-provider.yaml`
- ../cluster-api-provider-mailgun
enable_providers:
- mailgun
Bring tilt up by using the make tilt-up command in the cluster-api directory. This will ensure tilt is set up correctly to use a local registry for your image. You may need to make tilt-clean before this if you’ve been using tilt with other providers.
cd cluster-api
make tilt-up
Run tilt up in the cluster-api folder
You can then use Tilt to watch the container logs.
On any changed file in the listed places (live_reload_deps and those watched inside cluster-api repo), Tilt will build and deploy again. In the regular case of a changed file, only your controller’s binary gets rebuilt, copied into the running container, and the process restarted. This is much faster than a full re-build and re-deployment of a Docker image and restart of the Kubernetes pod.
You best watch the Kubernetes pods with something like k9s -A or watch kubectl get pod -A. Particularly in case your provider implementation crashes, Tilt has no chance to deploy any code changes into the container since it might be crash-looping indefinitely. In such a case – which you will notice in the log output – terminate Tilt (hit Ctrl+C) and start it again to deploy the Docker image from scratch.
Let’s try our cluster out. We’ll make some simple YAML:
apiVersion: cluster.x-k8s.io/v1beta2
kind: Cluster
metadata:
name: hello-mailgun
spec:
clusterNetwork:
pods:
cidrBlocks: ["192.168.0.0/16"]
infrastructureRef:
apiGroup: infrastructure.cluster.x-k8s.io
kind: MailgunCluster
name: hello-mailgun
---
apiVersion: infrastructure.cluster.x-k8s.io/v1alpha1
kind: MailgunCluster
metadata:
name: hello-mailgun
spec:
priority: "ExtremelyUrgent"
request: "Please make me a cluster, with sugar on top?"
requester: "cluster-admin@example.com"
We apply it as normal with kubectl apply -f <filename>.yaml.
If all goes well, you should be getting an email to the address you configured when you set up your management cluster:
Obviously, this is only the first step.
We need to implement our Machine object too, and log events, handle updates, and many more things.
Hopefully you feel empowered to go out and create your own provider now.
The world is your Kubernetes-based oyster!
The Cluster API contract defines a set of rules a provider is expected to comply with in order to interact with Cluster API.
Those rules can be in the form of CustomResourceDefinition (CRD) fields and/or expected behaviors to be implemented.
Different rules apply to each provider type and for each different resource that is expected to interact with “core” Cluster API.
See Cluster API release vs contract versions for info about current and supported contract versions.
Additional rules must be considered for a provider to work with the clusterctl CLI .
The definition of the contract between Cluster API and providers may be changed in future versions of Cluster API.
The Cluster API maintainers welcome feedback and contributions to the contract in order to improve how it’s defined,
its clarity and visibility to provider implementers and its suitability across the different kinds of Cluster API providers.
To provide feedback or open a discussion about the provider contract please open an issue on the Cluster API
repo or add an item to the agenda in the Cluster API community meeting .
Infrastructure providers SHOULD implement an InfraCluster resource using Kubernetes’ CustomResourceDefinition (CRD).
The goal of an InfraCluster resource is to supply whatever prerequisites (in term of infrastructure) are necessary for running machines.
Examples might include networking, load balancers, firewall rules, and so on.
The InfraCluster resource will be referenced by one of the Cluster API core resources, Cluster.
The Cluster’s controller will be responsible to coordinate operations of the InfraCluster,
and the interaction between the Cluster’s controller and the InfraCluster resource is based on the contract
rules defined in this page.
Once contract rules are satisfied by an InfraCluster implementation, other implementation details
could be addressed according to the specific needs (Cluster API is not prescriptive).
Nevertheless, it is always recommended to take a look at Cluster API controllers,
in-tree providers, other providers and use them as a reference implementation (unless custom solutions are required
in order to address very specific needs).
In order to facilitate the initial design for each InfraCluster resource, a few implementation best practices and infrastructure Provider Security Guidance
are explicitly called out in dedicated pages.
When developing a provider, you MUST consider any Cluster API behaviour that is not defined by a contract rule
as a Cluster API internal implementation detail, and internal implementation details can change at any time.
Accordingly, in order to not expose users to the risk that your provider breaks when the Cluster API internal behavior
changes, you MUST NOT rely on any Cluster API internal behaviour when implementing an InfraCluster resource.
Instead, whenever you need something more from the Cluster API contract, you MUST engage the community.
The Cluster API maintainers welcome feedback and contributions to the contract in order to improve how it’s defined,
its clarity and visibility to provider implementers and its suitability across the different kinds of Cluster API providers.
To provide feedback or open a discussion about the provider contract please open an issue on the Cluster API
repo or add an item to the agenda in the Cluster API community meeting .
Note:
All resources refers to all the provider’s resources “core” Cluster API interacts with;
In the context of this page: InfraCluster, InfraClusterTemplate and corresponding list types
All resources MUST be namespace-scoped.
All resources MUST have the standard Kubernetes TypeMeta and ObjectMeta fields.
In Kubernetes APIVersion is a combination of API group and version.
Special consideration MUST applies to both API group and version for all the resources Cluster API interacts with.
The domain for Cluster API resources is cluster.x-k8s.io, and infrastructure providers under the Kubernetes SIGS org
generally use infrastructure.cluster.x-k8s.io as API group.
If your provider uses a different API group, you MUST grant full read/write RBAC permissions for resources in your API group
to the Cluster API core controllers. If any resource sets another resource as the owner with blockOwnerDeletion set,
additional RBAC to update finalizers on the owner resource is required.
The canonical way to do so is via a ClusterRole resource with the aggregation label cluster.x-k8s.io/aggregate-to-manager: "true".
The following is an example ClusterRole for a FooCluster resource in the infrastructure.foo.com API group:
apiVersion: rbac.authorization.k8s.io/v1
kind: ClusterRole
metadata:
name: capi-foo-clusters
labels:
cluster.x-k8s.io/aggregate-to-manager: "true"
rules:
- apiGroups:
- infrastructure.foo.com
resources:
- fooclusters
verbs:
- create
- delete
- get
- list
- patch
- update
- watch
- apiGroups:
- infrastructure.foo.com
resources:
- fooclustertemplates
verbs:
- get
- list
- patch
- update
- watch
Note: The write permissions allow the Cluster controller to set owner references and labels on the InfraCluster resources;
write permissions are not used for general mutations of InfraCluster resources, unless specifically required (e.g. when
using ClusterClass and managed topologies).
The resource Version defines the stability of the API and its backward compatibility guarantees.
Examples include v1alpha1, v1beta1, v1, etc. and are governed by the Kubernetes API Deprecation Policy .
Your provider SHOULD abide by the same policies.
Note: The version of your provider does not need to be in sync with the version of core Cluster API resources.
Instead, prefer choosing a version that matches the stability of the provider API and its backward compatibility guarantees.
Additionally:
Providers MUST set cluster.x-k8s.io/<version> label on the InfraCluster Custom Resource Definitions.
The label is a map from a Cluster API contract version to your Custom Resource Definition versions.
The value is an underscore-delimited (_) list of versions. Each value MUST point to an available version in your CRD Spec.
The label allows Cluster API controllers to perform automatic conversions for object references, the controllers will pick
the last available version in the list if multiple versions are found.
To apply the label to CRDs it’s possible to use labels in your kustomization.yaml file, usually in config/crd:
labels:
- pairs:
cluster.x-k8s.io/v1beta1: v1beta1
cluster.x-k8s.io/v1beta2: v1beta2
An example of this is in the Kubeadm Bootstrap provider .
If the provider implements the clusterctl provider contract , the contract version defined in the
label above must be consistent with the contract version defined in the metadata.yaml file.
You MUST define a InfraCluster resource.
The InfraCluster resource name must have the format produced by sigs.k8s.io/cluster-api/util/contract.CalculateCRDName(Group, Kind).
Note: Cluster API is using such a naming convention to avoid an expensive CRD lookup operation when looking for labels from
the CRD definition of the InfraCluster resource.
It is a generally applied convention to use names in the format ${env}Cluster, where ${env} is a, possibly short, name
for the environment in question. For example GCPCluster is an implementation for the Google Cloud Platform, and AWSCluster
is one for Amazon Web Services.
// +kubebuilder:object:root=true
// +kubebuilder:resource:path=fooclusters,shortName=foocl,scope=Namespaced,categories=cluster-api
// +kubebuilder:storageversion
// +kubebuilder:subresource:status
// FooCluster is the Schema for fooclusters.
type FooCluster struct {
metav1.TypeMeta `json:",inline"`
metav1.ObjectMeta `json:"metadata,omitempty"`
Spec FooClusterSpec `json:"spec,omitempty"`
Status FooClusterStatus `json:"status,omitempty"`
}
type FooClusterSpec struct {
// See other rules for more details about mandatory/optional fields in InfraCluster spec.
// Other fields SHOULD be added based on the needs of your provider.
}
type FooClusterStatus struct {
// See other rules for more details about mandatory/optional fields in InfraCluster status.
// Other fields SHOULD be added based on the needs of your provider.
}
For each InfraCluster resource, you MUST also add the corresponding list resource.
The list resource MUST be named as <InfraCluster>List.
// +kubebuilder:object:root=true
// FooClusterList contains a list of fooclusters.
type FooClusterList struct {
metav1.TypeMeta `json:",inline"`
metav1.ListMeta `json:"metadata,omitempty"`
Items []FooCluster `json:"items"`
}
Each Cluster needs a control plane endpoint to sit in front of control plane machines.
Control plane endpoint can be provided in three ways in Cluster API: by the users, by the control plane provider or
by the infrastructure provider.
In case you are developing an infrastructure provider which is responsible to provide a control plane endpoint for
each Cluster, the host and port of the generated control plane endpoint MUST surface on spec.controlPlaneEndpoint
in the InfraCluster resource.
type FooClusterSpec struct {
// controlPlaneEndpoint represents the endpoint used to communicate with the control plane.
// +optional
ControlPlaneEndpoint APIEndpoint `json:"controlPlaneEndpoint,omitempty,omitzero"`
// See other rules for more details about mandatory/optional fields in InfraCluster spec.
// Other fields SHOULD be added based on the needs of your provider.
}
// APIEndpoint represents a reachable Kubernetes API endpoint.
// +kubebuilder:validation:MinProperties=1
type APIEndpoint struct {
// host is the hostname on which the API server is serving.
// +optional
// +kubebuilder:validation:MinLength=1
// +kubebuilder:validation:MaxLength=512
Host string `json:"host,omitempty"`
// port is the port on which the API server is serving.
// +optional
// +kubebuilder:validation:Minimum=1
// +kubebuilder:validation:Maximum=65535
Port int32 `json:"port,omitempty"`
}
Once spec.controlPlaneEndpoint is set on the InfraCluster resource and the [InfraCluster initialization completed],
the Cluster controller will surface this info in Cluster’s spec.controlPlaneEndpoint.
If instead you are developing an infrastructure provider which is NOT responsible to provide a control plane endpoint,
the implementer should exit reconciliation until it sees Cluster’s spec.controlPlaneEndpoint populated.
In order to ease the transition for providers, the v1beta2 version of the Cluster API contract temporarily
preserves compatibility with the deprecated v1beta1 contract; compatibility will be removed tentatively in April 2027.
type FooClusterSpec struct {
// controlPlaneEndpoint represents the endpoint used to communicate with the control plane.
// +optional
ControlPlaneEndpoint APIEndpoint `json:"controlPlaneEndpoint"`
// See other rules for more details about mandatory/optional fields in InfraCluster spec.
// Other fields SHOULD be added based on the needs of your provider.
}
// APIEndpoint represents a reachable Kubernetes API endpoint.
type APIEndpoint struct {
// host is the hostname on which the API server is serving.
Host string `json:"host"`
// port is the port on which the API server is serving.
Port int32 `json:"port"`
}
In case you are developing an infrastructure provider which has a notion of failure domains where machines should be
placed in, the list of available failure domains MUST surface on status.failureDomains in the InfraCluster resource.
type FooClusterStatus struct {
// failureDomains is a list of failure domain objects synced from the infrastructure provider.
// +optional
// +listType=map
// +listMapKey=name
// +kubebuilder:validation:MinItems=1
// +kubebuilder:validation:MaxItems=100
FailureDomains []clusterv1.FailureDomain `json:"failureDomains,omitempty"`
// See other rules for more details about mandatory/optional fields in InfraCluster status.
// Other fields SHOULD be added based on the needs of your provider.
}
FailureDomain is defined as:
name string: the name of the failure domain (must be unique)controlPlane *bool: indicates if failure domain is appropriate for running control plane instances.attributes map[string]string: arbitrary attributes for users to apply to a failure domain.
Once status.failureDomains is set on the InfraCluster resource and the [InfraCluster initialization completed],
the Cluster controller will surface this info in Cluster’s status.failureDomains.
In order to ease the transition for providers, the v1beta2 version of the Cluster API contract temporarily
preserves compatibility with the deprecated v1beta1 contract; compatibility will be removed tentatively in April 2027.
For reference, with the v1beta1 contract the field is of type clusterv1beta1.FailureDomains, which is a map defined as
map[string]clusterv1beta1.FailureDomainSpec. A unique key must be used for each FailureDomainSpec.
FailureDomainSpec is defined as:
controlPlane bool: indicates if failure domain is appropriate for running control plane instances.attributes map[string]string: arbitrary attributes for users to apply to a failure domain.
Each InfraCluster MUST report when Machine’s infrastructure is fully provisioned (initialization) by setting
status.initialization.provisioned in the InfraCluster resource.
type FooClusterStatus struct {
// initialization provides observations of the FooCluster initialization process.
// NOTE: Fields in this struct are part of the Cluster API contract and are used to orchestrate initial Cluster provisioning.
// +optional
Initialization FooClusterInitializationStatus `json:"initialization,omitempty,omitzero"`
// See other rules for more details about mandatory/optional fields in InfraCluster status.
// Other fields SHOULD be added based on the needs of your provider.
}
// FooClusterInitializationStatus provides observations of the FooCluster initialization process.
// +kubebuilder:validation:MinProperties=1
type FooClusterInitializationStatus struct {
// provisioned is true when the infrastructure provider reports that the Cluster's infrastructure is fully provisioned.
// NOTE: this field is part of the Cluster API contract, and it is used to orchestrate initial Cluster provisioning.
// +optional
Provisioned *bool `json:"provisioned,omitempty"`
}
Once status.initialization.provisioned is set the Cluster “core” controller will bubble up this info in Cluster’s
status.initialization.infrastructureProvisioned; if defined, also InfraCluster’s spec.controlPlaneEndpoint
and status.failureDomains will be surfaced on Cluster’s corresponding fields at the same time.
In order to ease the transition for providers, the v1beta2 version of the Cluster API contract temporarily
preserves compatibility with the deprecated v1beta1 contract; compatibility will be removed tentatively in April 2027.
With regards to initialization completed:
Cluster API will continue to temporarily support InfraCluster resource using status.ready field to
report initialization completed.
After compatibility with the deprecated v1beta1 contract will be removed, status.ready field in
the InfraCluster resource will be ignored.
According to Kubernetes API Conventions , Conditions provide a standard mechanism for higher-level
status reporting from a controller.
Providers implementers SHOULD implement status.conditions for their InfraCluster resource.
In case conditions are implemented on a InfraCluster resource, Cluster API will only consider conditions providing the following information:
type (required)status (required, one of True, False, Unknown)reason (optional, if omitted a default one will be used)message (optional, if omitted an empty message will be used)lastTransitionTime (optional, if omitted time.Now will be used)observedGeneration (optional, if omitted the generation of the InfraCluster resource will be used)
Other fields will be ignored.
If a condition with type Ready exist, such condition will be mirrored in Cluster’s InfrastructureReady condition.
Please note that the Ready condition is expected to surface the status of the InfraCluster during its own entire lifecycle,
including initial provisioning, the final deletion process, and the period in between these two moments.
See Improving status in CAPI resources for more context.
In order to ease the transition for providers, the v1beta2 version of the Cluster API contract temporarily
preserves compatibility with the deprecated v1beta1 contract; compatibility will be removed tentatively in April 2027.
With regards to conditions:
Cluster API will continue to read conditions from providers using deprecated Cluster API condition types.
Please note that provider that will continue to use deprecated Cluster API condition types MUST carefully take into account
the implication of this choice which are described both in the Cluster API v1.11 migration notes and in the Improving status in CAPI resources proposal.
Starting from the v1beta2 contract version, there is no more special treatment for provider’s terminal failures within Cluster API.
In case necessary, “terminal failures” should be surfaced using conditions, with a well documented type/reason;
it is up to consumers to treat them accordingly.
See Improving status in CAPI resources for more context.
In order to ease the transition for providers, the v1beta2 version of the Cluster API contract temporarily
preserves compatibility with the deprecated v1beta1 contract; compatibility will be removed tentatively in April 2027.
With regards to terminal failures:
In case an infrastructure provider reports that a InfraCluster resource is in a state that cannot be recovered (terminal failure) by
setting status.failureReason and status.failureMessage as defined by the deprecated v1beta1 contract,
the “core” Cluster controller will surface those info in the corresponding fields in the Cluster’s status.deprecated.v1beta1 struct.
However, those info won’t have any impact on the Cluster lifecycle as before (the Cluster controller won’t consider the
presence of status.failureReason and status.failureMessage info as “terminal failures”).
After compatibility with the deprecated v1beta1 contract will be removed, status.failureReason and status.failureMessage
fields in the InfraCluster resource will be ignored and Cluster’s status.deprecated.v1beta1 struct will be dropped.
For a given InfraCluster resource, you should also add a corresponding InfraClusterTemplate resources in order to use it in ClusterClasses.
The template resource MUST be named as <InfraCluster>Template.
// +kubebuilder:object:root=true
// +kubebuilder:resource:path=fooclustertemplates,scope=Namespaced,categories=cluster-api
// +kubebuilder:storageversion
// FooClusterTemplate is the Schema for the fooclustertemplates API.
type FooClusterTemplate struct {
metav1.TypeMeta `json:",inline"`
metav1.ObjectMeta `json:"metadata,omitempty"`
Spec FooClusterTemplateSpec `json:"spec,omitempty"`
}
type FooClusterTemplateSpec struct {
Template FooClusterTemplateResource `json:"template"`
}
type FooClusterTemplateResource struct {
// Standard object's metadata.
// More info: https://git.k8s.io/community/contributors/devel/sig-architecture/api-conventions.md#metadata
// +optional
ObjectMeta clusterv1.ObjectMeta `json:"metadata,omitempty,omitzero"`
Spec FooClusterSpec `json:"spec"`
}
NOTE: in this example InfraClusterTemplate’s spec.template.spec embeds FooClusterSpec from InfraCluster. This might not always be
the best choice depending of if/how InfraCluster’s spec fields applies to many clusters vs only one.
For each InfraClusterTemplate resource, you MUST also add the corresponding list resource.
The list resource MUST be named as <InfraClusterTemplate>List.
// +kubebuilder:object:root=true
// FooClusterTemplateList contains a list of FooClusterTemplates.
type FooClusterTemplateList struct {
metav1.TypeMeta `json:",inline"`
metav1.ListMeta `json:"metadata,omitempty"`
Items []FooClusterTemplate `json:"items"`
}
In some cases, users might be required (or choose to) manage infrastructure out of band and run CAPI on top of already
existing infrastructure.
In order to support this use case, the InfraCluster controller SHOULD skip reconciliation of InfraCluster resources with
the cluster.x-k8s.io/managed-by: "<name-of-system>" label, and not update the resource or its status in any way.
Please note that when the cluster infrastructure is externally managed, it is responsibility of external management system
to abide to the following contract rules:
[InfraCluster control plane endpoint]
[InfraCluster failure domains]
[InfraCluster initialization completed]
[InfraCluster terminal failures]
See the externally managed infrastructure proposal for more detail about this use case.
Multi tenancy in Cluster API defines the capability of an infrastructure provider to manage different credentials,
each one of them corresponding to an infrastructure tenant.
See infrastructure Provider Security Guidance for considerations about cloud provider credential management.
Please also note that Cluster API does not support running multiples instances of the same provider, which someone can
assume an alternative solution to implement multi tenancy; same applies to the clusterctl CLI.
See Support running multiple instances of the same provider for more context.
However, if you want to make it possible for users to run multiples instances of your provider, your controller’s SHOULD:
support the --namespace flag.
support the --watch-filter flag.
Please, read carefully the page linked above to fully understand implications and risks related to this option.
The clusterctl command is designed to work with all the providers compliant with the rules defined in the clusterctl provider contract .
Providers SHOULD implement the pause behaviour for every object with a reconciliation loop. This is done by checking if spec.paused is set on the Cluster object and by checking for the cluster.x-k8s.io/paused annotation on the InfraCluster object.
If implementing the pause behavior, providers SHOULD surface the paused status of an object using the Paused condition: Status.Conditions[Paused].
A cluster infrastructure provider must respond to changes to its InfraCluster resources. This process is
typically called reconciliation. The provider must watch for new, updated, and deleted resources and respond
accordingly.
As a reference you can look at the following workflow to understand how the typical reconciliation workflow
is implemented in InfraCluster controllers:
If the resource is externally managed, exit the reconciliation
The ResourceIsNotExternallyManaged predicate can be used to prevent reconciling externally managed resources
If the resource does not have a Cluster owner, exit the reconciliation
The Cluster API Cluster reconciler populates this based on the value in the Cluster‘s spec.infrastructureRef
field.
Add the provider-specific finalizer, if needed
Reconcile provider-specific cluster infrastructure
If any errors are encountered, exit the reconciliation
If the provider created a load balancer for the control plane, record its hostname or IP in spec.controlPlaneEndpoint
Set status.infrastructure.provisioned to true
Set status.failureDomains based on available provider failure domains (optional)
Patch the resource to persist changes
If the resource has a Cluster owner
Perform deletion of provider-specific cluster infrastructure
If any errors are encountered, exit the reconciliation
Remove the provider-specific finalizer from the resource
Patch the resource to persist changes
Infrastructure providers SHOULD implement an InfraMachine resource using Kubernetes’ CustomResourceDefinition (CRD).
The goal of an InfraMachine resource is to manage the lifecycle of a provider-specific machine instances.
These may be physical or virtual instances, and they represent the infrastructure for Kubernetes nodes.
The InfraMachine resource will be referenced by one of the Cluster API core resources, Machine.
The Machine’s controller will be responsible to coordinate operations of the InfraMachine,
and the interaction between the Machine’s controller and the InfraMachine resource is based on the contract
rules defined in this page.
Once contract rules are satisfied by an InfraMachine implementation, other implementation details
could be addressed according to the specific needs (Cluster API is not prescriptive).
Nevertheless, it is always recommended to take a look at Cluster API controllers,
in-tree providers, other providers and use them as a reference implementation (unless custom solutions are required
in order to address very specific needs).
In order to facilitate the initial design for each InfraMachine resource, a few implementation best practices and infrastructure Provider Security Guidance
are explicitly called out in dedicated pages.
When developing a provider, you MUST consider any Cluster API behaviour that is not defined by a contract rule
as a Cluster API internal implementation detail, and internal implementation details can change at any time.
Accordingly, in order to not expose users to the risk that your provider breaks when the Cluster API internal behavior
changes, you MUST NOT rely on any Cluster API internal behaviour when implementing an InfraMachine resource.
Instead, whenever you need something more from the Cluster API contract, you MUST engage the community.
The Cluster API maintainers welcome feedback and contributions to the contract in order to improve how it’s defined,
its clarity and visibility to provider implementers and its suitability across the different kinds of Cluster API providers.
To provide feedback or open a discussion about the provider contract please open an issue on the Cluster API
repo or add an item to the agenda in the Cluster API community meeting .
Note:
All resources refers to all the provider’s resources “core” Cluster API interacts with;
In the context of this page: InfraMachine, InfraMachineTemplate and corresponding list types
All resources MUST be namespace-scoped.
All resources MUST have the standard Kubernetes TypeMeta and ObjectMeta fields.
In Kubernetes APIVersion is a combination of API group and version.
Special consideration MUST applies to both API group and version for all the resources Cluster API interacts with.
The domain for Cluster API resources is cluster.x-k8s.io, and infrastructure providers under the Kubernetes SIGS org
generally use infrastructure.cluster.x-k8s.io as API group.
If your provider uses a different API group, you MUST grant full read/write RBAC permissions for resources in your API group
to the Cluster API core controllers. If any resource sets another resource as the owner with blockOwnerDeletion set,
additional RBAC to update finalizers on the owner resource is required.
The canonical way to do so is via a ClusterRole resource with the aggregation label cluster.x-k8s.io/aggregate-to-manager: "true".
The following is an example ClusterRole for a FooMachine resource in the infrastructure.foo.com API group:
apiVersion: rbac.authorization.k8s.io/v1
kind: ClusterRole
metadata:
name: capi-foo-clusters
labels:
cluster.x-k8s.io/aggregate-to-manager: "true"
rules:
- apiGroups:
- infrastructure.foo.com
resources:
- foomachines
- foomachinetemplates
verbs:
- create
- delete
- get
- list
- patch
- update
- watch
Note: The write permissions are required because Cluster API manages InfraMachines generated from InfraMachineTemplates;
when using ClusterClass and managed topologies, also InfraMachineTemplates are managed directly by Cluster API.
The resource Version defines the stability of the API and its backward compatibility guarantees.
Examples include v1alpha1, v1beta1, v1, etc. and are governed by the Kubernetes API Deprecation Policy .
Your provider SHOULD abide by the same policies.
Note: The version of your provider does not need to be in sync with the version of core Cluster API resources.
Instead, prefer choosing a version that matches the stability of the provider API and its backward compatibility guarantees.
Additionally:
Providers MUST set cluster.x-k8s.io/<version> label on the InfraMachine Custom Resource Definitions.
The label is a map from a Cluster API contract version to your Custom Resource Definition versions.
The value is an underscore-delimited (_) list of versions. Each value MUST point to an available version in your CRD Spec.
The label allows Cluster API controllers to perform automatic conversions for object references, the controllers will pick
the last available version in the list if multiple versions are found.
To apply the label to CRDs it’s possible to use labels in your kustomization.yaml file, usually in config/crd:
labels:
- pairs:
cluster.x-k8s.io/v1beta1: v1beta1
cluster.x-k8s.io/v1beta2: v1beta2
An example of this is in the Kubeadm Bootstrap provider .
If the provider implements the clusterctl provider contract , the contract version defined in the
label above must be consistent with the contract version defined in the metadata.yaml file.
You MUST define a InfraMachine resource.
The InfraMachine resource name must have the format produced by sigs.k8s.io/cluster-api/util/contract.CalculateCRDName(Group, Kind).
Note: Cluster API is using such a naming convention to avoid an expensive CRD lookup operation when looking for labels from
the CRD definition of the InfraMachine resource.
It is a generally applied convention to use names in the format ${env}Machine, where ${env} is a, possibly short, name
for the environment in question. For example GCPMachine is an implementation for the Google Cloud Platform, and AWSMachine
is one for Amazon Web Services.
// +kubebuilder:object:root=true
// +kubebuilder:resource:path=foomachines,shortName=foom,scope=Namespaced,categories=cluster-api
// +kubebuilder:storageversion
// +kubebuilder:subresource:status
// FooMachine is the Schema for foomachines.
type FooMachine struct {
metav1.TypeMeta `json:",inline"`
metav1.ObjectMeta `json:"metadata,omitempty"`
Spec FooMachineSpec `json:"spec,omitempty"`
Status FooMachineStatus `json:"status,omitempty"`
}
type FooMachineSpec struct {
// See other rules for more details about mandatory/optional fields in InfraMachine spec.
// Other fields SHOULD be added based on the needs of your provider.
}
type FooMachineStatus struct {
// See other rules for more details about mandatory/optional fields in InfraMachine status.
// Other fields SHOULD be added based on the needs of your provider.
}
For each InfraMachine resource, you MUST also add the corresponding list resource.
The list resource MUST be named as <InfraMachine>List.
// +kubebuilder:object:root=true
// FooMachineList contains a list of foomachines.
type FooMachineList struct {
metav1.TypeMeta `json:",inline"`
metav1.ListMeta `json:"metadata,omitempty"`
Items []FooMachine `json:"items"`
}
Each Machine needs a provider ID to identify the Kubernetes Node that runs on the machine.
Node’s Provider id MUST surface on spec.providerID in the InfraMachine resource.
type FooMachineSpec struct {
// providerID must match the provider ID as seen on the node object corresponding to this machine.
// For Kubernetes Nodes running on the Foo provider, this value is set by the corresponding CPI component
// and it has the format docker:////<vm-name>.
// +optional
// +kubebuilder:validation:MinLength=1
// +kubebuilder:validation:MaxLength=512
ProviderID string `json:"providerID,omitempty"`
// See other rules for more details about mandatory/optional fields in InfraMachine spec.
// Other fields SHOULD be added based on the needs of your provider.
}
NOTE: To align with API conventions, we recommend since the v1beta2 contract that the ProviderID field should be
of type string (it was *string before). Both are compatible with the v1beta2 contract though.
Once spec.providerID is set on the InfraMachine resource and the [InfraMachine initialization completed],
the Cluster controller will surface this info in Machine’s spec.providerID.
In case you are developing an infrastructure provider which has a notion of failure domains where machines should be
placed in, the InfraMachine resource MUST comply to the value that exists in the spec.failureDomain field of the Machine
(in other words, the InfraMachine MUST be placed in the failure domain specified at Machine level).
Also, InfraMachine providers are allowed to surface the failure domain where the machine is actually placed by
implementing the status.failureDomain field; this info, if present, will then surface at Machine level in a
corresponding field (also in status).
type FooMachineStatus struct {
// failureDomain is the unique identifier of the failure domain where this Machine has been placed in.
// +optional
// +kubebuilder:validation:MinLength=1
// +kubebuilder:validation:MaxLength=256
FailureDomain string `json:"failureDomain,omitempty"`
// See other rules for more details about mandatory/optional fields in InfraMachineStatus.
// Other fields SHOULD be added based on the needs of your provider.
}
In order to ease the transition for providers, the v1beta2 version of the Cluster API contract temporarily
preserves compatibility with the deprecated v1beta1 contract; compatibility will be removed tentatively in April 2027.
With regard to failure domain:
Cluster API will continue to temporarily support InfraMachine resource using spec.failureDomain to
set the failure domain. Note that this field has been preserved only for allowing transparent transition from when there
was no failure domain support in Cluster API and InfraMachine was authoritative WRT to failure domain placement (before CAPI v0.3.0).
After compatibility with the deprecated v1beta1 contract will be removed, spec.failureDomain field in
the InfraMachine resource will be ignored.
Infrastructure provider have the opportunity to surface machines addresses on the InfraMachine resource; this information
won’t be used by core Cluster API controller, but it is really useful for operator troubleshooting issues on machines.
In case you want to surface machine’s addresses, you MUST surface them in status.addresses in the InfraMachine resource.
type FooMachineStatus struct {
// addresses contains the associated addresses for the machine.
// +optional
Addresses []clusterv1.MachineAddress `json:"addresses,omitempty"`
// See other rules for more details about mandatory/optional fields in InfraMachine status.
// Other fields SHOULD be added based on the needs of your provider.
}
Each MachineAddress must have a type; accepted types are Hostname, ExternalIP, InternalIP, ExternalDNS or InternalDNS.
Once status.addresses is set on the InfraMachine resource and the [InfraMachine initialization completed],
the Machine controller will surface this info in Machine’s status.addresses.
Each InfraMachine MUST report when Machine’s infrastructure is fully provisioned (initialization) by setting
status.initialization.provisioned in the InfraMachine resource.
type FooMachineStatus struct {
// initialization provides observations of the FooMachine initialization process.
// NOTE: Fields in this struct are part of the Cluster API contract and are used to orchestrate initial Machine provisioning.
// +optional
Initialization FooMachineInitializationStatus `json:"initialization,omitempty,omitzero"`
// See other rules for more details about mandatory/optional fields in InfraMachine status.
// Other fields SHOULD be added based on the needs of your provider.
}
// FooMachineInitializationStatus provides observations of the FooMachine initialization process.
// +kubebuilder:validation:MinProperties=1
type FooMachineInitializationStatus struct {
// provisioned is true when the infrastructure provider reports that the Machine's infrastructure is fully provisioned.
// NOTE: this field is part of the Cluster API contract, and it is used to orchestrate initial Machine provisioning.
// +optional
Provisioned *bool `json:"provisioned,omitempty"`
}
Once status.initialization.provisioned is set the Machine “core” controller will bubble up this info in Machine’s
status.initialization.infrastructureProvisioned; also InfraMachine’s spec.providerID, status.failureDomain and status.addresses will
be surfaced on Machine’s corresponding fields at the same time.
In order to ease the transition for providers, the v1beta2 version of the Cluster API contract temporarily
preserves compatibility with the deprecated v1beta1 contract; compatibility will be removed tentatively in April 2027.
With regard to initialization completed:
Cluster API will continue to temporarily support InfraMachine resource using status.ready field to
report initialization completed.
After compatibility with the deprecated v1beta1 contract will be removed, status.ready field in
the InfraMachine resource will be ignored.
According to Kubernetes API Conventions , Conditions provide a standard mechanism for higher-level
status reporting from a controller.
Providers implementers SHOULD implement status.conditions for their InfraMachine resource.
In case conditions are implemented on a InfraMachine resource, Cluster API will only consider conditions providing the following information:
type (required)status (required, one of True, False, Unknown)reason (optional, if omitted a default one will be used)message (optional, if omitted an empty message will be used)lastTransitionTime (optional, if omitted time.Now will be used)observedGeneration (optional, if omitted the generation of the InfraMachine resource will be used)
Other fields will be ignored.
If a condition with type Ready exist, such condition will be mirrored in Machine’s InfrastructureReady condition.
Please note that the Ready condition is expected to surface the status of the InfraMachine during its own entire lifecycle,
including initial provisioning, the final deletion process, and the period in between these two moments.
See Improving status in CAPI resources for more context.
In order to ease the transition for providers, the v1beta2 version of the Cluster API contract temporarily
preserves compatibility with the deprecated v1beta1 contract; compatibility will be removed tentatively in April 2027.
With regards to conditions:
Cluster API will continue to read conditions from providers using deprecated Cluster API condition types.
Please note that provider that will continue to use deprecated Cluster API condition types MUST carefully take into account
the implication of this choice which are described both in the Cluster API v1.11 migration notes and in the Improving status in CAPI resources proposal.
Starting from the v1beta2 contract version, there is no more special treatment for provider’s terminal failures within Cluster API.
In case necessary, “terminal failures” should be surfaced using conditions, with a well documented type/reason;
it is up to consumers to treat them accordingly.
See Improving status in CAPI resources for more context.
In order to ease the transition for providers, the v1beta2 version of the Cluster API contract temporarily
preserves compatibility with the deprecated v1beta1 contract; compatibility will be removed tentatively in April 2027.
With regards to terminal failures:
In case an infrastructure provider reports that a InfraMachine resource is in a state that cannot be recovered (terminal failure) by
setting status.failureReason and status.failureMessage as defined by the deprecated v1beta1 contract,
the “core” Machine controller will surface those info in the corresponding fields in the Machine’s status.deprecated.v1beta1 struct.
However, those info won’t have any impact on the Machine lifecycle as before (the Machine controller won’t consider the
presence of status.failureReason and status.failureMessage info as “terminal failures”; similarly, the
MachineHealthCheck controller won’t consider the presence of status.failureReason and status.failureMessage to
determine when a Machine needs remediation).
After compatibility with the deprecated v1beta1 contract will be removed, status.failureReason and status.failureMessage
fields in the InfraMachine resource will be ignored and Machine’s status.deprecated.v1beta1 struct will be dropped.
In case you are developing an infrastructure provider with support for in-place updates of the Machine infrastructure,
you should consider following recommendations during implementation.
The Update Extension is the component responsible for orchestrating in-place changes on Machines.
Accordingly, the InfraMachine controller should ignore in-place changes. As alternative the InfraMachine controller
must orchestrate those changes with the Update Extension (e.g. the Update Extension must report change progress).
It might be useful to start thinking about the InfraMachine API surface as a set of fields with one of the following behaviors:
“Immutable” fields that can only be changed by performing a rollout.
“Mutable” fields that will be “reconciled” by the Update Extension.
Fields written back to spec by the infra provider (e.g. ProviderID).
The validation webhook for the InfraMachine CR should allow changes to “mutable” fields; in case an infra provider
wants to allow this change selectively, e.g. only when applied by core CAPI, please reach out to maintainers to discuss options.
Please note that the above field classification do not apply to the InfraMachineTemplate object.
See Proposal .
For a given InfraMachine resource, you MUST also add a corresponding InfraMachineTemplate resources in order to use it
when defining set of machines, e.g. MachineDeployments.
The template resource MUST be named as <InfraMachine>Template.
// +kubebuilder:object:root=true
// +kubebuilder:resource:path=foomachinetemplates,scope=Namespaced,categories=cluster-api
// +kubebuilder:storageversion
// FooMachineTemplate is the Schema for the foomachinetemplates API.
type FooMachineTemplate struct {
metav1.TypeMeta `json:",inline"`
metav1.ObjectMeta `json:"metadata,omitempty"`
Spec FooMachineTemplateSpec `json:"spec,omitempty"`
}
type FooMachineTemplateSpec struct {
Template FooMachineTemplateResource `json:"template"`
}
type FooMachineTemplateResource struct {
// Standard object's metadata.
// More info: https://git.k8s.io/community/contributors/devel/sig-architecture/api-conventions.md#metadata
// +optional
ObjectMeta clusterv1.ObjectMeta `json:"metadata,omitempty,omitzero"`
Spec FooMachineSpec `json:"spec"`
}
NOTE: in this example InfraMachineTemplate’s spec.template.spec embeds FooMachineSpec from InfraMachine. This might not always be
the best choice depending of if/how InfraMachine’s spec fields applies to many machines vs only one.
For each InfraMachineTemplate resource, you MUST also add the corresponding list resource.
The list resource MUST be named as <InfraMachineTemplate>List.
// +kubebuilder:object:root=true
// FooMachineTemplateList contains a list of FooMachineTemplates.
type FooMachineTemplateList struct {
metav1.TypeMeta `json:",inline"`
metav1.ListMeta `json:"metadata,omitempty"`
Items []FooMachineTemplate `json:"items"`
}
When Cluster API’s topology controller is trying to identify differences between templates defined in a ClusterClass and
the current Cluster topology, it is required to run Server Side Apply (SSA) dry run call.
However, in case you immutability checks for your InfraMachineTemplate, this can lead the SSA dry run call to errors.
In order to avoid this InfraMachineTemplate MUST specifically implement support for SSA dry run calls from the topology controller.
The implementation requires to use controller runtime’s CustomValidator, available in CR versions >= v0.12.3.
This will allow to skip the immutability check only when the topology controller is dry running while preserving the
validation behavior for all other cases.
See the DockerMachineTemplate webhook as a reference for a compatible implementation.
Multi tenancy in Cluster API defines the capability of an infrastructure provider to manage different credentials,
each one of them corresponding to an infrastructure tenant.
See infrastructure Provider Security Guidance for considerations about cloud provider credential management.
Please also note that Cluster API does not support running multiples instances of the same provider, which someone can
assume an alternative solution to implement multi tenancy; same applies to the clusterctl CLI.
See Support running multiple instances of the same provider for more context.
However, if you want to make it possible for users to run multiples instances of your provider, your controller’s SHOULD:
support the --namespace flag.
support the --watch-filter flag.
Please, read carefully the page linked above to fully understand implications and risks related to this option.
The clusterctl command is designed to work with all the providers compliant with the rules defined in the clusterctl provider contract .
Providers SHOULD implement the pause behaviour for every object with a reconciliation loop. This is done by checking if spec.paused is set on the Cluster object and by checking for the cluster.x-k8s.io/paused annotation on the InfraMachine object.
If implementing the pause behavior, providers SHOULD surface the paused status of an object using the Paused condition: Status.Conditions[Paused].
As described in the enhancement Opt-in Autoscaling from Zero , providers may implement the capacity and nodeInfo fields in machine templates to inform the cluster autoscaler about the resources available on that machine type, the architecture, and the operating system it runs.
Building on the FooMachineTemplate example from above, this shows the addition of a status and capacity field:
import corev1 "k8s.io/api/core/v1"
// FooMachineTemplate is the Schema for the foomachinetemplates API.
type FooMachineTemplate struct {
metav1.TypeMeta `json:",inline"`
metav1.ObjectMeta `json:"metadata,omitempty"`
Spec FooMachineTemplateSpec `json:"spec,omitempty"`
Status FooMachineTemplateStatus `json:"status,omitempty"`
}
// FooMachineTemplateStatus defines the observed state of FooMachineTemplate.
type FooMachineTemplateStatus struct {
// Capacity defines the resource capacity for this machine.
// This value is used for autoscaling from zero operations as defined in:
// https://github.com/kubernetes-sigs/cluster-api/blob/main/docs/proposals/20210310-opt-in-autoscaling-from-zero.md
// +optional
Capacity corev1.ResourceList `json:"capacity,omitempty"`
// +optional
NodeInfo NodeInfo `json:"nodeInfo,omitempty,omitzero"`
}
// Architecture represents the CPU architecture of the node.
// Its underlying type is a string and its value can be any of amd64, arm64, s390x, ppc64le.
// +kubebuilder:validation:Enum=amd64;arm64;s390x;ppc64le
// +enum
type Architecture string
// Example architecture constants defined for better readability and maintainability.
const (
ArchitectureAmd64 Architecture = "amd64"
ArchitectureArm64 Architecture = "arm64"
ArchitectureS390x Architecture = "s390x"
ArchitecturePpc64le Architecture = "ppc64le"
)
// NodeInfo contains information about the node's architecture and operating system.
// +kubebuilder:validation:MinProperties=1
type NodeInfo struct {
// architecture is the CPU architecture of the node.
// Its underlying type is a string and its value can be any of amd64, arm64, s390x, ppc64le.
// +optional
Architecture Architecture `json:"architecture,omitempty"`
// operatingSystem is a string representing the operating system of the node.
// This may be a string like 'linux' or 'windows'.
// +optional
OperatingSystem string `json:"operatingSystem,omitempty"`
}
When rendered to a manifest, the machine template status capacity field representing an amd64 linux instance with 500 megabytes of RAM, 1 CPU core, and 1 NVidia GPU should look like this:
status:
capacity:
memory: 500mb
cpu: "1"
nvidia.com/gpu: "1"
nodeInfo:
architecture: amd64
operatingSystem: linux
If the information in the nodeInfo field is not available, the result of the autoscaling from zero operation will depend
on the cluster autoscaler implementation. For example, the Cluster API implementation of the Kubernetes Cluster Autoscaler
will assume the host is running either the architecture set in the CAPI_SCALE_ZERO_DEFAULT_ARCH environment variable of
the cluster autoscaler pod environment, or the amd64 architecture and Linux operating system as default values.
See autoscaling .
A machine infrastructure provider must respond to changes to its InfraMachine resources. This process is
typically called reconciliation. The provider must watch for new, updated, and deleted resources and respond
accordingly.
As a reference you can look at the following workflow to understand how the typical reconciliation workflow
is implemented in InfraMachine controllers:
If the resource does not have a Machine owner, exit the reconciliation
The Cluster API Machine reconciler populates this based on the value in the Machines‘s
spec.infrastructureRef field
If the Cluster to which this resource belongs cannot be found, exit the reconciliation
Add the provider-specific finalizer, if needed
If the associated Cluster‘s status.infrastructureReady is false, exit the reconciliation
Note : This check should not be blocking any further delete reconciliation flows.Note : This check should only be performed after appropriate owner references (if any) are updated.
If the associated Machine‘s spec.bootstrap.dataSecretName is nil, exit the reconciliation
Reconcile provider-specific machine infrastructure
If this is a control plane machine, register the instance with the provider’s control plane load balancer
(optional)
Set spec.providerID to the provider-specific identifier for the provider’s machine instance
Set status.infrastructure.provisioned to true
Set status.addresses to the provider-specific set of instance addresses (optional)
Set status.failureDomain to the provider-specific failure domain the instance is running in (optional)
Patch the resource to persist changes
If the resource has a Machine owner
Perform deletion of provider-specific machine infrastructure
If this is a control plane machine, deregister the instance from the provider’s control plane load balancer
(optional)
If any errors are encountered, exit the reconciliation
Remove the provider-specific finalizer from the resource
Patch the resource to persist changes
Infrastructure providers CAN OPTIONALLY implement an InfraMachinePool resource using Kubernetes’ CustomResourceDefinition (CRD).
The goal of an InfraMachinePool is to manage the lifecycle of a provider-specific pool of machines using a provider specific service (like Auto Scaling groups in AWS & Virtual Machine Scale Sets in Azure).
The machines in the pool may be physical or virtual instances (although most likely virtual), and they represent the infrastructure for Kubernetes nodes.
The InfraMachinePool resource will be referenced by one of the Cluster API core resources, MachinePool.
The core MachinePool’s controller is responsible to coordinate operations of the MachinePool with the InfraMachinePool. The operations are coordinated via the contract rules defined in this page.
Once contract rules are satisfied by an InfraMachinePool implementation, other implementation details
could be addressed according to the specific needs (Cluster API is not prescriptive).
Nevertheless, it is always recommended to take a look at Cluster API controllers,
in-tree providers, other providers and use them as a reference implementation (unless custom solutions are required
in order to address very specific needs).
When developing a provider, you MUST consider any Cluster API behaviour that is not defined by a contract rule
as a Cluster API internal implementation detail, and internal implementation details can change at any time.
Accordingly, in order to not expose users to the risk that your provider breaks when the Cluster API internal behavior
changes, you MUST NOT rely on any Cluster API internal behaviour when implementing an InfraMachinePool resource.
Instead, whenever you need something more from the Cluster API contract, you MUST engage the community.
The Cluster API maintainers welcome feedback and contributions to the contract in order to improve how it’s defined,
its clarity and visibility to provider implementers and its suitability across the different kinds of Cluster API providers.
To provide feedback or open a discussion about the provider contract please open an issue on the Cluster API repo or add an item to the agenda in the Cluster API community meeting .
Note:
All resources refers to all the provider’s resources “core” Cluster API interacts with;
In the context of this page: InfraMachinePool, InfraMachinePoolTemplate and corresponding list types
All resources MUST be namespace-scoped.
All resources MUST have the standard Kubernetes TypeMeta and ObjectMeta fields.
In Kubernetes APIVersion is a combination of API group and version.
Special consideration MUST apply to both API group and version for all the resources Cluster API interacts with.
The domain for Cluster API resources is cluster.x-k8s.io, and infrastructure providers under the Kubernetes SIGS org
generally use infrastructure.cluster.x-k8s.io as API group.
If your provider uses a different API group, you MUST grant full read/write RBAC permissions for resources in your API group
to the Cluster API core controllers. If any resource sets another resource as the owner with blockOwnerDeletion set,
additional RBAC to update finalizers on the owner resource is required.
The canonical way to do so is via a ClusterRole resource with the [aggregation label] cluster.x-k8s.io/aggregate-to-manager: "true".
The following is an example ClusterRole for a FooMachinePool resource in the infrastructure.foo.com API group:
apiVersion: rbac.authorization.k8s.io/v1
kind: ClusterRole
metadata:
name: capi-foo-clusters
labels:
cluster.x-k8s.io/aggregate-to-manager: "true"
rules:
- apiGroups:
- infrastructure.foo.com
resources:
- foomachinepools
- foomachinepooltemplates
verbs:
- create
- delete
- get
- list
- patch
- update
- watch
Note: The write permissions are required because Cluster API manages InfraMachinePools generated from InfraMachinePoolTemplates; when using ClusterClass and managed topologies, also InfraMachinePoolTemplates are managed directly by Cluster API.
The resource Version defines the stability of the API and its backward compatibility guarantees.
Examples include v1alpha1, v1beta1, v1, etc. and are governed by the [Kubernetes API Deprecation Policy].
Your provider SHOULD abide by the same policies.
Note: The version of your provider does not need to be in sync with the version of core Cluster API resources.
Instead, prefer choosing a version that matches the stability of the provider API and its backward compatibility guarantees.
Additionally:
Providers MUST set cluster.x-k8s.io/<version> label on the InfraMachinePool Custom Resource Definitions.
The label is a map from a Cluster API contract version to your Custom Resource Definition versions.
The value is an underscore-delimited (_) list of versions. Each value MUST point to an available version in your CRD Spec.
The label allows Cluster API controllers to perform automatic conversions for object references, the controllers will pick
the last available version in the list if multiple versions are found.
To apply the label to CRDs it’s possible to use labels in your kustomization.yaml file, usually in config/crd:
labels:
- pairs:
cluster.x-k8s.io/v1beta1: v1beta1
cluster.x-k8s.io/v1beta2: v1beta2
An example of this is in the AWS infrastructure provider .
If the provider implements the clusterctl provider contract , the contract version defined in the
label above must be consistent with the contract version defined in the metadata.yaml file.
You MUST define a InfraMachinePool resource if you provider supports MachinePools.
The InfraMachinePool CRD name must have the format produced by sigs.k8s.io/cluster-api/util/contract.CalculateCRDName(Group, Kind)
Note: Cluster API is using such a naming convention to avoid an expensive CRD lookup operation when looking for labels from
the CRD definition of the InfraMachinePool resource.
It is a generally applied convention to use names in the format ${env}MachinePool, where ${env} is a, possibly short, name
for the environment in question. For example AWSMachinePool is an implementation for Amazon Web Services, and AzureMachinePool
is one for Azure.
// +kubebuilder:object:root=true
// +kubebuilder:resource:path=foomachinepools,shortName=foomp,scope=Namespaced,categories=cluster-api
// +kubebuilder:storageversion
// +kubebuilder:subresource:status
// +kubebuilder:printcolumn:name="Age",type="date",JSONPath=".metadata.creationTimestamp",description="Time duration since creation of FooMachinePool"
// FooMachinePool is the Schema for foomachinepools.
type FooMachinePool struct {
metav1.TypeMeta `json:",inline"`
metav1.ObjectMeta `json:"metadata,omitempty"`
Spec FooMachinePoolSpec `json:"spec,omitempty"`
Status FooMachinePoolStatus `json:"status,omitempty"`
}
type FooMachinePoolSpec struct {
// See other rules for more details about mandatory/optional fields in InfraMachinePool spec.
// Other fields SHOULD be added based on the needs of your provider.
}
type FooMachinePoolStatus struct {
// See other rules for more details about mandatory/optional fields in InfraMachinePool status.
// Other fields SHOULD be added based on the needs of your provider.
}
For each InfraMachinePool resource, you MUST also add the corresponding list resource.
The list resource MUST be named as <InfraMachinePool>List.
// +kubebuilder:object:root=true
// FooMachinePoolList contains a list of foomachinepools.
type FooMachinePoolList struct {
metav1.TypeMeta `json:",inline"`
metav1.ListMeta `json:"metadata,omitempty"`
Items []FooMachinePool `json:"items"`
}
Each InfraMachinePool MAY specify a status field that is used to report information about each replica within the machine pool. This field is not used by core CAPI. It is purely informational and is used as convenient way for a user to get details of the replicas in the machine pool, such as their provider id and ip addresses.
If you implement this then create a status.instances field that is a slice of a struct type that contains the information you want to store and be made available to the users.
type FooMachinePoolStatus struct {
// Instances contains the status for each instance in the pool
// +optional
Instances []FooMachinePoolInstanceStatus `json:"instances,omitempty"`
// See other rules for more details about mandatory/optional fields in InfraMachinePool status.
// Other fields SHOULD be added based on the needs of your provider.
}
// FooMachinePoolInstanceStatus contains instance status information about a FooMachinePool.
type FooMachinePoolInstanceStatus struct {
// Addresses contains the associated addresses for the machine.
// +optional
Addresses []clusterv1.MachineAddress `json:"addresses,omitempty"`
// InstanceName is the identification of the Machine Instance within the Machine Pool
InstanceName string `json:"instanceName,omitempty"`
// ProviderID is the provider identification of the Machine Pool Instance
// +optional
ProviderID *string `json:"providerID,omitempty"`
// Version defines the Kubernetes version for the Machine Instance
// +optional
Version *string `json:"version,omitempty"`
// Ready denotes that the machine is ready
// +optional
Ready bool `json:"ready"`
}
A provider can opt-in to MachinePool Machines (MPM). With MPM machines all the replicas in a MachinePool are represented by a Machine & InfraMachine. This enables core CAPI to perform common operations on single machines (and their Nodes), such as draining a node before scale down, integration with Cluster Autoscaler and also MachineHealthChecks .
If you want to adopt MPM then you MUST have an status.infrastructureMachineKind field and the fields value must be set to the resource kind that represents the replicas in the pool. This is usually the resource kind name for the providers InfraMachine. For example, for the AWS provider the value would be set to AWSMachine.
By opting in, the infra provider is expected to create a InfraMachine for every replica in the pool. The lifecycle of these InfraMachines must be managed so that when scale up or scale down happens, the list of InfraMachines is kept up to date.
type FooMachinePoolStatus struct {
// InfrastructureMachineKind is the kind of the infrastructure resources behind MachinePool Machines.
// +optional
InfrastructureMachineKind string `json:"infrastructureMachineKind,omitempty"`
// See other rules for more details about mandatory/optional fields in InfraMachinePool status.
// Other fields SHOULD be added based on the needs of your provider.
}
Note: not all InfraMachinePool implementations support MPM as it depends on whether the infrastructure service underpinning the InfraMachinePool supports operations being performed against single machines. For example, in CAPA AWSManagedMachinePool is used to represent an “EKS managed node group” and as a “managed” service you are expected to NOT perform operations against single nodes.
For further information see the proposal .
Each InfraMachinePool MAY specify a provider ID on spec.providerID that can be used to identify the infrastructure resource that implements the InfraMachinePool.
This field isn’t used by core CAPI. Its main purpose is purely informational to the user to surface the infrastructures identifier for the InfraMachinePool. For example, for AWSMachinePool this would be the ASG identifier.
type FooMachinePoolSpec struct {
// providerID is the identification ID of the FooMachinePool.
// +optional
// +kubebuilder:validation:MinLength=1
// +kubebuilder:validation:MaxLength=512
ProviderID string `json:"providerID,omitempty"`
// See other rules for more details about mandatory/optional fields in InfraMachinePool spec.
// Other fields SHOULD be added based on the needs of your provider.
}
NOTE: To align with API conventions, we recommend since the v1beta2 contract that the ProviderID field should be
of type string.
Each InfraMachinePool MUST supply a list of the identification IDs of the machine instances managed by the machine pool by storing these in spec.providerIDList.
type FooMachinePoolSpec struct {
// ProviderIDList is the list of identification IDs of machine instances managed by this Machine Pool
// +optional
// +listType=atomic
// +kubebuilder:validation:MaxItems=10000
// +kubebuilder:validation:items:MinLength=1
// +kubebuilder:validation:items:MaxLength=512
ProviderIDList []string `json:"providerIDList,omitempty"`
// See other rules for more details about mandatory/optional fields in InfraMachinePool spec.
// Other fields SHOULD be added based on the needs of your provider.
}
Cluster API uses this list to determine the status of the machine pool and to know when replicas have been deleted, at which point the Node will be deleted. Therefore, the list MUST be kept up to date.
Each InfraMachinePool MUST report when the MachinePool’s infrastructure is fully provisioned (initialization) by setting status.initialization.provisioned in the InfraMachinePool resource.
type FooMachinePoolStatus struct {
// initialization provides observations of the FooMachinePool initialization process.
// +optional
Initialization FooMachinePoolInitializationStatus `json:"initialization,omitempty,omitzero"`
// See other rules for more details about mandatory/optional fields in InfraMachinePool status.
// Other fields SHOULD be added based on the needs of your provider.
}
// FooMachinePoolInitializationStatus provides observations of the FooMachinePool initialization process.
// +kubebuilder:validation:MinProperties=1
type FooMachinePoolInitializationStatus struct {
// provisioned is true when the infrastructure provider reports that the MachinePool's infrastructure is fully provisioned.
// +optional
Provisioned *bool `json:"provisioned,omitempty"`
}
Once status.initialization.provisioned is set, the MachinePool “core” controller will bubble this info in the MachinePool’s status.initialization.infrastructureProvisioned; also InfraMachinePools’s spec.providerIDList and status.replicas will be surfaced on MachinePool’s corresponding fields at the same time.
In order to ease the transition for providers, the v1beta2 version of the Cluster API contract temporarily preserves compatibility with the deprecated v1beta1 contract; compatibility will be removed tentatively in April 2027.
With regard to initialization completed:
Cluster API will continue to temporarily support InfraMachinePool resource using status.ready field to report initialization completed.
After compatibility with the deprecated v1beta1 contract will be removed, status.ready field in
the InfraMachine resource will be ignored.
Providers SHOULD implement the pause behaviour for every object with a reconciliation loop. This is done by checking if spec.paused is set on the Cluster object and by checking for the cluster.x-k8s.io/paused annotation on the InfraMachinePool object. Preferably, the utility sigs.k8s.io/cluster-api/util/annotations.IsPaused(cluster, infraMachinePool) SHOULD be used.
If implementing the pause behaviour, providers SHOULD surface the paused status of an object using the Paused condition: Status.Conditions[Paused].
According to Kubernetes API Conventions , Conditions provide a standard mechanism for higher-level
status reporting from a controller.
Providers implementers SHOULD implement status.conditions for their InfraMachinePool resource.
In case conditions are implemented on a InfraMachinePool resource, Cluster API will only consider conditions providing the following information:
type (required)status (required, one of True, False, Unknown)reason (optional, if omitted a default one will be used)message (optional, if omitted an empty message will be used)lastTransitionTime (optional, if omitted time.Now will be used)observedGeneration (optional, if omitted the generation of the InfraMachinePool resource will be used)
Other fields will be ignored.
If a condition with type Ready exist, such condition will be mirrored in MachinePool’s InfrastructureReady condition (not implemented yet).
Please note that the Ready condition is expected to surface the status of the InfraMachinePool during its own entire lifecycle, including initial provisioning, the final deletion process, and the period in between these two moments.
See Improving status in CAPI resources for more context.
In order to ease the transition for providers, the v1beta2 version of the Cluster API contract temporarily
preserves compatibility with the deprecated v1beta1 contract; compatibility will be removed tentatively in April 2027.
With regards to conditions:
Cluster API will continue to read conditions from providers using deprecated Cluster API condition types.
Please note that provider that will continue to use deprecated Cluster API condition types MUST carefully take into account
the implication of this choice which are described both in the [Cluster API v1.11 migration notes] and in the Improving status in CAPI resources proposal.
Provider implementers MUST implement status.replicas to report the most recently observed number of machine instances in the pool. For example, in AWS this would be the number of replicas in a Auto Scaling group (ASG).
type FooMachinePoolStatus struct {
// Replicas is the most recently observed number of replicas.
// +optional
Replicas int32 `json:"replicas"`
// See other rules for more details about mandatory/optional fields in InfraMachinePool status.
// Other fields SHOULD be added based on the needs of your provider.
}
The value from this field is surfaced via the MachinePool’s status.replicas field.
Starting from the v1beta2 contract version, there is no more special treatment for provider’s terminal failures within Cluster API.
In case necessary, “terminal failures” should be surfaced using conditions, with a well documented type/reason; it is up to consumers to treat them accordingly.
See Improving status in CAPI resources for more context.
In order to ease the transition for providers, the v1beta2 version of the Cluster API contract temporarily preserves compatibility with the deprecated v1beta1 contract; compatibility will be removed tentatively in April 2027.
With regards to terminal failures:
In case an infrastructure provider reports that a InfraMachinePool resource is in a state that cannot be recovered (terminal failure) by setting status.failureReason and status.failureMessage as defined by the deprecated v1beta1 contract, the “core” MachinePool controller will surface those info in the corresponding fields in the MachinePools’s status.deprecated.v1beta1 struct.
After compatibility with the deprecated v1beta1 contract will be removed, status.failureReason and status.failureMessage fields in the InfraMachine resource will be ignored and Machine’s status.deprecated.v1beta1 struct will be dropped.
For a given InfraMachinePool resource, you SHOULD also add a corresponding InfraMachinePoolTemplate resource in order to use it in ClusterClasses. The template resource MUST be name <InfraMachinePool>Template.
// +kubebuilder:object:root=true
// +kubebuilder:resource:path=foomachinepooltemplates,scope=Namespaced,categories=cluster-api
// +kubebuilder:storageversion
// FooMachinePoolTemplate is the Schema for the foomachinepooltemplates API.
type FooMachinePoolTemplate struct {
metav1.TypeMeta `json:",inline"`
metav1.ObjectMeta `json:"metadata,omitempty"`
Spec FooMachinePoolTemplateSpec `json:"spec,omitempty"`
}
type FooMachinePoolTemplateSpec struct {
Template FooMachinePooleTemplateResource `json:"template"`
}
type FooMachinePoolTemplateResource struct {
// Standard object's metadata.
// More info: https://git.k8s.io/community/contributors/devel/sig-architecture/api-conventions.md#metadata
// +optional
ObjectMeta clusterv1.ObjectMeta `json:"metadata,omitempty,omitzero"`
Spec FooMachinePoolSpec `json:"spec"`
}
NOTE: in this example spec.template.spec embeds FooMachinePoolSpec from MachinePool. This might not always be
the best choice depending of if/how InfraMachinePools spec fields applies to many machine pools vs only one.
For each InfraMachinePoolTemplate resource, you MUST also add the corresponding list resource.
The list resource MUST be named as <InfraMachinePoolTemplate>List.
// +kubebuilder:object:root=true
// FooMachinePoolTemplateList contains a list of FooMachinePoolTemplates.
type FooMachinePoolTemplateList struct {
metav1.TypeMeta `json:",inline"`
metav1.ListMeta `json:"metadata,omitempty"`
Items []FooMachinePoolTemplate `json:"items"`
}
When Cluster API’s topology controller is trying to identify differences between templates defined in a ClusterClass and
the current Cluster topology, it is required to run [Server Side Apply] (SSA) dry run call.
However, in case you have immutability checks for your InfraMachinePoolTemplate, this can lead the SSA dry run call to error.
In order to avoid this InfraMachinePoolTemplate MUST specifically implement support for SSA dry run calls from the topology controller.
The implementation requires to use controller runtime’s CustomValidator, available since version v0.12.3.
This will allow to skip the immutability check only when the topology controller is dry running while preserving the
validation behavior for all other cases.
Multi tenancy in Cluster API defines the capability of an infrastructure provider to manage different credentials,
each one of them corresponding to an infrastructure tenant.
See infrastructure Provider Security Guidance for considerations about cloud provider credential management.
Please also note that Cluster API does not support running multiples instances of the same provider, which someone can
assume an alternative solution to implement multi tenancy; same applies to the clusterctl CLI.
See Support running multiple instances of the same provider for more context.
However, if you want to make it possible for users to run multiples instances of your provider, your controller’s SHOULD:
support the --namespace flag.
support the --watch-filter flag.
Please, read carefully the page linked above to fully understand implications and risks related to this option.
The clusterctl command is designed to work with all the providers compliant with the rules defined in the clusterctl provider contract .
Bootstrap providers SHOULD implement a BootstrapConfig resource using Kubernetes’ CustomResourceDefinition (CRD).
The goal of a BootstrapConfig resource is to generates bootstrap data that is used to bootstrap a Kubernetes node.
These may be e.g. cloud-init scripts.
The BootstrapConfig resource will be referenced by one of the Cluster API core resources, Machine.
The Machine’s controller will be responsible to coordinate operations of the BootstrapConfig,
and the interaction between the Machine’s controller and the BootstrapConfig resource is based on the contract
rules defined in this page.
Once contract rules are satisfied by a BootstrapConfig implementation, other implementation details
could be addressed according to the specific needs (Cluster API is not prescriptive).
Nevertheless, it is always recommended to take a look at Cluster API controllers,
in-tree providers, other providers and use them as a reference implementation (unless custom solutions are required
in order to address very specific needs).
In order to facilitate the initial design for each BootstrapConfig resource, a few implementation best practices
are explicitly called out in dedicated pages.
When developing a provider, you MUST consider any Cluster API behaviour that is not defined by a contract rule
as a Cluster API internal implementation detail, and internal implementation details can change at any time.
Accordingly, in order to not expose users to the risk that your provider breaks when the Cluster API internal behavior
changes, you MUST NOT rely on any Cluster API internal behaviour when implementing a BootstrapConfig resource.
Instead, whenever you need something more from the Cluster API contract, you MUST engage the community.
The Cluster API maintainers welcome feedback and contributions to the contract in order to improve how it’s defined,
its clarity and visibility to provider implementers and its suitability across the different kinds of Cluster API providers.
To provide feedback or open a discussion about the provider contract please open an issue on the Cluster API
repo or add an item to the agenda in the Cluster API community meeting .
Note:
All resources refers to all the provider’s resources “core” Cluster API interacts with;
In the context of this page: BootstrapConfig, BootstrapConfigTemplate and corresponding list types
All resources MUST be namespace-scoped.
All resources MUST have the standard Kubernetes TypeMeta and ObjectMeta fields.
In Kubernetes APIVersion is a combination of API group and version.
Special consideration MUST applies to both API group and version for all the resources Cluster API interacts with.
The domain for Cluster API resources is cluster.x-k8s.io, and bootstrap providers under the Kubernetes SIGS org
generally use bootstrap.cluster.x-k8s.io as API group.
If your provider uses a different API group, you MUST grant full read/write RBAC permissions for resources in your API group
to the Cluster API core controllers. If any resource sets another resource as the owner with blockOwnerDeletion set,
additional RBAC to update finalizers on the owner resource is required.
The canonical way to do so is via a ClusterRole resource with the aggregation label cluster.x-k8s.io/aggregate-to-manager: "true".
The following is an example ClusterRole for a FooConfig resource in the bootstrap.foo.com API group:
apiVersion: rbac.authorization.k8s.io/v1
kind: ClusterRole
metadata:
name: capi-foo-clusters
labels:
cluster.x-k8s.io/aggregate-to-manager: "true"
rules:
- apiGroups:
- bootstrap.foo.com
resources:
- fooconfig
- fooconfigtemplates
verbs:
- create
- delete
- get
- list
- patch
- update
- watch
Note: The write permissions are required because Cluster API manages BootstrapConfig generated from BootstrapConfigTemplates;
when using ClusterClass and managed topologies, also BootstrapConfigTemplates are managed directly by Cluster API.
The resource Version defines the stability of the API and its backward compatibility guarantees.
Examples include v1alpha1, v1beta1, v1, etc. and are governed by the Kubernetes API Deprecation Policy .
Your provider SHOULD abide by the same policies.
Note: The version of your provider does not need to be in sync with the version of core Cluster API resources.
Instead, prefer choosing a version that matches the stability of the provider API and its backward compatibility guarantees.
Additionally:
Providers MUST set cluster.x-k8s.io/<version> label on the BootstrapConfig Custom Resource Definitions.
The label is a map from a Cluster API contract version to your Custom Resource Definition versions.
The value is an underscore-delimited (_) list of versions. Each value MUST point to an available version in your CRD Spec.
The label allows Cluster API controllers to perform automatic conversions for object references, the controllers will pick
the last available version in the list if multiple versions are found.
To apply the label to CRDs it’s possible to use labels in your kustomization.yaml file, usually in config/crd:
labels:
- pairs:
cluster.x-k8s.io/v1beta1: v1beta1
cluster.x-k8s.io/v1beta2: v1beta2
An example of this is in the Kubeadm Bootstrap provider .
If the provider implements the clusterctl provider contract , the contract version defined in the
label above must be consistent with the contract version defined in the metadata.yaml file.
You MUST define a BootstrapConfig resource.
The BootstrapConfig resource name must have the format produced by sigs.k8s.io/cluster-api/util/contract.CalculateCRDName(Group, Kind).
Note: Cluster API is using such a naming convention to avoid an expensive CRD lookup operation when looking for labels from
the CRD definition of the BootstrapConfig resource.
It is a generally applied convention to use names in the format ${env}Config, where ${env} is a, possibly short, name
for the bootstrapper in question. For example KubeadmConfig is an implementation for kubeadm.
// +kubebuilder:object:root=true
// +kubebuilder:resource:path=fooconfig,scope=Namespaced,categories=cluster-api
// +kubebuilder:storageversion
// +kubebuilder:subresource:status
// FooConfig is the Schema for fooconfig.
type FooConfig struct {
metav1.TypeMeta `json:",inline"`
metav1.ObjectMeta `json:"metadata,omitempty"`
Spec FooConfigSpec `json:"spec,omitempty"`
Status FooConfigStatus `json:"status,omitempty"`
}
type FooConfigSpec struct {
// See other rules for more details about mandatory/optional fields in BootstrapConfig spec.
// Other fields SHOULD be added based on the needs of your provider.
}
type FooConfigStatus struct {
// See other rules for more details about mandatory/optional fields in BootstrapConfig status.
// Other fields SHOULD be added based on the needs of your provider.
}
For each BootstrapConfig resource, you MUST also add the corresponding list resource.
The list resource MUST be named as <BootstrapConfig>List.
// +kubebuilder:object:root=true
// FooConfigList contains a list of fooconfig.
type FooConfigList struct {
metav1.TypeMeta `json:",inline"`
metav1.ListMeta `json:"metadata,omitempty"`
Items []FooConfig `json:"items"`
}
Each BootstrapConfig MUST store generated bootstrap data into a Kubernetes Secret and surface the secret name in .status.dataSecretName.
type FooConfigStatus struct {
// dataSecretName is the name of the secret that stores the bootstrap data script.
// +optional
// +kubebuilder:validation:MinLength=1
// +kubebuilder:validation:MaxLength=253
DataSecretName string `json:"dataSecretName,omitempty"`
// See other rules for more details about mandatory/optional fields in BootstrapConfig status.
// Other fields SHOULD be added based on the needs of your provider.
}
The Secret containing bootstrap data must:
Use the API resource’s status.dataSecretName for its name
Have the label cluster.x-k8s.io/cluster-name set to the name of the cluster
Have a controller owner reference to the API resource
Have a single key, value, containing the bootstrap data
Note: because the dataSecretName is part of status, this value must be deterministically recreatable from the data in the
Cluster, Machine, and/or bootstrap resource. If the name is randomly generated, it is not always possible to move
the resource and its associated secret from one management cluster to another.
When the Secret is created its name MUST surface in the status.dataSecretName field of the BootstrapConfig resource;
the Machine controller will surface this info in Machine’s spec.boostrap.dataSecretName when BootstrapConfig: initialization completed .
Each BootstrapConfig MUST report when the bootstrap data secret is fully provisioned (initialization) by setting
status.initialization.dataSecretCreated in the BootstrapConfig resource.
type FooConfigStatus struct {
// initialization provides observations of the FooConfig initialization process.
// NOTE: Fields in this struct are part of the Cluster API contract and are used to orchestrate initial Machine provisioning.
// +optional
Initialization FooConfigInitializationStatus `json:"initialization,omitempty,omitzero"`
// See other rules for more details about mandatory/optional fields in BootstrapConfig status.
// Other fields SHOULD be added based on the needs of your provider.
}
// FooConfigInitializationStatus provides observations of the FooConfig initialization process.
// +kubebuilder:validation:MinProperties=1
type FooConfigInitializationStatus struct {
// dataSecretCreated is true when the Machine's boostrap secret is created.
// NOTE: this field is part of the Cluster API contract, and it is used to orchestrate initial Machine provisioning.
// +optional
DataSecretCreated *bool `json:"dataSecretCreated,omitempty"`
}
Once status.initialization.dataSecretCreated the Machine “core” controller will bubble up this info in Machine’s
status.initialization.bootstrapDataSecretCreated; also BootstrapConfig’s status.dataSecretName will be surfaced
on Machine’s corresponding fields at the same time.
In order to ease the transition for providers, the v1beta2 version of the Cluster API contract temporarily
preserves compatibility with the deprecated v1beta1 contract; compatibility will be removed tentatively in April 2027.
With regards to initialization completed:
Cluster API will continue to temporarily support BootstrapConfig resources using the status.ready field to
report initialization completed.
After compatibility with the deprecated v1beta1 contract will be removed, status.ready field in
the BootstrapConfig resource will be ignored.
According to Kubernetes API Conventions , Conditions provide a standard mechanism for higher-level
status reporting from a controller.
Providers implementers SHOULD implement status.conditions for their BootstrapConfig resource.
In case conditions are implemented on a BootstrapConfig resource, Cluster API will only consider conditions providing the following information:
type (required)status (required, one of True, False, Unknown)reason (optional, if omitted a default one will be used)message (optional, if omitted an empty message will be used)lastTransitionTime (optional, if omitted time.Now will be used)observedGeneration (optional, if omitted the generation of the BootstrapConfig resource will be used)
Other fields will be ignored.
If a condition with type Ready exist, such condition will be mirrored in Machine’s BootstrapConfigReady condition.
Please note that the Ready condition is expected to surface the status of the BootstrapConfig during its own entire lifecycle,
including initial provisioning, but not limited to that.
See Improving status in CAPI resources for more context.
In order to ease the transition for providers, the v1beta2 version of the Cluster API contract temporarily
preserves compatibility with the deprecated v1beta1 contract; compatibility will be removed tentatively in April 2027.
With regards to conditions:
Cluster API will continue to read conditions from providers using deprecated Cluster API condition types.
Please note that provider that will continue to use deprecated Cluster API condition types MUST carefully take into account
the implication of this choice which are described both in the Cluster API v1.11 migration notes and in the Improving status in CAPI resources proposal.
Starting from the v1beta2 contract version, there is no more special treatment for provider’s terminal failures within Cluster API.
In case necessary, “terminal failures” should be surfaced using conditions, with a well documented type/reason;
it is up to consumers to treat them accordingly.
See Improving status in CAPI resources for more context.
In order to ease the transition for providers, the v1beta2 version of the Cluster API contract temporarily
preserves compatibility with the deprecated v1beta1 contract; compatibility will be removed tentatively in April 2027.
With regards to terminal failures:
In case a Bootstrap provider reports that a BootstrapConfig resource is in a state that cannot be recovered (terminal failure) by
setting status.failureReason and status.failureMessage as defined by the deprecated v1beta1 contract,
the “core” Machine controller will surface those info in the corresponding fields within in Machine’s status.deprecated.v1beta1 struct.
However, those info won’t have any impact on the Machine lifecycle as before (the Machine controller won’t consider the
presence of status.failureReason and status.failureMessage info as “terminal failures”; similarly, the
MachineHealthCheck controller won’t consider the presence of status.failureReason and status.failureMessage to
determine when a Machine needs remediation).
After compatibility with the deprecated v1beta1 contract will be removed, status.failureReason and status.failureMessage
fields in the BootstrapConfig resource will be ignored and Machine’s status.deprecated.v1beta1 struct will be dropped.
In case you are developing an bootstrap config provider with support for in-place updates of the Machine configuration,
you should consider following recommendations during implementation.
The Update Extension is the component responsible for orchestrating in-place changes on Machines.
Accordingly, the BootstrapConfig controller should ignore in-place changes and do not re-generate the bootstrap config.
It might be useful to start thinking about the BootstrapConfig API surface as a set of fields with one of the following behaviors:
“Immutable” fields that can only be changed by performing a rollout.
“Mutable” fields that will be “reconciled” by the Update Extension.
The validation webhook for the BootstrapConfig CR should allow changes to “mutable” fields; in case a bootstrap config provider
wants to allow this change selectively, e.g. only when applied by core CAPI, please reach out to maintainers to discuss options.
Please note that the above field classification do not apply to the BootstrapConfigTemplate object.
See Proposal .
For a given BootstrapConfig resource, you MUST also add a corresponding BootstrapConfigTemplate resources in order to use it
when defining set of machines, e.g. MachineDeployments.
The template resource MUST be named as <BootstrapConfig>Template.
// +kubebuilder:object:root=true
// +kubebuilder:resource:path=fooconfigtemplates,scope=Namespaced,categories=cluster-api
// +kubebuilder:storageversion
// FooConfigTemplate is the Schema for the fooconfigtemplates API.
type FooConfigTemplate struct {
metav1.TypeMeta `json:",inline"`
metav1.ObjectMeta `json:"metadata,omitempty"`
Spec FooConfigTemplateSpec `json:"spec,omitempty"`
}
type FooConfigTemplateSpec struct {
Template FooConfigTemplateResource `json:"template"`
}
type FooConfigTemplateResource struct {
// Standard object's metadata.
// More info: https://git.k8s.io/community/contributors/devel/sig-architecture/api-conventions.md#metadata
// +optional
ObjectMeta clusterv1.ObjectMeta `json:"metadata,omitempty,omitzero"`
Spec FooConfigSpec `json:"spec"`
}
NOTE: in this example BootstrapConfigTemplate’s spec.template.spec embeds FooConfigSpec from BootstrapConfig. This might not always be
the best choice depending of if/how BootstrapConfig’s spec fields applies to many machines vs only one.
For each BootstrapConfigTemplate resource, you MUST also add the corresponding list resource.
The list resource MUST be named as <BootstrapConfigTemplate>List.
// +kubebuilder:object:root=true
// FooConfigTemplateList contains a list of FooConfigTemplates.
type FooConfigTemplateList struct {
metav1.TypeMeta `json:",inline"`
metav1.ListMeta `json:"metadata,omitempty"`
Items []FooConfigTemplate `json:"items"`
}
When Cluster API’s topology controller is trying to identify differences between templates defined in a ClusterClass and
the current Cluster topology, it is required to run Server Side Apply (SSA) dry run call.
However, in case you immutability checks for your BootstrapConfigTemplate, this can lead the SSA dry run call to errors.
In order to avoid this BootstrapConfigTemplate MUST specifically implement support for SSA dry run calls from the topology controller.
The implementation requires to use controller runtime’s CustomValidator, available in CR versions >= v0.12.3.
This will allow to skip the immutability check only when the topology controller is dry running while preserving the
validation behavior for all other cases.
See the DockerMachineTemplate webhook as a reference for a compatible implementation.
A bootstrap provider’s bootstrap data must create /run/cluster-api/bootstrap-success.complete
(or C:\run\cluster-api\bootstrap-success.complete for Windows machines) upon successful bootstrapping of a Kubernetes node.
This allows infrastructure providers to detect and act on bootstrap failures.
A bootstrap provider can optionally taint worker nodes at creation with node.cluster.x-k8s.io/uninitialized:NoSchedule.
This taint is used to prevent workloads to be scheduled on Nodes before the node is initialized by Cluster API.
As of today the Node initialization consists of syncing labels from Machines to Nodes. Once the labels have been
initially synced the taint is removed from the Node.
Cluster API does not support running multiples instances of the same provider, which someone can
assume an alternative solution to implement multi tenancy; same applies to the clusterctl CLI.
See Support running multiple instances of the same provider for more context.
However, if you want to make it possible for users to run multiples instances of your provider, your controller’s SHOULD:
support the --namespace flag.
support the --watch-filter flag.
Please, read carefully the page linked above to fully understand implications and risks related to this option.
The clusterctl command is designed to work with all the providers compliant with the rules defined in the clusterctl provider contract .
Providers SHOULD implement the pause behaviour for every object with a reconciliation loop. This is done by checking if spec.paused is set on the Cluster object and by checking for the cluster.x-k8s.io/paused annotation on the BootstrapConfig object.
If implementing the pause behavior, providers SHOULD surface the paused status of an object using the Paused condition: Status.Conditions[Paused].
A bootstrap provider must respond to changes to its BootstrapConfig resources. This process is
typically called reconciliation. The provider must watch for new, updated, and deleted resources and respond
accordingly.
As a reference you can look at the following workflow to understand how the typical reconciliation workflow
is implemented in BootstrapConfig controllers:
A bootstrap provider must respond to changes to its bootstrap resources. This process is
typically called reconciliation. The provider must watch for new, updated, and deleted resources and respond
accordingly.
The following diagram shows the typical logic for a bootstrap provider:
If the resource does not have a Machine owner, exit the reconciliation
The Cluster API Machine reconciler populates this based on the value in the Machine‘s spec.bootstrap.configRef
field.
If the Cluster to which this resource belongs cannot be found, exit the reconciliation
Deterministically generate the name for the bootstrap data secret
Try to retrieve the Secret with the name from the previous step
If it does not exist, generate bootstrap data and create the Secret
Set status.dataSecretName to the generated name
Set status.initialization.dataSecretCreated to true
Patch the resource to persist changes
Control plane providers MUST implement a ControlPlane resource using Kubernetes’ CustomResourceDefinition (CRD).
The goal of a ControlPlane resource is to instantiate a Kubernetes control plane; a Kubernetes control plane
at least contains the following components:
Kubernetes API Server
Kubernetes Controller Manager
Kubernetes Scheduler
etcd (if not externally managed)
Optional control plane components are
Cloud controller manager
Cluster DNS (e.g. CoreDNS)
Service proxy (e.g. kube-proxy)
Instead, CNI should be left to users to apply once the control plane is instantiated.
The ControlPlane resource will be referenced by one of the Cluster API core resources, Cluster.
The Cluster’s controller will be responsible to coordinate operations of the ControlPlane,
and the interaction between the Cluster’s controller and the ControlPlane resource is based on the contract
rules defined in this page.
Once contract rules are satisfied by a ControlPlane implementation, other implementation details
could be addressed according to the specific needs (Cluster API is not prescriptive).
Nevertheless, it is always recommended to take a look at Cluster API controllers,
in-tree providers, other providers and use them as a reference implementation (unless custom solutions are required
in order to address very specific needs).
In order to facilitate the initial design for each ControlPlane resource, a few implementation best practices
are explicitly called out in dedicated pages.
On top of that special consideration MUST be done to ensure
security around private key material required to create and run the Kubernetes control plane.
When developing a provider, you MUST consider any Cluster API behaviour that is not defined by a contract rule
as a Cluster API internal implementation detail, and internal implementation details can change at any time.
Accordingly, in order to not expose users to the risk that your provider breaks when the Cluster API internal behavior
changes, you MUST NOT rely on any Cluster API internal behaviour when implementing a ControlPlane resource.
Instead, whenever you need something more from the Cluster API contract, you MUST engage the community.
The Cluster API maintainers welcome feedback and contributions to the contract in order to improve how it’s defined,
its clarity and visibility to provider implementers and its suitability across the different kinds of Cluster API providers.
To provide feedback or open a discussion about the provider contract please open an issue on the Cluster API
repo or add an item to the agenda in the Cluster API community meeting .
All resources MUST be namespace-scoped.
All resources MUST have the standard Kubernetes TypeMeta and ObjectMeta fields.
In Kubernetes APIVersion is a combination of API group and version.
Special consideration MUST applies to both API group and version for all the resources Cluster API interacts with.
The domain for Cluster API resources is cluster.x-k8s.io, and control plane providers under the Kubernetes SIGS org
generally use controlplane.cluster.x-k8s.io as API group.
If your provider uses a different API group, you MUST grant full read/write RBAC permissions for resources in your API group
to the Cluster API core controllers. If any resource sets another resource as the owner with blockOwnerDeletion set,
additional RBAC to update finalizers on the owner resource is required.
The canonical way to do so is via a ClusterRole resource with the aggregation label cluster.x-k8s.io/aggregate-to-manager: "true".
The following is an example ClusterRole for a FooControlPlane resource in the controlplane.foo.com API group:
apiVersion: rbac.authorization.k8s.io/v1
kind: ClusterRole
metadata:
name: capi-foo-controlplane
labels:
cluster.x-k8s.io/aggregate-to-manager: "true"
rules:
- apiGroups:
- controlplane.foo.com
resources:
- foocontrolplanes
verbs:
- create
- delete
- get
- list
- patch
- update
- watch
- apiGroups:
- controlplane.foo.com
resources:
- foocontrolplanetemplates
verbs:
- get
- list
- patch
- update
- watch
Note: The write permissions allow the Cluster controller to set owner references and labels on the ControlPlane resources;
write permissions are not used for general mutations of ControlPlane resources, unless specifically required (e.g. when
using ClusterClass and managed topologies).
The resource Version defines the stability of the API and its backward compatibility guarantees.
Examples include v1alpha1, v1beta1, v1, etc. and are governed by the Kubernetes API Deprecation Policy .
Your provider SHOULD abide by the same policies.
Note: The version of your provider does not need to be in sync with the version of core Cluster API resources.
Instead, prefer choosing a version that matches the stability of the provider API and its backward compatibility guarantees.
Additionally:
Providers MUST set cluster.x-k8s.io/<version> label on the InfraCluster Custom Resource Definitions.
The label is a map from a Cluster API contract version to your Custom Resource Definition versions.
The value is an underscore-delimited (_) list of versions. Each value MUST point to an available version in your CRD Spec.
The label allows Cluster API controllers to perform automatic conversions for object references, the controllers will pick
the last available version in the list if multiple versions are found.
To apply the label to CRDs it’s possible to use labels in your kustomization.yaml file, usually in config/crd:
labels:
- pairs:
cluster.x-k8s.io/v1beta1: v1beta1
cluster.x-k8s.io/v1beta2: v1beta2
An example of this is in the Kubeadm Bootstrap provider .
If the provider implements the [clusterctl provider contract], the contract version defined in the
label above must be consistent with the contract version defined in the metadata.yaml file.
You MUST define a ControlPlane resource.
The ControlPlane resource name must have the format produced by sigs.k8s.io/cluster-api/util/contract.CalculateCRDName(Group, Kind).
Note: Cluster API is using such a naming convention to avoid an expensive CRD lookup operation when looking for labels from
the CRD definition of the ControlPlane resource.
It is a generally applied convention to use names in the format ${env}ControlPlane, where ${env} is a, possibly short, name
for the control plane implementation in question. For example KubeadmControlPlane is an implementation of a control plane
using kubeadm as a bootstrapper tool.
// +kubebuilder:object:root=true
// +kubebuilder:resource:path=foocontrolplanes,shortName=foocp,scope=Namespaced,categories=cluster-api
// +kubebuilder:storageversion
// +kubebuilder:subresource:status
// FooControlPlane is the Schema for foocontrolplanes.
type FooControlPlane struct {
metav1.TypeMeta `json:",inline"`
metav1.ObjectMeta `json:"metadata,omitempty"`
Spec FooControlPlaneSpec `json:"spec,omitempty"`
Status FooControlPlaneStatus `json:"status,omitempty"`
}
type FooControlPlaneSpec struct {
// See other rules for more details about mandatory/optional fields in ControlPlane spec.
// Other fields SHOULD be added based on the needs of your provider.
}
type FooControlPlaneStatus struct {
// See other rules for more details about mandatory/optional fields in ControlPlane status.
// Other fields SHOULD be added based on the needs of your provider.
}
For each ControlPlane resource, you MUST also add the corresponding list resource.
The list resource MUST be named as <ControlPlane>List.
// +kubebuilder:object:root=true
// FooControlPlaneList contains a list of foocontrolplanes.
type FooControlPlaneList struct {
metav1.TypeMeta `json:",inline"`
metav1.ListMeta `json:"metadata,omitempty"`
Items []FooControlPlane `json:"items"`
}
Each Cluster needs a control plane endpoint to sit in front of control plane machines.
Control plane endpoint can be provided in three ways in Cluster API: by the users, by the control plane provider or
by the infrastructure provider.
In case you are developing a control plane provider which is responsible to provide a control plane endpoint for
each Cluster, the host and port of the generated control plane endpoint MUST surface on spec.controlPlaneEndpoint
in the ControlPlane resource.
type FooControlPlaneSpec struct {
// controlPlaneEndpoint represents the endpoint used to communicate with the control plane.
// +optional
ControlPlaneEndpoint APIEndpoint `json:"controlPlaneEndpoint,omitempty,omitzero"`
// See other rules for more details about mandatory/optional fields in ControlPlane spec.
// Other fields SHOULD be added based on the needs of your provider.
}
// APIEndpoint represents a reachable Kubernetes API endpoint.
// +kubebuilder:validation:MinProperties=1
type APIEndpoint struct {
// host is the hostname on which the API server is serving.
// +optional
// +kubebuilder:validation:MinLength=1
// +kubebuilder:validation:MaxLength=512
Host string `json:"host,omitempty"`
// port is the port on which the API server is serving.
// +optional
// +kubebuilder:validation:Minimum=1
// +kubebuilder:validation:Maximum=65535
Port int32 `json:"port,omitempty"`
}
Once spec.controlPlaneEndpoint is set on the ControlPlane resource and the ControlPlane: initialization completed ,
the Cluster controller will surface this info in Cluster’s spec.controlPlaneEndpoint.
If instead you are developing a control plane provider which is NOT responsible to provide a control plane endpoint,
the implementer should exit reconciliation until it sees Cluster’s spec.controlPlaneEndpoint populated.
In order to ease the transition for providers, the v1beta2 version of the Cluster API contract temporarily
preserves compatibility with the deprecated v1beta1 contract; compatibility will be removed tentatively in April 2027.
type FooControlPlaneSpec struct {
// controlPlaneEndpoint represents the endpoint used to communicate with the control plane.
// +optional
ControlPlaneEndpoint APIEndpoint `json:"controlPlaneEndpoint"`
// See other rules for more details about mandatory/optional fields in ControlPlane spec.
// Other fields SHOULD be added based on the needs of your provider.
}
// APIEndpoint represents a reachable Kubernetes API endpoint.
type APIEndpoint struct {
// host is the hostname on which the API server is serving.
Host string `json:"host"`
// port is the port on which the API server is serving.
Port int32 `json:"port"`
}
In case you are developing a control plane provider which allows control of the number of replicas of the
Kubernetes control plane instances in your control plane, following fields MUST be implemented in
the ControlPlane spec.
type FooControlPlaneSpec struct {
// replicas represent the number of desired replicas.
// This is a pointer to distinguish between explicit zero and not specified.
// +optional
Replicas *int32 `json:"replicas,omitempty"`
// See other rules for more details about mandatory/optional fields in ControlPlane spec.
// Other fields SHOULD be added based on the needs of your provider.
}
Following fields MUST be implemented in the ControlPlane status.
type FooControlPlaneStatus struct {
// selector is the label selector in string format to avoid introspection
// by clients, and is used to provide the CRD-based integration for the
// scale subresource and additional integrations for things like kubectl
// describe. The string will be in the same format as the query-param syntax.
// More info about label selectors: http://kubernetes.io/docs/user-guide/labels#label-selectors
// +optional
Selector string `json:"selector,omitempty"`
// replicas is the total number of machines targeted by this control plane
// (their labels match the selector).
// +optional
Replicas *int32 `json:"replicas,omitempty"`
// readyReplicas is the number of ready replicas for this ControlPlane. A machine is considered ready when Machine's Ready condition is true.
// +optional
ReadyReplicas *int32 `json:"readyReplicas,omitempty"`
// availableReplicas is the number of available replicas for this ControlPlane. A machine is considered available when Machine's Available condition is true.
// +optional
AvailableReplicas *int32 `json:"availableReplicas,omitempty"`
// upToDateReplicas is the number of up-to-date replicas targeted by this ControlPlane. A machine is considered available when Machine's UpToDate condition is true.
// +optional
UpToDateReplicas *int32 `json:"upToDateReplicas,omitempty"`
// See other rules for more details about mandatory/optional fields in ControlPlane status.
// Other fields SHOULD be added based on the needs of your provider.
}
As you might have already noticed from the status.selector field, the ControlPlane custom resource definition MUST
support the scale subresource with the following signature:
scale:
labelSelectorPath: .status.selector
specReplicasPath: .spec.replicas
statusReplicasPath: .status.replicas
status: {}
More information about the scale subresource can be found in the Kubernetes
documentation .
In order to ease the transition for providers, the v1beta2 version of the Cluster API contract temporarily
preserves compatibility with the deprecated v1beta1 contract; compatibility will be removed tentatively in April 2027.
With regards to v1beta1 replica counters, the Cluster controller with temporarily continue to read
status.readyReplicas, status.updatedReplicas and status.unavailableReplicas, even if the semantic of the
field might be different from what expected.
In case you are developing a control plane provider which allows control of the version of the
Kubernetes control plane instances in your control plane, following fields MUST be implemented in
the ControlPlane spec.
type FooControlPlaneSpec struct {
// version defines the desired Kubernetes version for the control plane.
// The value must be a valid semantic version; also if the value provided by the user does not start with the v prefix, it
// must be added.
// +required
// +kubebuilder:validation:MinLength=1
// +kubebuilder:validation:MaxLength=256
Version string `json:"version"`
// See other rules for more details about mandatory/optional fields in ControlPlane spec.
// Other fields SHOULD be added based on the needs of your provider.
}
ControlPlane providers MUST report version information in the ControlPlane status by implementing
at least one of the following fields.
status.versions is the preferred source of truth for surfacing control plane versions.
Entries in this list MUST be ordered from the older to the newer version.
Each entry MUST include a valid semantic version and if control of the number of replicas is supported
the number of replicas at that version must be set as well.
type FooControlPlaneStatus struct {
// versions is the aggregated Kubernetes versions in this control plane.
// +optional
// +listType=map
// +listMapKey=version
// +kubebuilder:validation:MinItems=1
// +kubebuilder:validation:MaxItems=100
Versions []clusterv1.StatusVersion `json:"versions,omitempty"`
// See other rules for more details about mandatory/optional fields in ControlPlane status.
// Other fields SHOULD be added based on the needs of your provider.
}
status.version can be used as an alternative or as a fallback mechanism, but support
for this field will be removed in the next Cluster API contract version.
type FooControlPlaneStatus struct {
// version represents the minimum Kubernetes version for the control plane machines
// in the cluster.
//
// Deprecated: This field is deprecated and is going to be removed in a future API version.
// Please use status.versions instead.
// +optional
// +kubebuilder:validation:MinLength=1
// +kubebuilder:validation:MaxLength=256
Version string `json:"version,omitempty"`
// See other rules for more details about mandatory/optional fields in ControlPlane status.
// Other fields SHOULD be added based on the needs of your provider.
}
NOTE: To align with API conventions, we recommend since the v1beta2 contract that the Version field should be
of type string (it was *string before). Both are compatible with the v1beta2 contract though.
NOTE: The minimum Kubernetes version, and more specifically the API server version, will be used to determine
when a control plane is fully upgraded and for enforcing Kubernetes version skew policies when a Cluster derived
from a ClusterClass is managed by the Topology controller.
In case you are developing a control plane provider which uses a Cluster API Machine object to represent each
control plane instance, the providers MUST set the cluster.x-k8s.io/control-plane label with an empty value on the created Machines.
Additionally following the fields MUST be implemented in
the ControlPlane spec.
type FooControlPlaneSpec struct {
// machineTemplate contains information about how machines
// should be shaped when creating or updating a control plane.
// +required
MachineTemplate FooControlPlaneMachineTemplate `json:"machineTemplate"`
// See other rules for more details about mandatory/optional fields in ControlPlane spec.
// Other fields SHOULD be added based on the needs of your provider.
}
type FooControlPlaneMachineTemplate struct {
// metadata is the standard object's metadata.
// More info: https://git.k8s.io/community/contributors/devel/sig-architecture/api-conventions.md#metadata
// +optional
ObjectMeta clusterv1.ObjectMeta `json:"metadata,omitempty,omitzero"`
// spec defines the spec for Machines of the control plane.
// +optional
Spec FooControlPlaneMachineTemplateSpec `json:"spec,omitempty,omitzero"`
}
type FooControlPlaneMachineTemplateSpec struct {
// infrastructureRef is a required reference to a custom infra machine template resource
// offered by an infrastructure provider.
// +required
InfrastructureRef clusterv1.ContractVersionedObjectReference `json:"infrastructureRef"`
// deletion contains configuration options for Machine deletion.
// +optional
Deletion FooControlPlaneMachineTemplateDeletionSpec `json:"deletion,omitempty,omitzero"`
}
// FooControlPlaneMachineTemplateDeletionSpec contains configuration options for Machine deletion.
// +kubebuilder:validation:MinProperties=1
type FooControlPlaneMachineTemplateDeletionSpec struct {
// nodeDrainTimeoutSeconds is the total amount of time that the controller will spend on draining a controlplane node
// The default value is 0, meaning that the node can be drained without any time limitations.
// NOTE: nodeDrainTimeoutSeconds is different from `kubectl drain --timeout`
// +optional
// +kubebuilder:validation:Minimum=0
NodeDrainTimeoutSeconds *int32 `json:"nodeDrainTimeoutSeconds,omitempty"`
// nodeVolumeDetachTimeoutSeconds is the total amount of time that the controller will spend on waiting for all volumes
// to be detached. The default value is 0, meaning that the volumes can be detached without any time limitations.
// +optional
// +kubebuilder:validation:Minimum=0
NodeVolumeDetachTimeoutSeconds *int32 `json:"nodeVolumeDetachTimeoutSeconds,omitempty"`
// nodeDeletionTimeoutSeconds defines how long the machine controller will attempt to delete the Node that the Machine
// hosts after the Machine is marked for deletion. A duration of 0 will retry deletion indefinitely.
// If no value is provided, the default value for this property of the Machine resource will be used.
// +optional
// +kubebuilder:validation:Minimum=0
NodeDeletionTimeoutSeconds *int32 `json:"nodeDeletionTimeoutSeconds,omitempty"`
// Other fields SHOULD be added based on the needs of your provider.
}
Please note that some of the above fields (metadata, nodeDrainTimeoutSeconds, nodeVolumeDetachTimeoutSeconds, nodeDeletionTimeoutSeconds)
must be propagated to machines without triggering rollouts.
See In place propagation of changes affecting Kubernetes objects only as well as Metadata propagation for more details.
In order to ease the transition for providers, the v1beta2 version of the Cluster API contract temporarily
preserves compatibility with the deprecated v1beta1 contract; compatibility will be removed tentatively in April 2027.
For reference. The v1beta1 contract had nodeDrainTimeout, nodeVolumeDetachTimeout, nodeDeletionTimeout fields
of type *metav1.Duration instead of the new fields with Seconds suffix of type *int32.
infrastructureRef was of type corev1.ObjectReference, the new field has the type clusterv1.ContractVersionedObjectReference.
In v1beta2 we also moved infrastructureRef into the newly introduced spec.machineTemplate.spec field and nodeDrainTimeoutSeconds,
nodeVolumeDetachTimeoutSeconds and nodeDeletionTimeoutSeconds into the newly introduced spec.machineTemplate.spec.deletion field.
In case you are developing a control plane provider that allows definition of machine readiness gates, you SHOULD also implement
the following spec.machineTemplate.spec field.
type FooControlPlaneMachineTemplateSpec struct {
// readinessGates specifies additional conditions to include when evaluating Machine Ready condition.
//
// This field can be used e.g. by Cluster API control plane providers to extend the semantic of the
// Ready condition for the Machine they control, like the kubeadm control provider adding ReadinessGates
// for the APIServerPodHealthy, SchedulerPodHealthy conditions, etc.
//
// Another example are external controllers, e.g. responsible to install special software/hardware on the Machines;
// they can include the status of those components with a new condition and add this condition to ReadinessGates.
//
// NOTE: This field is considered only for computing v1beta2 conditions.
// NOTE: In case readinessGates conditions start with the APIServer, ControllerManager, Scheduler prefix, and all those
// readiness gates condition are reporting the same message, when computing the Machine's Ready condition those
// readinessGates will be replaced by a single entry reporting "Control plane components: " + message.
// This helps to improve readability of conditions bubbling up to the Machine's owner resource / to the Cluster).
// +optional
// +listType=map
// +listMapKey=conditionType
// +kubebuilder:validation:MinItems=1
// +kubebuilder:validation:MaxItems=32
ReadinessGates []clusterv1.MachineReadinessGate `json:"readinessGates,omitempty"`
// See other rules for more details about mandatory/optional fields in ControlPlane spec.
// Other fields SHOULD be added based on the needs of your provider.
}
NOTE: In the v1beta1 contract the readinessGates field was located directly in the spec.machineTemplate field.
In case you are developing a control plane provider that allows definition of machine taints, you SHOULD also implement
the following spec.machineTemplate.spec field.
type FooControlPlaneMachineTemplateSpec struct {
// taints are the node taints that Cluster API will manage.
// This list is not necessarily complete: other Kubernetes components may add or remove other taints from nodes,
// e.g. the node controller might add the node.kubernetes.io/not-ready taint.
// Only those taints defined in this list will be added or removed by core Cluster API controllers.
//
// There can be at most 64 taints.
// A pod would have to tolerate all existing taints to run on the corresponding node.
//
// NOTE: This list is implemented as a "map" type, meaning that individual elements can be managed by different owners.
// +optional
// +listType=map
// +listMapKey=key
// +listMapKey=effect
// +kubebuilder:validation:MinItems=1
// +kubebuilder:validation:MaxItems=64
Taints []clusterv1.MachineTaint `json:"taints,omitempty"`
// See other rules for more details about mandatory/optional fields in ControlPlane spec.
// Other fields SHOULD be added based on the needs of your provider.
}
In case you are developing a control plane provider where control plane instances uses a Cluster API Machine
object to represent each control plane instance, but those instances do not show up as a Kubernetes node (for example,
managed control plane providers for AKS, EKS, GKE etc), you SHOULD also implement the following status field.
type FooControlPlaneStatus struct {
// externalManagedControlPlane is a bool that should be set to true if the Node objects do not exist in the cluster.
// +optional
ExternalManagedControlPlane *bool `json:"externalManagedControlPlane,omitempty"`
// See other rules for more details about mandatory/optional fields in ControlPlane status.
// Other fields SHOULD be added based on the needs of your provider.
}
NOTE: To align with API conventions, we recommend since the v1beta2 contract that the ExternalManagedControlPlane field should be
of type *bool (it was bool before). Both are compatible with the v1beta2 contract though.
Please note that by representing each control plane instance as Cluster API machine, each control plane instance
can benefit from several Cluster API behaviours, for example:
Machine provisioning workflow (in coordination with an InfraMachine and a BootstrapConfig of your choice)
Machine health checking
Machine drain and wait for volume detach during deletion
In case you are developing a control plane provider which supports scheduled rollout via
the rolloutAfter field, following fields MUST be implemented in the ControlPlane spec.
type FooControlPlaneSpec struct {
// rollout allows you to configure the behaviour of rolling updates to the control plane.
// +optional
Rollout FooControlPlaneRolloutSpec `json:"rollout,omitempty,omitzero"`
// See other rules for more details about mandatory/optional fields in ControlPlane status.
// Other fields SHOULD be added based on the needs of your provider.
}
// +kubebuilder:validation:MinProperties=1
type FooControlPlaneRolloutSpec struct {
// after is a field to indicate a rollout should be performed
// after the specified time even if no changes have been made to the
// FooControlPlane.
// Example: In the YAML the time can be specified in the RFC3339 format.
// To specify the rolloutAfter target as March 9, 2023, at 9 am UTC
// use "2023-03-09T09:00:00Z".
// +optional
After metav1.Time `json:"after,omitempty,omitzero"`
}
Each ControlPlane MUST report when the Kubernetes control plane is initialized; usually a control plane is considered
initialized when it can accept requests, no matter if this happens before the control plane is fully provisioned or not.
For example, in a highly available Kubernetes control plane with three instances of each component, usually the control plane
can be considered initialized after the first instance is up and running.
A ControlPlane reports when it is initialized by setting status.initialization.controlPlaneInitialized.
type FooControlPlaneStatus struct {
// initialization provides observations of the FooControlPlane initialization process.
// NOTE: Fields in this struct are part of the Cluster API contract and are used to orchestrate initial Cluster provisioning.
// +optional
Initialization FooControlPlaneInitializationStatus `json:"initialization,omitempty,omitzero"`
// See other rules for more details about mandatory/optional fields in ControlPlane status.
// Other fields SHOULD be added based on the needs of your provider.
}
// FooControlPlaneInitializationStatus provides observations of the FooControlPlane initialization process.
// +kubebuilder:validation:MinProperties=1
type FooControlPlaneInitializationStatus struct {
// controlPlaneInitialized is true when the control plane provider reports that the Kubernetes control plane is initialized;
// usually a control plane is considered initialized when it can accept requests, no matter if this happens before
// the control plane is fully provisioned or not.
// NOTE: this field is part of the Cluster API contract, and it is used to orchestrate initial Cluster provisioning.
// +optional
ControlPlaneInitialized *bool `json:"controlPlaneInitialized,omitempty"`
}
Once status.initialization.controlPlaneInitialized is set the Cluster “core” controller will bubble up this info in Cluster’s
status.initialization.controlPlaneInitialized field and in the ControlPlaneInitialized condition.
If defined, also ControlPlane’s spec.controlPlaneEndpoint will be surfaced on Cluster’s corresponding fields at the same time.
In order to ease the transition for providers, the v1beta2 version of the Cluster API contract temporarily
preserves compatibility with the deprecated v1beta1 contract; compatibility will be removed tentatively in April 2027.
With regards to initialization completed:
Cluster API will continue to temporarily support ControlPlane resource using the status.initialized field to
report initialization completed.
After compatibility with the deprecated v1beta1 contract will be removed, the status.initialized field in
the ControlPlane resource will be ignored.
In case a control plane provider would like to provide support for in-place updates, please check the proposal .
Supporting in-place updates requires:
implementing the call for the registered CanUpdateMachine hook when performing the “can update in-place” decision.
when it is decided to perform the in-place decision:
the machine spec must be updated to the desired state, as well as the spec for the corresponding infrastructure machine and bootstrap config
while updating those objects also the in-place-updates.internal.cluster.x-k8s.io/update-in-progress annotation must be set
once all objects are updated the UpdateMachine hook must be set as pending on the machine object
After above steps are completed, the machine controller will take over and complete the in-place upgrade.
Implementing the in-place update transition in a race condition-free, re-entrant way is more complex than it might seem.
Please read the proposal’s implementation notes
carefully.
Also, it is highly recommended to use the KCP implementation as a reference.
According to Kubernetes API Conventions , Conditions provide a standard mechanism for higher-level
status reporting from a controller.
Providers implementers SHOULD implement status.conditions for their ControlPlane resource.
In case conditions are implemented on a ControlPlane resource, Cluster API will only consider conditions providing the following information:
type (required)status (required, one of True, False, Unknown)reason (optional, if omitted a default one will be used)message (optional, if omitted an empty message will be used)lastTransitionTime (optional, if omitted time.Now will be used)observedGeneration (optional, if omitted the generation of the ControlPlane resource will be used)
Other fields will be ignored.
If a condition with type Available exist, such condition will be mirrored in Cluster’s ControlPlaneAvailable condition.
The Available condition is expected to properly represents the fact that a ControlPlane can be operational
even if there is a certain degree of not readiness / disruption in the system, or if lifecycle operations are happening.
Last, but not least, in order to ensure a consistent users experience, it is also recommended to consider aligning also other
ControlPlane conditions to conditions existing on other Cluster API objects.
For example KubeadmControlPlane implements the following conditions on top of the Available defined by this contract:
CertificatesAvailable, EtcdClusterAvailable, MachinesReady, MachinesUpToDate, RollingOut, ScalingUp, ScalingDown,
Remediating, Deleting, Paused.
Most notably, If RollingOut, ScalingUp, ScalingDown conditions are implemented, the Cluster controller is going to read
them to compute a Cluster level RollingOut, ScalingUp, ScalingDown condition including all the scalable resources.
See Improving status in CAPI resources for more context.
In order to ease the transition for providers, the v1beta2 version of the Cluster API contract temporarily
preserves compatibility with the deprecated v1beta1 contract; compatibility will be removed tentatively in April 2027.
With regards to conditions:
Cluster API will continue to read conditions from providers using deprecated Cluster API condition types.
Please note that provider that will continue to use deprecated Cluster API condition types MUST carefully take into account
the implication of this choice which are described both in the Cluster API v1.11 migration notes and in the Improving status in CAPI resources proposal.
Starting from the v1beta2 contract version, there is no more special treatment for provider’s terminal failures within Cluster API.
In case necessary, “terminal failures” should be surfaced using conditions, with a well documented type/reason;
it is up to consumers to treat them accordingly.
See Improving status in CAPI resources for more context.
In order to ease the transition for providers, the v1beta2 version of the Cluster API contract temporarily
preserves compatibility with the deprecated v1beta1 contract; compatibility will be removed tentatively in April 2027.
With regards to terminal failures:
In case a Control Plane provider reports that a ControlPlane resource is in a state that cannot be recovered (terminal failure) by
setting status.failureReason and status.failureMessage as defined by the deprecated v1beta1 contract,
the “core” Cluster controller will surface those info in the corresponding fields in the Cluster’s status.deprecated.v1beta1 struct.
However, those info won’t have any impact on the Cluster lifecycle as before (the Cluster controller won’t consider the
presence of status.failureReason and status.failureMessage info as “terminal failures”).
After compatibility with the deprecated v1beta1 contract will be removed, status.failureReason and status.failureMessage
fields in the ControlPlane resource will be ignored and Cluster’s status.deprecated.v1beta1 struct will be dropped.
For a given ControlPlane resource, you should also add a corresponding ControlPlaneTemplate resources in order to use it in ClusterClasses.
The template resource MUST be named as <ControlPlane>Template.
// +kubebuilder:object:root=true
// +kubebuilder:resource:path=foocontrolplanetemplates,scope=Namespaced,categories=cluster-api
// +kubebuilder:storageversion
// FooControlPlaneTemplate is the Schema for the fooclustertemplates API.
type FooControlPlaneTemplate struct {
metav1.TypeMeta `json:",inline"`
metav1.ObjectMeta `json:"metadata,omitempty"`
Spec FooControlPlaneTemplateSpec `json:"spec,omitempty"`
}
type FooControlPlaneTemplateSpec struct {
Template FooControlPlaneTemplateResource `json:"template"`
}
type FooControlPlaneTemplateResource struct {
// Standard object's metadata.
// More info: https://git.k8s.io/community/contributors/devel/sig-architecture/api-conventions.md#metadata
// +optional
ObjectMeta clusterv1.ObjectMeta `json:"metadata,omitempty,omitzero"`
Spec FooControlPlaneSpec `json:"spec"`
}
NOTE: in this example ControlPlaneTemplate’s spec.template.spec embeds FooControlPlaneSpec from ControlPlane. This might not always be
the best choice depending of if/how ControlPlane’s spec fields applies to many clusters vs only one.
For each ControlPlaneTemplate resource, you MUST also add the corresponding list resource.
The list resource MUST be named as <ControlPlaneTemplate>List.
// +kubebuilder:object:root=true
// FooControlPlaneTemplateList contains a list of FooControlPlaneTemplates.
type FooControlPlaneTemplateList struct {
metav1.TypeMeta `json:",inline"`
metav1.ListMeta `json:"metadata,omitempty"`
Items []FooControlPlaneTemplate `json:"items"`
}
Control Plane providers are expected to create and maintain a Kubeconfig secret for Cluster API to gain access to the
workload cluster.
Such secret might be used also by operators to gain initial access to the cluster, but this secret MUST not be shared
with other users or applications build on top of Cluster API. Instead, follow instruction in Certificate Management
to create custom certificates for additional users or other applications.
The kubeconfig secret MUST:
Be created in the same namespace where the Cluster exists
Be named <cluster>-kubeconfig
Have type cluster.x-k8s.io/secret
Be labelled with the key-pair cluster.x-k8s.io/cluster-name=${CLUSTER_NAME}.
Note: this label is required for the secret to be retrievable in the cache used by CAPI managers.
Have the base64 encoded kubeconfig in the field called value
Important! If a control plane provider uses client certificates for authentication in these Kubeconfigs, the client certificate
MUST be kept with a reasonably short expiration period and periodically regenerated to keep a valid set of credentials available.
As an example, the Kubeadm Control Plane provider uses a year of validity and refreshes the certificate after 6 months.
Control Plane providers are expected to create and maintain all the certificates required to create and run a Kubernetes cluster.
Cluster certificates MUST be stored as a secrets:
In the same namespace where the Cluster exists
Following a naming convention <cluster>-<certificate>; common certificate names are ca, etcd, proxy, sa
Have type cluster.x-k8s.io/secret
Be labelled with the key-pair cluster.x-k8s.io/cluster-name=${CLUSTER_NAME}.
Note: this label is required for the secret to be retrievable in the cache used by CAPI managers.
See Certificate Management for more context.
Control Plane providers are expected to place machines in failure domains defined in Cluster’s status.failureDomains field.
More specifically, Control Plane should be spread across failure domains specifically flagged to host control plane machines.
Cluster API defines rules to propagate metadata (labels and annotations) across the hierarchies of objects, down
to Machines and nodes.
In order to ensure a nice and consistent user experience across the entire Cluster, also ControlPlane providers
are expected to implement similar propagation rules for control plane machines.
See. Metadata propagation rules for more
details about how metadata should be propagated across the hierarchy of Cluster API objects (use KubeadmControlPlane as a reference).
Also, please note that metadata MUST be propagated to control plane instances machines without triggering rollouts.
See In place propagation of changes affecting Kubernetes objects only for more details.
See. Label and Annotations Sync Between Machines and underlying Kubernetes Nodes for more details about how metadata are
propagated to Kubernetes Nodes.
When the v1beta2 contract will be released (August 2025), Cluster API is going to standardize how
machines determine if they are available or up to date with the spec of the owner resource.
In order to ensure a nice and consistent user experience across the entire Cluster, also ControlPlane providers
are expected to align to this effort and implement the following behaviours:
Control plane providers will be expected to continuously set Machines spec.minReadySeconds and Machine’s
status.conditions[UpToDate] condition.
Please note that a CP provider implementation can decide to enforce spec.minReadySeconds to be 0 and do not
introduce a difference between readiness and availability or introduce it at a later stage (e.g. KCP will do this).
Additionally, please note that the spec.minReadySeconds field MUST be treated like other fields propagated /updated in place,
and thus propagated to Machines without triggering rollouts.
See Improving status in CAPI resources and In place propagation of changes affecting Kubernetes objects only for more context.
Cluster API does not support running multiples instances of the same provider, which someone can
assume an alternative solution to implement multi tenancy; same applies to the clusterctl CLI.
See Support running multiple instances of the same provider for more context.
However, if you want to make it possible for users to run multiples instances of your provider, your controller’s SHOULD:
support the --namespace flag.
support the --watch-filter flag.
Please, read carefully the page linked above to fully understand implications and risks related to this option.
The clusterctl command is designed to work with all the providers compliant with the rules defined in the [clusterctl provider contract].
Providers SHOULD implement the pause behaviour for every object with a reconciliation loop. This is done by checking if spec.paused is set on the Cluster object and by checking for the cluster.x-k8s.io/paused annotation on the ControlPlane object.
If implementing the pause behavior, providers SHOULD surface the paused status of an object using the Paused condition: Status.Conditions[Paused].
A control plane provider must respond to changes to its ControlPlane resources. This process is
typically called reconciliation. The provider must watch for new, updated, and deleted resources and respond
accordingly.
As a reference you can look at the following workflow to understand how the typical reconciliation workflow
is implemented in ControlPlane controllers:
The clusterctl command is designed to work with all the providers compliant with the following rules.
Each provider MUST define a provider repository , that is a well-known place where the release assets for
a provider are published.
The provider repository MUST contain the following files:
The metadata YAML
The components YAML
Additionally, the provider repository SHOULD contain the following files:
Workload cluster templates
Optionally, the provider repository can include the following files:
The clusterctl command ships with a pre-defined list of provider repositories that allows a simpler “out-of-the-box” user experience.
As a provider implementer, if you are interested in being added to this list, please see next paragraph.
As a Cluster API project, we always have been more than happy to give visibility to all the open source CAPI providers
by allowing provider’s maintainers to add their own project to the pre-defined list of provider shipped with clusterctl.
Provider’s maintainer are the ultimately responsible for their own project.
Adding a provider to the clusterctl provider list does not imply any form of quality assessment, market screening,
entitlement, recognition or support by the Cluster API maintainers.
This is the process to add a new provider to the pre-defined list of providers shipped with clusterctl:
As soon as possible, create an issue to the Cluster API repository declaring the intent to add a new provider;
each provider must have a unique name & type in the pre-defined list of providers shipped with clusterctl; the provider’s name
must be declared in the issue above and abide to the following naming convention:
The name must consist of lower case alphanumeric characters or ‘-’, and must start and end with an alphanumeric character. If the name includes upper case alphanumeric characters, clusterctl enforces it lower case it.
The name length should not exceed 63 characters.
For providers not in the kubernetes-sigs org, in order to prevent conflicts the clusterctl name must be prefixed with
the provider’s GitHub org name followed by - (see note below).
Create a PR making the necessary changes to clusterctl and the Cluster API book, e.g. #9798 ,
9720 .
The Cluster API maintainers will review issues/PRs for adding new providers. If the PR merges before code freeze deadline
for the next Cluster API minor release, changes will be included in the release, otherwise in the next minor
release. Maintainers will also consider if possible/convenient to backport to the current Cluster API minor release
branch to include it in the next patch release.
Closed source provider can not be added to the pre-defined list of provider shipped with clusterctl, however,
those providers could be used with clusterctl by changing the clusterctl configuration .
The need to add a prefix for providers not in the kubernetes-sigs org applies to all the providers being added to
clusterctl‘s pre-defined list of provider starting from January 2024. This rule doesn’t apply retroactively
to the existing pre-defined providers, but we reserve the right to reconsider this in the future.
In the case of a provider being developed by an entity that owns multiple GitHub orgs, then it is up to the
provider to specify which of GitHub org to use as a prefix and it is the responsibility of the entity to avoid
or address provider name conflicts.
If prefixing the provider with the provider’s GitHub org prefix leads to stuttering, e.g. an example provider
from the example GitHub org would lead to example-example, then it is acceptable to omit the prefix.
Please note that the need to add a prefix for providers not in the kubernetes-sigs org does not apply to providers added by
changing the clusterctl configuration .
You can use a GitHub release to package your provider artifacts for other people to use.
A GitHub release can be used as a provider repository if:
The release tag is a valid semantic version number
The components YAML, the metadata YAML and eventually the workload cluster templates are included into the release assets.
See the GitHub docs for more information
about how to create a release.
Per default clusterctl will use a go proxy to detect the available versions to prevent additional
API calls to the GitHub API. It is possible to configure the go proxy url using the GOPROXY variable as
for go itself (defaults to https://proxy.golang.org).
To immediately fallback to the GitHub client and not use a go proxy, the environment variable could get set to
GOPROXY=off or GOPROXY=direct.
If a provider does not follow Go’s semantic versioning, clusterctl may fail when detecting the correct version.
In such cases, disabling the go proxy functionality via GOPROXY=off should be considered.
You can use a GitLab generic packages for provider artifacts.
A provider url should be in the form
https://{host}/api/v4/projects/{projectSlug}/packages/generic/{packageName}/{defaultVersion}/{componentsPath}, where:
{host} should start with gitlab. (gitlab.com, gitlab.example.org, ...){projectSlug} is either a project id (42) or escaped full path (myorg%2Fmyrepo){defaultVersion} is a valid semantic version numberThe components YAML, the metadata YAML and eventually the workload cluster templates are included into the same package version
See the GitLab docs for more information
about how to create a generic package.
If you are hosting a private Gitlab repository, you can use a personal access token or project access token to access the provider artifacts by adding the gitlab-access-token variable to the clusterctl configuration in order to authenticate against the GitLab API.
This can be used in conjunction with GitLabracadabra
to avoid direct internet access from clusterctl, and use GitLab as artifacts repository. For example,
for the core provider:
Use the following action file :
external-packages/cluster-api:
packages_enabled: true
package_mirrors:
- github:
full_name: kubernetes-sigs/cluster-api
tags:
- v1.2.3
assets:
- clusterctl-linux-amd64
- core-components.yaml
- bootstrap-components.yaml
- control-plane-components.yaml
- metadata.yaml
Use the following clusterctl configuration
providers:
# override a pre-defined provider on a self-host GitLab
- name: "cluster-api"
url: "https://gitlab.example.com/api/v4/projects/external-packages%2Fcluster-api/packages/generic/cluster-api/v1.2.3/core-components.yaml"
type: "CoreProvider"
Limitation: Provider artifacts hosted on GitLab don’t support getting all versions.
As a consequence, you need to set version explicitly for upgrades.
clusterctl supports reading from a repository defined on the local file system.
A local repository can be defined by creating a <provider-label> folder with a <version> sub-folder for each hosted release;
the sub-folder name MUST be a valid semantic version number. e.g.
~/local-repository/infrastructure-aws/v0.5.2
Each version sub-folder MUST contain the corresponding components YAML, the metadata YAML and eventually the workload cluster templates.
The provider is required to generate a metadata YAML file and publish it to the provider’s repository.
The metadata YAML file documents the release series of each provider and maps each release series to an API Version of Cluster API (contract).
For example, for Cluster API:
apiVersion: clusterctl.cluster.x-k8s.io/v1alpha3
kind: Metadata
releaseSeries:
- major: 0
minor: 3
contract: v1alpha3
- major: 0
minor: 2
contract: v1alpha2
The contract version for a specific release series must match the contract version that is declared in the CRD for different provider’s objects.
More specifically, you can consider the contract version in metadata.yaml as a “preview” of the contract version supported by the provider,
but this value is used only during clusterctl init or clusterctl upgrade, not at runtime.
At runtime, the system will use the contract version that is defined in the provider’s CRD that are installed in the cluster.
See contract rules for different providers for more details.
Starting from clusterctl v1.11, the metadata YAML file is subject to strict validation to ensure consistency and prevent configuration errors. The following validation rules are enforced:
apiVersion : Must be set to clusterctl.cluster.x-k8s.io/v1alpha3
This ensures compatibility with the current clusterctl metadata format
kind : Must be set to Metadata
This identifies the resource type correctly
releaseSeries : Must contain at least one entry
This ensures providers properly document their version compatibility
These validation rules help catch configuration issues early and provide clear error messages to assist in troubleshooting.
The provider is required to generate a components YAML file and publish it to the provider’s repository.
This file is a single YAML with all the components required for installing the provider itself (CRDs, Controller, RBAC etc.).
The following rules apply:
It is strongly recommended that:
Core providers release a file called core-components.yaml
Infrastructure providers release a file called infrastructure-components.yaml
Bootstrap providers release a file called bootstrap-components.yaml
Control plane providers release a file called control-plane-components.yaml
IPAM providers release a file called ipam-components.yaml
Runtime extensions providers release a file called runtime-extension-components.yaml
Add-on providers release a file called addon-components.yaml
The instance components should contain one Namespace object, which will be used as the default target namespace
when creating the provider components.
All the objects in the components YAML MUST belong to the target namespace, with the exception of objects that
are not namespaced, like ClusterRoles/ClusterRoleBinding and CRD objects.
If the generated component YAML doesn’t contain a Namespace object, the user will be required to provide one to clusterctl init
using the --target-namespace flag.
In case there is more than one Namespace object in the components YAML, clusterctl will generate an error and abort
the provider installation.
Each provider is expected to deploy controllers/runtime extension server using a Deployment.
While defining the Deployment Spec, the container that executes the controller/runtime extension server binary MUST be called manager.
For controllers only, the manager MUST support a --namespace flag for specifying the namespace where the controller
will look for objects to reconcile; however, clusterctl will always install providers watching for all namespaces
(--namespace=""); for more details see support for multiple instances
for more context.
While defining Pods for Deployments, canonical names should be used for images.
The components YAML can contain environment variables matching the format ${VAR}; it is highly
recommended to prefix the variable name with the provider name e.g. ${AWS_CREDENTIALS}
clusterctl currently supports variables with leading/trailing spaces such
as: ${ VAR }, ${ VAR},${VAR }.
Formats such as ${VAR$FOO} are not supported.
clusterctl uses the library drone/envsubst to perform
variable substitution.
# If `VAR` is not set or empty, the default value is used. This is true for
# all the following formats.
${VAR:=default}
${VAR=default}
${VAR:-default}
Other functions such as substring replacement are also supported by the
library. See drone/envsubst for more information.
Additionally, each provider should create user facing documentation with the list of required variables and with all the additional
notes that are required to assist the user in defining the value for each variable.
The components YAML components should be labeled with
cluster.x-k8s.io/provider and the name of the provider. This will enable an
easier transition from kubectl apply to clusterctl.
As a reference you can consider the labels applied to the following
providers.
Provider Name Label
CAPI cluster.x-k8s.io/provider=cluster-api CABPK cluster.x-k8s.io/provider=bootstrap-kubeadm CABPM cluster.x-k8s.io/provider=bootstrap-microk8s CABPKK3S cluster.x-k8s.io/provider=bootstrap-kubekey-k3s CABPK0S cluster.x-k8s.io/provider=bootstrap-k0smotron CACPK cluster.x-k8s.io/provider=control-plane-kubeadm CACPM cluster.x-k8s.io/provider=control-plane-microk8s CACPN cluster.x-k8s.io/provider=control-plane-nested CACPKK3S cluster.x-k8s.io/provider=control-plane-kubekey-k3s CACPK0S cluster.x-k8s.io/provider=control-plane-k0smotron CAPA cluster.x-k8s.io/provider=infrastructure-aws CAPB cluster.x-k8s.io/provider=infrastructure-byoh CAPC cluster.x-k8s.io/provider=infrastructure-cloudstack CAPCS cluster.x-k8s.io/provider=infrastructure-cloudscale-ch-cloudscale CAPD cluster.x-k8s.io/provider=infrastructure-docker CAPDO cluster.x-k8s.io/provider=infrastructure-digitalocean CAPG cluster.x-k8s.io/provider=infrastructure-gcp CAPH cluster.x-k8s.io/provider=infrastructure-hetzner CAPHV cluster.x-k8s.io/provider=infrastructure-hivelocity CAPHW cluster.x-k8s.io/provider=infrastructure-huawei CAPIBM cluster.x-k8s.io/provider=infrastructure-ibmcloud CAPKK cluster.x-k8s.io/provider=infrastructure-kubekey CAPK cluster.x-k8s.io/provider=infrastructure-kubevirt CAPM3 cluster.x-k8s.io/provider=infrastructure-metal3 CAPMS cluster.x-k8s.io/provider=infrastructure-metal-stack CAPN cluster.x-k8s.io/provider=infrastructure-nested CAPONE cluster.x-k8s.io/provider=infrastructure-opennebula CAPO cluster.x-k8s.io/provider=infrastructure-openstack CAPOCI cluster.x-k8s.io/provider=infrastructure-oci CAPS cluster.x-k8s.io/provider=infrastructure-scaleway CAPT cluster.x-k8s.io/provider=infrastructure-tinkerbell CAPV cluster.x-k8s.io/provider=infrastructure-vsphere CAPVC cluster.x-k8s.io/provider=infrastructure-vcluster CAPVCD cluster.x-k8s.io/provider=infrastructure-vcd CAPX cluster.x-k8s.io/provider=infrastructure-nutanix CAPZ cluster.x-k8s.io/provider=infrastructure-azure CAPOSC cluster.x-k8s.io/provider=infrastructure-outscale CAPK0S cluster.x-k8s.io/provider=infrastructure-k0smotron CAIPAMIC cluster.x-k8s.io/provider=ipam-in-cluster CAIPAMX cluster.x-k8s.io/provider=ipam-nutanix CAIPAM3 cluster.x-k8s.io/provider=ipam-metal3 CAREX cluster.x-k8s.io/provider=runtime-extensions-nutanix
An infrastructure provider could publish a cluster templates file to be used by clusterctl generate cluster.
This is single YAML with all the objects required to create a new workload cluster.
With ClusterClass enabled it is possible to have cluster templates with managed topologies. Cluster templates with managed
topologies require only the cluster object in the template and a corresponding ClusterClass definition.
The following rules apply:
Cluster templates MUST be stored in the same location as the component YAML and follow this naming convention:
The default cluster template should be named cluster-template.yaml.
Additional cluster template should be named cluster-template-{flavor}.yaml. e.g cluster-template-prod.yaml
{flavor} is the name the user can pass to the clusterctl generate cluster --flavor flag to identify the specific template to use.
Each provider SHOULD create user facing documentation with the list of available cluster templates.
The cluster template YAML MUST assume the target namespace already exists.
All the objects in the cluster template YAML MUST be deployed in the same namespace.
The cluster templates YAML can also contain environment variables (as can the components YAML).
Additionally, each provider should create user facing documentation with the list of required variables and with all the additional
notes that are required to assist the user in defining the value for each variable.
The clusterctl generate cluster command allows user to set a small set of common variables via CLI flags or command arguments.
Templates writers should use the common variables to ensure consistency across providers and a simpler user experience
(if compared to the usage of OS environment variables or the clusterctl config file).
CLI flag Variable name Note
--target-namespace${NAMESPACE}The namespace where the workload cluster should be deployed --kubernetes-version${KUBERNETES_VERSION}The Kubernetes version to use for the workload cluster --controlplane-machine-count${CONTROL_PLANE_MACHINE_COUNT}The number of control plane machines to be added to the workload cluster --worker-machine-count${WORKER_MACHINE_COUNT}The number of worker machines to be added to the workload cluster
Additionally, the value of the command argument to clusterctl generate cluster <cluster-name> (<cluster-name> in this case), will
be applied to every occurrence of the ${ CLUSTER_NAME } variable.
An infrastructure provider could publish a ClusterClass definition file to be used by clusterctl generate cluster that will be used along
with the workload cluster templates.
This is a single YAML with all the objects required that make up the ClusterClass.
The following rules apply:
ClusterClass definitions MUST be stored in the same location as the component YAML and follow this naming convention:
The ClusterClass definition should be named clusterclass-{ClusterClass-name}.yaml, e.g clusterclass-prod.yaml.
{ClusterClass-name} is the name of the ClusterClass that is referenced from the Cluster.spec.topology.class field
in the Cluster template; Cluster template files using a ClusterClass are usually simpler because they are no longer
required to have all the templates.
Additionally, namespace of the ClusterClass can differ from the Cluster. This requires specifying
Cluster.spec.topology.classNamespace field in the Cluster template;
Cluster template may define classNamespace as classNamespace: ${CLUSTER_CLASS_NAMESPACE:=""}, which would allow to
optionally specify namespace of the referred ClusterClass via env. Empty or missing value is uses Cluster namespace
by default.
Each provider should create user facing documentation with the list of available ClusterClass definitions.
The ClusterClass definition YAML MUST assume the target namespace already exists.
The references in the ClusterClass definition should NOT specify a namespace.
It is recommended that none of the objects in the ClusterClass YAML should specify a namespace.
Even if technically possible, it is strongly recommended that none of the objects in the ClusterClass definitions are shared across multiple definitions;
this helps in preventing changing an object inadvertently impacting many ClusterClasses, and consequently, all the Clusters using those ClusterClasses.
Currently the ClusterClass definitions SHOULD NOT have any environment variables in them.
ClusterClass definitions files should not use variable substitution, given that ClusterClass and managed topologies provide an alternative model for variable definition.
A ClusterClass definition is automatically included in the output of clusterctl generate cluster if the cluster template uses a managed topology
and a ClusterClass with the same name does not already exists in the Cluster.
Each provider is responsible to ensure that all the providers resources (like e.g. VSphereCluster, VSphereMachine, VSphereVM etc.
for the vsphere provider) MUST have a Metadata.OwnerReferences entry that links directly or indirectly to a Cluster object.
Please note that all the provider specific resources that are referenced by the Cluster API core objects will get the OwnerReference
set by the Cluster API core controllers, e.g.:
The Cluster controller ensures that all the objects referenced in Cluster.Spec.InfrastructureRef get an OwnerReference
that links directly to the corresponding Cluster.
The Machine controller ensures that all the objects referenced in Machine.Spec.InfrastructureRef get an OwnerReference
that links to the corresponding Machine, and the Machine is linked to the Cluster through its own OwnerReference chain.
That means that, practically speaking, provider implementers are responsible for ensuring that the OwnerReferences
are set only for objects that are not directly referenced by Cluster API core objects, e.g.:
All the VSphereVM instances should get an OwnerReference that links to the corresponding VSphereMachine, and the VSphereMachine
is linked to the Cluster through its own OwnerReference chain.
Provider authors should be aware of the following transformations that clusterctl applies during component installation:
Variable substitution;
Enforcement of target namespace:
The name of the namespace object is set;
The namespace field of all the objects is set (with exception of cluster wide objects like e.g. ClusterRoles);
All components are labeled;
Provider authors should be aware of the following transformations that clusterctl applies during components installation:
Variable substitution;
Enforcement of target namespace:
The namespace field of all the objects are set;
The clusterctl command requires that both the components YAML and the cluster templates contain all the required
objects.
If, for any reason, the provider authors/YAML designers decide not to comply with this recommendation and e.g. to
implement links to external objects from a component YAML (e.g. secrets, aggregated ClusterRoles NOT included in the component YAML)
implement link to external objects from a cluster template (e.g. secrets, configMaps NOT included in the cluster template)
The provider authors/YAML designers should be aware that it is their responsibility to ensure the proper
functioning of clusterctl when using non-compliant component YAML or cluster templates.
Provider authors should be aware that clusterctl move command implements a discovery mechanism that considers:
All the Kind defined in one of the CRDs installed by clusterctl using clusterctl init (identified via the clusterctl.cluster.x-k8s.io label);
For each CRD, discovery collects:
All the objects from the namespace being moved only if the CRD scope is Namespaced.
All the objects if the CRD scope is Cluster.
All the ConfigMap objects from the namespace being moved.
All the Secret objects from the namespace being moved and from the namespaces where infrastructure providers are installed.
After completing discovery, clusterctl move moves to the target cluster only the objects discovered in the previous phase
that are compliant with one of the following rules:
The object is directly or indirectly linked to a Cluster object (linked through the OwnerReference chain).
The object is a secret containing a user provided certificate (linked to a Cluster object via a naming convention).
The object is directly or indirectly linked to a ClusterResourceSet object (through the OwnerReference chain).
The object is directly or indirectly linked to another object with the clusterctl.cluster.x-k8s.io/move-hierarchy
label, e.g. the infrastructure Provider ClusterIdentity objects (linked through the OwnerReference chain).
The object has the clusterctl.cluster.x-k8s.io/move label or the clusterctl.cluster.x-k8s.io/move-hierarchy label,
e.g. the CPI config secret.
Note. clusterctl.cluster.x-k8s.io/move and clusterctl.cluster.x-k8s.io/move-hierarchy labels could be applied
to single objects or at the CRD level (the label applies to all the objects).
Please note that during move:
Namespaced objects, if not existing in the target cluster, are created.
Namespaced objects, if already existing in the target cluster, are updated.
Namespaced objects are removed from the source cluster.
Global objects, if not existing in the target cluster, are created.
Global objects, if already existing in the target cluster, are not updated.
Global objects are not removed from the source cluster.
Namespaced objects which are part of an owner chain that starts with a global object (e.g. a secret containing
credentials for an infrastructure Provider ClusterIdentity) are treated as Global objects.
When using the “move” label, if the CRD is a global resource, the object is copied to the target cluster but not removed from the source cluster. It is up to the user to remove the source object as necessary.
If moving some of excluded object is required, the provider authors should create documentation describing the
exact move sequence to be executed by the user.
Additionally, provider authors should be aware that clusterctl move assumes all the provider’s Controllers respect the
Cluster.spec.paused field. If a provider needs to perform extra work in response to a
cluster being paused, clusterctl move can be blocked from creating any resources on the destination
management cluster by annotating any resource to be moved with clusterctl.cluster.x-k8s.io/block-move.
Every object’s Status subresource, including every nested field (e.g. Status.Conditions), is never
restored during a move operation. A Status subresource should never contain fields that cannot
be recreated or derived from information in spec, metadata, or external systems.
Provider implementers should not store non-ephemeral data in the Status.
Status should be able to be fully rebuilt by controllers by observing the current state of resources.
The IPAM provider is responsible for handling the IP addresses for the machines in a cluster.
IPAM providers are optional when using Cluster API. Infrastructure providers need to implement explicit support to be usable in conjunction with IPAM providers.
Note that the IPAM contract is single-stack. If you need both v4 and v6 addresses, two pools and two IPAddressClaims are necessary.
An IPAM provider must define one or more API types for IP address pools using Kubernetes’ CustomResourceDefinition (CRD). The types:
Must belong to an API group served by the Kubernetes apiserver
Must be implemented as a CustomResourceDefinition.
The CRD name must have the format produced by sigs.k8s.io/cluster-api/util/contract.CalculateCRDName(Group, Kind).
Must have the standard Kubernetes “type metadata” and “object metadata”
Should have a status.conditions field with the following:
A Ready condition to represent the overall operational state of the component. It can be based on the summary of more detailed conditions existing on the same object, e.g. instanceReady, SecurityGroupsReady conditions.
IPAM providers must handle any IPAddressClaim resources that reference IP address pools that are managed by the provider and create an IPAddress resource for it. IPAddressClaims are usually created by infrastructure providers.
An IPAM provider must watch for new, updated and deleted IPAddressClaims that reference an IP address pool that is manged by the provider in their spec.poolRef field.
If the IPAddressClaim does not reference a pool managed by the provider in it’s spec.poolRef, abort the reconciliation.
If the related Cluster is paused, abort reconciliation
The related Cluster is referenced using the spec.clusterName field or a cluster.x-k8s.io/cluster-name label (the latter is deprecated).
If the paused field is empty and the cluster.x-k8s.io/paused annotation is not present, reconciliation can continue.
If the referenced cluster is not found, abort reconciliation.
If the referenced cluster has spec.paused set or a cluster.x-k8s.io/paused annotation, skip reconciliation
Add any required provider-specific finalziers (you probably need one)
Allocate an IP address for the claim
Create an IPAddress object
It should have the same name as the claim.
It must have a owner reference with controller: true and blockOwnerDeletion: true to the Claim
It must have a owner reference with controller: false and blockOwnerDeletion: true to the referenced Pool
It should have a Finalizer that prevents accidental deletion, e.g. ipam.cluster.x-k8s.io/protect-address.
Set the status.addressRef on the IPAddressClaim to the created IPAddress
If the related Cluster is paused, abort reconciliation (see 2. above)
Deallocate the IP address
Delete the IPAddress object
Remove any Finalizers that were set to prevent deletion
Remove the Finalizer from the claim
In order for Pools to be moved alongside clusters, they need to have a cluster.x-k8s.io/cluster-name label.
In order to consume IP addresses from an IP address pool, an IPAddressClaim resource needs to be created, which will then be fulfilled with an IPAddress resource. Since the IPAddressClaim needs to reference an IP pool, you’ll need to add a property to your infrastructure Machine that allows to specify the pool.
Note that the IPAM contract is single-stack. If you need both v4 and v6 addresses, two pools and two IPAddressClaims are necessary.
Create an IPAddressClaim
The spec.poolRef must reference the pool you want to use
It should have an owner reference to the infrastructure Machine (or the intermediate resource) it is created for (required to support clusterctl move). The reference should have controller: true and blockOwnerDeletion: true set.
It’s spec.clusterName field should be set (or it should have a cluster.x-k8s.io/cluster-name label)
Ideally it’s name is derived from the infrastructure Machine’s name
Wait until an IP is allocated, ideally by watching the IPAddressClaim and waiting for status.addressRef to be set
Fetch the IPAddress resource which contains the allocated address
When the infrastructure Machine is deleted, the claim should be deleted as well. The infrastructure Machine deletion should be blocked until the claim is deleted (handled by the API server if the owner relation is set up correctly).
Cluster API doesn’t define strict rules about how providers should implement controllers.
However, some best practice are worth to notice:
Infrastructure objects (e.g. load balancers, VMs etc) generated by the Infra providers SHOULD adopt a naming
convention that directly links to the Kubernetes resource that originated those objects.
Please note that in most cases external constraints might impact this decision, like e.g.
Differences in naming conversions from Kubernetes CRDs and the target infrastructure
The fact that the InfraCluster Kubernetes CRD is namespace-scoped while target infrastructure might have different approaches
to grouping resources
Naming convention above should not be used and advertised as a contract to build on top. Instead more robust mechanism
MUST always be provided and used for identifying objects, like tagging or labeling.
Please note that this is necessary not only to prevent issues in case Cluster API changes default naming strategies
for the Kubernetes objects generated by core controllers, but also to handle use cases where users intentionally influence Cluster API naming strategies.
Cluster API offers a great development environment based on Tilt, which can be easily extended to work with any provider. Use it!
See Rapid iterative development with Tilt
Cluster API defines a set of best practices and standards that, if adopted, could speed up provider development and improve
consistency with core Cluster API. See:
Cluster API implements a test framework that, if adopted, could help in ensuring the quality of the provider. See:
While standard security practices for developing Kubernetes controllers apply, it is important to recognize that
given that infrastructure provider deal with cloud credentials and cloud infrastructure, there are additional critical
security concern that must be addressed to ensure secure operations. See:
There are several critical areas that any infrastructure provider implementer must address to ensure secure operations. These include:
Management of cloud credentials assigned to the infrastructure provider, including setting quotas and rate limiting.Ensuring secure access to VMs for troubleshooting, with proper authentication methods.Controlling manual operations performed on cloud infrastructure targeted by the provider.Housekeeping of the cloud infrastructure, ensuring timely cleanup and garbage collection of unused resources.Securing Machine’s bootstrap data ensuring protection of oversensitive data that might be included in it.
The following list outlines high-level security recommendations. It is a community-maintained resource, and everyone’s contributions are essential to continuously improve and adapt these best practices. Each provider implementer is responsible for translating these recommendations to fit the context of their specific cloud provider:
Credentials Management :
Ensure credentials used by Cluster API are least privileged. Apply access control to Cluster API controller namespaces, restricting unauthorized access to cloud administrators only.
Two-Factor Authentication (2FA) :
Implement 2FA for all maintainer accounts on GitHub. For any privileged actions (e.g., image building or updates to machine images), follow the “second pair of eyes” principle to ensure review and oversight.
Short-lived Credentials :
Use short-lived credentials that are automatically renewed via node-level attestation mechanisms, minimizing the risk of credential misuse.
Rate Limiting for Cloud Resources :
Implement rate limits for the creation, deletion, and updating of cloud resources, protecting against potential abuse or accidental overload.
Resource Housekeeping :
Any cloud resource not linked to a cluster after a fixed configurable period, created by cloud credentials, should be automatically deleted or marked for garbage collection to avoid resource sprawl.
Securing Machine’s bootstrap data :
Bootstrap data are usually stored in machine’s metadata, and they might contain sensitive data, like e.g. Cluster secrets, user credentials, ssh certificates etc. It is important to ensure protection of this metadata, or if not possible, to clean it up immediately after machine bootstrap.
The following pages provide an overview of relevant changes between versions of Cluster API and their direct successors. These guides are intended to assist
maintainers of other providers and consumers of the Go API in upgrading from one version of Cluster API to a subsequent version.
For older versions please refer to Older Cluster API documentation versions
This document provides an overview over relevant changes between Cluster API v1.11 and v1.12 for
maintainers of providers and consumers of our Go API.
Any feedback or contributions to improve following documentation is welcome!
The minimal Go version required to build Cluster API is v1.24.x
The Go version used by Cluster API is v1.24.x
The Controller Runtime version used by Cluster API is v0.22.x
The version of the Kubernetes libraries used by Cluster API is v1.34.x
The following proposal have been implemented in the Cluster API v1.12 release:
The new spec.topology.controlPlane.healthCheck.checks.unhealthyMachineConditions field has been added
The new spec.topology.workers.machineDeployments[].healthCheck.checks.unhealthyMachineConditions field has been added
The TopologyReconciled condition reports new ClusterCreating and ClusterUpgrading reasons
The following reasons for the TopologyReconciled condition are now deprecated
ControlPlaneUpgradePendingMachineDeploymentsCreatePendingMachineDeploymentsUpgradePendingMachinePoolsUpgradePendingMachinePoolsCreatePendingLifecycleHookBlocking
The new spec.taint field has been added.
The HealthCheckSucceeded condition reports a new UnhealthyMachine reason when unhealthyMachineConditions checks fail
The UpToDate condition reports a new Updating reason when a machine is performing in-place updates
The new Updating condition has been added. It reports status True when a machine is performing in-place updates
Supported reasons are NotUpdating, InPlaceUpdating, InPlaceUpdateFailed
The field status.phases reports a new Updating phase when a machine is performing in-place updates
MachineDeployment spec.template.spec has been aligned to changes in the Machine spec struct
MachineSet spec.template.spec has been aligned to changes in the Machine spec struct
MachinePool spec.template.spec has been aligned to changes in the Machine spec struct
The new spec.checks.unhealthyMachineConditions field has been added
The new spec.controlPlane.healthCheck.checks.unhealthyMachineConditions field has been added
The new spec.workers.machineDeployments[].healthCheck.checks.unhealthyMachineConditions field has been added
The new spec.upgrade field has been added
The new spec.kubernetesVersions field has been added
The new spec.clusterConfiguration.encryptionAlgorithm field has been added
KubeadmConfigTemplate spec.template.spec has been aligned to changes in the KubeadmConfig spec struct
KubeadmControlPlane spec.kubeadmConfigSpec has been aligned to changes in the KubeadmConfig spec struct
KubeadmControlPlaneTemplate spec.template.spec has been aligned to changes in the KubeadmControlPlane spec struct
Lifecycle hooks
The request message for the BeforeClusterUpgrade hook has been extended to include info about the upgrade plan
The new BeforeControlPlaneUpgrade hook has been added; the hook is called before each “upgrade control plane” step
The request message for the AfterControlPlaneUpgrade hook have been extended to include info about the upgrade plan
The AfterControlPlaneUpgrade hook is now called after each “upgrade control plane” step
The new BeforeWorkersUpgrade, AfterWorkersUpgrade hooks have been added; the hooks are called before/after each “upgrade workers” step
The AfterClusterUpgrade has been transformed into a blocking hook (it blocks next upgrade)
Upgrade plan hooks (new!)
The new GenerateUpgradePlan has been added; the hook is called by the topology controller when it is required
to compute the upgrade plan for a cluster
In-place extension hooks (new!)
the new CanUpdateMachine hook has been added; the hook is called by the KubeadmControlPlane controller to perform the
“can update in-place” decision for a machine that is not up-to-date
the new CanUpdateMachineSet hook has been added; the hook is called by the MachineDeployment controller to perform the
“can update in-place” decision for a MachineSet that is not up-to-date
the new UpdateMachine hook has been added; the hook is called by the Machine controller to perform in-place upgrades
Some optimization have been implemented to ensure that hooks are called only when necessary
e.g. if a lifecycle hook response, e.g. the BeforeClusterUpgradeResponse, informs CAPI to retry after X seconds,
CAPI is going to not call the runtime extension until X expires, no matter if the underlying controller reconciles
one or more times in the between
GenerateUpgradePlan, CanUpdateMachine, CanUpdateMachineSet hooks will use slightly different caching strategy
Documentation for the MachinePool contract has been aligned to the documentation
of other contracts.
We strongly recommend all the MachinePool providers to read carefully this document and check compliance with
the updated definition of the contract rules.
A new, optional rule has been added to the control plane contract, defining what is required for implementing support
for in-place updates.
The following reasons for the TopologyReconciled condition on the Cluster object are now deprecated
ControlPlaneUpgradePending MachineDeploymentsCreatePendingMachineDeploymentsUpgradePendingMachinePoolsUpgradePendingMachinePoolsCreatePendingLifecycleHookBlocking
The controlplane.cluster.x-k8s.io/kubeadm-cluster-configuration annotation that KCP was previously setting on Machines has been removed.
KCP used this annotation to detect if a Machine requires a rollout, this is now done via the KubeadmConfig of the Machine instead.
For providers that copied the core Cluster API v1beta1 APIEndpoint struct and used it in their InfraCluster
or ControlPlane Go type it is recommended to now make the Host and Port fields optional (they already have been made optional in
clusterv1beta1.APIEndpoint in Cluster API v1.12).
tl;dr The fields were previously required, but due to side effects that validation was never enforced. These side
effects might go away which then makes the fields suddenly required. To avoid issues we recommend making the fields
optional. Similar to how they are optional in the v1beta2 APIEndpoint struct and v1beta2 InfraCluster contract.
For more details, please see: https://github.com/kubernetes-sigs/cluster-api/pull/12634#discussion_r2275468291.
But this might look differently depending on how your InfraCluster/ControlPlane Go type and corresponding
mutating webhook evolved over time.
We strongly recommend all the MachinePool providers to read carefully the MachinePool contract
and check compliance with the updated definition of the contract rules.
We strongly recommend providers to start moving to the new v1beta2 version of the Cluster API contract as soon as possible.
v1beta1 version of the Cluster API contract is now deprecated and it will be removed tentatively in August 2026:
In order to ease the transition to the new v1beta2 version of the Cluster API contract, v1beta2 version
will implement temporarily compatibility with the deprecated v1beta1 version of the Cluster API contract
Compatibility is only intended to ease the transition for providers, and it has some limitations; please
read details in following paragraphs.
Compatibility support for the v1beta1 version of the Cluster API contract will be removed tentatively in August 2026.
After compatibility support for the v1beta1 version of the Cluster API contract is removed, providers
which are implementing the v1beta1 contract will stop to work (they will work only with older versions of Cluster API).
Various Cluster API e2e tests with Kubernetes upgrades now use the wait-control-plane-upgrade and wait-machine-deployment-upgrade timeouts.
If you are running Cluster API e2e tests with upgrades you have to configure the timeouts in your e2e test configuration file, otherwise
the e2e tests will use 1s timeout which will lead to test failures. Example:
default/wait-control-plane-upgrade: ["15m", "10s"]
default/wait-machine-deployment-upgrade: ["10m", "10s"]
Reconciler rate limiting feature has been introduced (#13006 )
Can be enabled with the new ReconcilerRateLimiting feature gate
It rate-limits all reconcilers to at most 1 request per second
util.IsOwnedByObject, util.IsControlledBy and collections.OwnedMachines now also require schema.GroupKind as input parameter.
schema.GroupKind is needed for cases where typed objects are passed in because controller-runtime does not guarantee that GVK is set on typed objects.
As documented in Suggested changes for providers , it is highly recommended to start planning for future removals:
v1beta1 API version will be removed tentatively in August 2026
Starting from the CAPI release when v1beta1 removal will happen (tentative Aug 2026), the Cluster API project
will remove the Cluster API condition type, the util/conditions/deprecated/v1beta1 package,
the util/deprecated/v1beta1 package, the code handling old conditions in util/patch.Helper
and everything related to the custom Cluster API custom condition type.
All the status.deprecated fields will be removed tentatively in August 2026.
Compatibility support for the v1beta1 version of the Cluster API contract will be removed tentatively in August 2026
This document provides an overview over relevant changes between Cluster API v1.12 and v1.13 for
maintainers of providers and consumers of our Go API.
Any feedback or contributions to improve following documentation is welcome!
The minimal Go version required to build Cluster API is v1.25.x
The Go version used by Cluster API is v1.25.x
The Controller Runtime version used by Cluster API is v0.23.x
The version of the Kubernetes libraries used by Cluster API is v1.35.x
Both the PriorityQueue and the ReconcilerRateLimiting feature gate graduated to beta and are enabled by default
Starting from this release ReconcilerRateLimiting feature also requires PriorityQueue to be enabled.
The same constraint has been backported on the CAPI 1.12 branch starting from v1.12.4 in order
to ensure that ReconcilerRateLimiting works consistently with controller runtime exponential backoff.
The following proposal have been implemented in the Cluster API v1.12 release:
The new spec.topology.controlPlane.rollout.taints, spec.topology.workers.machineDeployments[].taints and spec.topology.workers.machinePools[].taints fields has been added
The new spec.topology.controlPlane.rollout.after and spec.topology.workers.machineDeployments[].rollout.after fields has been added
The new status.failureDomain field has been added.
The new NodeKubeadmLabelsAndTaintsSet condition has been added for Machines managed by KCP
The new spec.controlPlane.rollout.taints, spec.workers.machineDeployments[].taints and spec.workers.machinePools[].taints fields has been added
The new spec.diskSetup.partitions.diskLayout field has been added
KubeadmConfigTemplate spec.template.spec has been aligned to changes in the KubeadmConfig spec struct
The new spec.machineTemplate.taints field has been added
KubeadmControlPlane spec.kubeadmConfigSpec has been aligned to changes in the KubeadmConfig spec struct
KubeadmControlPlaneTemplate spec.template.spec has been aligned to changes in the KubeadmControlPlane spec struct
Following hook messages are now using v1beta2 Cluster type instead of the deprecated v1beta1 Cluster type.
BeforeClusterCreateRequestAfterControlPlaneInitializedRequestBeforeClusterUpgradeRequestBeforeControlPlaneUpgradeRequestAfterControlPlaneUpgradeRequestBeforeWorkersUpgradeRequestAfterWorkersUpgradeRequestAfterClusterUpgradeRequestBeforeClusterDeleteRequest
The DiscoverVariablesResponse hook message are now using v1beta2 ClusterClassVariable type instead of the
deprecated v1beta1 ClusterClassVariable type.
The Builtins type used for computing variables lists in the GeneratePatchesRequest and the ValidateTopologyRequest
hook messages is now using a custom ObjectMeta type instead of the deprecated v1beta1 ObjectMeta type.
A new, optional rule has been added to the bootstrap config contract and the infra machine provider contract, defining
what is required for implementing support for in-place changes.
A new, optional rule has been added to the control plane contract, defining what is required for implementing support
for taints.
A new, optional rule has been added to the control plane contract, defining what is required for implementing support
for rolloutAfter.
Clarification about expectations about consistency between metadata.yaml versions and cluster.x-k8s.io/<version> label
on provider’s CRDs has been added to the clusterctl contract and to contract for all the provider types.
The following API types are now deprecated (you should use corresponding Dev* API types)
DockerCluster and DockerClusterTemplate DockerMachine and DockerMachineTemplateDockerMachinePool and DockerMachinePoolTemplate
Remove deprecated --enable-crd-storage-version-migration flag for clusterctl upgrade and corresponding provider CRD storage version migration code
The deprecated --disable-grouping flag for clusterctl describe cluster has been removed.
The deprecated ClusterCache.GetClientCertificatePrivateKey method has been removed.
The deprecated --cluster-concurrency CABPK command-line flag has been removed
Remove deprecated util/topology.ShouldSkipImmutabilityChecks (use util/topology.IsDryRunRequest instead)
Removed deprecated util/version.ParseMajorMinorPatch (use semver.Parse instead)
Removed deprecated util/version.ParseMajorMinorPatchTolerant (use semver.ParseTolerant instead)
A new conversion.MarshalDataUnsafeNoCopy func was introduced. The difference to conversion.MarshalData is that it mutates the passed in source object
before marshaling to avoid additional memory allocations. Usually this is fine because this func is used at the end of ConvertFrom methods. Accordingly,
we recommend to start using this new func, except if it’s not safe in your circumstances.
If you are developing a control plane provider with support for machines, please consider adding spec.machineTemplate.spec.taints (see contract )
Cluster API bumped the default values of --kube-api-qps & --kube-api-burst to 100/200 in CAPI-13317 . You might want to consider doing the same.
As documented in Suggested changes for providers , it is highly recommended to start planning for future removals:
v1beta1 API version will be removed tentatively in April 2027 (instead of the original August 2026)
Starting from the CAPI release when v1beta1 removal will happen, tentatively April 2027, the Cluster API project
will remove the Cluster API condition type, the util/conditions/deprecated/v1beta1 package,
the util/deprecated/v1beta1 package, the code handling old conditions in util/patch.Helper
and everything related to the custom Cluster API custom condition type.
All the status.deprecated fields will be removed tentatively in April 2027.
Compatibility support for the v1beta1 version of the Cluster API contract will be removed tentatively in April 2027
Removal of Docker* API types will happen in a future version (as soon as possible)
NOTE: CAPD is considered a test provider, API deprecation guarantee do not apply
This document provides an overview over relevant changes between Cluster API v1.13 and v1.14 for
maintainers of providers and consumers of our Go API.
Any feedback or contributions to improve following documentation is welcome!
The minimal Go version required to build Cluster API is v1.26.x
The Go version used by Cluster API is v1.26.x
The Controller Runtime version used by Cluster API is v0.24.x
The version of the Kubernetes libraries used by Cluster API is v1.36.x
Please note that since CAPI-13813 errors returned from
Runtime Extensions might be surfaced in conditions. Accordingly, please ensure that the error messages are deterministic
to avoid infinite reconciles. This change was done because we realized that errors reported by Runtime Extensions are a
crucial feedback mechanism to users and its too cumbersome for users to search in controller logs for errors.
The following functions and types have been deprecated, please use ClusterCache or inline them instead:
controllers/remote.NewClusterClientcontrollers/remote.RESTConfigcontrollers/remote.ClusterClientGettercontrollers/remote/fake.NewClusterClient
As documented in Suggested changes for providers , it is highly recommended to start planning for future removals:
v1beta1 API version will be removed tentatively in April 2027 (instead of the original August 2026)
Starting from the CAPI release when v1beta1 removal will happen, tentatively April 2027, the Cluster API project
will remove the Cluster API condition type, the util/conditions/deprecated/v1beta1 package,
the util/deprecated/v1beta1 package, the code handling old conditions in util/patch.Helper
and everything related to the custom Cluster API custom condition type.
All the status.deprecated fields will be removed tentatively in April 2027.
Compatibility support for the v1beta1 version of the Cluster API contract will be removed tentatively in April 2027
Removal of Docker* API types will happen in a future version (as soon as possible)
NOTE: CAPD is considered a test provider, API deprecation guarantee do not apply
If you’ve run the Quick Start before ensure that you’ve cleaned up all resources before trying it again. Check docker ps to ensure there are no running containers left before beginning the Quick Start.
This guide assumes you’ve completed the apply the workload cluster section of the Quick Start using Docker.
When running clusterctl describe cluster capi-quickstart to verify the created resources, we expect the output to be similar to this (note: this is before installing the Calico CNI ).
NAME READY SEVERITY REASON SINCE MESSAGE
Cluster/capi-quickstart True 46m
├─ClusterInfrastructure - DockerCluster/capi-quickstart-94r9d True 48m
├─ControlPlane - KubeadmControlPlane/capi-quickstart-6487w True 46m
│ └─3 Machines... True 47m See capi-quickstart-6487w-d5lkp, capi-quickstart-6487w-mpmkq, ...
└─Workers
└─MachineDeployment/capi-quickstart-md-0-d6dn6 False Warning WaitingForAvailableMachines 48m Minimum availability requires 3 replicas, current 0 available
└─3 Machines... True 47m See capi-quickstart-md-0-d6dn6-584ff97cb7-kr7bj, capi-quickstart-md-0-d6dn6-584ff97cb7-s6cbf, ...
Machines should be started, but Workers are not because Calico isn’t installed yet. You should be able to see the containers running with docker ps --all and they should not be restarting.
If you notice Machines are failing to start/restarting your output might look similar to this:
clusterctl describe cluster capi-quickstart
NAME READY SEVERITY REASON SINCE MESSAGE
Cluster/capi-quickstart False Warning ScalingUp 57s Scaling up control plane to 3 replicas (actual 2)
├─ClusterInfrastructure - DockerCluster/capi-quickstart-n5w87 True 110s
├─ControlPlane - KubeadmControlPlane/capi-quickstart-6587k False Warning ScalingUp 57s Scaling up control plane to 3 replicas (actual 2)
│ ├─Machine/capi-quickstart-6587k-fgc6m True 81s
│ └─Machine/capi-quickstart-6587k-xtvnz False Warning BootstrapFailed 52s 1 of 2 completed
└─Workers
└─MachineDeployment/capi-quickstart-md-0-5whtj False Warning WaitingForAvailableMachines 110s Minimum availability requires 3 replicas, current 0 available
└─3 Machines... False Info Bootstrapping 77s See capi-quickstart-md-0-5whtj-5d8c9746c9-f8sw8, capi-quickstart-md-0-5whtj-5d8c9746c9-hzxc2, ...
In the example above we can see that the Machine capi-quickstart-6587k-xtvnz has failed to start. The reason provided is BootstrapFailed.
To investigate why a machine fails to start you can inspect the conditions of the objects using clusterctl describe --show-conditions all cluster capi-quickstart. You can get more detailed information about the status of the machines using kubectl describe machines.
To inspect the underlying infrastructure - in this case Docker containers acting as Machines - you can access the logs using docker logs <MACHINE-NAME>. For example:
docker logs capi-quickstart-6587k-xtvnz
(...)
Failed to create control group inotify object: Too many open files
Failed to allocate manager object: Too many open files
[!!!!!!] Failed to allocate manager object.
Exiting PID 1...
To resolve this specific error please read Cluster API with Docker - “too many open files” .
Failures during Node bootstrapping can have a lot of different causes. For example, Cluster API resources might be
misconfigured or there might be problems with the network. The following steps describe how bootstrap failures can
be troubleshooted systematically.
Access the Node via ssh.
Take a look at cloud-init logs via less /var/log/cloud-init-output.log or journalctl -u cloud-init --since "1 day ago".
(Note: cloud-init persists logs of the commands it executes (like kubeadm) only after they have returned.)
It might also be helpful to take a look at journalctl --since "1 day ago".
If you see that kubeadm times out waiting for the static Pods to come up, take a look at:
containerd: crictl ps -a, crictl logs, journalctl -u containerd
Kubelet: journalctl -u kubelet --since "1 day ago"
(Note: it might be helpful to increase the Kubelet log level by e.g. setting --v=8 via
systemctl edit --full kubelet && systemctl restart kubelet)
If Node bootstrapping consistently fails and the kubeadm logs are not verbose enough, the kubeadm verbosity
can be increased via KubeadmConfigSpec.Verbosity.
Self-assigning Node labels such as node-role.kubernetes.io using the kubelet --node-labels flag
(see kubeletExtraArgs in the CABPK examples )
is not possible due to a security measure imposed by the
NodeRestriction admission controller
Assigning such labels to Nodes must be done after the bootstrap process has completed:
kubectl label nodes <name> node-role.kubernetes.io/worker=""
For convenience, here is an example one-liner to do this post installation
# Kubernetes 1.19 (kubeadm 1.19 sets only the node-role.kubernetes.io/master label)
kubectl get nodes --no-headers -l '!node-role.kubernetes.io/master' -o jsonpath='{range .items[*]}{.metadata.name}{"\n"}' | xargs -I{} kubectl label node {} node-role.kubernetes.io/worker=''
# Kubernetes >= 1.20 (kubeadm >= 1.20 sets the node-role.kubernetes.io/control-plane label)
kubectl get nodes --no-headers -l '!node-role.kubernetes.io/control-plane' -o jsonpath='{range .items[*]}{.metadata.name}{"\n"}' | xargs -I{} kubectl label node {} node-role.kubernetes.io/worker=''
When provisioning workload clusters using Cluster API with the Docker infrastructure provider,
provisioning might be stuck:
if there are stopped containers on your machine from previous runs. Clean unused containers with docker rm -f .
if the Docker space on your disk is being exhausted
When creating many nodes using Cluster API and Docker infrastructure, either by creating large Clusters or a number of small Clusters, the OS may run into inotify limits which prevent new nodes from being provisioned.
If the error Failed to create inotify object: Too many open files is present in the logs of the Docker Infrastructure provider this limit is being hit.
On Linux this issue can be resolved by increasing the inotify watch limits with:
sysctl fs.inotify.max_user_watches=1048576
sysctl fs.inotify.max_user_instances=8192
Newly created clusters should be able to take advantage of the increased limits.
This error was also observed in Docker Desktop 4.3 and 4.4 on MacOS. It can be resolved by updating to Docker Desktop for Mac 4.5 or using a version lower than 4.3.
The upstream issue for this error is closed as of the release of Docker 4.5.0
Note: The below workaround is not recommended unless upgrade or downgrade cannot be performed.
If using a version of Docker Desktop for Mac 4.3 or 4.4, the following workaround can be used:
Increase the maximum inotify file watch settings in the Docker Desktop VM:
Enter the Docker Desktop VM
nc -U ~/Library/Containers/com.docker.docker/Data/debug-shell.sock
Increase the inotify limits using sysctl
sysctl fs.inotify.max_user_watches=1048576
sysctl fs.inotify.max_user_instances=8192
Exit the Docker Desktop VM
exit
When using older versions of Cluster API 0.4 and 1.0 releases - 0.4.6, 1.0.3 and older respectively - Cert Manager may not be downloadable due to a change in the repository location. This will cause clusterctl init to fail with the error:
clusterctl init --infrastructure docker
Fetching providers
Installing cert-manager Version="v1.11.0"
Error: action failed after 10 attempts: failed to get cert-manager object /, Kind=, /: Object 'Kind' is missing in 'unstructured object has no kind'
This error was fixed in more recent Cluster API releases on the 0.4 and 1.0 release branches. The simplest way to resolve the issue is to upgrade to a newer version of Cluster API for a given release. For who need to continue using an older release it is possible to override the repository used by clusterctl init in the clusterctl config file. The default location of this file is in $XDG_CONFIG_HOME/cluster-api/clusterctl.yaml.
To do so add the following to the file:
cert-manager:
url: "https://github.com/cert-manager/cert-manager/releases/latest/cert-manager.yaml"
Alternatively a Cert Manager yaml file can be placed in the clusterctl overrides layer which is by default in $XDG_CONFIG_HOME/cluster-api/overrides. A Cert Manager yaml file can be placed at e.g. $XDG_CONFIG_HOME/cluster-api/overrides/cert-manager/v1.11.0/cert-manager.yaml
More information on the clusterctl config file can be found at its page in the book
Upgrading Cert Manager may fail due to a breaking change introduced in Cert Manager release v1.6.
An upgrade using clusterctl is affected when:
using clusterctl in version v1.1.4 or a more recent version.
Cert Manager lower than version v1.0.0 did run in the management cluster (which was shipped in Cluster API until including v0.3.14).
This will cause clusterctl upgrade apply to fail with the error:
clusterctl upgrade apply
Checking cert-manager version...
Deleting cert-manager Version="v1.5.3"
Installing cert-manager Version="v1.7.2"
Error: action failed after 10 attempts: failed to update cert-manager component apiextensions.k8s.io/v1, Kind=CustomResourceDefinition, /certificaterequests.cert-manager.io: CustomResourceDefinition.apiextensions.k8s.io "certificaterequests.cert-manager.io" is invalid: status.storedVersions[0]: Invalid value: "v1alpha2": must appear in spec.versions
The Cert Manager maintainers provide documentation to migrate the deprecated API Resources to the new storage versions to mitigate the issue.
More information about the change in Cert Manager can be found at their upgrade notes from v1.5 to v1.6 .
clusterctl allows users to configure image overrides via the clusterctl config file.
However, when the image override is pinning a provider image to a specific version, it could happen that this
conflicts with clusterctl behavior of picking the latest version of a provider.
E.g., if you are pinning KCP images to version v1.0.2 but then clusterctl init fetches yamls for version v1.1.0 or greater KCP will
fail to start with the following error:
invalid argument "ClusterTopology=false,KubeadmBootstrapFormatIgnition=false" for "--feature-gates" flag: unrecognized feature gate: KubeadmBootstrapFormatIgnition
In order to solve this problem you should specify the version of the provider you are installing by appending a
version tag to the provider name:
clusterctl init -b kubeadm:v1.0.2 -c kubeadm:v1.0.2 --core cluster-api:v1.0.2 -i docker:v1.0.2
Even if slightly verbose, pinning the version provides a better control over what is installed, as usually
required in an enterprise environment, especially if you rely on an internal repository with a separated
software supply chain or a custom versioning schema.
As documented in #6320 managed topologies
assumes a slice to be either authored from templates or by the users/the infrastructure controllers.
In cases the slice is instead co-authored (templates provide some info, the infrastructure controller
fills in other info) this can lead to infinite reconcile.
A solution to this problem is being investigated, but in the meantime you should avoid co-authored slices.
The Cluster API projects is continuously improving its API, including improving the support for Server Side Apply,
which allows for a more granular ownership of list items.
However, when transitioning from atomic lists to map lists, there are edge cases not supported
and this can lead to a SSA patches failing to remove an item in a list.
Note: the issue only occurs in a very specific scenario, most of the users are not affected
(e.g. client-side apply or “continuous” SSA with GitOps tools works as expected)
Example of fields transitioned from atomic lists to map lists are e.g.
cluster.spec.topology.variablescluster.spec.topology.workers.machineDeployments
In case you face this issue, please use kubectl edit or kubectl apply with client-side apply
to remove the item from the list; after the item is removed everything should work as expected.
See comment for more details.
When upgrading a cluster to any of the following Kubernetes patch releases,
kubeadm join completes but the control plane rollout gets stuck because the
API server cannot proxy requests to the kubelet:
v1.36.1
v1.35.5
v1.34.8
v1.33.12
Cause: These releases include a kubeadm security improvement
(kubernetes/kubernetes#138957 )
that reduces the scope of the API server’s kubelet client credentials.
A dedicated ClusterRoleBinding named kubeadm:apiserver-kubelet-client is now
required, binding the API server’s certificate CN (kube-apiserver-kubelet-client)
to the system:kubelet-api-admin ClusterRole.
Without this binding, the API server cannot proxy or exec to kubelets on nodes
with the new certificates. KCP logs will show errors similar to:
unable to upgrade connection: Forbidden (user=kube-apiserver-kubelet-client,
verb=create, resource=nodes, subresource(s)=[proxy])
CAPI releases prior to v1.11.11, v1.12.8, and v1.13.2 do not create this binding
during upgrades, causing the control plane rollout to get stuck.
Fix: Before upgrading Kubernetes to the above patch versions, upgrade CAPI to
one of the following releases which include the corresponding fix
(cluster-api#13664 ):
v1.13.2 or later
v1.12.8 or later
v1.11.11 or later
If you are already in a broken state and cannot upgrade CAPI first, manually
create the missing ClusterRoleBinding on the workload cluster:
apiVersion: rbac.authorization.k8s.io/v1
kind: ClusterRoleBinding
metadata:
name: kubeadm:apiserver-kubelet-client
roleRef:
apiGroup: rbac.authorization.k8s.io
kind: ClusterRole
name: system:kubelet-api-admin
subjects:
- apiGroup: rbac.authorization.k8s.io
kind: User
name: kube-apiserver-kubelet-client
After applying this manifest to the workload cluster, retry the upgrade.
This section contains various resources that define the Cluster API project.
Cluster API currently exposes the following APIs:
Following pages provide additional documentation to better understand and use Cluster API types.
Label Note Managed by Applies to
cluster.x-k8s.io/cluster-name It is set on machines linked to a cluster and external objects(bootstrap and infrastructure providers). User Machines cluster.x-k8s.io/control-plane It is set on machines or related objects that are part of a control plane. Cluster API Machines cluster.x-k8s.io/control-plane-name It is set on machines if they’re controlled by a control plane. The value of this label may be a hash if the control plane name is longer than 63 characters. Cluster API Machines cluster.x-k8s.io/deployment-name It is set on machines if they’re controlled by a MachineDeployment. Cluster API Machines cluster.x-k8s.io/drain If set with the value “skip” on a Pod in the workload cluster, the Pod will not be evicted during Node drain. User Pods (workload cluster) cluster.x-k8s.io/interruptible It is used to mark the nodes that run on interruptible instances. User Nodes (workload cluster) cluster.x-k8s.io/pool-name It is set on machines if they’re controlled by a MachinePool. Cluster API Machines cluster.x-k8s.io/provider It is set on components in the provider manifest. The label allows one to easily identify all the components belonging to a provider. The clusterctl tool uses this label for implementing provider’s lifecycle operations. User Provider Components cluster.x-k8s.io/set-name It is set on machines if they’re controlled by MachineSet. The value of this label may be a hash if the MachineSet name is longer than 63 characters. Cluster API Machines cluster.x-k8s.io/watch-filter It can be applied to any Cluster API object. Controllers which allow for selective reconciliation may check this label and proceed with reconciliation of the object only if this label and a configured value is present. Cluster API All Cluster API objects machine-template-hash It is applied to Machines in a MachineDeployment containing the hash of the template. Cluster API Machines topology.cluster.x-k8s.io/deployment-name It is set on the generated MachineDeployment objects to track the name of the MachineDeployment topology it represents. Cluster API MachineDeployments topology.cluster.x-k8s.io/owned It is set on all the object which are managed as part of a ClusterTopology. Cluster API ClusterTopology objects
Annotation Note Managed By Applies to
before-upgrade.hook.cluster.cluster.x-k8s.io It specifies the prefix we search each annotation for during the before-upgrade lifecycle hook to block propagating the new version to the control plane. These hooks will prevent propagation of changes made to the Cluster Topology to the underlying objects. User Clusters cluster.x-k8s.io/annotations-from-machine It is set on nodes to track the annotations that originated from machines. Cluster API Nodes (workload cluster) cluster.x-k8s.io/cloned-from-groupkind It is the annotation that stores the group-kind of the template from which the current resource has been cloned from. Cluster API All Cluster API objects cloned from a template cluster.x-k8s.io/cloned-from-name It is the annotation that stores the name of the template from which the current resource has been cloned from. Cluster API All Cluster API objects cloned from a template cluster.x-k8s.io/cluster-name It is set on nodes identifying the name of the cluster the node belongs to. Cluster API Nodes (workload cluster) cluster.x-k8s.io/cluster-namespace It is set on nodes identifying the namespace of the cluster the node belongs to. Cluster API Nodes (workload cluster) cluster.x-k8s.io/delete-machine It marks control plane and worker nodes that will be given priority for deletion when KCP or a MachineSet scales down. It is given top priority on all delete policies. User Machines cluster.x-k8s.io/disable-machine-create It can be used to signal a MachineSet to stop creating new machines. It is utilized in the OnDelete MachineDeploymentStrategy to allow the MachineDeployment controller to scale down older MachineSets when Machines are deleted and add the new replicas to the latest MachineSet. Cluster API MachineSets cluster.x-k8s.io/labels-from-machine It is set on nodes to track the labels that originated from machines. Cluster API Nodes (workload cluster) cluster.x-k8s.io/managed-by It can be applied to InfraCluster resources to signify that some external system is managing the cluster infrastructure. Provider InfraCluster controllers will ignore resources with this annotation. An external controller must fulfill the contract of the InfraCluster resource. External infrastructure providers should ensure that the annotation, once set, cannot be removed. User InfraClusters cluster.x-k8s.io/machine It is set on nodes identifying the machine the node belongs to. Cluster API Nodes (workload cluster) cluster.x-k8s.io/owner-kind It is set on nodes identifying the machine’s owner kind the node belongs to. Cluster API Nodes (workload cluster) cluster.x-k8s.io/owner-name It is set on nodes identifying the machine’s owner name the node belongs to. Cluster API Nodes (workload cluster) cluster.x-k8s.io/paused It can be applied to any Cluster API object to prevent a controller from processing a resource. Controllers working with Cluster API objects must check the existence of this annotation on the reconciled object. User All Cluster API objects cluster.x-k8s.io/remediate-machine It can be applied to a machine to manually mark it for remediation by MachineHealthCheck reconciler. User Machines cluster.x-k8s.io/replicas-managed-by It can be applied to MachinePool resources to signify that some external system is managing infrastructure scaling for that pool. See the MachinePool documentation for more details. Infrastructure Providers MachinePools cluster.x-k8s.io/skip-remediation It is used to mark the machines that should not be considered for remediation by MachineHealthCheck reconciler. User Machines clusterctl.cluster.x-k8s.io/block-move BlockMoveAnnotation prevents the cluster move operation from starting if it is defined on at least one of the objects in scope. Provider controllers are expected to set the annotation on resources that cannot be instantaneously paused and remove the annotation when the resource has been actually paused. Providers All Cluster API objects clusterctl.cluster.x-k8s.io/delete-for-move DeleteForMoveAnnotation will be set to objects that are going to be deleted from the source cluster after being moved to the target cluster during the clusterctl move operation. It will help any validation webhook to take decision based on it. Cluster API All Cluster API objects clusterctl.cluster.x-k8s.io/skip-crd-name-preflight-check Can be placed on provider CRDs, so that clusterctl doesn’t emit an error if the CRD doesn’t comply with Cluster APIs naming scheme. Only CRDs that are referenced by core Cluster API CRDs have to comply with the naming scheme. Providers CRDs controlplane.cluster.x-k8s.io/remediation-for It is a machine annotation that links a new machine to the unhealthy machine it is replacing. Cluster API Machines controlplane.cluster.x-k8s.io/remediation-in-progress It is a KCP annotation that tracks that the system is in between having deleted an unhealthy machine and recreating its replacement. Cluster API KubeadmControlPlanes controlplane.cluster.x-k8s.io/skip-coredns It explicitly skips reconciling CoreDNS if set. User KubeadmControlPlanes controlplane.cluster.x-k8s.io/skip-kube-proxy It explicitly skips reconciling kube-proxy if set. User KubeadmControlPlanes crd-migration.cluster.x-k8s.io/observed-generation It indicates on a CRD for which generation CRD migration is completed. Cluster API CustomResourceDefinitions machine.cluster.x-k8s.io/certificates-expiry It captures the expiry date of the machine certificates in RFC3339 format. It is used to trigger rollout of control plane machines before certificates expire. It can be set on BootstrapConfig and Machine objects. The value set on Machine object takes precedence. The annotation is only used by control plane machines. Cluster API/User BootstrapConfigs, Machines machine.cluster.x-k8s.io/exclude-node-draining It explicitly skips node draining if set. User Machines machine.cluster.x-k8s.io/exclude-wait-for-node-volume-detach It explicitly skips the waiting for node volume detaching if set. User Machines machinedeployment.clusters.x-k8s.io/desired-replicas It is the desired replicas for a machine deployment recorded as an annotation in its machine sets. Helps in separating scaling events from the rollout process and for determining if the new machine set for a deployment is really saturated. Cluster API MachineSets machinedeployment.clusters.x-k8s.io/max-replicas It is the maximum replicas a deployment can have at a given point, which is machinedeployment.spec.replicas + maxSurge. Used by the underlying machine sets to estimate their proportions in case the deployment has surge replicas. Cluster API MachineSets machinedeployment.clusters.x-k8s.io/revision It is the revision annotation of a machine deployment’s machine sets which records its rollout sequence. Cluster API MachineSets machineset.cluster.x-k8s.io/skip-preflight-checks It can be applied on MachineDeployment, MachineSet and corresponding BootstrapConfigTemplate resources to specify a comma-separated list of preflight checks that should be skipped during MachineSet reconciliation. Supported preflight checks are: All, KubeadmVersionSkew, KubernetesVersionSkew, ControlPlaneIsStable. User MachineDeployments, MachineSets, BootstrapConfigTemplates pre-drain.delete.hook.machine.cluster.x-k8s.io It specifies the prefix we search each annotation for during the pre-drain.delete lifecycle hook to pause reconciliation of deletion. These hooks will prevent removal of draining the associated node until all are removed. User Machines pre-terminate.delete.hook.machine.cluster.x-k8s.io It specifies the prefix we search each annotation for during the pre-terminate.delete lifecycle hook to pause reconciliation of deletion. These hooks will prevent removal of an instance from an infrastructure provider until all are removed. User Machines topology.cluster.x-k8s.io/defer-upgrade It can be used to defer the Kubernetes upgrade of a single MachineDeployment topology. If the annotation is set on a MachineDeployment topology in Cluster.spec.topology.workers, the Kubernetes upgrade for this MachineDeployment topology is deferred. It doesn’t affect other MachineDeployment topologies. Cluster API MachineDeployments in Cluster.topology topology.cluster.x-k8s.io/dry-run It is an annotation that gets set on objects by the topology controller only during a server side dry run apply operation. It is used for validating update webhooks for objects which get updated by template rotation (e.g. InfrastructureMachineTemplate). When the annotation is set and the admission request is a dry run, the webhook should deny validation due to immutability. By that the request will succeed (without any changes to the actual object because it is a dry run) and the topology controller will receive the resulting object. Cluster API Template rotation objects topology.cluster.x-k8s.io/hold-upgrade-sequence It can be used to hold the entire MachineDeployment upgrade sequence. If the annotation is set on a MachineDeployment topology in Cluster.spec.topology.workers, the Kubernetes upgrade for this MachineDeployment topology and all subsequent ones is deferred. Cluster API MachineDeployments in Cluster.topology topology.cluster.x-k8s.io/upgrade-concurrency It can be used to configure the maximum concurrency while upgrading MachineDeployments of a classy Cluster. It is set as a top level annotation on the Cluster object. The value should be >= 1. If unspecified the upgrade concurrency will default to 1. Cluster API Clusters unsafe.topology.cluster.x-k8s.io/disable-update-class-name-check It can be used to disable the webhook check on update that disallows a pre-existing Cluster to be populated with Topology information and Class. User Clusters unsafe.topology.cluster.x-k8s.io/disable-update-version-check It can be used to disable the webhook checks on update that disallows updating the .topology.spec.version on certain conditions. User Clusters
Following annotation are used by CAPI internally.
Name, meaning and semantic of internal annotations can change anytime.
Users must not change or remove internal annotation on CAPI resources, because this can lead to issues or unexpected behaviour of the system.
Annotation Note Applies to
in-place-updates.internal.cluster.x-k8s.io/acknowledge-move This annotation is added by the MD controller to a MachineSet when it acknowledges a machine pending acknowledge after being moved from an oldMS MachineSet in-place-updates.internal.cluster.x-k8s.io/move-machines-to-machineset This annotation is added by the MD controller to the oldMS when it should scale down by moving machines that can be updated in-place to the newMS instead of deleting them. MachineSet in-place-updates.internal.cluster.x-k8s.io/pending-acknowledge-move This annotation is by the MS controller to a machine when being moved from the oldMS to the newMS Machine in-place-updates.internal.cluster.x-k8s.io/receive-machines-from-machinesets This annotation is added by the MD controller to the newMS when it should receive replicas from an oldMS MachineSet in-place-updates.internal.cluster.x-k8s.io/update-in-progress This annotation is added to machines by the controller owning the Machine when in-place update is started Machine topology.internal.cluster.x-k8s.io/upgrade-step This is an annotation used by the topology controller to a cluster to track upgrade steps. Clusters
There are many resources that appear in the Cluster API. In this section, we use diagrams to illustrate the most common relationships between Cluster API resources.
The straight lines represent “management”. For example, “MachineSet manages Machines”. The dotted line represents “reference”. For example, “Machine’s spec.infrastructureRef field references FooMachine”.
The direction of the arrows indicates the direction of “management” or “reference”. For example, “the relationship between MachineSet and Machine is management from MachineSet to Machine”, so the arrow points from MachineSet to Machine.
Cluster API controllers implement consistent metadata (labels & annotations) propagation across the core API resources.
This behaviour tries to be consistent with Kubernetes apps/v1 Deployment and ReplicaSet.
New providers should behave accordingly fitting within the following pattern:
ControlPlaneTopology labels are labels and annotations are continuously propagated to ControlPlane top-level labels and annotations
and ControlPlane MachineTemplate labels and annotations.
.spec.topology.controlPlane.metadata.labels => ControlPlane.labels, ControlPlane.spec.machineTemplate.metadata.labels.spec.topology.controlPlane.metadata.annotations => ControlPlane.annotations, ControlPlane.spec.machineTemplate.metadata.annotations
MachineDeploymentTopology labels and annotations are continuously propagated to MachineDeployment top-level labels and annotations
and MachineDeployment MachineTemplate labels and annotations.
.spec.topology.machineDeployments[i].metadata.labels => MachineDeployment.labels, MachineDeployment.spec.template.metadata.labels.spec.topology.machineDeployments[i].metadata.annotations => MachineDeployment.annotations, MachineDeployment.spec.template.metadata.annotations
ControlPlaneClass labels are labels and annotations are continuously propagated to ControlPlane top-level labels and annotations
and ControlPlane MachineTemplate labels and annotations.
.spec.controlPlane.metadata.labels => ControlPlane.labels, ControlPlane.spec.machineTemplate.metadata.labels.spec.controlPlane.metadata.annotations => ControlPlane.annotations, ControlPlane.spec.machineTemplate.metadata.annotations
Note: ControlPlaneTopology labels and annotations take precedence over ControlPlaneClass labels and annotations.
MachineDeploymentClass labels and annotations are continuously propagated to MachineDeployment top-level labels and annotations
and MachineDeployment MachineTemplate labels and annotations.
.spec.workers.machineDeployments[i].template.metadata.labels => MachineDeployment.labels, MachineDeployment.spec.template.metadata.labels.spec.worker.machineDeployments[i].template.metadata.annotations => MachineDeployment.annotations, MachineDeployment.spec.template.metadata.annotations
Note: MachineDeploymentTopology labels and annotations take precedence over MachineDeploymentClass labels and annotations.
Top-level labels and annotations do not propagate at all.
.labels => Not propagated..annotations => Not propagated.
MachineTemplate labels and annotations continuously propagate to new and existing Machines, InfraMachines and BootstrapConfigs.
.spec.machineTemplate.metadata.labels => Machine.labels, InfraMachine.labels, BootstrapConfig.labels.spec.machineTemplate.metadata.annotations => Machine.annotations, InfraMachine.annotations, BootstrapConfig.annotations
Top-level labels do not propagate at all.
Top-level annotations continuously propagate to MachineSets top-level annotations.
.labels => Not propagated..annotations => MachineSet.annotations
Template labels continuously propagate to MachineSets top-level and MachineSets template metadata.
Template annotations continuously propagate to MachineSets template metadata.
.spec.template.metadata.labels => MachineSet.labels, MachineSet.spec.template.metadata.labels.spec.template.metadata.annotations => MachineSet.spec.template.metadata.annotations
Top-level labels and annotations do not propagate at all.
.labels => Not propagated..annotations => Not propagated.
Template labels and annotations continuously propagate to new and existing Machines, InfraMachines and BootstrapConfigs.
.spec.template.metadata.labels => Machine.labels, InfraMachine.labels, BootstrapConfig.labels.spec.template.metadata.annotations => Machine.annotations, InfraMachine.annotations, BootstrapConfig.annotations
Top-level labels and annotations that meet a specific criteria are propagated to the Node labels and annotations.
.labels.[label-meets-criteria] => Node.labels.annotations.[annotation-meets-criteria] => Node.annotations
Labels that meet at least one of the following criteria are always propagated to the Node:
Has node-role.kubernetes.io as prefix.
Belongs to node-restriction.kubernetes.io domain.
Belongs to node.cluster.x-k8s.io domain.
In addition, any labels that match at least one of the regexes provided by the --additional-sync-machine-labels flag on the manager will be synced from the Machine to the Node.
Annotations that meet at least one of the following criteria are always propagated to the Node:
Belongs to node.cluster.x-k8s.io domain
In addition, any annotations that match at least one of the regexes provided by the --additional-sync-machine-annotations flag on the manager will be synced from the Machine to the Node.
While this is not technically metadata propagation, it is worth to notice that when using Cluster API managed topologies,
by using patches it is also possible to manage labels and annotations in resources that are originated from templates linked to the ClusterClass. More specifically:
Patches for ControlPlaneTemplates, InfraClusterTemplates, MachinePoolTemplates and BootstrapConfigTemplates (only if referenced from a MachinePool class):
Changes to .spec.template.metadata.{labels|annotations} will be reflected in .metadata.{labels|annotations} of the corresponding generated object.
e.g. KubeadmControlPlaneTemplate.spec.template.metadata.labels --> KubeadmControlPlane.metadata.labels
Patches for InfraMachineTemplates, BootstrapConfigTemplates (except when referenced from a MachinePool)
Changes to .metadata.{labels|annotations} will be reflected in .metadata.{labels|annotations} of the corresponding generated template.
e.g. VSphereMachineTemplate.metadata.labels --> VSphereMachineTemplate.metadata.labels
Changes to .spec.template.metadata.{labels|annotations} will be reflected in .spec.template.metadata.{labels|annotations} of the corresponding generated template.
e.g. VSphereMachineTemplate.spec.template.metadata.labels --> VSphereMachineTemplate.spec.template.metadata.labels
Cluster API uses Kubernetes owner references to track relationships between objects. These references are used
for Kubernetes garbage collection, which is also used for Cluster deletion in CAPI. They are also used in places where
the ownership hierarchy is important, for example when using clusterctl move.
CAPI uses owner references in an opinionated way. The following guidelines should be considered:
Objects should always be created with an owner reference to prevent leaking objects. Initial ownerReferences can be
Owner references should be re-reconciled if they are lost for an object. This is required as some tools - e.g. velero -
may delete owner references on objects.
Owner references should be kept to the most recent apiVersion.
This ensures garbage collection still works after an old apiVersion is no longer served.
Owner references should not be added unless required.
Multiple owner references on a single object should be exceptional.
The below tables map out the a reference for ownership relationships for the objects in a Cluster API cluster. The tables
are identical for classy and non-classy clusters.
Providers may implement their own ownership relationships which may or may not map directly to the below tables.
These owner references are almost all tested in an end-to-end test . Lack of testing is noted where this is not the case.
CAPI Providers can take advantage of the e2e test framework to ensure their owner references are predictable, documented and stable.
type Owner Controller Note
Secret KubeadmControlPlane yes For cluster certificates Secret KubeadmConfig yes For bootstrap secrets Secret ClusterResourceSet no When referenced by CRS. Not tested in e2e. ConfigMap ClusterResourceSet no When referenced by CRS
type Owner Controller Note
ExtensionConfig None ClusterClass None Cluster None MachineDeployments Cluster no MachineSet MachineDeployment yes Machine MachineSet yes When created by MachineSet Machine KubeadmControlPlane yes When created by KCP MachineHealthChecks Cluster no
type Owner Controller Note
ClusterResourcesSet None ClusterResourcesSetBinding ClusterResourceSet no May have many CRS owners MachinePool Cluster no
type Owner Controller Note
KubeadmControlPlane Cluster yes KubeadmControlPlaneTemplate ClusterClass no
type Owner Controller Note
KubeadmConfig Machine yes When created for Machine KubeadmConfig MachinePool yes When created for MachinePool KubeadmConfigTemplate Cluster no When referenced in MachineDeployment spec KubeadmConfigTemplate ClusterClass no When referenced in ClusterClass
type Owner Controller Note
InfrastructureMachine Machine yes InfrastructureMachineTemplate Cluster no When created by cluster topology controller InfrastructureMachineTemplate ClusterClass no When referenced in a ClusterClass InfrastructureCluster Cluster yes InfrastructureClusterTemplate ClusterClass no InfrastructureMachinePool MachinePool yes
Package v1beta2 contains API Schema definitions for the addons v1beta2 API group.
ClusterResourceSet is the Schema for the clusterresourcesets API.
For advanced use cases an add-on provider should be used instead.
Appears in:
Field Description Default Validation
apiVersion string addons.cluster.x-k8s.io/v1beta2kind string ClusterResourceSetmetadata ObjectMeta Refer to Kubernetes API documentation for fields of metadata. MinProperties: 1 spec ClusterResourceSetSpec spec is the desired state of ClusterResourceSet. Required: {} status ClusterResourceSetStatus status is the observed state of ClusterResourceSet. MinProperties: 1
ClusterResourceSetBinding lists all matching ClusterResourceSets with the cluster it belongs to.
Appears in:
Field Description Default Validation
apiVersion string addons.cluster.x-k8s.io/v1beta2kind string ClusterResourceSetBindingmetadata ObjectMeta Refer to Kubernetes API documentation for fields of metadata. MinProperties: 1 spec ClusterResourceSetBindingSpec spec is the desired state of ClusterResourceSetBinding. Required: {}
ClusterResourceSetBindingList contains a list of ClusterResourceSetBinding.
Field Description Default Validation
apiVersion string addons.cluster.x-k8s.io/v1beta2kind string ClusterResourceSetBindingListmetadata ListMeta Refer to Kubernetes API documentation for fields of metadata. Optional: {} items ClusterResourceSetBinding arrayitems is the list of ClusterResourceSetBindings.
ClusterResourceSetBindingSpec defines the desired state of ClusterResourceSetBinding.
Appears in:
Field Description Default Validation
bindings ResourceSetBinding arraybindings is a list of ClusterResourceSets and their resources. MaxItems: 100 clusterName string clusterName is the name of the Cluster this binding applies to. MaxLength: 63
ClusterResourceSetDeprecatedStatus groups all the status fields that are deprecated and will be removed in a future version.
See https://github.com/kubernetes-sigs/cluster-api/blob/main/docs/proposals/20240916-improve-status-in-CAPI-resources.md for more context.
Appears in:
Field Description Default Validation
v1beta1 ClusterResourceSetV1Beta1DeprecatedStatus v1beta1 groups all the status fields that are deprecated and will be removed when support for v1beta1 will be dropped. Optional: {}
ClusterResourceSetList contains a list of ClusterResourceSet.
Field Description Default Validation
apiVersion string addons.cluster.x-k8s.io/v1beta2kind string ClusterResourceSetListmetadata ListMeta Refer to Kubernetes API documentation for fields of metadata. Optional: {} items ClusterResourceSet arrayitems is the list of ClusterResourceSets.
ClusterResourceSetSpec defines the desired state of ClusterResourceSet.
Appears in:
Field Description Default Validation
clusterSelector LabelSelector clusterSelector is the label selector for Clusters. The Clusters that are Required: {} resources ResourceRef arrayresources is a list of Secrets/ConfigMaps where each contains 1 or more resources to be applied to remote clusters. MaxItems: 100 strategy string strategy is the strategy to be used during applying resources. Defaults to ApplyOnce. This field is immutable. Enum: [ApplyOnce Reconcile]
ClusterResourceSetStatus defines the observed state of ClusterResourceSet.
Validation:
Appears in:
Field Description Default Validation
conditions Condition arrayconditions represents the observations of a ClusterResourceSet’s current state. MaxItems: 32 observedGeneration integer observedGeneration reflects the generation of the most recently observed ClusterResourceSet. Minimum: 1 deprecated ClusterResourceSetDeprecatedStatus deprecated groups all the status fields that are deprecated and will be removed when all the nested field are removed. Optional: {}
ClusterResourceSetV1Beta1DeprecatedStatus groups all the status fields that are deprecated and will be removed when support for v1beta1 will be dropped.
See https://github.com/kubernetes-sigs/cluster-api/blob/main/docs/proposals/20240916-improve-status-in-CAPI-resources.md for more context.
Appears in:
Field Description Default Validation
conditions Conditions conditions defines current state of the ClusterResourceSet. Optional: {}
ResourceBinding shows the status of a resource that belongs to a ClusterResourceSet matched by the owner cluster of the ClusterResourceSetBinding object.
Appears in:
Field Description Default Validation
name string name of the resource that is in the same namespace with ClusterResourceSet object. MaxLength: 253 kind string kind of the resource. Supported kinds are: Secrets and ConfigMaps. Enum: [Secret ConfigMap] hash string hash is the hash of a resource’s data. This can be used to decide if a resource is changed. MaxLength: 256 applied boolean applied is to track if a resource is applied to the cluster or not. Required: {}
ResourceRef specifies a resource.
Appears in:
Field Description Default Validation
name string name of the resource that is in the same namespace with ClusterResourceSet object. MaxLength: 253 kind string kind of the resource. Supported kinds are: Secrets and ConfigMaps. Enum: [Secret ConfigMap]
ResourceSetBinding keeps info on all of the resources in a ClusterResourceSet.
Appears in:
Field Description Default Validation
clusterResourceSetName string clusterResourceSetName is the name of the ClusterResourceSet that is applied to the owner cluster of the binding. MaxLength: 253 resources ResourceBinding arrayresources is a list of resources that the ClusterResourceSet has. MaxItems: 100
Package v1beta2 contains API Schema definitions for the kubeadm v1beta2 API group.
APIEndpoint struct contains elements of API server instance deployed on a node.
Validation:
Appears in:
Field Description Default Validation
advertiseAddress string advertiseAddress sets the IP address for the API server to advertise. MaxLength: 39 bindPort integer bindPort sets the secure port for the API Server to bind to. Minimum: 1
APIServer holds settings necessary for API server deployments in the cluster.
Validation:
Appears in:
Field Description Default Validation
extraArgs Arg arrayextraArgs is a list of args to pass to the control plane component. MaxItems: 100 extraVolumes HostPathMount arrayextraVolumes is an extra set of host volumes, mounted to the control plane component. MaxItems: 100 extraEnvs EnvVar extraEnvs is an extra set of environment variables to pass to the control plane component. MaxItems: 100 certSANs string array certSANs sets extra Subject Alternative Names for the API Server signing cert. MaxItems: 100
Arg represents an argument with a name and a value.
Appears in:
Field Description Default Validation
name string name is the Name of the extraArg. MaxLength: 256 value string value is the Value of the extraArg. MaxLength: 1024
BootstrapToken describes one bootstrap token, stored as a Secret in the cluster.
Appears in:
Field Description Default Validation
token BootstrapTokenString token is used for establishing bidirectional trust between nodes and control-planes. MaxLength: 23 description string description sets a human-friendly message why this token exists and what it’s used MaxLength: 512 ttlSeconds integer ttlSeconds defines the time to live for this token. Defaults to 24h. Minimum: 0 usages string array usages describes the ways in which this token can be used. Can by default be used MaxItems: 100 groups string array groups specifies the extra groups that this token will authenticate as when/if MaxItems: 100
BootstrapTokenDiscovery is used to set the options for bootstrap token based discovery.
Validation:
Appears in:
Field Description Default Validation
token string token is a token used to validate cluster information MaxLength: 512 apiServerEndpoint string apiServerEndpoint is an IP or domain name to the API server from which info will be fetched. MaxLength: 512 caCertHashes string array caCertHashes specifies a set of public key pins to verify:“, MaxItems: 100 unsafeSkipCAVerification boolean unsafeSkipCAVerification allows token-based discovery Optional: {}
BootstrapTokenString is a token of the format abcdef.abcdef0123456789 that is used
for both validation of the practically of the API server from a joining node’s point
of view and as an authentication method for the node in the bootstrap phase of
“kubeadm join”. This token is and should be short-lived.
Validation:
MaxLength: 23
MinLength: 1
Type: string
Appears in:
ClusterConfiguration contains cluster-wide configuration for a kubeadm cluster.
Validation:
Appears in:
Field Description Default Validation
etcd Etcd etcd holds configuration for etcd. MinProperties: 1 controlPlaneEndpoint string controlPlaneEndpoint sets a stable IP address or DNS name for the control plane; it MaxLength: 512 apiServer APIServer apiServer contains extra settings for the API server control plane component MinProperties: 1 controllerManager ControllerManager controllerManager contains extra settings for the controller manager control plane component MinProperties: 1 scheduler Scheduler scheduler contains extra settings for the scheduler control plane component MinProperties: 1 dns DNS dns defines the options for the DNS add-on installed in the cluster. MinProperties: 1 certificatesDir string certificatesDir specifies where to store or look for all required certificates./etc/kubernetes/pki MaxLength: 512 imageRepository string imageRepository sets the container registry to pull images from. MaxLength: 512 featureGates object (keys:string, values:boolean) featureGates enabled by the user. Optional: {} certificateValidityPeriodDays integer certificateValidityPeriodDays specifies the validity period for non-CA certificates generated by kubeadm. Maximum: 1095 caCertificateValidityPeriodDays integer caCertificateValidityPeriodDays specifies the validity period for CA certificates generated by Cluster API. Maximum: 36500 encryptionAlgorithm EncryptionAlgorithmType encryptionAlgorithm holds the type of asymmetric encryption algorithm used for keys and certificates. Enum: [ECDSA-P256 ECDSA-P384 RSA-2048 RSA-3072 RSA-4096]
ContainerLinuxConfig contains CLC-specific configuration.
We use a structured type here to allow adding additional fields, for example ‘version’.
Validation:
Appears in:
Field Description Default Validation
additionalConfig string additionalConfig contains additional configuration to be merged with the Ignition MaxLength: 32768 strict boolean strict controls if AdditionalConfig should be strictly parsed. If so, warnings are treated as errors. Optional: {}
ControllerManager holds settings necessary for controller-manager deployments in the cluster.
Validation:
Appears in:
Field Description Default Validation
extraArgs Arg arrayextraArgs is a list of args to pass to the control plane component. MaxItems: 100 extraVolumes HostPathMount arrayextraVolumes is an extra set of host volumes, mounted to the control plane component. MaxItems: 100 extraEnvs EnvVar extraEnvs is an extra set of environment variables to pass to the control plane component. MaxItems: 100
DNS defines the DNS addon that should be used in the cluster.
Validation:
Appears in:
Field Description Default Validation
imageRepository string imageRepository sets the container registry to pull images from. MaxLength: 512 imageTag string imageTag allows to specify a tag for the image. MaxLength: 256
Discovery specifies the options for the kubelet to use during the TLS Bootstrap process.
Validation:
Appears in:
Field Description Default Validation
bootstrapToken BootstrapTokenDiscovery bootstrapToken is used to set the options for bootstrap token based discovery MinProperties: 1 file FileDiscovery file is used to specify a file or URL to a kubeconfig file from which to load cluster information Optional: {} tlsBootstrapToken string tlsBootstrapToken is a token used for TLS bootstrapping.must be set in case the KubeConfigFile does not contain any other authentication information MaxLength: 512
DiskSetup defines input for generated disk_setup and fs_setup in cloud-init.
Validation:
Appears in:
Field Description Default Validation
partitions Partition arraypartitions specifies the list of the partitions to setup. ExactlyOneOf: [layout diskLayout] filesystems Filesystem arrayfilesystems specifies the list of file systems to setup. MaxItems: 100
Underlying type: string
Encoding specifies the cloud-init file encoding.
Validation:
Enum: [base64 gzip gzip+base64]
Appears in:
Field Description
base64Base64 implies the contents of the file are encoded as base64. gzipGzip implies the contents of the file are encoded with gzip. gzip+base64GzipBase64 implies the contents of the file are first base64 encoded and then gzip encoded.
Underlying type: string
EncryptionAlgorithmType can define an asymmetric encryption algorithm type.
Validation:
Enum: [ECDSA-P256 ECDSA-P384 RSA-2048 RSA-3072 RSA-4096]
Appears in:
Field Description
ECDSA-P256EncryptionAlgorithmECDSAP256 defines the ECDSA encryption algorithm type with curve P256. ECDSA-P384EncryptionAlgorithmECDSAP384 defines the ECDSA encryption algorithm type with curve P384. RSA-2048EncryptionAlgorithmRSA2048 defines the RSA encryption algorithm type with key size 2048 bits. RSA-3072EncryptionAlgorithmRSA3072 defines the RSA encryption algorithm type with key size 3072 bits. RSA-4096EncryptionAlgorithmRSA4096 defines the RSA encryption algorithm type with key size 4096 bits.
EnvVar represents an environment variable present in a Container.
Appears in:
Field Description Default Validation
name string Name of the environment variable. value string Variable references $(VAR_NAME) are expanded Optional: {} valueFrom EnvVarSource Source for the environment variable’s value. Cannot be used if value is not empty. Optional: {}
Etcd contains elements describing Etcd configuration.
Validation:
Appears in:
Field Description Default Validation
local LocalEtcd local provides configuration knobs for configuring the local etcd instance MinProperties: 1 external ExternalEtcd external describes how to connect to an external etcd cluster Optional: {}
ExternalEtcd describes an external etcd cluster.
Kubeadm has no knowledge of where certificate files live and they must be supplied.
Appears in:
Field Description Default Validation
endpoints string array endpoints of etcd members. Required for ExternalEtcd. MaxItems: 50 caFile string caFile is an SSL Certificate Authority file used to secure etcd communication. MaxLength: 512 certFile string certFile is an SSL certification file used to secure etcd communication. MaxLength: 512 keyFile string keyFile is an SSL key file used to secure etcd communication. MaxLength: 512
File defines the input for generating write_files in cloud-init.
Appears in:
Field Description Default Validation
path string path specifies the full path on disk where to store the file. MaxLength: 512 owner string owner specifies the ownership of the file, e.g. “root:root”. MaxLength: 256 permissions string permissions specifies the permissions to assign to the file, e.g. “0640”. MaxLength: 16 encoding Encoding encoding specifies the encoding of the file contents. Enum: [base64 gzip gzip+base64] append boolean append specifies whether to append Content to existing file if Path exists. Optional: {} content string content is the actual content of the file. MaxLength: 10240 contentFrom FileSource contentFrom is a referenced source of content to populate the file. Optional: {} contentFormat FileContentFormat contentFormat specifies how to interpret content after it is resolved (inline or from contentFrom). Enum: [Raw Template]
Underlying type: string
FileContentFormat specifies how file content is interpreted after resolving content/contentFrom and before writing bootstrap data.
Validation:
Appears in:
Field Description
RawFileContentFormatRaw means content is used verbatim. TemplateFileContentFormatTemplate means content is rendered as a Go text/template.
FileDiscovery is used to specify a file or URL to a kubeconfig file from which to load cluster information.
Appears in:
Field Description Default Validation
kubeConfigPath string kubeConfigPath is used to specify the actual file path or URL to the kubeconfig file from which to load cluster information MaxLength: 512 kubeConfig FileDiscoveryKubeConfig kubeConfig is used (optionally) to generate a KubeConfig based on the KubeadmConfig’s information. Optional: {}
FileDiscoveryKubeConfig contains elements describing how to generate the kubeconfig for bootstrapping.
Appears in:
Field Description Default Validation
cluster KubeConfigCluster cluster contains information about how to communicate with the kubernetes cluster. MinProperties: 1 user KubeConfigUser user contains information that describes identity information. MinProperties: 1
FileSource is a union of all possible external source types for file data.
Only one field may be populated in any given instance. Developers adding new
sources of data for target systems should add them here.
Appears in:
Field Description Default Validation
secret SecretFileSource secret represents a secret that should populate this file. Required: {}
Filesystem defines the file systems to be created.
Appears in:
Field Description Default Validation
device string device specifies the device name MaxLength: 256 filesystem string filesystem specifies the file system type. MaxLength: 128 label string label specifies the file system label to be used. If set to None, no label is used. MaxLength: 512 partition string partition specifies the partition to use. The valid options are: “auto|any”, “auto”, “any”, “none”, and , where NUM is the actual partition number. MaxLength: 128 overwrite boolean overwrite defines whether or not to overwrite any existing filesystem. Optional: {} replaceFS string replaceFS is a special directive, used for Microsoft Azure that instructs cloud-init to replace a file system of <FS_TYPE>. MaxLength: 128 extraOpts string array extraOpts defined extra options to add to the command for creating the file system. MaxItems: 100
Underlying type: string
Format specifies the output format of the bootstrap data
Validation:
Enum: [cloud-config ignition]
Appears in:
Field Description
cloud-configCloudConfig make the bootstrap data to be of cloud-config format. ignitionIgnition make the bootstrap data to be of Ignition format.
HostPathMount contains elements describing volumes that are mounted from the
host.
Appears in:
Field Description Default Validation
name string name of the volume inside the pod template. MaxLength: 512 hostPath string hostPath is the path in the host that will be mounted inside MaxLength: 512 mountPath string mountPath is the path inside the pod where hostPath will be mounted. MaxLength: 512 readOnly boolean readOnly controls write access to the volume Optional: {} pathType HostPathType pathType is the type of the HostPath. Optional: {}
IgnitionSpec contains Ignition specific configuration.
Validation:
Appears in:
Field Description Default Validation
containerLinuxConfig ContainerLinuxConfig containerLinuxConfig contains CLC specific configuration. MinProperties: 1
InitConfiguration contains a list of elements that is specific “kubeadm init”-only runtime
information.
Validation:
Appears in:
Field Description Default Validation
bootstrapTokens BootstrapToken arraybootstrapTokens is respected at kubeadm init time and describes a set of Bootstrap Tokens to create. MaxItems: 100 nodeRegistration NodeRegistrationOptions nodeRegistration holds fields that relate to registering the new control-plane node to the cluster. MinProperties: 1 localAPIEndpoint APIEndpoint localAPIEndpoint represents the endpoint of the API server instance that’s deployed on this control plane node MinProperties: 1 skipPhases string array skipPhases is a list of phases to skip during command execution. MaxItems: 50 patches Patches patches contains options related to applying patches to components deployed by kubeadm during MinProperties: 1 timeouts Timeouts timeouts holds various timeouts that apply to kubeadm commands. MinProperties: 1
JoinConfiguration contains elements describing a particular node.
Validation:
Appears in:
Field Description Default Validation
nodeRegistration NodeRegistrationOptions nodeRegistration holds fields that relate to registering the new control-plane node to the cluster. MinProperties: 1 caCertPath string caCertPath is the path to the SSL certificate authority used to MaxLength: 512 discovery Discovery discovery specifies the options for the kubelet to use during the TLS Bootstrap process MinProperties: 1 controlPlane JoinControlPlane controlPlane defines the additional control plane instance to be deployed on the joining node. Optional: {} skipPhases string array skipPhases is a list of phases to skip during command execution. MaxItems: 50 patches Patches patches contains options related to applying patches to components deployed by kubeadm during MinProperties: 1 timeouts Timeouts timeouts holds various timeouts that apply to kubeadm commands. MinProperties: 1
JoinControlPlane contains elements describing an additional control plane instance to be deployed on the joining node.
Appears in:
Field Description Default Validation
localAPIEndpoint APIEndpoint localAPIEndpoint represents the endpoint of the API server instance to be deployed on this node. MinProperties: 1
KubeConfigAuthExec specifies a command to provide client credentials. The command is exec’d
and outputs structured stdout holding credentials.
See the client.authentication.k8s.io API group for specifications of the exact input
and output format.
Appears in:
Field Description Default Validation
command string command to execute. MaxLength: 1024 args string array args is the arguments to pass to the command when executing it. MaxItems: 100 env KubeConfigAuthExecEnv arrayenv defines additional environment variables to expose to the process. These MaxItems: 100 apiVersion string apiVersion is preferred input version of the ExecInfo. The returned ExecCredentials MUST use MaxLength: 512 provideClusterInfo boolean provideClusterInfo determines whether or not to provide cluster information, Optional: {}
KubeConfigAuthExecEnv is used for setting environment variables when executing an exec-based
credential plugin.
Appears in:
Field Description Default Validation
name string name of the environment variable MaxLength: 512 value string value of the environment variable MaxLength: 512
KubeConfigAuthProvider holds the configuration for a specified auth provider.
Appears in:
Field Description Default Validation
name string name is the name of the authentication plugin. MaxLength: 256 config object (keys:string, values:string) config holds the parameters for the authentication plugin. Optional: {}
KubeConfigCluster contains information about how to communicate with a kubernetes cluster.
Adapted from clientcmdv1.Cluster.
Validation:
Appears in:
Field Description Default Validation
server string server is the address of the kubernetes cluster (https://hostname:port). MaxLength: 512 tlsServerName string tlsServerName is used to check server certificate. If TLSServerName is empty, the hostname used to contact the server is used. MaxLength: 512 insecureSkipTLSVerify boolean insecureSkipTLSVerify skips the validity check for the server’s certificate. This will make your HTTPS connections insecure. Optional: {} certificateAuthorityData integer array certificateAuthorityData contains PEM-encoded certificate authority certificates. MaxLength: 51200 proxyURL string proxyURL is the URL to the proxy to be used for all requests made by this MaxLength: 512
KubeConfigUser contains information that describes identity information.
This is used to tell the kubernetes cluster who you are.
Either authProvider or exec must be filled.
Adapted from clientcmdv1.AuthInfo.
Validation:
Appears in:
Field Description Default Validation
authProvider KubeConfigAuthProvider authProvider specifies a custom authentication plugin for the kubernetes cluster. Optional: {} exec KubeConfigAuthExec exec specifies a custom exec-based authentication plugin for the kubernetes cluster. Optional: {}
KubeadmConfig is the Schema for the kubeadmconfigs API.
Appears in:
Field Description Default Validation
apiVersion string bootstrap.cluster.x-k8s.io/v1beta2kind string KubeadmConfigmetadata ObjectMeta Refer to Kubernetes API documentation for fields of metadata. MinProperties: 1 spec KubeadmConfigSpec spec is the desired state of KubeadmConfig. MinProperties: 1 status KubeadmConfigStatus status is the observed state of KubeadmConfig. MinProperties: 1
KubeadmConfigDeprecatedStatus groups all the status fields that are deprecated and will be removed in a future version.
See https://github.com/kubernetes-sigs/cluster-api/blob/main/docs/proposals/20240916-improve-status-in-CAPI-resources.md for more context.
Appears in:
Field Description Default Validation
v1beta1 KubeadmConfigV1Beta1DeprecatedStatus v1beta1 groups all the status fields that are deprecated and will be removed when support for v1beta1 will be dropped. Optional: {}
KubeadmConfigInitializationStatus provides observations of the KubeadmConfig initialization process.
Validation:
Appears in:
Field Description Default Validation
dataSecretCreated boolean dataSecretCreated is true when the Machine’s boostrap secret is created. Optional: {}
KubeadmConfigList contains a list of KubeadmConfig.
Field Description Default Validation
apiVersion string bootstrap.cluster.x-k8s.io/v1beta2kind string KubeadmConfigListmetadata ListMeta Refer to Kubernetes API documentation for fields of metadata. Optional: {} items KubeadmConfig arrayitems is the list of KubeadmConfigs.
KubeadmConfigSpec defines the desired state of KubeadmConfig.
Either ClusterConfiguration and InitConfiguration should be defined or the JoinConfiguration should be defined.
Validation:
Appears in:
Field Description Default Validation
clusterConfiguration ClusterConfiguration clusterConfiguration along with InitConfiguration are the configurations necessary for the init command MinProperties: 1 initConfiguration InitConfiguration initConfiguration along with ClusterConfiguration are the configurations necessary for the init command MinProperties: 1 joinConfiguration JoinConfiguration joinConfiguration is the kubeadm configuration for the join command MinProperties: 1 files File arrayfiles specifies extra files to be passed to user_data upon creation. MaxItems: 200 diskSetup DiskSetup diskSetup specifies options for the creation of partition tables and file systems on devices. MinProperties: 1 mounts MountPoints arraymounts specifies a list of mount points to be setup. MaxItems: 100 bootCommands string array bootCommands specifies extra commands to run very early in the boot process via the cloud-init bootcmd MaxItems: 1000 preKubeadmCommands string array preKubeadmCommands specifies extra commands to run before kubeadm runs. MaxItems: 1000 postKubeadmCommands string array postKubeadmCommands specifies extra commands to run after kubeadm runs. MaxItems: 1000 users User arrayusers specifies extra users to add MaxItems: 100 ntp NTP ntp specifies NTP configuration MinProperties: 1 format Format format specifies the output format of the bootstrap data. Enum: [cloud-config ignition] verbosity integer verbosity is the number for the kubeadm log level verbosity.--v flag in kubeadm commands. Optional: {} ignition IgnitionSpec ignition contains Ignition specific configuration. MinProperties: 1
KubeadmConfigStatus defines the observed state of KubeadmConfig.
Validation:
Appears in:
Field Description Default Validation
conditions Condition arrayconditions represents the observations of a KubeadmConfig’s current state. MaxItems: 32 initialization KubeadmConfigInitializationStatus initialization provides observations of the KubeadmConfig initialization process. MinProperties: 1 dataSecretName string dataSecretName is the name of the secret that stores the bootstrap data script. MaxLength: 253 observedGeneration integer observedGeneration is the latest generation observed by the controller. Minimum: 1 deprecated KubeadmConfigDeprecatedStatus deprecated groups all the status fields that are deprecated and will be removed when all the nested field are removed. Optional: {}
KubeadmConfigTemplate is the Schema for the kubeadmconfigtemplates API.
Appears in:
Field Description Default Validation
apiVersion string bootstrap.cluster.x-k8s.io/v1beta2kind string KubeadmConfigTemplatemetadata ObjectMeta Refer to Kubernetes API documentation for fields of metadata. MinProperties: 1 spec KubeadmConfigTemplateSpec spec is the desired state of KubeadmConfigTemplate. Optional: {}
KubeadmConfigTemplateList contains a list of KubeadmConfigTemplate.
Field Description Default Validation
apiVersion string bootstrap.cluster.x-k8s.io/v1beta2kind string KubeadmConfigTemplateListmetadata ListMeta Refer to Kubernetes API documentation for fields of metadata. Optional: {} items KubeadmConfigTemplate arrayitems is the list of KubeadmConfigTemplates.
KubeadmConfigTemplateResource defines the Template structure.
Validation:
Appears in:
Field Description Default Validation
metadata ObjectMeta Refer to Kubernetes API documentation for fields of metadata. MinProperties: 1 spec KubeadmConfigSpec spec is the desired state of KubeadmConfig. MinProperties: 1
KubeadmConfigTemplateSpec defines the desired state of KubeadmConfigTemplate.
Appears in:
Field Description Default Validation
template KubeadmConfigTemplateResource template defines the desired state of KubeadmConfigTemplate. MinProperties: 1
KubeadmConfigV1Beta1DeprecatedStatus groups all the status fields that are deprecated and will be removed when support for v1beta1 will be dropped.
See https://github.com/kubernetes-sigs/cluster-api/blob/main/docs/proposals/20240916-improve-status-in-CAPI-resources.md for more context.
Appears in:
Field Description Default Validation
conditions Conditions conditions defines current service state of the KubeadmConfig. Optional: {} failureReason string failureReason will be set on non-retryable errors MaxLength: 256 failureMessage string failureMessage will be set on non-retryable errors MaxLength: 10240
LocalEtcd describes that kubeadm should run an etcd cluster locally.
Validation:
Appears in:
Field Description Default Validation
imageRepository string imageRepository sets the container registry to pull images from. MaxLength: 512 imageTag string imageTag allows to specify a tag for the image. MaxLength: 256 dataDir string dataDir is the directory etcd will place its data. MaxLength: 512 extraArgs Arg arrayextraArgs is a list of args to pass to etcd. MaxItems: 100 extraEnvs EnvVar extraEnvs is an extra set of environment variables to pass to etcd. MaxItems: 100 serverCertSANs string array serverCertSANs sets extra Subject Alternative Names for the etcd server signing cert. MaxItems: 100 peerCertSANs string array peerCertSANs sets extra Subject Alternative Names for the etcd peer signing cert. MaxItems: 100
Underlying type: string array
MountPoints defines input for generated mounts in cloud-init.
Validation:
MaxItems: 100
MinItems: 1
items:MaxLength: 512
items:MinLength: 1
Appears in:
NTP defines input for generated ntp in cloud-init.
Validation:
Appears in:
Field Description Default Validation
servers string array servers specifies which NTP servers to use MaxItems: 100 enabled boolean enabled specifies whether NTP should be enabled Optional: {}
NodeRegistrationOptions holds fields that relate to registering a new control-plane or node to the cluster, either via “kubeadm init” or “kubeadm join”.
Note: The NodeRegistrationOptions struct has to be kept in sync with the structs in MarshalJSON.
Validation:
Appears in:
Field Description Default Validation
name string name is the .Metadata.Name field of the Node API object that will be created in this kubeadm init or kubeadm join operation. MaxLength: 253 criSocket string criSocket is used to retrieve container runtime info. This information will be annotated to the Node API object, for later re-use MaxLength: 512 taints Taint taints specifies the taints the Node API object should be registered with. If this field is unset, i.e. nil, in the kubeadm init processtaints: [] in the YAML file. This field is solely used for Node registration. MaxItems: 100 kubeletExtraArgs Arg arraykubeletExtraArgs is a list of args to pass to kubelet. MaxItems: 100 ignorePreflightErrors string array ignorePreflightErrors provides a slice of pre-flight errors to be ignored when the current node is registered, e.g. ‘IsPrivilegedUser,Swap’. MaxItems: 50 imagePullPolicy PullPolicy imagePullPolicy specifies the policy for image pulling Enum: [Always IfNotPresent Never] imagePullSerial boolean imagePullSerial specifies if image pulling performed by kubeadm must be done serially or in parallel. Optional: {}
Partition defines how to create and layout a partition.
Validation:
ExactlyOneOf: [layout diskLayout]
Appears in:
Field Description Default Validation
device string device is the name of the device. MaxLength: 256 layout boolean layout specifies the device layout. Optional: {} overwrite boolean overwrite describes whether to skip checks and create the partition if a partition or filesystem is found on the device. Optional: {} tableType string tableType specifies the tupe of partition table. The following are supported: Enum: [mbr gpt] diskLayout PartitionSpec arraydiskLayout specifies an ordered list of partitions, where each item defines the MaxItems: 100
PartitionSpec defines the size and optional type for a partition.
Appears in:
Field Description Default Validation
percentage integer percentage of disk that partition will take (1-100) Maximum: 100 partitionType string partitionType is the partition type (optional). MaxLength: 36
PasswdSource is a union of all possible external source types for passwd data.
Only one field may be populated in any given instance. Developers adding new
sources of data for target systems should add them here.
Appears in:
Field Description Default Validation
secret SecretPasswdSource secret represents a secret that should populate this password. Required: {}
Patches contains options related to applying patches to components deployed by kubeadm.
Validation:
Appears in:
Field Description Default Validation
directory string directory is a path to a directory that contains files named “target[suffix][+patchtype].extension”. MaxLength: 512
Scheduler holds settings necessary for scheduler deployments in the cluster.
Validation:
Appears in:
Field Description Default Validation
extraArgs Arg arrayextraArgs is a list of args to pass to the control plane component. MaxItems: 100 extraVolumes HostPathMount arrayextraVolumes is an extra set of host volumes, mounted to the control plane component. MaxItems: 100 extraEnvs EnvVar extraEnvs is an extra set of environment variables to pass to the control plane component. MaxItems: 100
SecretFileSource adapts a Secret into a FileSource.
The contents of the target Secret’s Data field will be presented
as files using the keys in the Data field as the file names.
Appears in:
Field Description Default Validation
name string name of the secret in the KubeadmBootstrapConfig’s namespace to use. MaxLength: 253 key string key is the key in the secret’s data map for this value. MaxLength: 256
SecretPasswdSource adapts a Secret into a PasswdSource.
The contents of the target Secret’s Data field will be presented
as passwd using the keys in the Data field as the file names.
Appears in:
Field Description Default Validation
name string name of the secret in the KubeadmBootstrapConfig’s namespace to use. MaxLength: 253 key string key is the key in the secret’s data map for this value. MaxLength: 256
Timeouts holds various timeouts that apply to kubeadm commands.
Validation:
Appears in:
Field Description Default Validation
controlPlaneComponentHealthCheckSeconds integer controlPlaneComponentHealthCheckSeconds is the amount of time to wait for a control plane Minimum: 0 kubeletHealthCheckSeconds integer kubeletHealthCheckSeconds is the amount of time to wait for the kubelet to be healthy Minimum: 0 kubernetesAPICallSeconds integer kubernetesAPICallSeconds is the amount of time to wait for the kubeadm client to complete a request to Minimum: 0 etcdAPICallSeconds integer etcdAPICallSeconds is the amount of time to wait for the kubeadm etcd client to complete a request to Minimum: 0 tlsBootstrapSeconds integer tlsBootstrapSeconds is the amount of time to wait for the kubelet to complete TLS bootstrap Minimum: 0 discoverySeconds integer discoverySeconds is the amount of time to wait for kubeadm to validate the API server identity Minimum: 0
User defines the input for a generated user in cloud-init.
Appears in:
Field Description Default Validation
name string name specifies the user name MaxLength: 256 gecos string gecos specifies the gecos to use for the user MaxLength: 256 groups string groups specifies the additional groups for the user MaxLength: 256 homeDir string homeDir specifies the home directory to use for the user MaxLength: 256 inactive boolean inactive specifies whether to mark the user as inactive Optional: {} shell string shell specifies the user’s shell MaxLength: 256 passwd string passwd specifies a hashed password for the user MaxLength: 256 passwdFrom PasswdSource passwdFrom is a referenced source of passwd to populate the passwd. Optional: {} primaryGroup string primaryGroup specifies the primary group for the user MaxLength: 256 lockPassword boolean lockPassword specifies if password login should be disabled Optional: {} sudo string sudo specifies a sudo role for the user MaxLength: 256 sshAuthorizedKeys string array sshAuthorizedKeys specifies a list of ssh authorized keys for the user MaxItems: 100
Package v1beta2 contains API Schema definitions for the cluster v1beta2 API group
APIEndpoint represents a reachable Kubernetes API endpoint.
Validation:
Appears in:
Field Description Default Validation
host string host is the hostname on which the API server is serving. MaxLength: 512 port integer port is the port on which the API server is serving. Maximum: 65535
Bootstrap encapsulates fields to configure the Machine’s bootstrapping mechanism.
Appears in:
Field Description Default Validation
configRef ContractVersionedObjectReference configRef is a reference to a bootstrap provider-specific resource Optional: {} dataSecretName string dataSecretName is the name of the secret that stores the bootstrap data script. MaxLength: 253
Cluster is the Schema for the clusters API.
Appears in:
Field Description Default Validation
apiVersion string cluster.x-k8s.io/v1beta2kind string Clustermetadata ObjectMeta Refer to Kubernetes API documentation for fields of metadata. MinProperties: 1 spec ClusterSpec spec is the desired state of Cluster. MinProperties: 1 status ClusterStatus status is the observed state of Cluster. MinProperties: 1
ClusterAvailabilityGate contains the type of a Cluster condition to be used as availability gate.
Appears in:
Field Description Default Validation
conditionType string conditionType refers to a condition with matching type in the Cluster’s condition list. MaxLength: 316 ^([a-z0-9]([-a-z0-9]*[a-z0-9])?(\.[a-z0-9]([-a-z0-9]*[a-z0-9])?)*/)?(([A-Za-z0-9][-A-Za-z0-9_.]*)?[A-Za-z0-9])$ polarity ConditionPolarity polarity of the conditionType specified in this availabilityGate. Enum: [Positive Negative]
ClusterClass is a template which can be used to create managed topologies.
NOTE: This CRD can only be used if the ClusterTopology feature gate is enabled.
Appears in:
Field Description Default Validation
apiVersion string cluster.x-k8s.io/v1beta2kind string ClusterClassmetadata ObjectMeta Refer to Kubernetes API documentation for fields of metadata. MinProperties: 1 spec ClusterClassSpec spec is the desired state of ClusterClass. Required: {} status ClusterClassStatus status is the observed state of ClusterClass. MinProperties: 1
ClusterClassDeprecatedStatus groups all the status fields that are deprecated and will be removed in a future version.
See https://github.com/kubernetes-sigs/cluster-api/blob/main/docs/proposals/20240916-improve-status-in-CAPI-resources.md for more context.
Appears in:
Field Description Default Validation
v1beta1 ClusterClassV1Beta1DeprecatedStatus v1beta1 groups all the status fields that are deprecated and will be removed when support for v1beta1 will be dropped. Optional: {}
ClusterClassList contains a list of Cluster.
Field Description Default Validation
apiVersion string cluster.x-k8s.io/v1beta2kind string ClusterClassListmetadata ListMeta Refer to Kubernetes API documentation for fields of metadata. Optional: {} items ClusterClass arrayitems is the list of ClusterClasses.
ClusterClassPatch defines a patch which is applied to customize the referenced templates.
Appears in:
Field Description Default Validation
name string name of the patch. MaxLength: 256 description string description is a human-readable description of this patch. MaxLength: 1024 enabledIf string enabledIf is a Go template to be used to calculate if a patch should be enabled.true, otherwise it will MaxLength: 256 definitions PatchDefinition arraydefinitions define inline patches. MaxItems: 100 external ExternalPatchDefinition external defines an external patch. Optional: {}
ClusterClassRef is the ref to the ClusterClass that should be used for the topology.
Appears in:
Field Description Default Validation
name string name is the name of the ClusterClass that should be used for the topology. MaxLength: 253 ^[a-z0-9]([-a-z0-9]*[a-z0-9])?(\.[a-z0-9]([-a-z0-9]*[a-z0-9])?)*$ namespace string namespace is the namespace of the ClusterClass that should be used for the topology. MaxLength: 63 ^[a-z0-9]([-a-z0-9]*[a-z0-9])?$
ClusterClassSpec describes the desired state of the ClusterClass.
Appears in:
Field Description Default Validation
availabilityGates ClusterAvailabilityGate arrayavailabilityGates specifies additional conditions to include when evaluating Cluster Available condition. MaxItems: 32 infrastructure InfrastructureClass infrastructure is a reference to a local struct that holds the details Required: {} controlPlane ControlPlaneClass controlPlane is a reference to a local struct that holds the details Required: {} workers WorkersClass workers describes the worker nodes for the cluster. MinProperties: 1 variables ClusterClassVariable arrayvariables defines the variables which can be configured MaxItems: 1000 patches ClusterClassPatch arraypatches defines the patches which are applied to customize MaxItems: 1000 upgrade ClusterClassUpgrade upgrade defines the upgrade configuration for clusters using this ClusterClass. MinProperties: 1 kubernetesVersions string array kubernetesVersions is the list of Kubernetes versions that can be MaxItems: 100
ClusterClassStatus defines the observed state of the ClusterClass.
Validation:
Appears in:
Field Description Default Validation
conditions Condition arrayconditions represents the observations of a ClusterClass’s current state. MaxItems: 32 variables ClusterClassStatusVariable arrayvariables is a list of ClusterClassStatusVariable that are defined for the ClusterClass. MaxItems: 1000 observedGeneration integer observedGeneration is the latest generation observed by the controller. Minimum: 1 deprecated ClusterClassDeprecatedStatus deprecated groups all the status fields that are deprecated and will be removed when all the nested field are removed. Optional: {}
ClusterClassStatusVariable defines a variable which appears in the status of a ClusterClass.
Appears in:
Field Description Default Validation
name string name is the name of the variable. MaxLength: 256 definitionsConflict boolean definitionsConflict specifies whether or not there are conflicting definitions for a single variable name. Optional: {} definitions ClusterClassStatusVariableDefinition arraydefinitions is a list of definitions for a variable. MaxItems: 100
ClusterClassStatusVariableDefinition defines a variable which appears in the status of a ClusterClass.
Appears in:
Field Description Default Validation
from string from specifies the origin of the variable definition.inline for variables defined in the ClusterClass or the name of a patch defined in the ClusterClass MaxLength: 256 required boolean required specifies if the variable is required. Required: {} deprecatedV1Beta1Metadata ClusterClassVariableMetadata deprecatedV1Beta1Metadata is the metadata of a variable. MinProperties: 1 schema VariableSchema schema defines the schema of the variable. Required: {}
ClusterClassTemplateReference is a reference to a ClusterClass template.
Appears in:
Field Description Default Validation
kind string kind of the template. MaxLength: 63 ^[a-zA-Z]([-a-zA-Z0-9]*[a-zA-Z0-9])?$ name string name of the template. MaxLength: 253 ^[a-z0-9]([-a-z0-9]*[a-z0-9])?(\.[a-z0-9]([-a-z0-9]*[a-z0-9])?)*$ apiVersion string apiVersion of the template. MaxLength: 317 ^[a-z0-9]([-a-z0-9]*[a-z0-9])?(\.[a-z0-9]([-a-z0-9]*[a-z0-9])?)*\/[a-z]([-a-z0-9]*[a-z0-9])?$
ClusterClassUpgrade defines the upgrade configuration for clusters using the ClusterClass.
Validation:
Appears in:
Field Description Default Validation
external ClusterClassUpgradeExternal external defines external runtime extensions for upgrade operations. MinProperties: 1
ClusterClassUpgradeExternal defines external runtime extensions for upgrade operations.
Validation:
Appears in:
Field Description Default Validation
generateUpgradePlanExtension string generateUpgradePlanExtension references an extension which is called to generate upgrade plan. MaxLength: 512
ClusterClassV1Beta1DeprecatedStatus groups all the status fields that are deprecated and will be removed when support for v1beta1 will be dropped.
See https://github.com/kubernetes-sigs/cluster-api/blob/main/docs/proposals/20240916-improve-status-in-CAPI-resources.md for more context.
Appears in:
Field Description Default Validation
conditions Conditions conditions defines current observed state of the ClusterClass. Optional: {}
ClusterClassVariable defines a variable which can
be configured in the Cluster topology and used in patches.
Appears in:
Field Description Default Validation
name string name of the variable. MaxLength: 256 required boolean required specifies if the variable is required. Required: {} deprecatedV1Beta1Metadata ClusterClassVariableMetadata deprecatedV1Beta1Metadata is the metadata of a variable. MinProperties: 1 schema VariableSchema schema defines the schema of the variable. Required: {}
ClusterClassVariableMetadata is the metadata of a variable.
It can be used to add additional data for higher level tools to
a ClusterClassVariable.
Deprecated: This struct is deprecated and is going to be removed in the next apiVersion.
Validation:
Appears in:
Field Description Default Validation
labels object (keys:string, values:string) labels is a map of string keys and values that can be used to organize and categorize Optional: {} annotations object (keys:string, values:string) annotations is an unstructured key value map that can be used to store and Optional: {}
ClusterControlPlaneStatus groups all the observations about control plane current state.
Appears in:
Field Description Default Validation
desiredReplicas integer desiredReplicas is the total number of desired control plane machines in this cluster. Optional: {} replicas integer replicas is the total number of control plane machines in this cluster. Optional: {} upToDateReplicas integer upToDateReplicas is the number of up-to-date control plane machines in this cluster. A machine is considered up-to-date when Machine’s UpToDate condition is true. Optional: {} readyReplicas integer readyReplicas is the total number of ready control plane machines in this cluster. A machine is considered ready when Machine’s Ready condition is true. Optional: {} availableReplicas integer availableReplicas is the total number of available control plane machines in this cluster. A machine is considered available when Machine’s Available condition is true. Optional: {} versions StatusVersion arrayversions is the aggregated Kubernetes versions in this control plane. MaxItems: 32 upgradePlan StatusUpgradePlanVersion arrayupgradePlan reports the list of versions that would be applied to the control plane object according to the upgrade plan. MaxItems: 32
ClusterDeprecatedStatus groups all the status fields that are deprecated and will be removed in a future version.
See https://github.com/kubernetes-sigs/cluster-api/blob/main/docs/proposals/20240916-improve-status-in-CAPI-resources.md for more context.
Appears in:
Field Description Default Validation
v1beta1 ClusterV1Beta1DeprecatedStatus v1beta1 groups all the status fields that are deprecated and will be removed when support for v1beta1 will be dropped. Optional: {}
ClusterInitializationStatus provides observations of the Cluster initialization process.
NOTE: Fields in this struct are part of the Cluster API contract and are used to orchestrate initial Cluster provisioning.
Validation:
Appears in:
Field Description Default Validation
infrastructureProvisioned boolean infrastructureProvisioned is true when the infrastructure provider reports that Cluster’s infrastructure is fully provisioned. Optional: {} controlPlaneInitialized boolean controlPlaneInitialized denotes when the control plane is functional enough to accept requests. Optional: {}
ClusterList contains a list of Cluster.
Field Description Default Validation
apiVersion string cluster.x-k8s.io/v1beta2kind string ClusterListmetadata ListMeta Refer to Kubernetes API documentation for fields of metadata. Optional: {} items Cluster arrayitems is the list of Clusters.
ClusterNetwork specifies the different networking
parameters for a cluster.
Validation:
Appears in:
Field Description Default Validation
apiServerPort integer apiServerPort specifies the port the API Server should bind to. Maximum: 65535 services NetworkRanges services is the network ranges from which service VIPs are allocated. Optional: {} pods NetworkRanges pods is the network ranges from which Pod networks are allocated. Optional: {} serviceDomain string serviceDomain is the domain name for services. MaxLength: 253
ClusterSpec defines the desired state of Cluster.
Validation:
Appears in:
Field Description Default Validation
paused boolean paused can be used to prevent controllers from processing the Cluster and all its associated objects. Optional: {} clusterNetwork ClusterNetwork clusterNetwork represents the cluster network configuration. MinProperties: 1 controlPlaneEndpoint APIEndpoint controlPlaneEndpoint represents the endpoint used to communicate with the control plane. MinProperties: 1 controlPlaneRef ContractVersionedObjectReference controlPlaneRef is an optional reference to a provider-specific resource that holds Optional: {} infrastructureRef ContractVersionedObjectReference infrastructureRef is a reference to a provider-specific resource that holds the details Optional: {} topology Topology topology encapsulates the topology for the cluster. Optional: {} availabilityGates ClusterAvailabilityGate arrayavailabilityGates specifies additional conditions to include when evaluating Cluster Available condition. MaxItems: 32
ClusterStatus defines the observed state of Cluster.
Validation:
Appears in:
Field Description Default Validation
conditions Condition arrayconditions represents the observations of a Cluster’s current state. MaxItems: 32 initialization ClusterInitializationStatus initialization provides observations of the Cluster initialization process. MinProperties: 1 controlPlane ClusterControlPlaneStatus controlPlane groups all the observations about Cluster’s ControlPlane current state. Optional: {} workers WorkersStatus workers groups all the observations about Cluster’s Workers current state. Optional: {} failureDomains FailureDomain arrayfailureDomains is a slice of failure domain objects synced from the infrastructure provider. MaxItems: 100 phase string phase represents the current phase of cluster actuation. Enum: [Pending Provisioning Provisioned Deleting Failed Unknown] observedGeneration integer observedGeneration is the latest generation observed by the controller. Minimum: 1 deprecated ClusterDeprecatedStatus deprecated groups all the status fields that are deprecated and will be removed when all the nested field are removed. Optional: {}
ClusterV1Beta1DeprecatedStatus groups all the status fields that are deprecated and will be removed when support for v1beta1 will be dropped.
See https://github.com/kubernetes-sigs/cluster-api/blob/main/docs/proposals/20240916-improve-status-in-CAPI-resources.md for more context.
Appears in:
Field Description Default Validation
conditions Conditions conditions defines current service state of the cluster. Optional: {} failureReason ClusterStatusError failureReason indicates that there is a fatal problem reconciling the Optional: {} failureMessage string failureMessage indicates that there is a fatal problem reconciling the MaxLength: 10240
ClusterVariable can be used to customize the Cluster through patches. Each ClusterVariable is associated with a
Variable definition in the ClusterClass status variables.
Appears in:
Field Description Default Validation
name string name of the variable. MaxLength: 256 value JSON value of the variable. Required: {}
Condition defines an observation of a Cluster API resource operational state.
Deprecated: This type is deprecated and is going to be removed when support for v1beta1 will be dropped. Please see https://github.com/kubernetes-sigs/cluster-api/blob/main/docs/proposals/20240916-improve-status-in-CAPI-resources.md for more details.
Appears in:
Field Description Default Validation
type ConditionType type of condition in CamelCase or in foo.example.com/CamelCase. MaxLength: 256 status ConditionStatus status of the condition, one of True, False, Unknown. Required: {} severity ConditionSeverity severity provides an explicit classification of Reason code, so the users or machines can immediately MaxLength: 32 reason string reason is the reason for the condition’s last transition in CamelCase. MaxLength: 256 message string message is a human readable message indicating details about the transition. MaxLength: 10240
Underlying type: string
ConditionPolarity defines the polarity for a metav1.Condition.
Validation:
Enum: [Positive Negative]
Appears in:
Field Description
PositivePositivePolarityCondition describe a condition with positive polarity, a condition NegativeNegativePolarityCondition describe a condition with negative polarity, a condition
Underlying type: string
ConditionSeverity expresses the severity of a Condition Type failing.
Deprecated: This type is deprecated and is going to be removed when support for v1beta1 will be dropped. Please see https://github.com/kubernetes-sigs/cluster-api/blob/main/docs/proposals/20240916-improve-status-in-CAPI-resources.md for more details.
Validation:
Appears in:
Field Description
ErrorConditionSeverityError specifies that a condition with Status=False is an error. WarningConditionSeverityWarning specifies that a condition with Status=False is a warning. InfoConditionSeverityInfo specifies that a condition with Status=False is informative. `` ConditionSeverityNone should apply only to conditions with Status=True.
Underlying type: string
ConditionType is a valid value for Condition.Type.
Deprecated: This type is deprecated and is going to be removed when support for v1beta1 will be dropped. Please see https://github.com/kubernetes-sigs/cluster-api/blob/main/docs/proposals/20240916-improve-status-in-CAPI-resources.md for more details.
Validation:
MaxLength: 256
MinLength: 1
Appears in:
Field Description
ReadyReadyV1Beta1Condition defines the Ready condition type that summarizes the operational state of a Cluster API object. InfrastructureReadyInfrastructureReadyV1Beta1Condition reports a summary of current status of the infrastructure object defined for this cluster/machine/machinepool. VariablesReconciledClusterClassVariablesReconciledV1Beta1Condition reports if the ClusterClass variables, including both inline and external ControlPlaneInitializedControlPlaneInitializedV1Beta1Condition reports if the cluster’s control plane has been initialized such that the ControlPlaneReadyControlPlaneReadyV1Beta1Condition reports the ready condition from the control plane object defined for this cluster. BootstrapReadyBootstrapReadyV1Beta1Condition reports a summary of current status of the bootstrap object defined for this machine. DrainingSucceededDrainingSucceededV1Beta1Condition provide evidence of the status of the node drain operation which happens during the machine PreDrainDeleteHookSucceededPreDrainDeleteHookSucceededV1Beta1Condition reports a machine waiting for a PreDrainDeleteHook before being delete. PreTerminateDeleteHookSucceededPreTerminateDeleteHookSucceededV1Beta1Condition reports a machine waiting for a PreDrainDeleteHook before being delete. VolumeDetachSucceededVolumeDetachSucceededV1Beta1Condition reports a machine waiting for volumes to be detached. HealthCheckSucceededMachineHealthCheckSucceededV1Beta1Condition is set on machines that have passed a healthcheck by the MachineHealthCheck controller. OwnerRemediatedMachineOwnerRemediatedV1Beta1Condition is set on machines that have failed a healthcheck by the MachineHealthCheck controller. ExternalRemediationTemplateAvailableExternalRemediationTemplateAvailableV1Beta1Condition is set on machinehealthchecks when MachineHealthCheck controller uses external remediation. ExternalRemediationRequestAvailableExternalRemediationRequestAvailableV1Beta1Condition is set on machinehealthchecks when MachineHealthCheck controller uses external remediation. NodeHealthyMachineNodeHealthyV1Beta1Condition provides info about the operational state of the Kubernetes node hosted on the machine by summarizing node conditions. RemediationAllowedRemediationAllowedV1Beta1Condition is set on MachineHealthChecks to show the status of whether the MachineHealthCheck is AvailableMachineDeploymentAvailableV1Beta1Condition means the MachineDeployment is available, that is, at least the minimum available MachineSetReadyMachineSetReadyV1Beta1Condition reports a summary of current status of the MachineSet owned by the MachineDeployment. MachinesCreatedMachinesCreatedV1Beta1Condition documents that the machines controlled by the MachineSet are created. MachinesReadyMachinesReadyV1Beta1Condition reports an aggregate of current status of the machines controlled by the MachineSet. ResizedResizedV1Beta1Condition documents a MachineSet is resizing the set of controlled machines. TopologyReconciledTopologyReconciledV1Beta1Condition provides evidence about the reconciliation of a Cluster topology into RefVersionsUpToDateClusterClassRefVersionsUpToDateV1Beta1Condition documents if the references in the ClusterClass are ReplicasReadyReplicasReadyV1Beta1Condition reports an aggregate of current status of the replicas controlled by the MachinePool.
Underlying type: Condition
Conditions provide observations of the operational state of a Cluster API resource.
Deprecated: This type is deprecated and is going to be removed when support for v1beta1 will be dropped. Please see https://github.com/kubernetes-sigs/cluster-api/blob/main/docs/proposals/20240916-improve-status-in-CAPI-resources.md for more details.
Appears in:
Field Description Default Validation
type ConditionType type of condition in CamelCase or in foo.example.com/CamelCase. MaxLength: 256 status ConditionStatus status of the condition, one of True, False, Unknown. Required: {} severity ConditionSeverity severity provides an explicit classification of Reason code, so the users or machines can immediately MaxLength: 32 reason string reason is the reason for the condition’s last transition in CamelCase. MaxLength: 256 message string message is a human readable message indicating details about the transition. MaxLength: 10240
ContractVersionedObjectReference is a reference to a resource for which the version is inferred from contract labels.
Appears in:
Field Description Default Validation
kind string kind of the resource being referenced. MaxLength: 63 ^[a-zA-Z]([-a-zA-Z0-9]*[a-zA-Z0-9])?$ name string name of the resource being referenced. MaxLength: 253 ^[a-z0-9]([-a-z0-9]*[a-z0-9])?(\.[a-z0-9]([-a-z0-9]*[a-z0-9])?)*$ apiGroup string apiGroup is the group of the resource being referenced. MaxLength: 253 ^[a-z0-9]([-a-z0-9]*[a-z0-9])?(\.[a-z0-9]([-a-z0-9]*[a-z0-9])?)*$
ControlPlaneClass defines the class for the control plane.
Appears in:
Field Description Default Validation
metadata ObjectMeta Refer to Kubernetes API documentation for fields of metadata. MinProperties: 1 templateRef ClusterClassTemplateReference templateRef contains the reference to a provider-specific control plane template. Required: {} machineInfrastructure ControlPlaneClassMachineInfrastructureTemplate machineInfrastructure defines the metadata and infrastructure information Optional: {} healthCheck ControlPlaneClassHealthCheck healthCheck defines a MachineHealthCheck for this ControlPlaneClass. MinProperties: 1 naming ControlPlaneClassNamingSpec naming allows changing the naming pattern used when creating the control plane provider object. MinProperties: 1 deletion ControlPlaneClassMachineDeletionSpec deletion contains configuration options for Machine deletion. MinProperties: 1 taints MachineTaint arraytaints are the node taints that Cluster API will manage. MaxItems: 64 readinessGates MachineReadinessGate arrayreadinessGates specifies additional conditions to include when evaluating Machine Ready condition. MaxItems: 32
ControlPlaneClassHealthCheck defines a MachineHealthCheck for control plane machines.
Validation:
Appears in:
Field Description Default Validation
checks ControlPlaneClassHealthCheckChecks checks are the checks that are used to evaluate if a Machine is healthy.cluster.x-k8s.io/remediate-machine annotation and MinProperties: 1 remediation ControlPlaneClassHealthCheckRemediation remediation configures if and how remediations are triggered if a Machine is unhealthy. MinProperties: 1
ControlPlaneClassHealthCheckChecks are the checks that are used to evaluate if a control plane Machine is healthy.
Validation:
Appears in:
Field Description Default Validation
nodeStartupTimeoutSeconds integer nodeStartupTimeoutSeconds allows to set the maximum time for MachineHealthCheckSpec.ProviderID field. Minimum: 0 unhealthyNodeConditions UnhealthyNodeCondition arrayunhealthyNodeConditions contains a list of conditions that determine MaxItems: 100 unhealthyMachineConditions UnhealthyMachineCondition arrayunhealthyMachineConditions contains a list of the machine conditions that determine MaxItems: 100
ControlPlaneClassHealthCheckRemediation configures if and how remediations are triggered if a control plane Machine is unhealthy.
Validation:
Appears in:
Field Description Default Validation
triggerIf ControlPlaneClassHealthCheckRemediationTriggerIf triggerIf configures if remediations are triggered. MinProperties: 1 templateRef MachineHealthCheckRemediationTemplateReference templateRef is a reference to a remediation template Optional: {}
ControlPlaneClassHealthCheckRemediationTriggerIf configures if remediations are triggered.
Validation:
Appears in:
Field Description Default Validation
unhealthyLessThanOrEqualTo IntOrString unhealthyLessThanOrEqualTo specifies that remediations are only triggered if the number of Optional: {} unhealthyInRange string unhealthyInRange specifies that remediations are only triggered if the number of MaxLength: 32 ^\[[0-9]+-[0-9]+\]$
ControlPlaneClassMachineDeletionSpec contains configuration options for Machine deletion.
Validation:
Appears in:
Field Description Default Validation
nodeDrainTimeoutSeconds integer nodeDrainTimeoutSeconds is the total amount of time that the controller will spend on draining a node.kubectl drain --timeout Minimum: 0 nodeVolumeDetachTimeoutSeconds integer nodeVolumeDetachTimeoutSeconds is the total amount of time that the controller will spend on waiting for all volumes Minimum: 0 nodeDeletionTimeoutSeconds integer nodeDeletionTimeoutSeconds defines how long the controller will attempt to delete the Node that the Machine Minimum: 0
ControlPlaneClassMachineInfrastructureTemplate defines the template for a MachineInfrastructure of a ControlPlane.
Appears in:
Field Description Default Validation
templateRef ClusterClassTemplateReference templateRef is a required reference to the template for a MachineInfrastructure of a ControlPlane. Required: {}
ControlPlaneClassNamingSpec defines the naming strategy for control plane objects.
Validation:
Appears in:
Field Description Default Validation
template string template defines the template to use for generating the name of the ControlPlane object.\{\{ .cluster.name \}\}-\{\{ .random \}\}..cluster.name: The name of the cluster object..random: A random alphanumeric string, without vowels, of length 5. MaxLength: 1024
ControlPlaneTopology specifies the parameters for the control plane nodes in the cluster.
Validation:
Appears in:
Field Description Default Validation
metadata ObjectMeta Refer to Kubernetes API documentation for fields of metadata. MinProperties: 1 replicas integer replicas is the number of control plane nodes. Optional: {} rollout ControlPlaneTopologyRolloutSpec rollout allows you to configure the behavior of rolling updates to the control plane. MinProperties: 1 healthCheck ControlPlaneTopologyHealthCheck healthCheck allows to enable, disable and override control plane health check MinProperties: 1 deletion ControlPlaneTopologyMachineDeletionSpec deletion contains configuration options for Machine deletion. MinProperties: 1 taints MachineTaint arraytaints are the node taints that Cluster API will manage. MaxItems: 64 readinessGates MachineReadinessGate arrayreadinessGates specifies additional conditions to include when evaluating Machine Ready condition. MaxItems: 32 variables ControlPlaneVariables variables can be used to customize the ControlPlane through patches. MinProperties: 1
ControlPlaneTopologyHealthCheck defines a MachineHealthCheck for control plane machines.
Validation:
Appears in:
Field Description Default Validation
enabled boolean enabled controls if a MachineHealthCheck should be created for the target machines.enable is true and no MachineHealthCheck definition is available. Optional: {} checks ControlPlaneTopologyHealthCheckChecks checks are the checks that are used to evaluate if a Machine is healthy.cluster.x-k8s.io/remediate-machine annotation and MinProperties: 1 remediation ControlPlaneTopologyHealthCheckRemediation remediation configures if and how remediations are triggered if a Machine is unhealthy. MinProperties: 1
ControlPlaneTopologyHealthCheckChecks are the checks that are used to evaluate if a control plane Machine is healthy.
Validation:
Appears in:
Field Description Default Validation
nodeStartupTimeoutSeconds integer nodeStartupTimeoutSeconds allows to set the maximum time for MachineHealthCheckSpec.ProviderID field. Minimum: 0 unhealthyNodeConditions UnhealthyNodeCondition arrayunhealthyNodeConditions contains a list of conditions that determine MaxItems: 100 unhealthyMachineConditions UnhealthyMachineCondition arrayunhealthyMachineConditions contains a list of the machine conditions that determine MaxItems: 100
ControlPlaneTopologyHealthCheckRemediation configures if and how remediations are triggered if a control plane Machine is unhealthy.
Validation:
Appears in:
Field Description Default Validation
triggerIf ControlPlaneTopologyHealthCheckRemediationTriggerIf triggerIf configures if remediations are triggered. MinProperties: 1 templateRef MachineHealthCheckRemediationTemplateReference templateRef is a reference to a remediation template Optional: {}
ControlPlaneTopologyHealthCheckRemediationTriggerIf configures if remediations are triggered.
Validation:
Appears in:
Field Description Default Validation
unhealthyLessThanOrEqualTo IntOrString unhealthyLessThanOrEqualTo specifies that remediations are only triggered if the number of Optional: {} unhealthyInRange string unhealthyInRange specifies that remediations are only triggered if the number of MaxLength: 32 ^\[[0-9]+-[0-9]+\]$
ControlPlaneTopologyMachineDeletionSpec contains configuration options for Machine deletion.
Validation:
Appears in:
Field Description Default Validation
nodeDrainTimeoutSeconds integer nodeDrainTimeoutSeconds is the total amount of time that the controller will spend on draining a node.kubectl drain --timeout Minimum: 0 nodeVolumeDetachTimeoutSeconds integer nodeVolumeDetachTimeoutSeconds is the total amount of time that the controller will spend on waiting for all volumes Minimum: 0 nodeDeletionTimeoutSeconds integer nodeDeletionTimeoutSeconds defines how long the controller will attempt to delete the Node that the Machine Minimum: 0
ControlPlaneTopologyRolloutSpec defines the rollout behavior.
Validation:
Appears in:
ControlPlaneVariables can be used to provide variables for the ControlPlane.
Validation:
Appears in:
Field Description Default Validation
overrides ClusterVariable arrayoverrides can be used to override Cluster level variables. MaxItems: 1000
ExternalPatchDefinition defines an external patch.
Note: At least one of GeneratePatchesExtension or ValidateTopologyExtension must be set.
Appears in:
Field Description Default Validation
generatePatchesExtension string generatePatchesExtension references an extension which is called to generate patches. MaxLength: 512 validateTopologyExtension string validateTopologyExtension references an extension which is called to validate the topology. MaxLength: 512 discoverVariablesExtension string discoverVariablesExtension references an extension which is called to discover variables. MaxLength: 512 settings object (keys:string, values:string) settings defines key value pairs to be passed to the extensions. Optional: {}
FailureDomain is the Schema for Cluster API failure domains.
It allows controllers to understand how many failure domains a cluster can optionally span across.
Appears in:
Field Description Default Validation
name string name is the name of the failure domain. MaxLength: 256 controlPlane boolean controlPlane determines if this failure domain is suitable for use by control plane machines. Optional: {} attributes object (keys:string, values:string) attributes is a free form map of attributes an infrastructure provider might use or require. Optional: {}
Underlying type: string
FieldValueErrorReason is a machine-readable value providing more detail about why a field failed the validation.
Appears in:
Field Description
FieldValueRequiredFieldValueRequired is used to report required values that are not FieldValueDuplicateFieldValueDuplicate is used to report collisions of values that must be FieldValueInvalidFieldValueInvalid is used to report malformed values (e.g. failed regex FieldValueForbiddenFieldValueForbidden is used to report valid (as per formatting rules)
InfrastructureClass defines the class for the infrastructure cluster.
Appears in:
Field Description Default Validation
templateRef ClusterClassTemplateReference templateRef contains the reference to a provider-specific infrastructure cluster template. Required: {} naming InfrastructureClassNamingSpec naming allows changing the naming pattern used when creating the infrastructure cluster object. MinProperties: 1
InfrastructureClassNamingSpec defines the naming strategy for infrastructure objects.
Validation:
Appears in:
Field Description Default Validation
template string template defines the template to use for generating the name of the Infrastructure object.\{\{ .cluster.name \}\}-\{\{ .random \}\}..cluster.name: The name of the cluster object..random: A random alphanumeric string, without vowels, of length 5. MaxLength: 1024
JSONPatch defines a JSON patch.
Appears in:
Field Description Default Validation
op string op defines the operation of the patch.add, replace and remove are supported. Enum: [add replace remove] path string path defines the path of the patch.append and prepend, i.e.:add: only index 0 (prepend) and - (append) are allowedreplace or remove: no indexes are allowed MaxLength: 512 value JSON value defines the value of the patch. Optional: {} valueFrom JSONPatchValue valueFrom defines the value of the patch. Optional: {}
JSONPatchValue defines the value of a patch.
Note: Only one of the fields is allowed to be set at the same time.
Appears in:
Field Description Default Validation
variable string variable is the variable to be used as value. MaxLength: 256 template string template is the Go template to be used to calculate the value. MaxLength: 10240
JSONSchemaProps is a JSON-Schema following Specification Draft 4 (http://json-schema.org/).
This struct has been initially copied from apiextensionsv1.JSONSchemaProps, but all fields
which are not supported in CAPI have been removed.
Validation:
Appears in:
Field Description Default Validation
description string description is a human-readable description of this variable. MaxLength: 4096 example JSON example is an example for this variable. Optional: {} type string type is the type of the variable. Enum: [object array string integer number boolean] properties object (keys:string, values:JSONSchemaProps ) properties specifies fields of an object. Schemaless: {} additionalProperties JSONSchemaProps additionalProperties specifies the schema of values in a map (keys are always strings). MinProperties: 1 maxProperties integer maxProperties is the maximum amount of entries in a map or properties in an object. Optional: {} minProperties integer minProperties is the minimum amount of entries in a map or properties in an object. Optional: {} required string array required specifies which fields of an object are required. MaxItems: 1000 items JSONSchemaProps items specifies fields of an array. MinProperties: 1 maxItems integer maxItems is the max length of an array variable. Optional: {} minItems integer minItems is the min length of an array variable. Optional: {} uniqueItems boolean uniqueItems specifies if items in an array must be unique. Optional: {} format string format is an OpenAPI v3 format string. Unknown formats are ignored. MaxLength: 32 maxLength integer maxLength is the max length of a string variable. Optional: {} minLength integer minLength is the min length of a string variable. Optional: {} pattern string pattern is the regex which a string variable must match. MaxLength: 512 maximum integer maximum is the maximum of an integer or number variable. Optional: {} exclusiveMaximum boolean exclusiveMaximum specifies if the Maximum is exclusive. Optional: {} minimum integer minimum is the minimum of an integer or number variable. Optional: {} exclusiveMinimum boolean exclusiveMinimum specifies if the Minimum is exclusive. Optional: {} x-kubernetes-preserve-unknown-fields boolean x-kubernetes-preserve-unknown-fields allows setting fields in a variable object Optional: {} enum JSON arrayenum is the list of valid values of the variable. MaxItems: 100 default JSON default is the default value of the variable. Optional: {} x-kubernetes-validations ValidationRule arrayx-kubernetes-validations describes a list of validation rules written in the CEL expression language. MaxItems: 100 x-metadata VariableSchemaMetadata x-metadata is the metadata of a variable or a nested field within a variable. MinProperties: 1 x-kubernetes-int-or-string boolean x-kubernetes-int-or-string specifies that this value is Optional: {} allOf JSONSchemaProps arrayallOf specifies that the variable must validate against all of the subschemas in the array. MinProperties: 1 oneOf JSONSchemaProps arrayoneOf specifies that the variable must validate against exactly one of the subschemas in the array. MinProperties: 1 anyOf JSONSchemaProps arrayanyOf specifies that the variable must validate against one or more of the subschemas in the array. MinProperties: 1 not JSONSchemaProps not specifies that the variable must not validate against the subschema. MinProperties: 1
Machine is the Schema for the machines API.
Appears in:
Field Description Default Validation
apiVersion string cluster.x-k8s.io/v1beta2kind string Machinemetadata ObjectMeta Refer to Kubernetes API documentation for fields of metadata. MinProperties: 1 spec MachineSpec spec is the desired state of Machine. Required: {} status MachineStatus status is the observed state of Machine. MinProperties: 1
MachineAddress contains information for the node’s address.
Appears in:
Field Description Default Validation
type MachineAddressType type is the machine address type, one of Hostname, ExternalIP, InternalIP, ExternalDNS or InternalDNS. Enum: [Hostname ExternalIP InternalIP ExternalDNS InternalDNS] address string address is the machine address. MaxLength: 256
Underlying type: string
MachineAddressType describes a valid MachineAddress type.
Validation:
Enum: [Hostname ExternalIP InternalIP ExternalDNS InternalDNS]
Appears in:
Field Description
HostnameExternalIPInternalIPExternalDNSInternalDNS
Underlying type: MachineAddress
MachineAddresses is a slice of MachineAddress items to be used by infrastructure providers.
Validation:
Appears in:
Field Description Default Validation
type MachineAddressType type is the machine address type, one of Hostname, ExternalIP, InternalIP, ExternalDNS or InternalDNS. Enum: [Hostname ExternalIP InternalIP ExternalDNS InternalDNS] address string address is the machine address. MaxLength: 256
MachineDeletionSpec contains configuration options for Machine deletion.
Validation:
Appears in:
Field Description Default Validation
nodeDrainTimeoutSeconds integer nodeDrainTimeoutSeconds is the total amount of time that the controller will spend on draining a node.kubectl drain --timeout Minimum: 0 nodeVolumeDetachTimeoutSeconds integer nodeVolumeDetachTimeoutSeconds is the total amount of time that the controller will spend on waiting for all volumes Minimum: 0 nodeDeletionTimeoutSeconds integer nodeDeletionTimeoutSeconds defines how long the controller will attempt to delete the Node that the Machine Minimum: 0
MachineDeletionStatus is the deletion state of the Machine.
Appears in:
MachineDeployment is the Schema for the machinedeployments API.
Appears in:
Field Description Default Validation
apiVersion string cluster.x-k8s.io/v1beta2kind string MachineDeploymentmetadata ObjectMeta Refer to Kubernetes API documentation for fields of metadata. MinProperties: 1 spec MachineDeploymentSpec spec is the desired state of MachineDeployment. Required: {} status MachineDeploymentStatus status is the observed state of MachineDeployment. MinProperties: 1
MachineDeploymentClass serves as a template to define a set of worker nodes of the cluster
provisioned using the ClusterClass.
Appears in:
Field Description Default Validation
metadata ObjectMeta Refer to Kubernetes API documentation for fields of metadata. MinProperties: 1 class string class denotes a type of worker node present in the cluster, MaxLength: 256 bootstrap MachineDeploymentClassBootstrapTemplate bootstrap contains the bootstrap template reference to be used Required: {} infrastructure MachineDeploymentClassInfrastructureTemplate infrastructure contains the infrastructure template reference to be used Required: {} healthCheck MachineDeploymentClassHealthCheck healthCheck defines a MachineHealthCheck for this MachineDeploymentClass. MinProperties: 1 failureDomain string failureDomain is the failure domain the machines will be created in. MaxLength: 256 naming MachineDeploymentClassNamingSpec naming allows changing the naming pattern used when creating the MachineDeployment. MinProperties: 1 deletion MachineDeploymentClassMachineDeletionSpec deletion contains configuration options for Machine deletion. MinProperties: 1 taints MachineTaint arraytaints are the node taints that Cluster API will manage. MaxItems: 64 minReadySeconds integer minReadySeconds is the minimum number of seconds for which a newly created machine should Minimum: 0 readinessGates MachineReadinessGate arrayreadinessGates specifies additional conditions to include when evaluating Machine Ready condition. MaxItems: 32 rollout MachineDeploymentClassRolloutSpec rollout allows you to configure the behaviour of rolling updates to the MachineDeployment Machines. MinProperties: 1
MachineDeploymentClassBootstrapTemplate defines the BootstrapTemplate for a MachineDeployment.
Appears in:
Field Description Default Validation
templateRef ClusterClassTemplateReference templateRef is a required reference to the BootstrapTemplate for a MachineDeployment. Required: {}
MachineDeploymentClassHealthCheck defines a MachineHealthCheck for MachineDeployment machines.
Validation:
Appears in:
Field Description Default Validation
checks MachineDeploymentClassHealthCheckChecks checks are the checks that are used to evaluate if a Machine is healthy.cluster.x-k8s.io/remediate-machine annotation and MinProperties: 1 remediation MachineDeploymentClassHealthCheckRemediation remediation configures if and how remediations are triggered if a Machine is unhealthy. MinProperties: 1
MachineDeploymentClassHealthCheckChecks are the checks that are used to evaluate if a MachineDeployment Machine is healthy.
Validation:
Appears in:
Field Description Default Validation
nodeStartupTimeoutSeconds integer nodeStartupTimeoutSeconds allows to set the maximum time for MachineHealthCheckSpec.ProviderID field. Minimum: 0 unhealthyNodeConditions UnhealthyNodeCondition arrayunhealthyNodeConditions contains a list of conditions that determine MaxItems: 100 unhealthyMachineConditions UnhealthyMachineCondition arrayunhealthyMachineConditions contains a list of the machine conditions that determine MaxItems: 100
MachineDeploymentClassHealthCheckRemediation configures if and how remediations are triggered if a MachineDeployment Machine is unhealthy.
Validation:
Appears in:
Field Description Default Validation
maxInFlight IntOrString maxInFlight determines how many in flight remediations should happen at the same time. Optional: {} triggerIf MachineDeploymentClassHealthCheckRemediationTriggerIf triggerIf configures if remediations are triggered. MinProperties: 1 templateRef MachineHealthCheckRemediationTemplateReference templateRef is a reference to a remediation template Optional: {}
MachineDeploymentClassHealthCheckRemediationTriggerIf configures if remediations are triggered.
Validation:
Appears in:
Field Description Default Validation
unhealthyLessThanOrEqualTo IntOrString unhealthyLessThanOrEqualTo specifies that remediations are only triggered if the number of Optional: {} unhealthyInRange string unhealthyInRange specifies that remediations are only triggered if the number of MaxLength: 32 ^\[[0-9]+-[0-9]+\]$
MachineDeploymentClassInfrastructureTemplate defines the InfrastructureTemplate for a MachineDeployment.
Appears in:
Field Description Default Validation
templateRef ClusterClassTemplateReference templateRef is a required reference to the InfrastructureTemplate for a MachineDeployment. Required: {}
MachineDeploymentClassMachineDeletionSpec contains configuration options for Machine deletion.
Validation:
Appears in:
Field Description Default Validation
order MachineSetDeletionOrder order defines the order in which Machines are deleted when downscaling. Enum: [Random Newest Oldest] nodeDrainTimeoutSeconds integer nodeDrainTimeoutSeconds is the total amount of time that the controller will spend on draining a node.kubectl drain --timeout Minimum: 0 nodeVolumeDetachTimeoutSeconds integer nodeVolumeDetachTimeoutSeconds is the total amount of time that the controller will spend on waiting for all volumes Minimum: 0 nodeDeletionTimeoutSeconds integer nodeDeletionTimeoutSeconds defines how long the controller will attempt to delete the Node that the Machine Minimum: 0
MachineDeploymentClassNamingSpec defines the naming strategy for machine deployment objects.
Validation:
Appears in:
Field Description Default Validation
template string template defines the template to use for generating the name of the MachineDeployment object.\{\{ .cluster.name \}\}-\{\{ .machineDeployment.topologyName \}\}-\{\{ .random \}\}..cluster.name: The name of the cluster object..random: A random alphanumeric string, without vowels, of length 5..machineDeployment.topologyName: The name of the MachineDeployment topology (Cluster.spec.topology.workers.machineDeployments[].name). MaxLength: 1024
MachineDeploymentClassRolloutSpec defines the rollout behavior.
Validation:
Appears in:
MachineDeploymentClassRolloutStrategy describes how to replace existing machines
with new ones.
Validation:
Appears in:
MachineDeploymentClassRolloutStrategyRollingUpdate is used to control the desired behavior of rolling update.
Validation:
Appears in:
Field Description Default Validation
maxUnavailable IntOrString maxUnavailable is the maximum number of machines that can be unavailable during the update. Optional: {} maxSurge IntOrString maxSurge is the maximum number of machines that can be scheduled above the Optional: {}
MachineDeploymentDeletionSpec contains configuration options for MachineDeployment deletion.
Validation:
Appears in:
Field Description Default Validation
order MachineSetDeletionOrder order defines the order in which Machines are deleted when downscaling. Enum: [Random Newest Oldest]
MachineDeploymentDeprecatedStatus groups all the status fields that are deprecated and will be removed in a future version.
See https://github.com/kubernetes-sigs/cluster-api/blob/main/docs/proposals/20240916-improve-status-in-CAPI-resources.md for more context.
Appears in:
Field Description Default Validation
v1beta1 MachineDeploymentV1Beta1DeprecatedStatus v1beta1 groups all the status fields that are deprecated and will be removed when support for v1beta1 will be dropped. Optional: {}
MachineDeploymentList contains a list of MachineDeployment.
Field Description Default Validation
apiVersion string cluster.x-k8s.io/v1beta2kind string MachineDeploymentListmetadata ListMeta Refer to Kubernetes API documentation for fields of metadata. Optional: {} items MachineDeployment arrayitems is the list of MachineDeployments.
MachineDeploymentRemediationSpec controls how unhealthy Machines are remediated.
Validation:
Appears in:
Field Description Default Validation
maxInFlight IntOrString maxInFlight determines how many in flight remediations should happen at the same time. Optional: {}
MachineDeploymentRolloutSpec defines the rollout behavior.
Validation:
Appears in:
Field Description Default Validation
strategy MachineDeploymentRolloutStrategy strategy specifies how to roll out control plane Machines. MinProperties: 1
MachineDeploymentRolloutStrategy describes how to replace existing machines
with new ones.
Validation:
Appears in:
MachineDeploymentRolloutStrategyRollingUpdate is used to control the desired behavior of rolling update.
Validation:
Appears in:
Field Description Default Validation
maxUnavailable IntOrString maxUnavailable is the maximum number of machines that can be unavailable during the update. Optional: {} maxSurge IntOrString maxSurge is the maximum number of machines that can be scheduled above the Optional: {}
Underlying type: string
MachineDeploymentRolloutStrategyType defines the type of MachineDeployment rollout strategies.
Validation:
Enum: [RollingUpdate OnDelete]
Appears in:
Field Description
RollingUpdateRollingUpdateMachineDeploymentStrategyType replaces the old MachineSet by new one using rolling update OnDeleteOnDeleteMachineDeploymentStrategyType replaces old MachineSets when the deletion of the associated machines are completed.
MachineDeploymentSpec defines the desired state of MachineDeployment.
Appears in:
Field Description Default Validation
clusterName string clusterName is the name of the Cluster this object belongs to. MaxLength: 63 replicas integer replicas is the number of desired machines. Optional: {} rollout MachineDeploymentRolloutSpec rollout allows you to configure the behaviour of rolling updates to the MachineDeployment Machines. MinProperties: 1 selector LabelSelector selector is the label selector for machines. Existing MachineSets whose machines are Required: {} template MachineTemplateSpec template describes the machines that will be created. Required: {} machineNaming MachineNamingSpec machineNaming allows changing the naming pattern used when creating Machines. MinProperties: 1 remediation MachineDeploymentRemediationSpec remediation controls how unhealthy Machines are remediated. MinProperties: 1 deletion MachineDeploymentDeletionSpec deletion contains configuration options for MachineDeployment deletion. MinProperties: 1 paused boolean paused indicates that the deployment is paused. Optional: {}
MachineDeploymentStatus defines the observed state of MachineDeployment.
Validation:
Appears in:
Field Description Default Validation
conditions Condition arrayconditions represents the observations of a MachineDeployment’s current state. MaxItems: 32 observedGeneration integer observedGeneration is the generation observed by the deployment controller. Minimum: 1 selector string selector is the same as the label selector but in the string format to avoid introspection MaxLength: 4096 replicas integer replicas is the total number of non-terminated machines targeted by this deployment Optional: {} readyReplicas integer readyReplicas is the number of ready replicas for this MachineDeployment. A machine is considered ready when Machine’s Ready condition is true. Optional: {} availableReplicas integer availableReplicas is the number of available replicas for this MachineDeployment. A machine is considered available when Machine’s Available condition is true. Optional: {} upToDateReplicas integer upToDateReplicas is the number of up-to-date replicas targeted by this deployment. A machine is considered up-to-date when Machine’s UpToDate condition is true. Optional: {} versions StatusVersion arrayversions is the aggregated Kubernetes versions in this MachineDeployment. MaxItems: 100 phase string phase represents the current phase of a MachineDeployment (ScalingUp, ScalingDown, Running, Failed, or Unknown). Enum: [ScalingUp ScalingDown Running Failed Unknown] deprecated MachineDeploymentDeprecatedStatus deprecated groups all the status fields that are deprecated and will be removed when all the nested field are removed. Optional: {}
MachineDeploymentTopology specifies the different parameters for a set of worker nodes in the topology.
This set of nodes is managed by a MachineDeployment object whose lifecycle is managed by the Cluster controller.
Appears in:
Field Description Default Validation
metadata ObjectMeta Refer to Kubernetes API documentation for fields of metadata. MinProperties: 1 class string class is the name of the MachineDeploymentClass used to create the set of worker nodes.Cluster.Spec.Class field. MaxLength: 256 name string name is the unique identifier for this MachineDeploymentTopology. MaxLength: 63 ^[a-z0-9]([-a-z0-9]*[a-z0-9])?(\.[a-z0-9]([-a-z0-9]*[a-z0-9])?)*$ failureDomain string failureDomain is the failure domain the machines will be created in. MaxLength: 256 replicas integer replicas is the number of worker nodes belonging to this set. Optional: {} healthCheck MachineDeploymentTopologyHealthCheck healthCheck allows to enable, disable and override MachineDeployment health check MinProperties: 1 deletion MachineDeploymentTopologyMachineDeletionSpec deletion contains configuration options for Machine deletion. MinProperties: 1 taints MachineTaint arraytaints are the node taints that Cluster API will manage. MaxItems: 64 minReadySeconds integer minReadySeconds is the minimum number of seconds for which a newly created machine should Minimum: 0 readinessGates MachineReadinessGate arrayreadinessGates specifies additional conditions to include when evaluating Machine Ready condition. MaxItems: 32 rollout MachineDeploymentTopologyRolloutSpec rollout allows you to configure the behaviour of rolling updates to the MachineDeployment Machines. MinProperties: 1 variables MachineDeploymentVariables variables can be used to customize the MachineDeployment through patches. MinProperties: 1
MachineDeploymentTopologyHealthCheck defines a MachineHealthCheck for MachineDeployment machines.
Validation:
Appears in:
Field Description Default Validation
enabled boolean enabled controls if a MachineHealthCheck should be created for the target machines.enable is true and no MachineHealthCheck definition is available. Optional: {} checks MachineDeploymentTopologyHealthCheckChecks checks are the checks that are used to evaluate if a Machine is healthy.cluster.x-k8s.io/remediate-machine annotation and MinProperties: 1 remediation MachineDeploymentTopologyHealthCheckRemediation remediation configures if and how remediations are triggered if a Machine is unhealthy. MinProperties: 1
MachineDeploymentTopologyHealthCheckChecks are the checks that are used to evaluate if a MachineDeployment Machine is healthy.
Validation:
Appears in:
Field Description Default Validation
nodeStartupTimeoutSeconds integer nodeStartupTimeoutSeconds allows to set the maximum time for MachineHealthCheckSpec.ProviderID field. Minimum: 0 unhealthyNodeConditions UnhealthyNodeCondition arrayunhealthyNodeConditions contains a list of conditions that determine MaxItems: 100 unhealthyMachineConditions UnhealthyMachineCondition arrayunhealthyMachineConditions contains a list of the machine conditions that determine MaxItems: 100
MachineDeploymentTopologyHealthCheckRemediation configures if and how remediations are triggered if a MachineDeployment Machine is unhealthy.
Validation:
Appears in:
Field Description Default Validation
maxInFlight IntOrString maxInFlight determines how many in flight remediations should happen at the same time. Optional: {} triggerIf MachineDeploymentTopologyHealthCheckRemediationTriggerIf triggerIf configures if remediations are triggered. MinProperties: 1 templateRef MachineHealthCheckRemediationTemplateReference templateRef is a reference to a remediation template Optional: {}
MachineDeploymentTopologyHealthCheckRemediationTriggerIf configures if remediations are triggered.
Validation:
Appears in:
Field Description Default Validation
unhealthyLessThanOrEqualTo IntOrString unhealthyLessThanOrEqualTo specifies that remediations are only triggered if the number of Optional: {} unhealthyInRange string unhealthyInRange specifies that remediations are only triggered if the number of MaxLength: 32 ^\[[0-9]+-[0-9]+\]$
MachineDeploymentTopologyMachineDeletionSpec contains configuration options for Machine deletion.
Validation:
Appears in:
Field Description Default Validation
order MachineSetDeletionOrder order defines the order in which Machines are deleted when downscaling. Enum: [Random Newest Oldest] nodeDrainTimeoutSeconds integer nodeDrainTimeoutSeconds is the total amount of time that the controller will spend on draining a node.kubectl drain --timeout Minimum: 0 nodeVolumeDetachTimeoutSeconds integer nodeVolumeDetachTimeoutSeconds is the total amount of time that the controller will spend on waiting for all volumes Minimum: 0 nodeDeletionTimeoutSeconds integer nodeDeletionTimeoutSeconds defines how long the controller will attempt to delete the Node that the Machine Minimum: 0
MachineDeploymentTopologyRolloutSpec defines the rollout behavior.
Validation:
Appears in:
MachineDeploymentTopologyRolloutStrategy describes how to replace existing machines
with new ones.
Validation:
Appears in:
MachineDeploymentTopologyRolloutStrategyRollingUpdate is used to control the desired behavior of rolling update.
Validation:
Appears in:
Field Description Default Validation
maxUnavailable IntOrString maxUnavailable is the maximum number of machines that can be unavailable during the update. Optional: {} maxSurge IntOrString maxSurge is the maximum number of machines that can be scheduled above the Optional: {}
MachineDeploymentV1Beta1DeprecatedStatus groups all the status fields that are deprecated and will be removed when support for v1beta1 will be dropped.
See https://github.com/kubernetes-sigs/cluster-api/blob/main/docs/proposals/20240916-improve-status-in-CAPI-resources.md for more context.
Appears in:
Field Description Default Validation
conditions Conditions conditions defines current service state of the MachineDeployment. Optional: {} updatedReplicas integer updatedReplicas is the total number of non-terminated machines targeted by this deployment Optional: {} readyReplicas integer readyReplicas is the total number of ready machines targeted by this deployment. Optional: {} availableReplicas integer availableReplicas is the total number of available machines (ready for at least minReadySeconds) Optional: {} unavailableReplicas integer unavailableReplicas is the total number of unavailable machines targeted by this deployment. Optional: {}
MachineDeploymentVariables can be used to provide variables for a specific MachineDeployment.
Validation:
Appears in:
Field Description Default Validation
overrides ClusterVariable arrayoverrides can be used to override Cluster level variables. MaxItems: 1000
MachineDeprecatedStatus groups all the status fields that are deprecated and will be removed in a future version.
See https://github.com/kubernetes-sigs/cluster-api/blob/main/docs/proposals/20240916-improve-status-in-CAPI-resources.md for more context.
Appears in:
Field Description Default Validation
v1beta1 MachineV1Beta1DeprecatedStatus v1beta1 groups all the status fields that are deprecated and will be removed when support for v1beta1 will be dropped. Optional: {}
MachineDrainRule is the Schema for the MachineDrainRule API.
Appears in:
Field Description Default Validation
apiVersion string cluster.x-k8s.io/v1beta2kind string MachineDrainRulemetadata ObjectMeta Refer to Kubernetes API documentation for fields of metadata. MinProperties: 1 spec MachineDrainRuleSpec spec defines the spec of a MachineDrainRule. Required: {}
Underlying type: string
MachineDrainRuleDrainBehavior defines the drain behavior. Can be either “Drain”, “Skip”, or “WaitCompleted”.
Validation:
Enum: [Drain Skip WaitCompleted]
Appears in:
Field Description
DrainMachineDrainRuleDrainBehaviorDrain means a Pod should be drained. SkipMachineDrainRuleDrainBehaviorSkip means the drain for a Pod should be skipped. WaitCompletedMachineDrainRuleDrainBehaviorWaitCompleted means the Pod should not be evicted,
MachineDrainRuleDrainConfig configures if and how Pods are drained.
Appears in:
Field Description Default Validation
behavior MachineDrainRuleDrainBehavior behavior defines the drain behavior. Enum: [Drain Skip WaitCompleted] order integer order defines the order in which Pods are drained. Optional: {}
MachineDrainRuleList contains a list of MachineDrainRules.
Field Description Default Validation
apiVersion string cluster.x-k8s.io/v1beta2kind string MachineDrainRuleListmetadata ListMeta Refer to Kubernetes API documentation for fields of metadata. Required: {} items MachineDrainRule arrayitems contains the items of the MachineDrainRuleList.
MachineDrainRuleMachineSelector defines to which Machines this MachineDrainRule should be applied.
Validation:
Appears in:
Field Description Default Validation
selector LabelSelector selector is a label selector which selects Machines by their labels. Optional: {} clusterSelector LabelSelector clusterSelector is a label selector which selects Machines by the labels of Optional: {}
MachineDrainRulePodSelector defines to which Pods this MachineDrainRule should be applied.
Validation:
Appears in:
Field Description Default Validation
selector LabelSelector selector is a label selector which selects Pods by their labels. Optional: {} namespaceSelector LabelSelector namespaceSelector is a label selector which selects Pods by the labels of Optional: {}
MachineDrainRuleSpec defines the spec of a MachineDrainRule.
Appears in:
Field Description Default Validation
drain MachineDrainRuleDrainConfig drain configures if and how Pods are drained. Required: {} machines MachineDrainRuleMachineSelector arraymachines defines to which Machines this MachineDrainRule should be applied. MaxItems: 32 pods MachineDrainRulePodSelector arraypods defines to which Pods this MachineDrainRule should be applied. MaxItems: 32
MachineHealthCheck is the Schema for the machinehealthchecks API.
Appears in:
Field Description Default Validation
apiVersion string cluster.x-k8s.io/v1beta2kind string MachineHealthCheckmetadata ObjectMeta Refer to Kubernetes API documentation for fields of metadata. MinProperties: 1 spec MachineHealthCheckSpec spec is the specification of machine health check policy Required: {} status MachineHealthCheckStatus status is the most recently observed status of MachineHealthCheck resource MinProperties: 1
MachineHealthCheckChecks are the checks that are used to evaluate if a Machine is healthy.
Validation:
Appears in:
Field Description Default Validation
nodeStartupTimeoutSeconds integer nodeStartupTimeoutSeconds allows to set the maximum time for MachineHealthCheckSpec.ProviderID field. Minimum: 0 unhealthyNodeConditions UnhealthyNodeCondition arrayunhealthyNodeConditions contains a list of conditions that determine MaxItems: 100 unhealthyMachineConditions UnhealthyMachineCondition arrayunhealthyMachineConditions contains a list of the machine conditions that determine MaxItems: 100
MachineHealthCheckDeprecatedStatus groups all the status fields that are deprecated and will be removed in a future version.
See https://github.com/kubernetes-sigs/cluster-api/blob/main/docs/proposals/20240916-improve-status-in-CAPI-resources.md for more context.
Appears in:
Field Description Default Validation
v1beta1 MachineHealthCheckV1Beta1DeprecatedStatus v1beta1 groups all the status fields that are deprecated and will be removed when support for v1beta1 will be dropped. Optional: {}
MachineHealthCheckList contains a list of MachineHealthCheck.
Field Description Default Validation
apiVersion string cluster.x-k8s.io/v1beta2kind string MachineHealthCheckListmetadata ListMeta Refer to Kubernetes API documentation for fields of metadata. Optional: {} items MachineHealthCheck arrayitems is the list of MachineHealthChecks.
MachineHealthCheckRemediation configures if and how remediations are triggered if a Machine is unhealthy.
Validation:
Appears in:
Field Description Default Validation
triggerIf MachineHealthCheckRemediationTriggerIf triggerIf configures if remediations are triggered. MinProperties: 1 templateRef MachineHealthCheckRemediationTemplateReference templateRef is a reference to a remediation template Optional: {}
MachineHealthCheckRemediationTemplateReference is a reference to a remediation template.
Appears in:
Field Description Default Validation
kind string kind of the remediation template. MaxLength: 63 ^[a-zA-Z]([-a-zA-Z0-9]*[a-zA-Z0-9])?$ name string name of the remediation template. MaxLength: 253 ^[a-z0-9]([-a-z0-9]*[a-z0-9])?(\.[a-z0-9]([-a-z0-9]*[a-z0-9])?)*$ apiVersion string apiVersion of the remediation template. MaxLength: 317 ^[a-z0-9]([-a-z0-9]*[a-z0-9])?(\.[a-z0-9]([-a-z0-9]*[a-z0-9])?)*\/[a-z]([-a-z0-9]*[a-z0-9])?$
MachineHealthCheckRemediationTriggerIf configures if remediations are triggered.
Validation:
Appears in:
Field Description Default Validation
unhealthyLessThanOrEqualTo IntOrString unhealthyLessThanOrEqualTo specifies that remediations are only triggered if the number of Optional: {} unhealthyInRange string unhealthyInRange specifies that remediations are only triggered if the number of MaxLength: 32 ^\[[0-9]+-[0-9]+\]$
MachineHealthCheckSpec defines the desired state of MachineHealthCheck.
Appears in:
Field Description Default Validation
clusterName string clusterName is the name of the Cluster this object belongs to. MaxLength: 63 selector LabelSelector selector is a label selector to match machines whose health will be exercised Required: {} checks MachineHealthCheckChecks checks are the checks that are used to evaluate if a Machine is healthy.cluster.x-k8s.io/remediate-machine annotation and MinProperties: 1 remediation MachineHealthCheckRemediation remediation configures if and how remediations are triggered if a Machine is unhealthy. MinProperties: 1
MachineHealthCheckStatus defines the observed state of MachineHealthCheck.
Validation:
Appears in:
Field Description Default Validation
conditions Condition arrayconditions represents the observations of a MachineHealthCheck’s current state. MaxItems: 32 expectedMachines integer expectedMachines is the total number of machines counted by this machine health check Minimum: 0 currentHealthy integer currentHealthy is the total number of healthy machines counted by this machine health check Minimum: 0 remediationsAllowed integer remediationsAllowed is the number of further remediations allowed by this machine health check before Minimum: 0 observedGeneration integer observedGeneration is the latest generation observed by the controller. Minimum: 1 targets string array targets shows the current list of machines the machine health check is watching MaxItems: 10000 deprecated MachineHealthCheckDeprecatedStatus deprecated groups all the status fields that are deprecated and will be removed when all the nested field are removed. Optional: {}
MachineHealthCheckV1Beta1DeprecatedStatus groups all the status fields that are deprecated and will be removed when support for v1beta1 will be dropped.
See https://github.com/kubernetes-sigs/cluster-api/blob/main/docs/proposals/20240916-improve-status-in-CAPI-resources.md for more context.
Appears in:
Field Description Default Validation
conditions Conditions conditions defines current service state of the MachineHealthCheck. Optional: {}
MachineInitializationStatus provides observations of the Machine initialization process.
NOTE: Fields in this struct are part of the Cluster API contract and are used to orchestrate initial Machine provisioning.
Validation:
Appears in:
Field Description Default Validation
infrastructureProvisioned boolean infrastructureProvisioned is true when the infrastructure provider reports that Machine’s infrastructure is fully provisioned. Optional: {} bootstrapDataSecretCreated boolean bootstrapDataSecretCreated is true when the bootstrap provider reports that the Machine’s boostrap secret is created. Optional: {}
MachineList contains a list of Machine.
Field Description Default Validation
apiVersion string cluster.x-k8s.io/v1beta2kind string MachineListmetadata ListMeta Refer to Kubernetes API documentation for fields of metadata. Optional: {} items Machine arrayitems is the list of Machines.
MachineNamingSpec allows changing the naming pattern used when creating
Machines.
Note: InfraMachines & BootstrapConfigs will use the same name as the corresponding Machines.
Validation:
Appears in:
Field Description Default Validation
template string template defines the template to use for generating the names of the\{\{ .machineSet.name \}\}-\{\{ .random \}\}..cluster.name,.machineSet.name and .random..cluster.name retrieves the name of the cluster object.machineSet.name retrieves the name of the MachineSet.random is substituted with random alphanumeric string, MaxLength: 256
MachineNodeReference is a reference to the node running on the machine.
Appears in:
Field Description Default Validation
name string name of the node. MaxLength: 253 ^[a-z0-9]([-a-z0-9]*[a-z0-9])?(\.[a-z0-9]([-a-z0-9]*[a-z0-9])?)*$
MachinePool is the Schema for the machinepools API.
NOTE: This CRD can only be used if the MachinePool feature gate is enabled.
Appears in:
Field Description Default Validation
apiVersion string cluster.x-k8s.io/v1beta2kind string MachinePoolmetadata ObjectMeta Refer to Kubernetes API documentation for fields of metadata. MinProperties: 1 spec MachinePoolSpec spec is the desired state of MachinePool. Required: {} status MachinePoolStatus status is the observed state of MachinePool. MinProperties: 1
MachinePoolClass serves as a template to define a pool of worker nodes of the cluster
provisioned using ClusterClass.
Appears in:
Field Description Default Validation
metadata ObjectMeta Refer to Kubernetes API documentation for fields of metadata. MinProperties: 1 class string class denotes a type of machine pool present in the cluster, MaxLength: 256 bootstrap MachinePoolClassBootstrapTemplate bootstrap contains the bootstrap template reference to be used Required: {} infrastructure MachinePoolClassInfrastructureTemplate infrastructure contains the infrastructure template reference to be used Required: {} failureDomains string array failureDomains is the list of failure domains the MachinePool should be attached to. MaxItems: 100 naming MachinePoolClassNamingSpec naming allows changing the naming pattern used when creating the MachinePool. MinProperties: 1 deletion MachinePoolClassMachineDeletionSpec deletion contains configuration options for Machine deletion. MinProperties: 1 taints MachineTaint arraytaints are the node taints that Cluster API will manage. MaxItems: 64 minReadySeconds integer minReadySeconds is the minimum number of seconds for which a newly created machine pool should Minimum: 0
MachinePoolClassBootstrapTemplate defines the BootstrapTemplate for a MachinePool.
Appears in:
Field Description Default Validation
templateRef ClusterClassTemplateReference templateRef is a required reference to the BootstrapTemplate for a MachinePool. Required: {}
MachinePoolClassInfrastructureTemplate defines the InfrastructureTemplate for a MachinePool.
Appears in:
Field Description Default Validation
templateRef ClusterClassTemplateReference templateRef is a required reference to the InfrastructureTemplate for a MachinePool. Required: {}
MachinePoolClassMachineDeletionSpec contains configuration options for Machine deletion.
Validation:
Appears in:
Field Description Default Validation
nodeDrainTimeoutSeconds integer nodeDrainTimeoutSeconds is the total amount of time that the controller will spend on draining a node.kubectl drain --timeout Minimum: 0 nodeVolumeDetachTimeoutSeconds integer nodeVolumeDetachTimeoutSeconds is the total amount of time that the controller will spend on waiting for all volumes Minimum: 0 nodeDeletionTimeoutSeconds integer nodeDeletionTimeoutSeconds defines how long the controller will attempt to delete the Node that the Machine Minimum: 0
MachinePoolClassNamingSpec defines the naming strategy for MachinePool objects.
Validation:
Appears in:
Field Description Default Validation
template string template defines the template to use for generating the name of the MachinePool object.\{\{ .cluster.name \}\}-\{\{ .machinePool.topologyName \}\}-\{\{ .random \}\}..cluster.name: The name of the cluster object..random: A random alphanumeric string, without vowels, of length 5..machinePool.topologyName: The name of the MachinePool topology (Cluster.spec.topology.workers.machinePools[].name). MaxLength: 1024
MachinePoolDeprecatedStatus groups all the status fields that are deprecated and will be removed in a future version.
See https://github.com/kubernetes-sigs/cluster-api/blob/main/docs/proposals/20240916-improve-status-in-CAPI-resources.md for more context.
Appears in:
Field Description Default Validation
v1beta1 MachinePoolV1Beta1DeprecatedStatus v1beta1 groups all the status fields that are deprecated and will be removed when support for v1beta1 will be dropped. Optional: {}
MachinePoolInitializationStatus provides observations of the MachinePool initialization process.
NOTE: Fields in this struct are part of the Cluster API contract and are used to orchestrate initial MachinePool provisioning.
Validation:
Appears in:
Field Description Default Validation
infrastructureProvisioned boolean infrastructureProvisioned is true when the infrastructure provider reports that MachinePool’s infrastructure is fully provisioned. Optional: {} bootstrapDataSecretCreated boolean bootstrapDataSecretCreated is true when the bootstrap provider reports that the MachinePool’s boostrap secret is created. Optional: {}
MachinePoolList contains a list of MachinePool.
Field Description Default Validation
apiVersion string cluster.x-k8s.io/v1beta2kind string MachinePoolListmetadata ListMeta Refer to Kubernetes API documentation for fields of metadata. Optional: {} items MachinePool arrayitems is the list of MachinePools.
MachinePoolSpec defines the desired state of MachinePool.
Appears in:
Field Description Default Validation
clusterName string clusterName is the name of the Cluster this object belongs to. MaxLength: 63 replicas integer replicas is the number of desired machines. Defaults to 1. Optional: {} template MachineTemplateSpec template describes the machines that will be created. Required: {} providerIDList string array providerIDList are the identification IDs of machine instances provided by the provider. MaxItems: 10000 failureDomains string array failureDomains is the list of failure domains this MachinePool should be attached to. MaxItems: 100
MachinePoolStatus defines the observed state of MachinePool.
Validation:
Appears in:
Field Description Default Validation
conditions Condition arrayconditions represents the observations of a MachinePool’s current state. MaxItems: 32 initialization MachinePoolInitializationStatus initialization provides observations of the MachinePool initialization process. MinProperties: 1 nodeRefs ObjectReference arraynodeRefs will point to the corresponding Nodes if they exist. MaxItems: 10000 replicas integer replicas is the most recently observed number of replicas. Optional: {} readyReplicas integer readyReplicas is the number of ready replicas for this MachinePool. A machine is considered ready when Machine’s Ready condition is true. Optional: {} availableReplicas integer availableReplicas is the number of available replicas for this MachinePool. A machine is considered available when Machine’s Available condition is true. Optional: {} upToDateReplicas integer upToDateReplicas is the number of up-to-date replicas targeted by this MachinePool. A machine is considered up-to-date when Machine’s UpToDate condition is true. Optional: {} versions StatusVersion arrayversions is the aggregated Kubernetes versions in this MachinePool. MaxItems: 100 phase string phase represents the current phase of cluster actuation. Enum: [Pending Provisioning Provisioned Running ScalingUp ScalingDown Scaling Deleting Failed Unknown] observedGeneration integer observedGeneration is the latest generation observed by the controller. Minimum: 1 deprecated MachinePoolDeprecatedStatus deprecated groups all the status fields that are deprecated and will be removed when all the nested field are removed. Optional: {}
MachinePoolTopology specifies the different parameters for a pool of worker nodes in the topology.
This pool of nodes is managed by a MachinePool object whose lifecycle is managed by the Cluster controller.
Appears in:
Field Description Default Validation
metadata ObjectMeta Refer to Kubernetes API documentation for fields of metadata. MinProperties: 1 class string class is the name of the MachinePoolClass used to create the pool of worker nodes.Cluster.Spec.Class field. MaxLength: 256 name string name is the unique identifier for this MachinePoolTopology. MaxLength: 63 ^[a-z0-9]([-a-z0-9]*[a-z0-9])?(\.[a-z0-9]([-a-z0-9]*[a-z0-9])?)*$ failureDomains string array failureDomains is the list of failure domains the machine pool will be created in. MaxItems: 100 deletion MachinePoolTopologyMachineDeletionSpec deletion contains configuration options for Machine deletion. MinProperties: 1 taints MachineTaint arraytaints are the node taints that Cluster API will manage. MaxItems: 64 minReadySeconds integer minReadySeconds is the minimum number of seconds for which a newly created machine pool should Minimum: 0 replicas integer replicas is the number of nodes belonging to this pool. Optional: {} variables MachinePoolVariables variables can be used to customize the MachinePool through patches. MinProperties: 1
MachinePoolTopologyMachineDeletionSpec contains configuration options for Machine deletion.
Validation:
Appears in:
Field Description Default Validation
nodeDrainTimeoutSeconds integer nodeDrainTimeoutSeconds is the total amount of time that the controller will spend on draining a node.kubectl drain --timeout Minimum: 0 nodeVolumeDetachTimeoutSeconds integer nodeVolumeDetachTimeoutSeconds is the total amount of time that the controller will spend on waiting for all volumes Minimum: 0 nodeDeletionTimeoutSeconds integer nodeDeletionTimeoutSeconds defines how long the controller will attempt to delete the Node that the MachinePool Minimum: 0
MachinePoolV1Beta1DeprecatedStatus groups all the status fields that are deprecated and will be removed when support for v1beta1 will be dropped.
See https://github.com/kubernetes-sigs/cluster-api/blob/main/docs/proposals/20240916-improve-status-in-CAPI-resources.md for more context.
Appears in:
Field Description Default Validation
conditions Conditions conditions define the current service state of the MachinePool. Optional: {} failureReason MachinePoolStatusFailure failureReason indicates that there is a problem reconciling the state, and Optional: {} failureMessage string failureMessage indicates that there is a problem reconciling the state, MaxLength: 10240 readyReplicas integer readyReplicas is the number of ready replicas for this MachinePool. A machine is considered ready when the node has been created and is “Ready”. Optional: {} availableReplicas integer availableReplicas is the number of available replicas (ready for at least minReadySeconds) for this MachinePool. Optional: {} unavailableReplicas integer unavailableReplicas is the total number of unavailable machine instances targeted by this machine pool. Optional: {}
MachinePoolVariables can be used to provide variables for a specific MachinePool.
Validation:
Appears in:
Field Description Default Validation
overrides ClusterVariable arrayoverrides can be used to override Cluster level variables. MaxItems: 1000
MachineReadinessGate contains the type of a Machine condition to be used as a readiness gate.
Appears in:
Field Description Default Validation
conditionType string conditionType refers to a condition with matching type in the Machine’s condition list. MaxLength: 316 ^([a-z0-9]([-a-z0-9]*[a-z0-9])?(\.[a-z0-9]([-a-z0-9]*[a-z0-9])?)*/)?(([A-Za-z0-9][-A-Za-z0-9_.]*)?[A-Za-z0-9])$ polarity ConditionPolarity polarity of the conditionType specified in this readinessGate. Enum: [Positive Negative]
MachineSet is the Schema for the machinesets API.
Appears in:
Field Description Default Validation
apiVersion string cluster.x-k8s.io/v1beta2kind string MachineSetmetadata ObjectMeta Refer to Kubernetes API documentation for fields of metadata. MinProperties: 1 spec MachineSetSpec spec is the desired state of MachineSet. Required: {} status MachineSetStatus status is the observed state of MachineSet. MinProperties: 1
Underlying type: string
MachineSetDeletionOrder defines how priority is assigned to nodes to delete when
downscaling a MachineSet. Defaults to “Random”.
Validation:
Enum: [Random Newest Oldest]
Appears in:
Field Description
RandomRandomMachineSetDeletionOrder prioritizes both Machines that have the annotation NewestNewestMachineSetDeletionOrder prioritizes both Machines that have the annotation OldestOldestMachineSetDeletionOrder prioritizes both Machines that have the annotation
MachineSetDeletionSpec contains configuration options for MachineSet deletion.
Validation:
Appears in:
Field Description Default Validation
order MachineSetDeletionOrder order defines the order in which Machines are deleted when downscaling. Enum: [Random Newest Oldest]
MachineSetDeprecatedStatus groups all the status fields that are deprecated and will be removed in a future version.
See https://github.com/kubernetes-sigs/cluster-api/blob/main/docs/proposals/20240916-improve-status-in-CAPI-resources.md for more context.
Appears in:
Field Description Default Validation
v1beta1 MachineSetV1Beta1DeprecatedStatus v1beta1 groups all the status fields that are deprecated and will be removed when support for v1beta1 will be dropped. Optional: {}
MachineSetList contains a list of MachineSet.
Field Description Default Validation
apiVersion string cluster.x-k8s.io/v1beta2kind string MachineSetListmetadata ListMeta Refer to Kubernetes API documentation for fields of metadata. Optional: {} items MachineSet arrayitems is the list of MachineSets.
MachineSetSpec defines the desired state of MachineSet.
Appears in:
Field Description Default Validation
clusterName string clusterName is the name of the Cluster this object belongs to. MaxLength: 63 replicas integer replicas is the number of desired replicas. Optional: {} selector LabelSelector selector is a label query over machines that should match the replica count. Required: {} template MachineTemplateSpec template is the object that describes the machine that will be created if Required: {} machineNaming MachineNamingSpec machineNaming allows changing the naming pattern used when creating Machines. MinProperties: 1 deletion MachineSetDeletionSpec deletion contains configuration options for MachineSet deletion. MinProperties: 1
MachineSetStatus defines the observed state of MachineSet.
Validation:
Appears in:
Field Description Default Validation
conditions Condition arrayconditions represents the observations of a MachineSet’s current state. MaxItems: 32 selector string selector is the same as the label selector but in the string format to avoid introspection MaxLength: 4096 replicas integer replicas is the most recently observed number of replicas. Optional: {} readyReplicas integer readyReplicas is the number of ready replicas for this MachineSet. A machine is considered ready when Machine’s Ready condition is true. Optional: {} availableReplicas integer availableReplicas is the number of available replicas for this MachineSet. A machine is considered available when Machine’s Available condition is true. Optional: {} upToDateReplicas integer upToDateReplicas is the number of up-to-date replicas for this MachineSet. A machine is considered up-to-date when Machine’s UpToDate condition is true. Optional: {} versions StatusVersion arrayversions is the aggregated Kubernetes versions in this MachineSet. MaxItems: 100 observedGeneration integer observedGeneration reflects the generation of the most recently observed MachineSet. Minimum: 1 deprecated MachineSetDeprecatedStatus deprecated groups all the status fields that are deprecated and will be removed when all the nested field are removed. Optional: {}
MachineSetV1Beta1DeprecatedStatus groups all the status fields that are deprecated and will be removed when support for v1beta1 will be dropped.
See https://github.com/kubernetes-sigs/cluster-api/blob/main/docs/proposals/20240916-improve-status-in-CAPI-resources.md for more context.
Appears in:
Field Description Default Validation
conditions Conditions conditions defines current service state of the MachineSet. Optional: {} failureReason MachineSetStatusError failureReason will be set in the event that there is a terminal problem Optional: {} failureMessage string failureMessage will be set in the event that there is a terminal problem MaxLength: 10240 fullyLabeledReplicas integer fullyLabeledReplicas is the number of replicas that have labels matching the labels of the machine template of the MachineSet. Optional: {} readyReplicas integer readyReplicas is the number of ready replicas for this MachineSet. A machine is considered ready when the node has been created and is “Ready”. Optional: {} availableReplicas integer availableReplicas is the number of available replicas (ready for at least minReadySeconds) for this MachineSet. Optional: {}
MachineSpec defines the desired state of Machine.
Appears in:
Field Description Default Validation
clusterName string clusterName is the name of the Cluster this object belongs to. MaxLength: 63 bootstrap Bootstrap bootstrap is a reference to a local struct which encapsulates Required: {} infrastructureRef ContractVersionedObjectReference infrastructureRef is a required reference to a custom resource Required: {} version string version defines the desired Kubernetes version. MaxLength: 256 providerID string providerID is the identification ID of the machine provided by the provider. MaxLength: 512 failureDomain string failureDomain is the failure domain the machine will be created in. MaxLength: 256 minReadySeconds integer minReadySeconds is the minimum number of seconds for which a Machine should be ready before considering it available. Minimum: 0 readinessGates MachineReadinessGate arrayreadinessGates specifies additional conditions to include when evaluating Machine Ready condition. MaxItems: 32 deletion MachineDeletionSpec deletion contains configuration options for Machine deletion. MinProperties: 1 taints MachineTaint arraytaints are the node taints that Cluster API will manage. MaxItems: 64
MachineStatus defines the observed state of Machine.
Validation:
Appears in:
Field Description Default Validation
conditions Condition arrayconditions represents the observations of a Machine’s current state. MaxItems: 32 initialization MachineInitializationStatus initialization provides observations of the Machine initialization process. MinProperties: 1 nodeRef MachineNodeReference nodeRef will point to the corresponding Node if it exists. Optional: {} nodeInfo NodeSystemInfo nodeInfo is a set of ids/uuids to uniquely identify the node. Optional: {} addresses MachineAddresses addresses is a list of addresses assigned to the machine. MaxItems: 256 failureDomain string failureDomain is the failure domain where the Machine has been scheduled. MaxLength: 256 phase string phase represents the current phase of machine actuation. Enum: [Pending Provisioning Provisioned Running Updating Deleting Deleted Failed Unknown] observedGeneration integer observedGeneration is the latest generation observed by the controller. Minimum: 1 deletion MachineDeletionStatus deletion contains information relating to removal of the Machine. Optional: {} deprecated MachineDeprecatedStatus deprecated groups all the status fields that are deprecated and will be removed when all the nested field are removed. Optional: {}
MachineTaint defines a taint equivalent to corev1.Taint, but additionally having a propagation field.
Appears in:
Field Description Default Validation
key string key is the taint key to be applied to a node./. MaxLength: 317 ^([a-z0-9]([-a-z0-9]*[a-z0-9])?(\.[a-z0-9]([-a-z0-9]*[a-z0-9])?)*\/)?([A-Za-z0-9][-A-Za-z0-9_.]*)?[A-Za-z0-9]$ value string value is the taint value corresponding to the taint key. MaxLength: 63 ^(([A-Za-z0-9][-A-Za-z0-9_.]*)?[A-Za-z0-9])?$ effect TaintEffect effect is the effect for the taint. Valid values are NoSchedule, PreferNoSchedule and NoExecute. Enum: [NoSchedule PreferNoSchedule NoExecute] propagation MachineTaintPropagation propagation defines how this taint should be propagated to nodes. Enum: [Always OnInitialization]
Underlying type: string
MachineTaintPropagation defines when a taint should be propagated to nodes.
Validation:
Enum: [Always OnInitialization]
Appears in:
Field Description
AlwaysMachineTaintPropagationAlways means the taint should be continuously reconciled and kept on the node. OnInitializationMachineTaintPropagationOnInitialization means the taint should be set once during initialization and then
MachineTemplateSpec describes the data needed to create a Machine from a template.
Appears in:
Field Description Default Validation
metadata ObjectMeta Refer to Kubernetes API documentation for fields of metadata. MinProperties: 1 spec MachineSpec spec is the specification of the desired behavior of the machine. Required: {}
MachineV1Beta1DeprecatedStatus groups all the status fields that are deprecated and will be removed when support for v1beta1 will be dropped.
See https://github.com/kubernetes-sigs/cluster-api/blob/main/docs/proposals/20240916-improve-status-in-CAPI-resources.md for more context.
Appears in:
Field Description Default Validation
conditions Conditions conditions defines current service state of the Machine. Optional: {} failureReason MachineStatusError failureReason will be set in the event that there is a terminal problem Optional: {} failureMessage string failureMessage will be set in the event that there is a terminal problem MaxLength: 10240
NetworkRanges represents ranges of network addresses.
Appears in:
Field Description Default Validation
cidrBlocks string array cidrBlocks is a list of CIDR blocks. MaxItems: 100
ObjectMeta is metadata that all persisted resources must have, which includes all objects
users must create. This is a copy of customizable fields from metav1.ObjectMeta.
ObjectMeta is embedded in Machine.Spec, MachineDeployment.Template and MachineSet.Template,
which are not top-level Kubernetes objects. Given that metav1.ObjectMeta has lots of special cases
and read-only fields which end up in the generated CRD validation, having it as a subset simplifies
the API and some issues that can impact user experience.
During the upgrade to controller-tools@v2
for v1alpha2, we noticed a failure would occur running Cluster API test suite against the new CRDs,
specifically spec.metadata.creationTimestamp in body must be of type string: "null".
The investigation showed that controller-tools@v2 behaves differently than its previous version
when handling types from metav1 package.
In more details, we found that embedded (non-top level) types that embedded metav1.ObjectMeta
had validation properties, including for creationTimestamp (metav1.Time).
The metav1.Time type specifies a custom json marshaller that, when IsZero() is true, returns null
which breaks validation because the field isn’t marked as nullable.
In future versions, controller-tools@v2 might allow overriding the type and validation for embedded
types. When that happens, this hack should be revisited.
Validation:
Appears in:
Field Description Default Validation
labels object (keys:string, values:string) labels is a map of string keys and values that can be used to organize and categorize Optional: {} annotations object (keys:string, values:string) annotations is an unstructured key value map stored with a resource that may be Optional: {}
PatchDefinition defines a patch which is applied to customize the referenced templates.
Appears in:
Field Description Default Validation
selector PatchSelector selector defines on which templates the patch should be applied. Required: {} jsonPatches JSONPatch arrayjsonPatches defines the patches which should be applied on the templates MaxItems: 100
PatchSelector defines on which templates the patch should be applied.
Note: Matching on APIVersion and Kind is mandatory, to enforce that the patches are
written for the correct version. The version of the references in the ClusterClass may
be automatically updated during reconciliation if there is a newer version for the same contract.
Note: The results of selection based on the individual fields are ANDed.
Appears in:
Field Description Default Validation
apiVersion string apiVersion filters templates by apiVersion. MaxLength: 317 ^[a-z0-9]([-a-z0-9]*[a-z0-9])?(\.[a-z0-9]([-a-z0-9]*[a-z0-9])?)*\/[a-z]([-a-z0-9]*[a-z0-9])?$ kind string kind filters templates by kind. MaxLength: 63 ^[a-zA-Z]([-a-zA-Z0-9]*[a-zA-Z0-9])?$ matchResources PatchSelectorMatch matchResources selects templates based on where they are referenced. MinProperties: 1
PatchSelectorMatch selects templates based on where they are referenced.
Note: The selector must match at least one template.
Note: The results of selection based on the individual fields are ORed.
Validation:
Appears in:
Field Description Default Validation
controlPlane boolean controlPlane selects templates referenced in .spec.ControlPlane. Optional: {} infrastructureCluster boolean infrastructureCluster selects templates referenced in .spec.infrastructure. Optional: {} machineDeploymentClass PatchSelectorMatchMachineDeploymentClass machineDeploymentClass selects templates referenced in specific MachineDeploymentClasses in Optional: {} machinePoolClass PatchSelectorMatchMachinePoolClass machinePoolClass selects templates referenced in specific MachinePoolClasses in Optional: {}
PatchSelectorMatchMachineDeploymentClass selects templates referenced
in specific MachineDeploymentClasses in .spec.workers.machineDeployments.
Appears in:
Field Description Default Validation
names string array names selects templates by class names. MaxItems: 100
PatchSelectorMatchMachinePoolClass selects templates referenced
in specific MachinePoolClasses in .spec.workers.machinePools.
Appears in:
Field Description Default Validation
names string array names selects templates by class names. MaxItems: 100
StatusUpgradePlanVersion groups upgrade plan version-related status information.
Appears in:
Field Description Default Validation
version string version is the Kubernetes version. MaxLength: 256
StatusVersion groups version-related status information.
Appears in:
Field Description Default Validation
version string version is the Kubernetes version. MaxLength: 256 replicas integer replicas is the number of replicas at this version. Minimum: 1
Topology encapsulates the information of the managed resources.
Appears in:
Field Description Default Validation
classRef ClusterClassRef classRef is the ref to the ClusterClass that should be used for the topology. Required: {} version string version is the Kubernetes version of the cluster. MaxLength: 256 controlPlane ControlPlaneTopology controlPlane describes the cluster control plane. MinProperties: 1 workers WorkersTopology workers encapsulates the different constructs that form the worker nodes MinProperties: 1 variables ClusterVariable arrayvariables can be used to customize the Cluster through MaxItems: 1000
UnhealthyMachineCondition represents a Machine condition type and value with a timeout
specified as a duration. When the named condition has been in the given
status for at least the timeout value, a machine is considered unhealthy.
Appears in:
Field Description Default Validation
type string type of Machine condition MaxLength: 316 ^([a-z0-9]([-a-z0-9]*[a-z0-9])?(\.[a-z0-9]([-a-z0-9]*[a-z0-9])?)*/)?(([A-Za-z0-9][-A-Za-z0-9_.]*)?[A-Za-z0-9])$ status ConditionStatus status of the condition, one of True, False, Unknown. Enum: [True False Unknown] timeoutSeconds integer timeoutSeconds is the duration that a machine must be in a given status for, Minimum: 0
UnhealthyNodeCondition represents a Node condition type and value with a timeout
specified as a duration. When the named condition has been in the given
status for at least the timeout value, a node is considered unhealthy.
Appears in:
Field Description Default Validation
type NodeConditionType type of Node condition MinLength: 1 status ConditionStatus status of the condition, one of True, False, Unknown. MinLength: 1 timeoutSeconds integer timeoutSeconds is the duration that a node must be in a given status for, Minimum: 0
VariableSchema defines the schema of a variable.
Appears in:
Field Description Default Validation
openAPIV3Schema JSONSchemaProps openAPIV3Schema defines the schema of a variable via OpenAPI v3 MinProperties: 1
Underlying type: struct{Labels map[string]string “json:“labels,omitempty“”; Annotations map[string]string “json:“annotations,omitempty“”}
VariableSchemaMetadata is the metadata of a variable or a nested field within a variable.
It can be used to add additional data for higher level tools.
Validation:
Appears in:
WorkersClass is a collection of deployment classes.
Validation:
Appears in:
Field Description Default Validation
machineDeployments MachineDeploymentClass arraymachineDeployments is a list of machine deployment classes that can be used to create MaxItems: 100 machinePools MachinePoolClass arraymachinePools is a list of machine pool classes that can be used to create MaxItems: 100
WorkersStatus groups all the observations about workers current state.
Appears in:
Field Description Default Validation
desiredReplicas integer desiredReplicas is the total number of desired worker machines in this cluster. Optional: {} replicas integer replicas is the total number of worker machines in this cluster. Optional: {} upToDateReplicas integer upToDateReplicas is the number of up-to-date worker machines in this cluster. A machine is considered up-to-date when Machine’s UpToDate condition is true. Optional: {} readyReplicas integer readyReplicas is the total number of ready worker machines in this cluster. A machine is considered ready when Machine’s Ready condition is true. Optional: {} availableReplicas integer availableReplicas is the total number of available worker machines in this cluster. A machine is considered available when Machine’s Available condition is true. Optional: {} versions StatusVersion arrayversions is the aggregated Kubernetes versions in cluster workers. MaxItems: 32 upgradePlan StatusUpgradePlanVersion arrayupgradePlan reports the list of versions that would be applied to the worker objects (all MachineDeployments and MachinePools). MaxItems: 32
WorkersTopology represents the different sets of worker nodes in the cluster.
Validation:
Appears in:
Field Description Default Validation
machineDeployments MachineDeploymentTopology arraymachineDeployments is a list of machine deployments in the cluster. MaxItems: 2000 machinePools MachinePoolTopology arraymachinePools is a list of machine pools in the cluster. MaxItems: 2000
Package v1beta2 contains API Schema definitions for the kubeadm v1beta2 API group.
KubeadmControlPlane is the Schema for the KubeadmControlPlane API.
Appears in:
Field Description Default Validation
apiVersion string controlplane.cluster.x-k8s.io/v1beta2kind string KubeadmControlPlanemetadata ObjectMeta Refer to Kubernetes API documentation for fields of metadata. MinProperties: 1 spec KubeadmControlPlaneSpec spec is the desired state of KubeadmControlPlane. Required: {} status KubeadmControlPlaneStatus status is the observed state of KubeadmControlPlane. MinProperties: 1
KubeadmControlPlaneDeprecatedStatus groups all the status fields that are deprecated and will be removed in a future version.
See https://github.com/kubernetes-sigs/cluster-api/blob/main/docs/proposals/20240916-improve-status-in-CAPI-resources.md for more context.
Appears in:
Field Description Default Validation
v1beta1 KubeadmControlPlaneV1Beta1DeprecatedStatus v1beta1 groups all the status fields that are deprecated and will be removed when support for v1beta1 will be dropped. Optional: {}
KubeadmControlPlaneInitializationStatus provides observations of the KubeadmControlPlane initialization process.
Validation:
Appears in:
Field Description Default Validation
controlPlaneInitialized boolean controlPlaneInitialized is true when the KubeadmControlPlane provider reports that the Kubernetes control plane is initialized; Optional: {}
KubeadmControlPlaneList contains a list of KubeadmControlPlane.
Field Description Default Validation
apiVersion string controlplane.cluster.x-k8s.io/v1beta2kind string KubeadmControlPlaneListmetadata ListMeta Refer to Kubernetes API documentation for fields of metadata. Optional: {} items KubeadmControlPlane arrayitems is the list of KubeadmControlPlanes.
KubeadmControlPlaneMachineTemplate defines the template for Machines
in a KubeadmControlPlane object.
Appears in:
Field Description Default Validation
metadata ObjectMeta Refer to Kubernetes API documentation for fields of metadata. MinProperties: 1 spec KubeadmControlPlaneMachineTemplateSpec spec defines the spec for Machines Required: {}
KubeadmControlPlaneMachineTemplateDeletionSpec contains configuration options for Machine deletion.
Validation:
Appears in:
Field Description Default Validation
nodeDrainTimeoutSeconds integer nodeDrainTimeoutSeconds is the total amount of time that the controller will spend on draining a controlplane nodekubectl drain --timeout Minimum: 0 nodeVolumeDetachTimeoutSeconds integer nodeVolumeDetachTimeoutSeconds is the total amount of time that the controller will spend on waiting for all volumes Minimum: 0 nodeDeletionTimeoutSeconds integer nodeDeletionTimeoutSeconds defines how long the machine controller will attempt to delete the Node that the Machine Minimum: 0
KubeadmControlPlaneMachineTemplateSpec defines the spec for Machines
in a KubeadmControlPlane object.
Appears in:
Field Description Default Validation
infrastructureRef ContractVersionedObjectReference infrastructureRef is a required reference to a custom resource Required: {} readinessGates MachineReadinessGate arrayreadinessGates specifies additional conditions to include when evaluating Machine Ready condition; MaxItems: 32 deletion KubeadmControlPlaneMachineTemplateDeletionSpec deletion contains configuration options for Machine deletion. MinProperties: 1 taints MachineTaint arraytaints are the node taints that Cluster API will manage. MaxItems: 64
KubeadmControlPlaneRemediationSpec controls how unhealthy control plane Machines are remediated.
Validation:
Appears in:
Field Description Default Validation
maxRetry integer maxRetry is the Max number of retries while attempting to remediate an unhealthy machine. Optional: {} retryPeriodSeconds integer retryPeriodSeconds is the duration that KCP should wait before remediating a machine being created as a replacement Minimum: 0 minHealthyPeriodSeconds integer minHealthyPeriodSeconds defines the duration after which KCP will consider any failure to a machine unrelated Minimum: 0
KubeadmControlPlaneRolloutBeforeSpec describes when a rollout should be performed on the KCP machines.
Validation:
Appears in:
Field Description Default Validation
certificatesExpiryDays integer certificatesExpiryDays indicates a rollout needs to be performed if the Minimum: 7
KubeadmControlPlaneRolloutSpec allows you to configure the behaviour of rolling updates to the control plane Machines.
It allows you to require that all Machines are replaced before or after a certain time,
and allows you to define the strategy used during rolling replacements.
Validation:
Appears in:
KubeadmControlPlaneRolloutStrategy describes how to replace existing machines
with new ones.
Validation:
Appears in:
KubeadmControlPlaneRolloutStrategyRollingUpdate is used to control the desired behavior of rolling update.
Validation:
Appears in:
Field Description Default Validation
maxSurge IntOrString maxSurge is the maximum number of control planes that can be scheduled above or under the Optional: {}
Underlying type: string
KubeadmControlPlaneRolloutStrategyType defines the rollout strategies for a KubeadmControlPlane.
Validation:
Appears in:
Field Description
RollingUpdateRollingUpdateStrategyType replaces the old control planes by new one using rolling update
KubeadmControlPlaneSpec defines the desired state of KubeadmControlPlane.
Appears in:
Field Description Default Validation
replicas integer replicas is the number of desired machines. Defaults to 1. When stacked etcd is used onlyetcd best practice . Optional: {} version string version defines the desired Kubernetes version. MaxLength: 256 machineTemplate KubeadmControlPlaneMachineTemplate machineTemplate contains information about how machines Required: {} kubeadmConfigSpec KubeadmConfigSpec kubeadmConfigSpec is a KubeadmConfigSpec MinProperties: 1 rollout KubeadmControlPlaneRolloutSpec rollout allows you to configure the behaviour of rolling updates to the control plane Machines. MinProperties: 1 remediation KubeadmControlPlaneRemediationSpec remediation controls how unhealthy Machines are remediated. MinProperties: 1 machineNaming MachineNamingSpec machineNaming allows changing the naming pattern used when creating Machines. MinProperties: 1
KubeadmControlPlaneStatus defines the observed state of KubeadmControlPlane.
Validation:
Appears in:
Field Description Default Validation
conditions Condition arrayconditions represents the observations of a KubeadmControlPlane’s current state. MaxItems: 32 initialization KubeadmControlPlaneInitializationStatus initialization provides observations of the KubeadmControlPlane initialization process. MinProperties: 1 selector string selector is the label selector in string format to avoid introspection MaxLength: 4096 replicas integer replicas is the total number of non-terminated machines targeted by this control plane Optional: {} readyReplicas integer readyReplicas is the number of ready replicas for this KubeadmControlPlane. A machine is considered ready when Machine’s Ready condition is true. Optional: {} availableReplicas integer availableReplicas is the number of available replicas targeted by this KubeadmControlPlane. A machine is considered available when Machine’s Available condition is true. Optional: {} upToDateReplicas integer upToDateReplicas is the number of up-to-date replicas targeted by this KubeadmControlPlane. A machine is considered up-to-date when Machine’s UpToDate condition is true. Optional: {} versions StatusVersion arrayversions is the aggregated Kubernetes versions in this KubeadmControlPlane. MaxItems: 100 version string version represents the minimum Kubernetes version for the control plane machines MaxLength: 256 observedGeneration integer observedGeneration is the latest generation observed by the controller. Minimum: 1 lastRemediation LastRemediationStatus lastRemediation stores info about last remediation performed. Optional: {} deprecated KubeadmControlPlaneDeprecatedStatus deprecated groups all the status fields that are deprecated and will be removed when all the nested field are removed. Optional: {}
KubeadmControlPlaneTemplate is the Schema for the kubeadmcontrolplanetemplates API.
NOTE: This CRD can only be used if the ClusterTopology feature gate is enabled.
Appears in:
Field Description Default Validation
apiVersion string controlplane.cluster.x-k8s.io/v1beta2kind string KubeadmControlPlaneTemplatemetadata ObjectMeta Refer to Kubernetes API documentation for fields of metadata. MinProperties: 1 spec KubeadmControlPlaneTemplateSpec spec is the desired state of KubeadmControlPlaneTemplate. Optional: {}
KubeadmControlPlaneTemplateList contains a list of KubeadmControlPlaneTemplate.
Field Description Default Validation
apiVersion string controlplane.cluster.x-k8s.io/v1beta2kind string KubeadmControlPlaneTemplateListmetadata ListMeta Refer to Kubernetes API documentation for fields of metadata. Optional: {} items KubeadmControlPlaneTemplate arrayitems is the list of KubeadmControlPlaneTemplates.
KubeadmControlPlaneTemplateMachineTemplate defines the template for Machines
in a KubeadmControlPlaneTemplate object.
NOTE: KubeadmControlPlaneTemplateMachineTemplate is similar to KubeadmControlPlaneMachineTemplate but
omits ObjectMeta and InfrastructureRef fields. These fields do not make sense on the KubeadmControlPlaneTemplate,
because they are calculated by the Cluster topology reconciler during reconciliation and thus cannot
be configured on the KubeadmControlPlaneTemplate.
Validation:
Appears in:
Field Description Default Validation
metadata ObjectMeta Refer to Kubernetes API documentation for fields of metadata. MinProperties: 1 spec KubeadmControlPlaneTemplateMachineTemplateSpec spec defines the spec for Machines MinProperties: 1
KubeadmControlPlaneTemplateMachineTemplateDeletionSpec contains configuration options for Machine deletion.
Validation:
Appears in:
Field Description Default Validation
nodeDrainTimeoutSeconds integer nodeDrainTimeoutSeconds is the total amount of time that the controller will spend on draining a controlplane nodekubectl drain --timeout Minimum: 0 nodeVolumeDetachTimeoutSeconds integer nodeVolumeDetachTimeoutSeconds is the total amount of time that the controller will spend on waiting for all volumes Minimum: 0 nodeDeletionTimeoutSeconds integer nodeDeletionTimeoutSeconds defines how long the machine controller will attempt to delete the Node that the Machine Minimum: 0
KubeadmControlPlaneTemplateMachineTemplateSpec defines the spec for Machines
in a KubeadmControlPlane object.
Validation:
Appears in:
Field Description Default Validation
deletion KubeadmControlPlaneTemplateMachineTemplateDeletionSpec deletion contains configuration options for Machine deletion. MinProperties: 1 taints MachineTaint arraytaints are the node taints that Cluster API will manage. MaxItems: 64
KubeadmControlPlaneTemplateResource describes the data needed to create a KubeadmControlPlane from a template.
Validation:
Appears in:
Field Description Default Validation
metadata ObjectMeta Refer to Kubernetes API documentation for fields of metadata. MinProperties: 1 spec KubeadmControlPlaneTemplateResourceSpec spec is the desired state of KubeadmControlPlaneTemplateResource. MinProperties: 1
KubeadmControlPlaneTemplateResourceSpec defines the desired state of KubeadmControlPlane.
NOTE: KubeadmControlPlaneTemplateResourceSpec is similar to KubeadmControlPlaneSpec but
omits Replicas and Version fields. These fields do not make sense on the KubeadmControlPlaneTemplate,
because they are calculated by the Cluster topology reconciler during reconciliation and thus cannot
be configured on the KubeadmControlPlaneTemplate.
Validation:
Appears in:
Field Description Default Validation
machineTemplate KubeadmControlPlaneTemplateMachineTemplate machineTemplate contains information about how machines MinProperties: 1 kubeadmConfigSpec KubeadmConfigSpec kubeadmConfigSpec is a KubeadmConfigSpec MinProperties: 1 rollout KubeadmControlPlaneRolloutSpec rollout allows you to configure the behaviour of rolling updates to the control plane Machines. MinProperties: 1 remediation KubeadmControlPlaneRemediationSpec remediation controls how unhealthy Machines are remediated. MinProperties: 1 machineNaming MachineNamingSpec machineNaming allows changing the naming pattern used when creating Machines. MinProperties: 1
KubeadmControlPlaneTemplateSpec defines the desired state of KubeadmControlPlaneTemplate.
Appears in:
KubeadmControlPlaneV1Beta1DeprecatedStatus groups all the status fields that are deprecated and will be removed when support for v1beta1 will be dropped.
See https://github.com/kubernetes-sigs/cluster-api/blob/main/docs/proposals/20240916-improve-status-in-CAPI-resources.md for more context.
Appears in:
Field Description Default Validation
conditions Conditions conditions defines current service state of the KubeadmControlPlane. Optional: {} failureReason KubeadmControlPlaneStatusError failureReason indicates that there is a terminal problem reconciling the Optional: {} failureMessage string failureMessage indicates that there is a terminal problem reconciling the MaxLength: 10240 updatedReplicas integer updatedReplicas is the total number of non-terminated machines targeted by this control plane Optional: {} readyReplicas integer readyReplicas is the total number of fully running and ready control plane machines. Optional: {} unavailableReplicas integer unavailableReplicas is the total number of unavailable machines targeted by this control plane. Optional: {}
LastRemediationStatus stores info about last remediation performed.
NOTE: if for any reason information about last remediation are lost, RetryCount is going to restart from 0 and thus
more remediations than expected might happen.
Appears in:
Field Description Default Validation
machine string machine is the machine name of the latest machine being remediated. MaxLength: 253 retryCount integer retryCount used to keep track of remediation retry for the last remediated machine. Minimum: 0
MachineNamingSpec allows changing the naming pattern used when creating Machines.
InfraMachines & KubeadmConfigs will use the same name as the corresponding Machines.
Validation:
Appears in:
Field Description Default Validation
template string template defines the template to use for generating the names of the Machine objects.\{\{ .kubeadmControlPlane.name \}\}-\{\{ .random \}\}..cluster.name, .kubeadmControlPlane.name and .random..cluster.name retrieves the name of the cluster object that owns the Machines being created..kubeadmControlPlane.name retrieves the name of the KubeadmControlPlane object that owns the Machines being created..random is substituted with random alphanumeric string, without vowels, of length 5. This variable is required MaxLength: 256
Package v1beta2 contains API Schema definitions for the v1beta2 IPAM API.
IPAddress is the Schema for the ipaddress API.
Appears in:
Field Description Default Validation
apiVersion string ipam.cluster.x-k8s.io/v1beta2kind string IPAddressmetadata ObjectMeta Refer to Kubernetes API documentation for fields of metadata. MinProperties: 1 spec IPAddressSpec spec is the desired state of IPAddress. Required: {}
IPAddressClaim is the Schema for the ipaddressclaim API.
Appears in:
Field Description Default Validation
apiVersion string ipam.cluster.x-k8s.io/v1beta2kind string IPAddressClaimmetadata ObjectMeta Refer to Kubernetes API documentation for fields of metadata. MinProperties: 1 spec IPAddressClaimSpec spec is the desired state of IPAddressClaim. Required: {} status IPAddressClaimStatus status is the observed state of IPAddressClaim. MinProperties: 1
IPAddressClaimDeprecatedStatus groups all the status fields that are deprecated and will be removed in a future version.
See https://github.com/kubernetes-sigs/cluster-api/blob/main/docs/proposals/20240916-improve-status-in-CAPI-resources.md for more context.
Appears in:
Field Description Default Validation
v1beta1 IPAddressClaimV1Beta1DeprecatedStatus v1beta1 groups all the status fields that are deprecated and will be removed when support for v1beta1 will be dropped. Optional: {}
IPAddressClaimList is a list of IPAddressClaims.
Field Description Default Validation
apiVersion string ipam.cluster.x-k8s.io/v1beta2kind string IPAddressClaimListmetadata ListMeta Refer to Kubernetes API documentation for fields of metadata. Optional: {} items IPAddressClaim arrayitems is the list of IPAddressClaims.
IPAddressClaimReference is a reference to an IPAddressClaim.
Appears in:
Field Description Default Validation
name string name of the IPAddressClaim. MaxLength: 253 ^[a-z0-9]([-a-z0-9]*[a-z0-9])?(\.[a-z0-9]([-a-z0-9]*[a-z0-9])?)*$
IPAddressClaimSpec is the desired state of an IPAddressClaim.
Appears in:
Field Description Default Validation
clusterName string clusterName is the name of the Cluster this object belongs to. MaxLength: 63 poolRef IPPoolReference poolRef is a reference to the pool from which an IP address should be created. Required: {}
IPAddressClaimStatus is the observed status of a IPAddressClaim.
Validation:
Appears in:
Field Description Default Validation
conditions Condition arrayconditions represents the observations of a IPAddressClaim’s current state. MaxItems: 32 addressRef IPAddressReference addressRef is a reference to the address that was created for this claim. Optional: {} deprecated IPAddressClaimDeprecatedStatus deprecated groups all the status fields that are deprecated and will be removed when all the nested field are removed. Optional: {}
IPAddressClaimV1Beta1DeprecatedStatus groups all the status fields that are deprecated and will be removed when support for v1beta1 will be dropped.
See https://github.com/kubernetes-sigs/cluster-api/blob/main/docs/proposals/20240916-improve-status-in-CAPI-resources.md for more context.
Appears in:
Field Description Default Validation
conditions Conditions conditions summarises the current state of the IPAddressClaim Optional: {}
IPAddressList is a list of IPAddress.
Field Description Default Validation
apiVersion string ipam.cluster.x-k8s.io/v1beta2kind string IPAddressListmetadata ListMeta Refer to Kubernetes API documentation for fields of metadata. Optional: {} items IPAddress arrayitems is the list of IPAddresses.
IPAddressReference is a reference to an IPAddress.
Appears in:
Field Description Default Validation
name string name of the IPAddress. MaxLength: 253 ^[a-z0-9]([-a-z0-9]*[a-z0-9])?(\.[a-z0-9]([-a-z0-9]*[a-z0-9])?)*$
IPAddressSpec is the desired state of an IPAddress.
Appears in:
Field Description Default Validation
claimRef IPAddressClaimReference claimRef is a reference to the claim this IPAddress was created for. Required: {} poolRef IPPoolReference poolRef is a reference to the pool that this IPAddress was created from. Required: {} address string address is the IP address. MaxLength: 39 prefix integer prefix is the prefix of the address. Maximum: 128 gateway string gateway is the network gateway of the network the address is from. MaxLength: 39
IPPoolReference is a reference to an IPPool.
Appears in:
Field Description Default Validation
name string name of the IPPool. MaxLength: 253 ^[a-z0-9]([-a-z0-9]*[a-z0-9])?(\.[a-z0-9]([-a-z0-9]*[a-z0-9])?)*$ kind string kind of the IPPool. MaxLength: 63 ^[a-zA-Z]([-a-zA-Z0-9]*[a-zA-Z0-9])?$ apiGroup string apiGroup of the IPPool. MaxLength: 253 ^[a-z0-9]([-a-z0-9]*[a-z0-9])?(\.[a-z0-9]([-a-z0-9]*[a-z0-9])?)*$
Package v1beta2 contains the v1beta2 implementation of ExtensionConfig.
ClientConfig contains the information to make a client
connection with an Extension server.
Validation:
Appears in:
Field Description Default Validation
url string url gives the location of the Extension server, in standard URL formscheme://host:port/path).url or service must be specified.host should not refer to a service running in the cluster; useservice field instead. MaxLength: 512 service ServiceReference service is a reference to the Kubernetes service for the Extension server.url or service must be specified.service. Optional: {} caBundle integer array caBundle is a PEM encoded CA bundle which will be used to validate the Extension server’s server certificate. MaxLength: 51200
ExtensionConfig is the Schema for the ExtensionConfig API.
NOTE: This CRD can only be used if the RuntimeSDK feature gate is enabled.
Appears in:
Field Description Default Validation
apiVersion string runtime.cluster.x-k8s.io/v1beta2kind string ExtensionConfigmetadata ObjectMeta Refer to Kubernetes API documentation for fields of metadata. MinProperties: 1 spec ExtensionConfigSpec spec is the desired state of the ExtensionConfig. Required: {} status ExtensionConfigStatus status is the current state of the ExtensionConfig MinProperties: 1
ExtensionConfigDeprecatedStatus groups all the status fields that are deprecated and will be removed in a future version.
Appears in:
Field Description Default Validation
v1beta1 ExtensionConfigV1Beta1DeprecatedStatus v1beta1 groups all the status fields that are deprecated and will be removed when support for v1beta1 will be dropped. Optional: {}
ExtensionConfigList contains a list of ExtensionConfig.
Field Description Default Validation
apiVersion string runtime.cluster.x-k8s.io/v1beta2kind string ExtensionConfigListmetadata ListMeta Refer to Kubernetes API documentation for fields of metadata. Optional: {} items ExtensionConfig arrayitems is the list of ExtensionConfigs.
ExtensionConfigSpec defines the desired state of ExtensionConfig.
Appears in:
Field Description Default Validation
clientConfig ClientConfig clientConfig defines how to communicate with the Extension server. MinProperties: 1 namespaceSelector LabelSelector namespaceSelector decides whether to call the hook for an object based Optional: {} settings object (keys:string, values:string) settings defines key value pairs to be passed to all calls Optional: {}
ExtensionConfigStatus defines the observed state of ExtensionConfig.
Validation:
Appears in:
Field Description Default Validation
conditions Condition arrayconditions represents the observations of a ExtensionConfig’s current state. MaxItems: 32 handlers ExtensionHandler arrayhandlers defines the current ExtensionHandlers supported by an Extension. MaxItems: 512 deprecated ExtensionConfigDeprecatedStatus deprecated groups all the status fields that are deprecated and will be removed when all the nested field are removed. Optional: {}
ExtensionConfigV1Beta1DeprecatedStatus groups all the status fields that are deprecated and will be removed when support for v1beta1 will be dropped.
See https://github.com/kubernetes-sigs/cluster-api/blob/main/docs/proposals/20240916-improve-status-in-CAPI-resources.md for more context.
Appears in:
Field Description Default Validation
conditions Conditions conditions defines current service state of the ExtensionConfig. Optional: {}
ExtensionHandler specifies the details of a handler for a particular runtime hook registered by an Extension server.
Appears in:
Field Description Default Validation
name string name is the unique name of the ExtensionHandler. MaxLength: 512 requestHook GroupVersionHook requestHook defines the versioned runtime hook which this ExtensionHandler serves. Required: {} timeoutSeconds integer timeoutSeconds defines the timeout duration for client calls to the ExtensionHandler. Minimum: 1 failurePolicy FailurePolicy failurePolicy defines how failures in calls to the ExtensionHandler should be handled by a client. Enum: [Ignore Fail]
Underlying type: string
FailurePolicy specifies how unrecognized errors when calling the ExtensionHandler are handled.
FailurePolicy helps with extensions not working consistently, e.g. due to an intermittent network issue.
The following type of errors are never ignored by FailurePolicy Ignore:
Misconfigurations (e.g. incompatible types)
Extension explicitly returns a Status Failure.
Validation:
Appears in:
Field Description
IgnoreFailurePolicyIgnore means that an error when calling the extension is ignored. FailFailurePolicyFail means that an error when calling the extension is propagated as an error.
GroupVersionHook defines the runtime hook when the ExtensionHandler is called.
Appears in:
Field Description Default Validation
apiVersion string apiVersion is the group and version of the Hook. MaxLength: 512 hook string hook is the name of the hook. MaxLength: 256
ServiceReference holds a reference to a Kubernetes Service of an Extension server.
Appears in:
Field Description Default Validation
namespace string namespace is the namespace of the service. MaxLength: 63 name string name is the name of the service. MaxLength: 63 path string path is an optional URL path and if present may be any string permissible in MaxLength: 512 port integer port is the port on the service that’s hosting the Extension server. Optional: {}
This page documents deprecated API packages. For current types, see CRD API Reference (v1beta2) .
Package v1beta1 contains API Schema definitions for the addons v1beta1 API group
Deprecated: This package is deprecated and is going to be removed when support for v1beta1 will be dropped.
ClusterResourceSet is the Schema for the clusterresourcesets API.
For advanced use cases an add-on provider should be used instead.
Appears in:
Field Description Default Validation
apiVersion string addons.cluster.x-k8s.io/v1beta1kind string ClusterResourceSetmetadata ObjectMeta Refer to Kubernetes API documentation for fields of metadata. Optional: {} spec ClusterResourceSetSpec spec is the desired state of ClusterResourceSet. Optional: {} status ClusterResourceSetStatus status is the observed state of ClusterResourceSet. Optional: {}
ClusterResourceSetBinding lists all matching ClusterResourceSets with the cluster it belongs to.
Appears in:
Field Description Default Validation
apiVersion string addons.cluster.x-k8s.io/v1beta1kind string ClusterResourceSetBindingmetadata ObjectMeta Refer to Kubernetes API documentation for fields of metadata. Optional: {} spec ClusterResourceSetBindingSpec spec is the desired state of ClusterResourceSetBinding. Optional: {}
ClusterResourceSetBindingList contains a list of ClusterResourceSetBinding.
Field Description Default Validation
apiVersion string addons.cluster.x-k8s.io/v1beta1kind string ClusterResourceSetBindingListmetadata ListMeta Refer to Kubernetes API documentation for fields of metadata. Optional: {} items ClusterResourceSetBinding arrayitems is the list of ClusterResourceSetBindings.
ClusterResourceSetBindingSpec defines the desired state of ClusterResourceSetBinding.
Appears in:
Field Description Default Validation
bindings ResourceSetBinding arraybindings is a list of ClusterResourceSets and their resources. MaxItems: 100 clusterName string clusterName is the name of the Cluster this binding applies to. MaxLength: 63
ClusterResourceSetList contains a list of ClusterResourceSet.
Field Description Default Validation
apiVersion string addons.cluster.x-k8s.io/v1beta1kind string ClusterResourceSetListmetadata ListMeta Refer to Kubernetes API documentation for fields of metadata. Optional: {} items ClusterResourceSet arrayitems is the list of ClusterResourceSets.
ClusterResourceSetSpec defines the desired state of ClusterResourceSet.
Appears in:
Field Description Default Validation
clusterSelector LabelSelector clusterSelector is the label selector for Clusters. The Clusters that are Required: {} resources ResourceRef arrayresources is a list of Secrets/ConfigMaps where each contains 1 or more resources to be applied to remote clusters. MaxItems: 100 strategy string strategy is the strategy to be used during applying resources. Defaults to ApplyOnce. This field is immutable. Enum: [ApplyOnce Reconcile]
ClusterResourceSetStatus defines the observed state of ClusterResourceSet.
Appears in:
Field Description Default Validation
observedGeneration integer observedGeneration reflects the generation of the most recently observed ClusterResourceSet. Optional: {} conditions Conditions conditions defines current state of the ClusterResourceSet. Optional: {} v1beta2 ClusterResourceSetV1Beta2Status v1beta2 groups all the fields that will be added or modified in ClusterResourceSet’s status with the V1Beta2 version. Optional: {}
ClusterResourceSetV1Beta2Status groups all the fields that will be added or modified in ClusterResourceSet with the V1Beta2 version.
See https://github.com/kubernetes-sigs/cluster-api/blob/main/docs/proposals/20240916-improve-status-in-CAPI-resources.md for more context.
Appears in:
Field Description Default Validation
conditions Condition arrayconditions represents the observations of a ClusterResourceSet’s current state. MaxItems: 32
ResourceBinding shows the status of a resource that belongs to a ClusterResourceSet matched by the owner cluster of the ClusterResourceSetBinding object.
Appears in:
Field Description Default Validation
name string name of the resource that is in the same namespace with ClusterResourceSet object. MaxLength: 253 kind string kind of the resource. Supported kinds are: Secrets and ConfigMaps. Enum: [Secret ConfigMap] hash string hash is the hash of a resource’s data. This can be used to decide if a resource is changed. MaxLength: 256 applied boolean applied is to track if a resource is applied to the cluster or not. Required: {}
ResourceRef specifies a resource.
Appears in:
Field Description Default Validation
name string name of the resource that is in the same namespace with ClusterResourceSet object. MaxLength: 253 kind string kind of the resource. Supported kinds are: Secrets and ConfigMaps. Enum: [Secret ConfigMap]
ResourceSetBinding keeps info on all of the resources in a ClusterResourceSet.
Appears in:
Field Description Default Validation
clusterResourceSetName string clusterResourceSetName is the name of the ClusterResourceSet that is applied to the owner cluster of the binding. MaxLength: 253 resources ResourceBinding arrayresources is a list of resources that the ClusterResourceSet has. MaxItems: 100
Package v1beta1 contains API Schema definitions for the kubeadm v1beta1 API group.
Deprecated: This package is deprecated and is going to be removed when support for v1beta1 will be dropped.
APIEndpoint struct contains elements of API server instance deployed on a node.
Appears in:
Field Description Default Validation
advertiseAddress string advertiseAddress sets the IP address for the API server to advertise. MaxLength: 39 bindPort integer bindPort sets the secure port for the API Server to bind to. Optional: {}
APIServer holds settings necessary for API server deployments in the cluster.
Appears in:
Field Description Default Validation
extraArgs object (keys:string, values:string) extraArgs is an extra set of flags to pass to the control plane component. Optional: {} extraVolumes HostPathMount arrayextraVolumes is an extra set of host volumes, mounted to the control plane component. MaxItems: 100 extraEnvs EnvVar arrayextraEnvs is an extra set of environment variables to pass to the control plane component. MaxItems: 100 certSANs string array certSANs sets extra Subject Alternative Names for the API Server signing cert. MaxItems: 100 timeoutForControlPlane Duration timeoutForControlPlane controls the timeout that we use for API server to appear Optional: {}
BootstrapToken describes one bootstrap token, stored as a Secret in the cluster.
Appears in:
Field Description Default Validation
token BootstrapTokenString token is used for establishing bidirectional trust between nodes and control-planes. Type: string description string description sets a human-friendly message why this token exists and what it’s used MaxLength: 512 ttl Duration ttl defines the time to live for this token. Defaults to 24h. Optional: {} usages string array usages describes the ways in which this token can be used. Can by default be used MaxItems: 100 groups string array groups specifies the extra groups that this token will authenticate as when/if MaxItems: 100
BootstrapTokenDiscovery is used to set the options for bootstrap token based discovery.
Appears in:
Field Description Default Validation
token string token is a token used to validate cluster information MaxLength: 512 apiServerEndpoint string apiServerEndpoint is an IP or domain name to the API server from which info will be fetched. MaxLength: 512 caCertHashes string array caCertHashes specifies a set of public key pins to verify:“, MaxItems: 100 unsafeSkipCAVerification boolean unsafeSkipCAVerification allows token-based discovery Optional: {}
BootstrapTokenString is a token of the format abcdef.abcdef0123456789 that is used
for both validation of the practically of the API server from a joining node’s point
of view and as an authentication method for the node in the bootstrap phase of
“kubeadm join”. This token is and should be short-lived.
Validation:
Appears in:
ClusterConfiguration contains cluster-wide configuration for a kubeadm cluster.
Appears in:
Field Description Default Validation
etcd Etcd etcd holds configuration for etcd. Optional: {} networking Networking networking holds configuration for the networking topology of the cluster. Optional: {} kubernetesVersion string kubernetesVersion is the target version of the control plane. MaxLength: 256 controlPlaneEndpoint string controlPlaneEndpoint sets a stable IP address or DNS name for the control plane; it MaxLength: 512 apiServer APIServer apiServer contains extra settings for the API server control plane component Optional: {} controllerManager ControlPlaneComponent controllerManager contains extra settings for the controller manager control plane component Optional: {} scheduler ControlPlaneComponent scheduler contains extra settings for the scheduler control plane component Optional: {} dns DNS dns defines the options for the DNS add-on installed in the cluster. Optional: {} certificatesDir string certificatesDir specifies where to store or look for all required certificates./etc/kubernetes/pki MaxLength: 512 imageRepository string imageRepository sets the container registry to pull images from.ci/ or ci-cross/)gcr.io/k8s-staging-ci-images will be used as a default for control plane componentsregistry.k8s.io will be used for all the other images. MaxLength: 512 featureGates object (keys:string, values:boolean) featureGates enabled by the user. Optional: {} certificateValidityPeriodDays integer certificateValidityPeriodDays specifies the validity period for non-CA certificates generated by kubeadm. Maximum: 1095 caCertificateValidityPeriodDays integer caCertificateValidityPeriodDays specifies the validity period for CA certificates generated by Cluster API. Maximum: 36500 encryptionAlgorithm EncryptionAlgorithmType encryptionAlgorithm holds the type of asymmetric encryption algorithm used for keys and certificates. Enum: [ECDSA-P256 ECDSA-P384 RSA-2048 RSA-3072 RSA-4096] clusterName string clusterName is the cluster name MaxLength: 63
ContainerLinuxConfig contains CLC-specific configuration.
We use a structured type here to allow adding additional fields, for example ‘version’.
Appears in:
Field Description Default Validation
additionalConfig string additionalConfig contains additional configuration to be merged with the Ignition MaxLength: 32768 strict boolean strict controls if AdditionalConfig should be strictly parsed. If so, warnings are treated as errors. Optional: {}
ControlPlaneComponent holds settings common to control plane component of the cluster.
Appears in:
Field Description Default Validation
extraArgs object (keys:string, values:string) extraArgs is an extra set of flags to pass to the control plane component. Optional: {} extraVolumes HostPathMount arrayextraVolumes is an extra set of host volumes, mounted to the control plane component. MaxItems: 100 extraEnvs EnvVar arrayextraEnvs is an extra set of environment variables to pass to the control plane component. MaxItems: 100
DNS defines the DNS addon that should be used in the cluster.
Appears in:
Field Description Default Validation
imageRepository string imageRepository sets the container registry to pull images from. MaxLength: 512 imageTag string imageTag allows to specify a tag for the image. MaxLength: 256
Discovery specifies the options for the kubelet to use during the TLS Bootstrap process.
Appears in:
Field Description Default Validation
bootstrapToken BootstrapTokenDiscovery bootstrapToken is used to set the options for bootstrap token based discovery Optional: {} file FileDiscovery file is used to specify a file or URL to a kubeconfig file from which to load cluster information Optional: {} tlsBootstrapToken string tlsBootstrapToken is a token used for TLS bootstrapping.must be set in case the KubeConfigFile does not contain any other authentication information MaxLength: 512 timeout Duration timeout modifies the discovery timeout Optional: {}
DiskSetup defines input for generated disk_setup and fs_setup in cloud-init.
Appears in:
Field Description Default Validation
partitions Partition arraypartitions specifies the list of the partitions to setup. MaxItems: 100 filesystems Filesystem arrayfilesystems specifies the list of file systems to setup. MaxItems: 100
Underlying type: string
Encoding specifies the cloud-init file encoding.
Validation:
Enum: [base64 gzip gzip+base64]
Appears in:
Field Description
base64Base64 implies the contents of the file are encoded as base64. gzipGzip implies the contents of the file are encoded with gzip. gzip+base64GzipBase64 implies the contents of the file are first base64 encoded and then gzip encoded.
Underlying type: string
EncryptionAlgorithmType can define an asymmetric encryption algorithm type.
Validation:
Enum: [ECDSA-P256 ECDSA-P384 RSA-2048 RSA-3072 RSA-4096]
Appears in:
Field Description
ECDSA-P256EncryptionAlgorithmECDSAP256 defines the ECDSA encryption algorithm type with curve P256. ECDSA-P384EncryptionAlgorithmECDSAP384 defines the ECDSA encryption algorithm type with curve P384. RSA-2048EncryptionAlgorithmRSA2048 defines the RSA encryption algorithm type with key size 2048 bits. RSA-3072EncryptionAlgorithmRSA3072 defines the RSA encryption algorithm type with key size 3072 bits. RSA-4096EncryptionAlgorithmRSA4096 defines the RSA encryption algorithm type with key size 4096 bits.
EnvVar represents an environment variable present in a Container.
Appears in:
Field Description Default Validation
name string Name of the environment variable. value string Variable references $(VAR_NAME) are expanded Optional: {} valueFrom EnvVarSource Source for the environment variable’s value. Cannot be used if value is not empty. Optional: {}
Etcd contains elements describing Etcd configuration.
Appears in:
Field Description Default Validation
local LocalEtcd local provides configuration knobs for configuring the local etcd instance Optional: {} external ExternalEtcd external describes how to connect to an external etcd cluster Optional: {}
ExternalEtcd describes an external etcd cluster.
Kubeadm has no knowledge of where certificate files live and they must be supplied.
Appears in:
Field Description Default Validation
endpoints string array endpoints of etcd members. Required for ExternalEtcd. MaxItems: 50 caFile string caFile is an SSL Certificate Authority file used to secure etcd communication. MaxLength: 512 certFile string certFile is an SSL certification file used to secure etcd communication. MaxLength: 512 keyFile string keyFile is an SSL key file used to secure etcd communication. MaxLength: 512
File defines the input for generating write_files in cloud-init.
Appears in:
Field Description Default Validation
path string path specifies the full path on disk where to store the file. MaxLength: 512 owner string owner specifies the ownership of the file, e.g. “root:root”. MaxLength: 256 permissions string permissions specifies the permissions to assign to the file, e.g. “0640”. MaxLength: 16 encoding Encoding encoding specifies the encoding of the file contents. Enum: [base64 gzip gzip+base64] append boolean append specifies whether to append Content to existing file if Path exists. Optional: {} content string content is the actual content of the file. MaxLength: 10240 contentFrom FileSource contentFrom is a referenced source of content to populate the file. Optional: {} contentFormat FileContentFormat contentFormat specifies how to interpret content after it is resolved (inline or from contentFrom). Enum: [Raw Template]
Underlying type: string
FileContentFormat specifies how file content is interpreted after resolving content/contentFrom and before writing bootstrap data.
Validation:
Appears in:
Field Description
RawFileContentFormatRaw means content is used verbatim. TemplateFileContentFormatTemplate means content is rendered as a Go text/template.
FileDiscovery is used to specify a file or URL to a kubeconfig file from which to load cluster information.
Appears in:
Field Description Default Validation
kubeConfigPath string kubeConfigPath is used to specify the actual file path or URL to the kubeconfig file from which to load cluster information MaxLength: 512 kubeConfig FileDiscoveryKubeConfig kubeConfig is used (optionally) to generate a KubeConfig based on the KubeadmConfig’s information. Optional: {}
FileDiscoveryKubeConfig contains elements describing how to generate the kubeconfig for bootstrapping.
Appears in:
Field Description Default Validation
cluster KubeConfigCluster cluster contains information about how to communicate with the kubernetes cluster. Optional: {} user KubeConfigUser user contains information that describes identity information. Required: {}
FileSource is a union of all possible external source types for file data.
Only one field may be populated in any given instance. Developers adding new
sources of data for target systems should add them here.
Appears in:
Field Description Default Validation
secret SecretFileSource secret represents a secret that should populate this file. Required: {}
Filesystem defines the file systems to be created.
Appears in:
Field Description Default Validation
device string device specifies the device name MaxLength: 256 filesystem string filesystem specifies the file system type. MaxLength: 128 label string label specifies the file system label to be used. If set to None, no label is used. MaxLength: 512 partition string partition specifies the partition to use. The valid options are: “auto|any”, “auto”, “any”, “none”, and , where NUM is the actual partition number. MaxLength: 128 overwrite boolean overwrite defines whether or not to overwrite any existing filesystem. Optional: {} replaceFS string replaceFS is a special directive, used for Microsoft Azure that instructs cloud-init to replace a file system of <FS_TYPE>. MaxLength: 128 extraOpts string array extraOpts defined extra options to add to the command for creating the file system. MaxItems: 100
Underlying type: string
Format specifies the output format of the bootstrap data
Validation:
Enum: [cloud-config ignition]
Appears in:
Field Description
cloud-configCloudConfig make the bootstrap data to be of cloud-config format. ignitionIgnition make the bootstrap data to be of Ignition format.
HostPathMount contains elements describing volumes that are mounted from the
host.
Appears in:
Field Description Default Validation
name string name of the volume inside the pod template. MaxLength: 512 hostPath string hostPath is the path in the host that will be mounted inside MaxLength: 512 mountPath string mountPath is the path inside the pod where hostPath will be mounted. MaxLength: 512 readOnly boolean readOnly controls write access to the volume Optional: {} pathType HostPathType pathType is the type of the HostPath. Optional: {}
IgnitionSpec contains Ignition specific configuration.
Appears in:
Field Description Default Validation
containerLinuxConfig ContainerLinuxConfig containerLinuxConfig contains CLC specific configuration. Optional: {}
ImageMeta allows to customize the image used for components that are not
originated from the Kubernetes/Kubernetes release process.
Appears in:
Field Description Default Validation
imageRepository string imageRepository sets the container registry to pull images from. MaxLength: 512 imageTag string imageTag allows to specify a tag for the image. MaxLength: 256
InitConfiguration contains a list of elements that is specific “kubeadm init”-only runtime
information.
Appears in:
Field Description Default Validation
bootstrapTokens BootstrapToken arraybootstrapTokens is respected at kubeadm init time and describes a set of Bootstrap Tokens to create. MaxItems: 100 nodeRegistration NodeRegistrationOptions nodeRegistration holds fields that relate to registering the new control-plane node to the cluster. Optional: {} localAPIEndpoint APIEndpoint localAPIEndpoint represents the endpoint of the API server instance that’s deployed on this control plane node Optional: {} skipPhases string array skipPhases is a list of phases to skip during command execution. MaxItems: 50 patches Patches patches contains options related to applying patches to components deployed by kubeadm during Optional: {}
JoinConfiguration contains elements describing a particular node.
Appears in:
Field Description Default Validation
nodeRegistration NodeRegistrationOptions nodeRegistration holds fields that relate to registering the new control-plane node to the cluster. Optional: {} caCertPath string caCertPath is the path to the SSL certificate authority used to MaxLength: 512 discovery Discovery discovery specifies the options for the kubelet to use during the TLS Bootstrap process Optional: {} controlPlane JoinControlPlane controlPlane defines the additional control plane instance to be deployed on the joining node. Optional: {} skipPhases string array skipPhases is a list of phases to skip during command execution. MaxItems: 50 patches Patches patches contains options related to applying patches to components deployed by kubeadm during Optional: {}
JoinControlPlane contains elements describing an additional control plane instance to be deployed on the joining node.
Appears in:
Field Description Default Validation
localAPIEndpoint APIEndpoint localAPIEndpoint represents the endpoint of the API server instance to be deployed on this node. Optional: {}
KubeConfigAuthExec specifies a command to provide client credentials. The command is exec’d
and outputs structured stdout holding credentials.
See the client.authentication.k8s.io API group for specifications of the exact input
and output format.
Appears in:
Field Description Default Validation
command string command to execute. MaxLength: 1024 args string array args is the arguments to pass to the command when executing it. MaxItems: 100 env KubeConfigAuthExecEnv arrayenv defines additional environment variables to expose to the process. These MaxItems: 100 apiVersion string apiVersion is preferred input version of the ExecInfo. The returned ExecCredentials MUST use MaxLength: 512 provideClusterInfo boolean provideClusterInfo determines whether or not to provide cluster information, Optional: {}
Underlying type: struct{Name string “json:“name“”; Value string “json:“value“”}
KubeConfigAuthExecEnv is used for setting environment variables when executing an exec-based
credential plugin.
Appears in:
KubeConfigAuthProvider holds the configuration for a specified auth provider.
Appears in:
Field Description Default Validation
name string name is the name of the authentication plugin. MaxLength: 256 config object (keys:string, values:string) config holds the parameters for the authentication plugin. Optional: {}
KubeConfigCluster contains information about how to communicate with a kubernetes cluster.
Adapted from clientcmdv1.Cluster.
Appears in:
Field Description Default Validation
server string server is the address of the kubernetes cluster (https://hostname:port). MaxLength: 512 tlsServerName string tlsServerName is used to check server certificate. If TLSServerName is empty, the hostname used to contact the server is used. MaxLength: 512 insecureSkipTLSVerify boolean insecureSkipTLSVerify skips the validity check for the server’s certificate. This will make your HTTPS connections insecure. Optional: {} certificateAuthorityData integer array certificateAuthorityData contains PEM-encoded certificate authority certificates. MaxLength: 51200 proxyURL string proxyURL is the URL to the proxy to be used for all requests made by this MaxLength: 512
KubeConfigUser contains information that describes identity information.
This is used to tell the kubernetes cluster who you are.
Either authProvider or exec must be filled.
Adapted from clientcmdv1.AuthInfo.
Appears in:
Field Description Default Validation
authProvider KubeConfigAuthProvider authProvider specifies a custom authentication plugin for the kubernetes cluster. Optional: {} exec KubeConfigAuthExec exec specifies a custom exec-based authentication plugin for the kubernetes cluster. Optional: {}
KubeadmConfig is the Schema for the kubeadmconfigs API.
Appears in:
Field Description Default Validation
apiVersion string bootstrap.cluster.x-k8s.io/v1beta1kind string KubeadmConfigmetadata ObjectMeta Refer to Kubernetes API documentation for fields of metadata. Optional: {} spec KubeadmConfigSpec spec is the desired state of KubeadmConfig. Optional: {} status KubeadmConfigStatus status is the observed state of KubeadmConfig. Optional: {}
KubeadmConfigList contains a list of KubeadmConfig.
Field Description Default Validation
apiVersion string bootstrap.cluster.x-k8s.io/v1beta1kind string KubeadmConfigListmetadata ListMeta Refer to Kubernetes API documentation for fields of metadata. Optional: {} items KubeadmConfig arrayitems is the list of KubeadmConfigs.
KubeadmConfigSpec defines the desired state of KubeadmConfig.
Either ClusterConfiguration and InitConfiguration should be defined or the JoinConfiguration should be defined.
Appears in:
Field Description Default Validation
clusterConfiguration ClusterConfiguration clusterConfiguration along with InitConfiguration are the configurations necessary for the init command Optional: {} initConfiguration InitConfiguration initConfiguration along with ClusterConfiguration are the configurations necessary for the init command Optional: {} joinConfiguration JoinConfiguration joinConfiguration is the kubeadm configuration for the join command Optional: {} files File arrayfiles specifies extra files to be passed to user_data upon creation. MaxItems: 200 diskSetup DiskSetup diskSetup specifies options for the creation of partition tables and file systems on devices. Optional: {} mounts MountPoints arraymounts specifies a list of mount points to be setup. MaxItems: 100 bootCommands string array bootCommands specifies extra commands to run very early in the boot process via the cloud-init bootcmd MaxItems: 1000 preKubeadmCommands string array preKubeadmCommands specifies extra commands to run before kubeadm runs. MaxItems: 1000 postKubeadmCommands string array postKubeadmCommands specifies extra commands to run after kubeadm runs. MaxItems: 1000 users User arrayusers specifies extra users to add MaxItems: 100 ntp NTP ntp specifies NTP configuration Optional: {} format Format format specifies the output format of the bootstrap data Enum: [cloud-config ignition] verbosity integer verbosity is the number for the kubeadm log level verbosity.--v flag in kubeadm commands. Optional: {} useExperimentalRetryJoin boolean useExperimentalRetryJoin replaces a basic kubeadm command with a shell Optional: {} ignition IgnitionSpec ignition contains Ignition specific configuration. Optional: {}
KubeadmConfigStatus defines the observed state of KubeadmConfig.
Appears in:
Field Description Default Validation
ready boolean ready indicates the BootstrapData field is ready to be consumed Optional: {} dataSecretName string dataSecretName is the name of the secret that stores the bootstrap data script. MaxLength: 253 failureReason string failureReason will be set on non-retryable errors MaxLength: 256 failureMessage string failureMessage will be set on non-retryable errors MaxLength: 10240 observedGeneration integer observedGeneration is the latest generation observed by the controller. Optional: {} conditions Conditions conditions defines current service state of the KubeadmConfig. Optional: {} v1beta2 KubeadmConfigV1Beta2Status v1beta2 groups all the fields that will be added or modified in KubeadmConfig’s status with the V1Beta2 version. Optional: {}
KubeadmConfigTemplate is the Schema for the kubeadmconfigtemplates API.
Appears in:
Field Description Default Validation
apiVersion string bootstrap.cluster.x-k8s.io/v1beta1kind string KubeadmConfigTemplatemetadata ObjectMeta Refer to Kubernetes API documentation for fields of metadata. Optional: {} spec KubeadmConfigTemplateSpec spec is the desired state of KubeadmConfigTemplate. Optional: {}
KubeadmConfigTemplateList contains a list of KubeadmConfigTemplate.
Field Description Default Validation
apiVersion string bootstrap.cluster.x-k8s.io/v1beta1kind string KubeadmConfigTemplateListmetadata ListMeta Refer to Kubernetes API documentation for fields of metadata. Optional: {} items KubeadmConfigTemplate arrayitems is the list of KubeadmConfigTemplates.
KubeadmConfigTemplateResource defines the Template structure.
Appears in:
Field Description Default Validation
metadata ObjectMeta Refer to Kubernetes API documentation for fields of metadata. Optional: {} spec KubeadmConfigSpec spec is the desired state of KubeadmConfig. Optional: {}
KubeadmConfigTemplateSpec defines the desired state of KubeadmConfigTemplate.
Appears in:
KubeadmConfigV1Beta2Status groups all the fields that will be added or modified in KubeadmConfig with the V1Beta2 version.
See https://github.com/kubernetes-sigs/cluster-api/blob/main/docs/proposals/20240916-improve-status-in-CAPI-resources.md for more context.
Appears in:
Field Description Default Validation
conditions Condition arrayconditions represents the observations of a KubeadmConfig’s current state. MaxItems: 32
LocalEtcd describes that kubeadm should run an etcd cluster locally.
Appears in:
Field Description Default Validation
imageRepository string imageRepository sets the container registry to pull images from. MaxLength: 512 imageTag string imageTag allows to specify a tag for the image. MaxLength: 256 dataDir string dataDir is the directory etcd will place its data. MaxLength: 512 extraArgs object (keys:string, values:string) extraArgs are extra arguments provided to the etcd binary Optional: {} extraEnvs EnvVar arrayextraEnvs is an extra set of environment variables to pass to the control plane component. MaxItems: 100 serverCertSANs string array serverCertSANs sets extra Subject Alternative Names for the etcd server signing cert. MaxItems: 100 peerCertSANs string array peerCertSANs sets extra Subject Alternative Names for the etcd peer signing cert. MaxItems: 100
Underlying type: string array
MountPoints defines input for generated mounts in cloud-init.
Validation:
items:MaxLength: 512
items:MinLength: 1
Appears in:
NTP defines input for generated ntp in cloud-init.
Appears in:
Field Description Default Validation
servers string array servers specifies which NTP servers to use MaxItems: 100 enabled boolean enabled specifies whether NTP should be enabled Optional: {}
Networking contains elements describing cluster’s networking configuration.
Appears in:
Field Description Default Validation
serviceSubnet string serviceSubnet is the subnet used by k8s services. MaxLength: 1024 podSubnet string podSubnet is the subnet used by pods. MaxLength: 1024 dnsDomain string dnsDomain is the dns domain used by k8s services. Defaults to “cluster.local”. MaxLength: 253
NodeRegistrationOptions holds fields that relate to registering a new control-plane or node to the cluster, either via “kubeadm init” or “kubeadm join”.
Note: The NodeRegistrationOptions struct has to be kept in sync with the structs in MarshalJSON.
Appears in:
Field Description Default Validation
name string name is the .Metadata.Name field of the Node API object that will be created in this kubeadm init or kubeadm join operation. MaxLength: 253 criSocket string criSocket is used to retrieve container runtime info. This information will be annotated to the Node API object, for later re-use MaxLength: 512 taints Taint arraytaints specifies the taints the Node API object should be registered with. If this field is unset, i.e. nil, in the kubeadm init processtaints: [] in the YAML file. This field is solely used for Node registration. MaxItems: 100 kubeletExtraArgs object (keys:string, values:string) kubeletExtraArgs passes through extra arguments to the kubelet. The arguments here are passed to the kubelet command line via the environment file Optional: {} ignorePreflightErrors string array ignorePreflightErrors provides a slice of pre-flight errors to be ignored when the current node is registered. MaxItems: 50 imagePullPolicy string imagePullPolicy specifies the policy for image pulling Enum: [Always IfNotPresent Never] imagePullSerial boolean imagePullSerial specifies if image pulling performed by kubeadm must be done serially or in parallel. Optional: {}
Partition defines how to create and layout a partition.
Appears in:
Field Description Default Validation
device string device is the name of the device. MaxLength: 256 layout boolean layout specifies the device layout. Required: {} overwrite boolean overwrite describes whether to skip checks and create the partition if a partition or filesystem is found on the device. Optional: {} tableType string tableType specifies the tupe of partition table. The following are supported: Enum: [mbr gpt] diskLayout PartitionSpec arraydiskLayout specifies an ordered list of partitions, where each item defines the MaxItems: 100
PartitionSpec defines the size and optional type for a partition.
Appears in:
Field Description Default Validation
percentage integer percentage of disk that partition will take (1-100) Maximum: 100 partitionType string partitionType is the partition type (optional). MaxLength: 36
PasswdSource is a union of all possible external source types for passwd data.
Only one field may be populated in any given instance. Developers adding new
sources of data for target systems should add them here.
Appears in:
Field Description Default Validation
secret SecretPasswdSource secret represents a secret that should populate this password. Required: {}
Patches contains options related to applying patches to components deployed by kubeadm.
Appears in:
Field Description Default Validation
directory string directory is a path to a directory that contains files named “target[suffix][+patchtype].extension”. MaxLength: 512
SecretFileSource adapts a Secret into a FileSource.
The contents of the target Secret’s Data field will be presented
as files using the keys in the Data field as the file names.
Appears in:
Field Description Default Validation
name string name of the secret in the KubeadmBootstrapConfig’s namespace to use. MaxLength: 253 key string key is the key in the secret’s data map for this value. MaxLength: 256
SecretPasswdSource adapts a Secret into a PasswdSource.
The contents of the target Secret’s Data field will be presented
as passwd using the keys in the Data field as the file names.
Appears in:
Field Description Default Validation
name string name of the secret in the KubeadmBootstrapConfig’s namespace to use. MaxLength: 253 key string key is the key in the secret’s data map for this value. MaxLength: 256
User defines the input for a generated user in cloud-init.
Appears in:
Field Description Default Validation
name string name specifies the user name MaxLength: 256 gecos string gecos specifies the gecos to use for the user MaxLength: 256 groups string groups specifies the additional groups for the user MaxLength: 256 homeDir string homeDir specifies the home directory to use for the user MaxLength: 256 inactive boolean inactive specifies whether to mark the user as inactive Optional: {} shell string shell specifies the user’s shell MaxLength: 256 passwd string passwd specifies a hashed password for the user MaxLength: 256 passwdFrom PasswdSource passwdFrom is a referenced source of passwd to populate the passwd. Optional: {} primaryGroup string primaryGroup specifies the primary group for the user MaxLength: 256 lockPassword boolean lockPassword specifies if password login should be disabled Optional: {} sudo string sudo specifies a sudo role for the user MaxLength: 256 sshAuthorizedKeys string array sshAuthorizedKeys specifies a list of ssh authorized keys for the user MaxItems: 100
Package v1beta1 contains API Schema definitions for the cluster v1beta1 API group
Deprecated: This package is deprecated and is going to be removed when support for v1beta1 will be dropped.
APIEndpoint represents a reachable Kubernetes API endpoint.
Appears in:
Field Description Default Validation
host string host is the hostname on which the API server is serving. MaxLength: 512 port integer port is the port on which the API server is serving. Optional: {}
Bootstrap encapsulates fields to configure the Machine’s bootstrapping mechanism.
Appears in:
Field Description Default Validation
configRef ObjectReference configRef is a reference to a bootstrap provider-specific resource Optional: {} dataSecretName string dataSecretName is the name of the secret that stores the bootstrap data script. MaxLength: 253
Cluster is the Schema for the clusters API.
Appears in:
Field Description Default Validation
apiVersion string cluster.x-k8s.io/v1beta1kind string Clustermetadata ObjectMeta Refer to Kubernetes API documentation for fields of metadata. Optional: {} spec ClusterSpec spec is the desired state of Cluster. Optional: {} status ClusterStatus status is the observed state of Cluster. Optional: {}
ClusterAvailabilityGate contains the type of a Cluster condition to be used as availability gate.
Appears in:
Field Description Default Validation
conditionType string conditionType refers to a condition with matching type in the Cluster’s condition list. MaxLength: 316 ^([a-z0-9]([-a-z0-9]*[a-z0-9])?(\.[a-z0-9]([-a-z0-9]*[a-z0-9])?)*/)?(([A-Za-z0-9][-A-Za-z0-9_.]*)?[A-Za-z0-9])$ polarity ConditionPolarity polarity of the conditionType specified in this availabilityGate. Enum: [Positive Negative]
ClusterClass is a template which can be used to create managed topologies.
Appears in:
Field Description Default Validation
apiVersion string cluster.x-k8s.io/v1beta1kind string ClusterClassmetadata ObjectMeta Refer to Kubernetes API documentation for fields of metadata. Optional: {} spec ClusterClassSpec spec is the desired state of ClusterClass. Optional: {} status ClusterClassStatus status is the observed state of ClusterClass. Optional: {}
ClusterClassList contains a list of Cluster.
Field Description Default Validation
apiVersion string cluster.x-k8s.io/v1beta1kind string ClusterClassListmetadata ListMeta Refer to Kubernetes API documentation for fields of metadata. Optional: {} items ClusterClass arrayitems is the list of ClusterClasses.
ClusterClassPatch defines a patch which is applied to customize the referenced templates.
Appears in:
Field Description Default Validation
name string name of the patch. MaxLength: 256 description string description is a human-readable description of this patch. MaxLength: 1024 enabledIf string enabledIf is a Go template to be used to calculate if a patch should be enabled.true, otherwise it will MaxLength: 256 definitions PatchDefinition arraydefinitions define inline patches. MaxItems: 100 external ExternalPatchDefinition external defines an external patch. Optional: {}
ClusterClassSpec describes the desired state of the ClusterClass.
Appears in:
Field Description Default Validation
availabilityGates ClusterAvailabilityGate arrayavailabilityGates specifies additional conditions to include when evaluating Cluster Available condition. MaxItems: 32 infrastructure LocalObjectTemplate infrastructure is a reference to a provider-specific template that holds Optional: {} infrastructureNamingStrategy InfrastructureNamingStrategy infrastructureNamingStrategy allows changing the naming pattern used when creating the infrastructure object. Optional: {} controlPlane ControlPlaneClass controlPlane is a reference to a local struct that holds the details Optional: {} workers WorkersClass workers describes the worker nodes for the cluster. Optional: {} variables ClusterClassVariable arrayvariables defines the variables which can be configured MaxItems: 1000 patches ClusterClassPatch arraypatches defines the patches which are applied to customize MaxItems: 1000 upgrade ClusterClassUpgrade upgrade defines the upgrade configuration for clusters using this ClusterClass. MinProperties: 1 kubernetesVersions string array kubernetesVersions is the list of Kubernetes versions that can be MaxItems: 100
ClusterClassStatus defines the observed state of the ClusterClass.
Appears in:
Field Description Default Validation
variables ClusterClassStatusVariable arrayvariables is a list of ClusterClassStatusVariable that are defined for the ClusterClass. MaxItems: 1000 conditions Conditions conditions defines current observed state of the ClusterClass. Optional: {} observedGeneration integer observedGeneration is the latest generation observed by the controller. Optional: {} v1beta2 ClusterClassV1Beta2Status v1beta2 groups all the fields that will be added or modified in ClusterClass’s status with the V1Beta2 version. Optional: {}
ClusterClassStatusVariable defines a variable which appears in the status of a ClusterClass.
Appears in:
Field Description Default Validation
name string name is the name of the variable. MaxLength: 256 definitionsConflict boolean definitionsConflict specifies whether or not there are conflicting definitions for a single variable name. Optional: {} definitions ClusterClassStatusVariableDefinition arraydefinitions is a list of definitions for a variable. MaxItems: 100
ClusterClassStatusVariableDefinition defines a variable which appears in the status of a ClusterClass.
Appears in:
Field Description Default Validation
from string from specifies the origin of the variable definition.inline for variables defined in the ClusterClass or the name of a patch defined in the ClusterClass MaxLength: 256 required boolean required specifies if the variable is required. Required: {} metadata ClusterClassVariableMetadata Refer to Kubernetes API documentation for fields of metadata. Optional: {} schema VariableSchema schema defines the schema of the variable. Required: {}
ClusterClassUpgrade defines the upgrade configuration for clusters using the ClusterClass.
Validation:
Appears in:
Field Description Default Validation
external ClusterClassUpgradeExternal external defines external runtime extensions for upgrade operations. MinProperties: 1
ClusterClassUpgradeExternal defines external runtime extensions for upgrade operations.
Validation:
Appears in:
Field Description Default Validation
generateUpgradePlanExtension string generateUpgradePlanExtension references an extension which is called to generate upgrade plan. MaxLength: 512
ClusterClassV1Beta2Status groups all the fields that will be added or modified in ClusterClass with the V1Beta2 version.
See https://github.com/kubernetes-sigs/cluster-api/blob/main/docs/proposals/20240916-improve-status-in-CAPI-resources.md for more context.
Appears in:
Field Description Default Validation
conditions Condition arrayconditions represents the observations of a ClusterClass’s current state. MaxItems: 32
ClusterClassVariable defines a variable which can
be configured in the Cluster topology and used in patches.
Appears in:
Field Description Default Validation
name string name of the variable. MaxLength: 256 required boolean required specifies if the variable is required. Required: {} metadata ClusterClassVariableMetadata Refer to Kubernetes API documentation for fields of metadata. Optional: {} schema VariableSchema schema defines the schema of the variable. Required: {}
ClusterClassVariableMetadata is the metadata of a variable.
It can be used to add additional data for higher level tools to
a ClusterClassVariable.
Deprecated: This struct is deprecated and is going to be removed in the next apiVersion.
Appears in:
Field Description Default Validation
labels object (keys:string, values:string) labels is a map of string keys and values that can be used to organize and categorize Optional: {} annotations object (keys:string, values:string) annotations is an unstructured key value map that can be used to store and Optional: {}
ClusterControlPlaneStatus groups all the observations about control plane current state.
Appears in:
Field Description Default Validation
desiredReplicas integer desiredReplicas is the total number of desired control plane machines in this cluster. Optional: {} replicas integer replicas is the total number of control plane machines in this cluster. Optional: {} upToDateReplicas integer upToDateReplicas is the number of up-to-date control plane machines in this cluster. A machine is considered up-to-date when Machine’s UpToDate condition is true. Optional: {} readyReplicas integer readyReplicas is the total number of ready control plane machines in this cluster. A machine is considered ready when Machine’s Ready condition is true. Optional: {} availableReplicas integer availableReplicas is the total number of available control plane machines in this cluster. A machine is considered available when Machine’s Available condition is true. Optional: {} versions StatusVersion arrayversions is the aggregated Kubernetes versions in this control plane. MaxItems: 32 upgradePlan StatusUpgradePlanVersion arrayupgradePlan reports the list of versions that would be applied to the control plane object according to the upgrade plan. MaxItems: 32
ClusterList contains a list of Cluster.
Field Description Default Validation
apiVersion string cluster.x-k8s.io/v1beta1kind string ClusterListmetadata ListMeta Refer to Kubernetes API documentation for fields of metadata. Optional: {} items Cluster arrayitems is the list of Clusters.
ClusterNetwork specifies the different networking
parameters for a cluster.
Appears in:
Field Description Default Validation
apiServerPort integer apiServerPort specifies the port the API Server should bind to. Optional: {} services NetworkRanges services is the network ranges from which service VIPs are allocated. Optional: {} pods NetworkRanges pods is the network ranges from which Pod networks are allocated. Optional: {} serviceDomain string serviceDomain is the domain name for services. MaxLength: 253
ClusterSpec defines the desired state of Cluster.
Appears in:
Field Description Default Validation
paused boolean paused can be used to prevent controllers from processing the Cluster and all its associated objects. Optional: {} clusterNetwork ClusterNetwork clusterNetwork represents the cluster network configuration. Optional: {} controlPlaneEndpoint APIEndpoint controlPlaneEndpoint represents the endpoint used to communicate with the control plane. Optional: {} controlPlaneRef ObjectReference controlPlaneRef is an optional reference to a provider-specific resource that holds Optional: {} infrastructureRef ObjectReference infrastructureRef is a reference to a provider-specific resource that holds the details Optional: {} topology Topology topology encapsulates the topology for the cluster. Optional: {} availabilityGates ClusterAvailabilityGate arrayavailabilityGates specifies additional conditions to include when evaluating Cluster Available condition. MaxItems: 32
ClusterStatus defines the observed state of Cluster.
Appears in:
Field Description Default Validation
failureDomains FailureDomains failureDomains is a slice of failure domain objects synced from the infrastructure provider. Optional: {} failureReason ClusterStatusError failureReason indicates that there is a fatal problem reconciling the Optional: {} failureMessage string failureMessage indicates that there is a fatal problem reconciling the MaxLength: 10240 phase string phase represents the current phase of cluster actuation. Enum: [Pending Provisioning Provisioned Deleting Failed Unknown] infrastructureReady boolean infrastructureReady is the state of the infrastructure provider. Optional: {} controlPlaneReady boolean controlPlaneReady denotes if the control plane became ready during initial provisioning Optional: {} conditions Conditions conditions defines current service state of the cluster. Optional: {} observedGeneration integer observedGeneration is the latest generation observed by the controller. Optional: {} v1beta2 ClusterV1Beta2Status v1beta2 groups all the fields that will be added or modified in Cluster’s status with the V1Beta2 version. Optional: {}
ClusterV1Beta2Status groups all the fields that will be added or modified in Cluster with the V1Beta2 version.
See https://github.com/kubernetes-sigs/cluster-api/blob/main/docs/proposals/20240916-improve-status-in-CAPI-resources.md for more context.
Appears in:
Field Description Default Validation
conditions Condition arrayconditions represents the observations of a Cluster’s current state. MaxItems: 32 controlPlane ClusterControlPlaneStatus controlPlane groups all the observations about Cluster’s ControlPlane current state. Optional: {} workers WorkersStatus workers groups all the observations about Cluster’s Workers current state. Optional: {}
ClusterVariable can be used to customize the Cluster through patches. Each ClusterVariable is associated with a
Variable definition in the ClusterClass status variables.
Appears in:
Field Description Default Validation
name string name of the variable. MaxLength: 256 definitionFrom string definitionFrom specifies where the definition of this Variable is from. MaxLength: 256 value JSON value of the variable. Required: {}
Condition defines an observation of a Cluster API resource operational state.
Appears in:
Field Description Default Validation
type ConditionType type of condition in CamelCase or in foo.example.com/CamelCase. MaxLength: 256 status ConditionStatus status of the condition, one of True, False, Unknown. Required: {} severity ConditionSeverity severity provides an explicit classification of Reason code, so the users or machines can immediately MaxLength: 32 reason string reason is the reason for the condition’s last transition in CamelCase. MaxLength: 256 message string message is a human readable message indicating details about the transition. MaxLength: 10240
Underlying type: string
ConditionPolarity defines the polarity for a metav1.Condition.
Appears in:
Field Description
PositivePositivePolarityCondition describe a condition with positive polarity, a condition NegativeNegativePolarityCondition describe a condition with negative polarity, a condition
Underlying type: string
ConditionSeverity expresses the severity of a Condition Type failing.
Validation:
Appears in:
Field Description
ErrorConditionSeverityError specifies that a condition with Status=False is an error. WarningConditionSeverityWarning specifies that a condition with Status=False is a warning. InfoConditionSeverityInfo specifies that a condition with Status=False is informative. `` ConditionSeverityNone should apply only to conditions with Status=True.
Underlying type: string
ConditionType is a valid value for Condition.Type.
Validation:
MaxLength: 256
MinLength: 1
Appears in:
Field Description
ReadyReadyCondition defines the Ready condition type that summarizes the operational state of a Cluster API object. InfrastructureReadyInfrastructureReadyCondition reports a summary of current status of the infrastructure object defined for this cluster/machine/machinepool. VariablesReconciledClusterClassVariablesReconciledCondition reports if the ClusterClass variables, including both inline and external ControlPlaneInitializedControlPlaneInitializedCondition reports if the cluster’s control plane has been initialized such that the ControlPlaneReadyControlPlaneReadyCondition reports the ready condition from the control plane object defined for this cluster. BootstrapReadyBootstrapReadyCondition reports a summary of current status of the bootstrap object defined for this machine. DrainingSucceededDrainingSucceededCondition provide evidence of the status of the node drain operation which happens during the machine PreDrainDeleteHookSucceededPreDrainDeleteHookSucceededCondition reports a machine waiting for a PreDrainDeleteHook before being delete. PreTerminateDeleteHookSucceededPreTerminateDeleteHookSucceededCondition reports a machine waiting for a PreDrainDeleteHook before being delete. VolumeDetachSucceededVolumeDetachSucceededCondition reports a machine waiting for volumes to be detached. HealthCheckSucceededMachineHealthCheckSucceededCondition is set on machines that have passed a healthcheck by the MachineHealthCheck controller. OwnerRemediatedMachineOwnerRemediatedCondition is set on machines that have failed a healthcheck by the MachineHealthCheck controller. ExternalRemediationTemplateAvailableExternalRemediationTemplateAvailableCondition is set on machinehealthchecks when MachineHealthCheck controller uses external remediation. ExternalRemediationRequestAvailableExternalRemediationRequestAvailableCondition is set on machinehealthchecks when MachineHealthCheck controller uses external remediation. NodeHealthyMachineNodeHealthyCondition provides info about the operational state of the Kubernetes node hosted on the machine by summarizing node conditions. RemediationAllowedRemediationAllowedCondition is set on MachineHealthChecks to show the status of whether the MachineHealthCheck is AvailableMachineDeploymentAvailableCondition means the MachineDeployment is available, that is, at least the minimum available MachineSetReadyMachineSetReadyCondition reports a summary of current status of the MachineSet owned by the MachineDeployment. MachinesCreatedMachinesCreatedCondition documents that the machines controlled by the MachineSet are created. MachinesReadyMachinesReadyCondition reports an aggregate of current status of the machines controlled by the MachineSet. ResizedResizedCondition documents a MachineSet is resizing the set of controlled machines. TopologyReconciledTopologyReconciledCondition provides evidence about the reconciliation of a Cluster topology into RefVersionsUpToDateClusterClassRefVersionsUpToDateCondition documents if the references in the ClusterClass are ReplicasReadyReplicasReadyCondition reports an aggregate of current status of the replicas controlled by the MachinePool.
Underlying type: Condition
Conditions provide observations of the operational state of a Cluster API resource.
Appears in:
Field Description Default Validation
type ConditionType type of condition in CamelCase or in foo.example.com/CamelCase. MaxLength: 256 status ConditionStatus status of the condition, one of True, False, Unknown. Required: {} severity ConditionSeverity severity provides an explicit classification of Reason code, so the users or machines can immediately MaxLength: 32 reason string reason is the reason for the condition’s last transition in CamelCase. MaxLength: 256 message string message is a human readable message indicating details about the transition. MaxLength: 10240
ControlPlaneClass defines the class for the control plane.
Appears in:
Field Description Default Validation
metadata ObjectMeta Refer to Kubernetes API documentation for fields of metadata. Optional: {} ref ObjectReference ref is a required reference to a custom resource Required: {} machineInfrastructure LocalObjectTemplate machineInfrastructure defines the metadata and infrastructure information Optional: {} machineHealthCheck MachineHealthCheckClass machineHealthCheck defines a MachineHealthCheck for this ControlPlaneClass. Optional: {} namingStrategy ControlPlaneClassNamingStrategy namingStrategy allows changing the naming pattern used when creating the control plane provider object. Optional: {} nodeDrainTimeout Duration nodeDrainTimeout is the total amount of time that the controller will spend on draining a node.kubectl drain --timeout Optional: {} nodeVolumeDetachTimeout Duration nodeVolumeDetachTimeout is the total amount of time that the controller will spend on waiting for all volumes Optional: {} nodeDeletionTimeout Duration nodeDeletionTimeout defines how long the controller will attempt to delete the Node that the Machine Optional: {} taints MachineTaint arraytaints are the node taints that Cluster API will manage. MaxItems: 64 readinessGates MachineReadinessGate arrayreadinessGates specifies additional conditions to include when evaluating Machine Ready condition. MaxItems: 32
ControlPlaneClassNamingStrategy defines the naming strategy for control plane objects.
Appears in:
Field Description Default Validation
template string template defines the template to use for generating the name of the ControlPlane object.\{\{ .cluster.name \}\}-\{\{ .random \}\}..cluster.name: The name of the cluster object..random: A random alphanumeric string, without vowels, of length 5. MaxLength: 1024
ControlPlaneTopology specifies the parameters for the control plane nodes in the cluster.
Appears in:
Field Description Default Validation
metadata ObjectMeta Refer to Kubernetes API documentation for fields of metadata. Optional: {} replicas integer replicas is the number of control plane nodes. Optional: {} rollout ControlPlaneTopologyRolloutSpec rollout allows you to configure the behavior of rolling updates to the control plane. MinProperties: 1 machineHealthCheck MachineHealthCheckTopology machineHealthCheck allows to enable, disable and override Optional: {} nodeDrainTimeout Duration nodeDrainTimeout is the total amount of time that the controller will spend on draining a node.kubectl drain --timeout Optional: {} nodeVolumeDetachTimeout Duration nodeVolumeDetachTimeout is the total amount of time that the controller will spend on waiting for all volumes Optional: {} nodeDeletionTimeout Duration nodeDeletionTimeout defines how long the controller will attempt to delete the Node that the Machine Optional: {} taints MachineTaint arraytaints are the node taints that Cluster API will manage. MaxItems: 64 readinessGates MachineReadinessGate arrayreadinessGates specifies additional conditions to include when evaluating Machine Ready condition. MaxItems: 32 variables ControlPlaneVariables variables can be used to customize the ControlPlane through patches. Optional: {}
ControlPlaneTopologyRolloutSpec defines the rollout behavior.
Validation:
Appears in:
ControlPlaneVariables can be used to provide variables for the ControlPlane.
Appears in:
Field Description Default Validation
overrides ClusterVariable arrayoverrides can be used to override Cluster level variables. MaxItems: 1000
ExternalPatchDefinition defines an external patch.
Note: At least one of GenerateExtension or ValidateExtension must be set.
Appears in:
Field Description Default Validation
generateExtension string generateExtension references an extension which is called to generate patches. MaxLength: 512 validateExtension string validateExtension references an extension which is called to validate the topology. MaxLength: 512 discoverVariablesExtension string discoverVariablesExtension references an extension which is called to discover variables. MaxLength: 512 settings object (keys:string, values:string) settings defines key value pairs to be passed to the extensions. Optional: {}
FailureDomainSpec is the Schema for Cluster API failure domains.
It allows controllers to understand how many failure domains a cluster can optionally span across.
Appears in:
Field Description Default Validation
controlPlane boolean controlPlane determines if this failure domain is suitable for use by control plane machines. Optional: {} attributes object (keys:string, values:string) attributes is a free form map of attributes an infrastructure provider might use or require. Optional: {}
Underlying type: map[string]FailureDomainSpec
FailureDomains is a slice of FailureDomains.
Appears in:
Underlying type: string
FieldValueErrorReason is a machine-readable value providing more detail about why a field failed the validation.
Appears in:
Field Description
FieldValueRequiredFieldValueRequired is used to report required values that are not FieldValueDuplicateFieldValueDuplicate is used to report collisions of values that must be FieldValueInvalidFieldValueInvalid is used to report malformed values (e.g. failed regex FieldValueForbiddenFieldValueForbidden is used to report valid (as per formatting rules)
InfrastructureNamingStrategy defines the naming strategy for infrastructure objects.
Appears in:
Field Description Default Validation
template string template defines the template to use for generating the name of the Infrastructure object.\{\{ .cluster.name \}\}-\{\{ .random \}\}..cluster.name: The name of the cluster object..random: A random alphanumeric string, without vowels, of length 5. MaxLength: 1024
JSONPatch defines a JSON patch.
Appears in:
Field Description Default Validation
op string op defines the operation of the patch.add, replace and remove are supported. Enum: [add replace remove] path string path defines the path of the patch.append and prepend, i.e.:add: only index 0 (prepend) and - (append) are allowedreplace or remove: no indexes are allowed MaxLength: 512 value JSON value defines the value of the patch. Optional: {} valueFrom JSONPatchValue valueFrom defines the value of the patch. Optional: {}
JSONPatchValue defines the value of a patch.
Note: Only one of the fields is allowed to be set at the same time.
Appears in:
Field Description Default Validation
variable string variable is the variable to be used as value. MaxLength: 256 template string template is the Go template to be used to calculate the value. MaxLength: 10240
JSONSchemaProps is a JSON-Schema following Specification Draft 4 (http://json-schema.org/).
This struct has been initially copied from apiextensionsv1.JSONSchemaProps, but all fields
which are not supported in CAPI have been removed.
Appears in:
Field Description Default Validation
description string description is a human-readable description of this variable. MaxLength: 4096 example JSON example is an example for this variable. Optional: {} type string type is the type of the variable. Enum: [object array string integer number boolean] properties object (keys:string, values:JSONSchemaProps ) properties specifies fields of an object. Schemaless: {} additionalProperties JSONSchemaProps additionalProperties specifies the schema of values in a map (keys are always strings). Schemaless: {} maxProperties integer maxProperties is the maximum amount of entries in a map or properties in an object. Optional: {} minProperties integer minProperties is the minimum amount of entries in a map or properties in an object. Optional: {} required string array required specifies which fields of an object are required. MaxItems: 1000 items JSONSchemaProps items specifies fields of an array. Schemaless: {} maxItems integer maxItems is the max length of an array variable. Optional: {} minItems integer minItems is the min length of an array variable. Optional: {} uniqueItems boolean uniqueItems specifies if items in an array must be unique. Optional: {} format string format is an OpenAPI v3 format string. Unknown formats are ignored. MaxLength: 32 maxLength integer maxLength is the max length of a string variable. Optional: {} minLength integer minLength is the min length of a string variable. Optional: {} pattern string pattern is the regex which a string variable must match. MaxLength: 512 maximum integer maximum is the maximum of an integer or number variable. Optional: {} exclusiveMaximum boolean exclusiveMaximum specifies if the Maximum is exclusive. Optional: {} minimum integer minimum is the minimum of an integer or number variable. Optional: {} exclusiveMinimum boolean exclusiveMinimum specifies if the Minimum is exclusive. Optional: {} x-kubernetes-preserve-unknown-fields boolean x-kubernetes-preserve-unknown-fields allows setting fields in a variable object Optional: {} enum JSON arrayenum is the list of valid values of the variable. MaxItems: 100 default JSON default is the default value of the variable. Optional: {} x-kubernetes-validations ValidationRule arrayx-kubernetes-validations describes a list of validation rules written in the CEL expression language. MaxItems: 100 x-metadata VariableSchemaMetadata x-metadata is the metadata of a variable or a nested field within a variable. Optional: {} x-kubernetes-int-or-string boolean x-kubernetes-int-or-string specifies that this value is Optional: {} allOf JSONSchemaProps arrayallOf specifies that the variable must validate against all of the subschemas in the array. Schemaless: {} oneOf JSONSchemaProps arrayoneOf specifies that the variable must validate against exactly one of the subschemas in the array. Schemaless: {} anyOf JSONSchemaProps arrayanyOf specifies that the variable must validate against one or more of the subschemas in the array. Schemaless: {} not JSONSchemaProps not specifies that the variable must not validate against the subschema. Schemaless: {}
LocalObjectTemplate defines a template for a topology Class.
Appears in:
Field Description Default Validation
ref ObjectReference ref is a required reference to a custom resource Required: {}
Machine is the Schema for the machines API.
Appears in:
Field Description Default Validation
apiVersion string cluster.x-k8s.io/v1beta1kind string Machinemetadata ObjectMeta Refer to Kubernetes API documentation for fields of metadata. Optional: {} spec MachineSpec spec is the desired state of Machine. Optional: {} status MachineStatus status is the observed state of Machine. Optional: {}
MachineAddress contains information for the node’s address.
Appears in:
Field Description Default Validation
type MachineAddressType type is the machine address type, one of Hostname, ExternalIP, InternalIP, ExternalDNS or InternalDNS. Enum: [Hostname ExternalIP InternalIP ExternalDNS InternalDNS] address string address is the machine address. MaxLength: 256
Underlying type: string
MachineAddressType describes a valid MachineAddress type.
Validation:
Enum: [Hostname ExternalIP InternalIP ExternalDNS InternalDNS]
Appears in:
Field Description
HostnameExternalIPInternalIPExternalDNSInternalDNS
Underlying type: MachineAddress
MachineAddresses is a slice of MachineAddress items to be used by infrastructure providers.
Appears in:
Field Description Default Validation
type MachineAddressType type is the machine address type, one of Hostname, ExternalIP, InternalIP, ExternalDNS or InternalDNS. Enum: [Hostname ExternalIP InternalIP ExternalDNS InternalDNS] address string address is the machine address. MaxLength: 256
MachineDeletionStatus is the deletion state of the Machine.
Appears in:
MachineDeployment is the Schema for the machinedeployments API.
Appears in:
Field Description Default Validation
apiVersion string cluster.x-k8s.io/v1beta1kind string MachineDeploymentmetadata ObjectMeta Refer to Kubernetes API documentation for fields of metadata. Optional: {} spec MachineDeploymentSpec spec is the desired state of MachineDeployment. Optional: {} status MachineDeploymentStatus status is the observed state of MachineDeployment. Optional: {}
MachineDeploymentClass serves as a template to define a set of worker nodes of the cluster
provisioned using the ClusterClass.
Appears in:
Field Description Default Validation
class string class denotes a type of worker node present in the cluster, MaxLength: 256 template MachineDeploymentClassTemplate template is a local struct containing a collection of templates for creation of Required: {} machineHealthCheck MachineHealthCheckClass machineHealthCheck defines a MachineHealthCheck for this MachineDeploymentClass. Optional: {} failureDomain string failureDomain is the failure domain the machines will be created in. MaxLength: 256 namingStrategy MachineDeploymentClassNamingStrategy namingStrategy allows changing the naming pattern used when creating the MachineDeployment. Optional: {} nodeDrainTimeout Duration nodeDrainTimeout is the total amount of time that the controller will spend on draining a node.kubectl drain --timeout Optional: {} nodeVolumeDetachTimeout Duration nodeVolumeDetachTimeout is the total amount of time that the controller will spend on waiting for all volumes Optional: {} nodeDeletionTimeout Duration nodeDeletionTimeout defines how long the controller will attempt to delete the Node that the Machine Optional: {} taints MachineTaint arraytaints are the node taints that Cluster API will manage. MaxItems: 64 minReadySeconds integer minReadySeconds is the minimum number of seconds for which a newly created machine should Optional: {} readinessGates MachineReadinessGate arrayreadinessGates specifies additional conditions to include when evaluating Machine Ready condition. MaxItems: 32 strategy MachineDeploymentStrategy strategy is the deployment strategy to use to replace existing machines with Optional: {}
MachineDeploymentClassNamingStrategy defines the naming strategy for machine deployment objects.
Appears in:
Field Description Default Validation
template string template defines the template to use for generating the name of the MachineDeployment object.\{\{ .cluster.name \}\}-\{\{ .machineDeployment.topologyName \}\}-\{\{ .random \}\}..cluster.name: The name of the cluster object..random: A random alphanumeric string, without vowels, of length 5..machineDeployment.topologyName: The name of the MachineDeployment topology (Cluster.spec.topology.workers.machineDeployments[].name). MaxLength: 1024
MachineDeploymentClassTemplate defines how a MachineDeployment generated from a MachineDeploymentClass
should look like.
Appears in:
Field Description Default Validation
metadata ObjectMeta Refer to Kubernetes API documentation for fields of metadata. Optional: {} bootstrap LocalObjectTemplate bootstrap contains the bootstrap template reference to be used Required: {} infrastructure LocalObjectTemplate infrastructure contains the infrastructure template reference to be used Required: {}
MachineDeploymentList contains a list of MachineDeployment.
Field Description Default Validation
apiVersion string cluster.x-k8s.io/v1beta1kind string MachineDeploymentListmetadata ListMeta Refer to Kubernetes API documentation for fields of metadata. Optional: {} items MachineDeployment arrayitems is the list of MachineDeployments.
MachineDeploymentSpec defines the desired state of MachineDeployment.
Appears in:
Field Description Default Validation
clusterName string clusterName is the name of the Cluster this object belongs to. MaxLength: 63 replicas integer replicas is the number of desired machines. Optional: {} selector LabelSelector selector is the label selector for machines. Existing MachineSets whose machines are Required: {} template MachineTemplateSpec template describes the machines that will be created. Required: {} strategy MachineDeploymentStrategy strategy is the deployment strategy to use to replace existing machines with Optional: {} machineNamingStrategy MachineNamingStrategy machineNamingStrategy allows changing the naming pattern used when creating Machines. Optional: {} minReadySeconds integer minReadySeconds is the minimum number of seconds for which a Node for a newly created machine should be ready before considering the replica available. Optional: {} revisionHistoryLimit integer revisionHistoryLimit is the number of old MachineSets to retain to allow rollback. Optional: {} paused boolean paused indicates that the deployment is paused. Optional: {} progressDeadlineSeconds integer progressDeadlineSeconds is the maximum time in seconds for a deployment to make progress before it Optional: {}
MachineDeploymentStatus defines the observed state of MachineDeployment.
Appears in:
Field Description Default Validation
observedGeneration integer observedGeneration is the generation observed by the deployment controller. Optional: {} selector string selector is the same as the label selector but in the string format to avoid introspection MaxLength: 4096 replicas integer replicas is the total number of non-terminated machines targeted by this deployment Optional: {} updatedReplicas integer updatedReplicas is the total number of non-terminated machines targeted by this deployment Optional: {} readyReplicas integer readyReplicas is the total number of ready machines targeted by this deployment. Optional: {} availableReplicas integer availableReplicas is the total number of available machines (ready for at least minReadySeconds) Optional: {} unavailableReplicas integer unavailableReplicas is the total number of unavailable machines targeted by this deployment. Optional: {} phase string phase represents the current phase of a MachineDeployment (ScalingUp, ScalingDown, Running, Failed, or Unknown). Enum: [ScalingUp ScalingDown Running Failed Unknown] conditions Conditions conditions defines current service state of the MachineDeployment. Optional: {} versions StatusVersion arrayversions is the aggregated Kubernetes versions in this MachineDeployment. MaxItems: 100 v1beta2 MachineDeploymentV1Beta2Status v1beta2 groups all the fields that will be added or modified in MachineDeployment’s status with the V1Beta2 version. Optional: {}
MachineDeploymentStrategy describes how to replace existing machines
with new ones.
Appears in:
Field Description Default Validation
type MachineDeploymentStrategyType type of deployment. Allowed values are RollingUpdate and OnDelete. Enum: [RollingUpdate OnDelete] rollingUpdate MachineRollingUpdateDeployment rollingUpdate is the rolling update config params. Present only if Optional: {} remediation RemediationStrategy remediation controls the strategy of remediating unhealthy machines Optional: {}
Underlying type: string
MachineDeploymentStrategyType defines the type of MachineDeployment rollout strategies.
Appears in:
Field Description
RollingUpdateRollingUpdateMachineDeploymentStrategyType replaces the old MachineSet by new one using rolling update OnDeleteOnDeleteMachineDeploymentStrategyType replaces old MachineSets when the deletion of the associated machines are completed.
MachineDeploymentTopology specifies the different parameters for a set of worker nodes in the topology.
This set of nodes is managed by a MachineDeployment object whose lifecycle is managed by the Cluster controller.
Appears in:
Field Description Default Validation
metadata ObjectMeta Refer to Kubernetes API documentation for fields of metadata. Optional: {} class string class is the name of the MachineDeploymentClass used to create the set of worker nodes.Cluster.Spec.Class field. MaxLength: 256 name string name is the unique identifier for this MachineDeploymentTopology. MaxLength: 63 failureDomain string failureDomain is the failure domain the machines will be created in. MaxLength: 256 replicas integer replicas is the number of worker nodes belonging to this set. Optional: {} machineHealthCheck MachineHealthCheckTopology machineHealthCheck allows to enable, disable and override Optional: {} nodeDrainTimeout Duration nodeDrainTimeout is the total amount of time that the controller will spend on draining a node.kubectl drain --timeout Optional: {} nodeVolumeDetachTimeout Duration nodeVolumeDetachTimeout is the total amount of time that the controller will spend on waiting for all volumes Optional: {} nodeDeletionTimeout Duration nodeDeletionTimeout defines how long the controller will attempt to delete the Node that the Machine Optional: {} taints MachineTaint arraytaints are the node taints that Cluster API will manage. MaxItems: 64 minReadySeconds integer minReadySeconds is the minimum number of seconds for which a newly created machine should Optional: {} readinessGates MachineReadinessGate arrayreadinessGates specifies additional conditions to include when evaluating Machine Ready condition. MaxItems: 32 rollout MachineDeploymentTopologyRolloutSpec rollout allows you to configure the behaviour of rolling updates to the MachineDeployment Machines. MinProperties: 1 strategy MachineDeploymentStrategy strategy is the deployment strategy to use to replace existing machines with Optional: {} variables MachineDeploymentVariables variables can be used to customize the MachineDeployment through patches. Optional: {}
MachineDeploymentTopologyRolloutSpec defines the rollout behavior.
Validation:
Appears in:
MachineDeploymentV1Beta2Status groups all the fields that will be added or modified in MachineDeployment with the V1Beta2 version.
See https://github.com/kubernetes-sigs/cluster-api/blob/main/docs/proposals/20240916-improve-status-in-CAPI-resources.md for more context.
Appears in:
Field Description Default Validation
conditions Condition arrayconditions represents the observations of a MachineDeployment’s current state. MaxItems: 32 readyReplicas integer readyReplicas is the number of ready replicas for this MachineDeployment. A machine is considered ready when Machine’s Ready condition is true. Optional: {} availableReplicas integer availableReplicas is the number of available replicas for this MachineDeployment. A machine is considered available when Machine’s Available condition is true. Optional: {} upToDateReplicas integer upToDateReplicas is the number of up-to-date replicas targeted by this deployment. A machine is considered up-to-date when Machine’s UpToDate condition is true. Optional: {}
MachineDeploymentVariables can be used to provide variables for a specific MachineDeployment.
Appears in:
Field Description Default Validation
overrides ClusterVariable arrayoverrides can be used to override Cluster level variables. MaxItems: 1000
MachineDrainRule is the Schema for the MachineDrainRule API.
Appears in:
Field Description Default Validation
apiVersion string cluster.x-k8s.io/v1beta1kind string MachineDrainRulemetadata ObjectMeta Refer to Kubernetes API documentation for fields of metadata. Required: {} spec MachineDrainRuleSpec spec defines the spec of a MachineDrainRule. Required: {}
Underlying type: string
MachineDrainRuleDrainBehavior defines the drain behavior. Can be either “Drain”, “Skip”, or “WaitCompleted”.
Validation:
Enum: [Drain Skip WaitCompleted]
Appears in:
Field Description
DrainMachineDrainRuleDrainBehaviorDrain means a Pod should be drained. SkipMachineDrainRuleDrainBehaviorSkip means the drain for a Pod should be skipped. WaitCompletedMachineDrainRuleDrainBehaviorWaitCompleted means the Pod should not be evicted,
MachineDrainRuleDrainConfig configures if and how Pods are drained.
Appears in:
Field Description Default Validation
behavior MachineDrainRuleDrainBehavior behavior defines the drain behavior. Enum: [Drain Skip WaitCompleted] order integer order defines the order in which Pods are drained. Optional: {}
MachineDrainRuleList contains a list of MachineDrainRules.
Field Description Default Validation
apiVersion string cluster.x-k8s.io/v1beta1kind string MachineDrainRuleListmetadata ListMeta Refer to Kubernetes API documentation for fields of metadata. Required: {} items MachineDrainRule arrayitems contains the items of the MachineDrainRuleList.
MachineDrainRuleMachineSelector defines to which Machines this MachineDrainRule should be applied.
Validation:
Appears in:
Field Description Default Validation
selector LabelSelector selector is a label selector which selects Machines by their labels. Optional: {} clusterSelector LabelSelector clusterSelector is a label selector which selects Machines by the labels of Optional: {}
MachineDrainRulePodSelector defines to which Pods this MachineDrainRule should be applied.
Validation:
Appears in:
Field Description Default Validation
selector LabelSelector selector is a label selector which selects Pods by their labels. Optional: {} namespaceSelector LabelSelector namespaceSelector is a label selector which selects Pods by the labels of Optional: {}
MachineDrainRuleSpec defines the spec of a MachineDrainRule.
Appears in:
Field Description Default Validation
drain MachineDrainRuleDrainConfig drain configures if and how Pods are drained. Required: {} machines MachineDrainRuleMachineSelector arraymachines defines to which Machines this MachineDrainRule should be applied. MaxItems: 32 pods MachineDrainRulePodSelector arraypods defines to which Pods this MachineDrainRule should be applied. MaxItems: 32
MachineHealthCheck is the Schema for the machinehealthchecks API.
Appears in:
Field Description Default Validation
apiVersion string cluster.x-k8s.io/v1beta1kind string MachineHealthCheckmetadata ObjectMeta Refer to Kubernetes API documentation for fields of metadata. Optional: {} spec MachineHealthCheckSpec spec is the specification of machine health check policy Optional: {} status MachineHealthCheckStatus status is the most recently observed status of MachineHealthCheck resource Optional: {}
MachineHealthCheckClass defines a MachineHealthCheck for a group of Machines.
Appears in:
Field Description Default Validation
unhealthyConditions UnhealthyCondition arrayunhealthyConditions contains a list of the conditions that determine MaxItems: 100 unhealthyMachineConditions UnhealthyMachineCondition arrayunhealthyMachineConditions contains a list of the machine conditions that determine MaxItems: 100 maxUnhealthy IntOrString maxUnhealthy specifies the maximum number of unhealthy machines allowed. Optional: {} unhealthyRange string unhealthyRange specifies the range of unhealthy machines allowed. MaxLength: 32 ^\[[0-9]+-[0-9]+\]$ nodeStartupTimeout Duration nodeStartupTimeout allows to set the maximum time for MachineHealthCheckSpec.ProviderID field. Optional: {} remediationTemplate ObjectReference remediationTemplate is a reference to a remediation template Optional: {}
MachineHealthCheckList contains a list of MachineHealthCheck.
Field Description Default Validation
apiVersion string cluster.x-k8s.io/v1beta1kind string MachineHealthCheckListmetadata ListMeta Refer to Kubernetes API documentation for fields of metadata. Optional: {} items MachineHealthCheck arrayitems is the list of MachineHealthChecks.
MachineHealthCheckSpec defines the desired state of MachineHealthCheck.
Appears in:
Field Description Default Validation
clusterName string clusterName is the name of the Cluster this object belongs to. MaxLength: 63 selector LabelSelector selector is a label selector to match machines whose health will be exercised Required: {} unhealthyConditions UnhealthyCondition arrayunhealthyConditions contains a list of the conditions that determine MaxItems: 100 unhealthyMachineConditions UnhealthyMachineCondition arrayunhealthyMachineConditions contains a list of the machine conditions that determine MaxItems: 100 maxUnhealthy IntOrString maxUnhealthy specifies the maximum number of unhealthy machines allowed. Optional: {} unhealthyRange string unhealthyRange specifies the range of unhealthy machines allowed. MaxLength: 32 ^\[[0-9]+-[0-9]+\]$ nodeStartupTimeout Duration nodeStartupTimeout allows to set the maximum time for MachineHealthCheckSpec.ProviderID field. Optional: {} remediationTemplate ObjectReference remediationTemplate is a reference to a remediation template Optional: {}
MachineHealthCheckStatus defines the observed state of MachineHealthCheck.
Appears in:
Field Description Default Validation
expectedMachines integer expectedMachines is the total number of machines counted by this machine health check Minimum: 0 currentHealthy integer currentHealthy is the total number of healthy machines counted by this machine health check Minimum: 0 remediationsAllowed integer remediationsAllowed is the number of further remediations allowed by this machine health check before Minimum: 0 observedGeneration integer observedGeneration is the latest generation observed by the controller. Optional: {} targets string array targets shows the current list of machines the machine health check is watching MaxItems: 10000 conditions Conditions conditions defines current service state of the MachineHealthCheck. Optional: {} v1beta2 MachineHealthCheckV1Beta2Status v1beta2 groups all the fields that will be added or modified in MachineHealthCheck’s status with the V1Beta2 version. Optional: {}
MachineHealthCheckTopology defines a MachineHealthCheck for a group of machines.
Appears in:
Field Description Default Validation
enable boolean enable controls if a MachineHealthCheck should be created for the target machines.enable is true and no MachineHealthCheck definition is available. Optional: {} unhealthyConditions UnhealthyCondition arrayunhealthyConditions contains a list of the conditions that determine MaxItems: 100 unhealthyMachineConditions UnhealthyMachineCondition arrayunhealthyMachineConditions contains a list of the machine conditions that determine MaxItems: 100 maxUnhealthy IntOrString maxUnhealthy specifies the maximum number of unhealthy machines allowed. Optional: {} unhealthyRange string unhealthyRange specifies the range of unhealthy machines allowed. MaxLength: 32 ^\[[0-9]+-[0-9]+\]$ nodeStartupTimeout Duration nodeStartupTimeout allows to set the maximum time for MachineHealthCheckSpec.ProviderID field. Optional: {} remediationTemplate ObjectReference remediationTemplate is a reference to a remediation template Optional: {}
MachineHealthCheckV1Beta2Status groups all the fields that will be added or modified in MachineHealthCheck with the V1Beta2 version.
See https://github.com/kubernetes-sigs/cluster-api/blob/main/docs/proposals/20240916-improve-status-in-CAPI-resources.md for more context.
Appears in:
Field Description Default Validation
conditions Condition arrayconditions represents the observations of a MachineHealthCheck’s current state. MaxItems: 32
MachineList contains a list of Machine.
Field Description Default Validation
apiVersion string cluster.x-k8s.io/v1beta1kind string MachineListmetadata ListMeta Refer to Kubernetes API documentation for fields of metadata. Optional: {} items Machine arrayitems is the list of Machines.
MachineNamingStrategy allows changing the naming pattern used when creating
Machines.
Note: InfraMachines & BootstrapConfigs will use the same name as the corresponding Machines.
Appears in:
Field Description Default Validation
template string template defines the template to use for generating the names of the\{\{ .machineSet.name \}\}-\{\{ .random \}\}..cluster.name,.machineSet.name and .random..cluster.name retrieves the name of the cluster object.machineSet.name retrieves the name of the MachineSet.random is substituted with random alphanumeric string, MaxLength: 256
MachinePool is the Schema for the machinepools API.
Appears in:
Field Description Default Validation
apiVersion string cluster.x-k8s.io/v1beta1kind string MachinePoolmetadata ObjectMeta Refer to Kubernetes API documentation for fields of metadata. Optional: {} spec MachinePoolSpec spec is the desired state of MachinePool. Optional: {} status MachinePoolStatus status is the observed state of MachinePool. Optional: {}
MachinePoolClass serves as a template to define a pool of worker nodes of the cluster
provisioned using ClusterClass.
Appears in:
Field Description Default Validation
class string class denotes a type of machine pool present in the cluster, MaxLength: 256 template MachinePoolClassTemplate template is a local struct containing a collection of templates for creation of Required: {} failureDomains string array failureDomains is the list of failure domains the MachinePool should be attached to. MaxItems: 100 namingStrategy MachinePoolClassNamingStrategy namingStrategy allows changing the naming pattern used when creating the MachinePool. Optional: {} nodeDrainTimeout Duration nodeDrainTimeout is the total amount of time that the controller will spend on draining a node.kubectl drain --timeout Optional: {} nodeVolumeDetachTimeout Duration nodeVolumeDetachTimeout is the total amount of time that the controller will spend on waiting for all volumes Optional: {} nodeDeletionTimeout Duration nodeDeletionTimeout defines how long the controller will attempt to delete the Node that the Machine Optional: {} taints MachineTaint arraytaints are the node taints that Cluster API will manage. MaxItems: 64 minReadySeconds integer minReadySeconds is the minimum number of seconds for which a newly created machine pool should Optional: {}
MachinePoolClassNamingStrategy defines the naming strategy for machine pool objects.
Appears in:
Field Description Default Validation
template string template defines the template to use for generating the name of the MachinePool object.\{\{ .cluster.name \}\}-\{\{ .machinePool.topologyName \}\}-\{\{ .random \}\}..cluster.name: The name of the cluster object..random: A random alphanumeric string, without vowels, of length 5..machinePool.topologyName: The name of the MachinePool topology (Cluster.spec.topology.workers.machinePools[].name). MaxLength: 1024
MachinePoolClassTemplate defines how a MachinePool generated from a MachinePoolClass
should look like.
Appears in:
Field Description Default Validation
metadata ObjectMeta Refer to Kubernetes API documentation for fields of metadata. Optional: {} bootstrap LocalObjectTemplate bootstrap contains the bootstrap template reference to be used Required: {} infrastructure LocalObjectTemplate infrastructure contains the infrastructure template reference to be used Required: {}
MachinePoolList contains a list of MachinePool.
Field Description Default Validation
apiVersion string cluster.x-k8s.io/v1beta1kind string MachinePoolListmetadata ListMeta Refer to Kubernetes API documentation for fields of metadata. Optional: {} items MachinePool arrayitems is the list of MachinePools.
MachinePoolSpec defines the desired state of MachinePool.
Appears in:
Field Description Default Validation
clusterName string clusterName is the name of the Cluster this object belongs to. MaxLength: 63 replicas integer replicas is the number of desired machines. Defaults to 1. Optional: {} template MachineTemplateSpec template describes the machines that will be created. Required: {} minReadySeconds integer minReadySeconds is the minimum number of seconds for which a newly created machine instances should Optional: {} providerIDList string array providerIDList are the identification IDs of machine instances provided by the provider. MaxItems: 10000 failureDomains string array failureDomains is the list of failure domains this MachinePool should be attached to. MaxItems: 100
MachinePoolStatus defines the observed state of MachinePool.
Appears in:
Field Description Default Validation
nodeRefs ObjectReference arraynodeRefs will point to the corresponding Nodes if they exist. MaxItems: 10000 replicas integer replicas is the most recently observed number of replicas. Optional: {} readyReplicas integer readyReplicas is the number of ready replicas for this MachinePool. A machine is considered ready when the node has been created and is “Ready”. Optional: {} availableReplicas integer availableReplicas is the number of available replicas (ready for at least minReadySeconds) for this MachinePool. Optional: {} unavailableReplicas integer unavailableReplicas is the total number of unavailable machine instances targeted by this machine pool. Optional: {} failureReason MachinePoolStatusFailure failureReason indicates that there is a problem reconciling the state, and Optional: {} failureMessage string failureMessage indicates that there is a problem reconciling the state, MaxLength: 10240 phase string phase represents the current phase of cluster actuation. Enum: [Pending Provisioning Provisioned Running ScalingUp ScalingDown Scaling Deleting Failed Unknown] bootstrapReady boolean bootstrapReady is the state of the bootstrap provider. Optional: {} infrastructureReady boolean infrastructureReady is the state of the infrastructure provider. Optional: {} observedGeneration integer observedGeneration is the latest generation observed by the controller. Optional: {} conditions Conditions conditions define the current service state of the MachinePool. Optional: {} versions StatusVersion arrayversions is the aggregated Kubernetes versions in this MachinePool. MaxItems: 100 v1beta2 MachinePoolV1Beta2Status v1beta2 groups all the fields that will be added or modified in MachinePool’s status with the V1Beta2 version. Optional: {}
MachinePoolTopology specifies the different parameters for a pool of worker nodes in the topology.
This pool of nodes is managed by a MachinePool object whose lifecycle is managed by the Cluster controller.
Appears in:
Field Description Default Validation
metadata ObjectMeta Refer to Kubernetes API documentation for fields of metadata. Optional: {} class string class is the name of the MachinePoolClass used to create the pool of worker nodes.Cluster.Spec.Class field. MaxLength: 256 name string name is the unique identifier for this MachinePoolTopology. MaxLength: 63 failureDomains string array failureDomains is the list of failure domains the machine pool will be created in. MaxItems: 100 nodeDrainTimeout Duration nodeDrainTimeout is the total amount of time that the controller will spend on draining a node.kubectl drain --timeout Optional: {} nodeVolumeDetachTimeout Duration nodeVolumeDetachTimeout is the total amount of time that the controller will spend on waiting for all volumes Optional: {} nodeDeletionTimeout Duration nodeDeletionTimeout defines how long the controller will attempt to delete the Node that the MachinePool Optional: {} taints MachineTaint arraytaints are the node taints that Cluster API will manage. MaxItems: 64 minReadySeconds integer minReadySeconds is the minimum number of seconds for which a newly created machine pool should Optional: {} replicas integer replicas is the number of nodes belonging to this pool. Optional: {} variables MachinePoolVariables variables can be used to customize the MachinePool through patches. Optional: {}
MachinePoolV1Beta2Status groups all the fields that will be added or modified in MachinePoolStatus with the V1Beta2 version.
See https://github.com/kubernetes-sigs/cluster-api/blob/main/docs/proposals/20240916-improve-status-in-CAPI-resources.md for more context.
Appears in:
Field Description Default Validation
conditions Condition arrayconditions represents the observations of a MachinePool’s current state. MaxItems: 32 readyReplicas integer readyReplicas is the number of ready replicas for this MachinePool. A machine is considered ready when Machine’s Ready condition is true. Optional: {} availableReplicas integer availableReplicas is the number of available replicas for this MachinePool. A machine is considered available when Machine’s Available condition is true. Optional: {} upToDateReplicas integer upToDateReplicas is the number of up-to-date replicas targeted by this MachinePool. A machine is considered up-to-date when Machine’s UpToDate condition is true. Optional: {}
MachinePoolVariables can be used to provide variables for a specific MachinePool.
Appears in:
Field Description Default Validation
overrides ClusterVariable arrayoverrides can be used to override Cluster level variables. MaxItems: 1000
MachineReadinessGate contains the type of a Machine condition to be used as a readiness gate.
Appears in:
Field Description Default Validation
conditionType string conditionType refers to a condition with matching type in the Machine’s condition list. MaxLength: 316 ^([a-z0-9]([-a-z0-9]*[a-z0-9])?(\.[a-z0-9]([-a-z0-9]*[a-z0-9])?)*/)?(([A-Za-z0-9][-A-Za-z0-9_.]*)?[A-Za-z0-9])$ polarity ConditionPolarity polarity of the conditionType specified in this readinessGate. Enum: [Positive Negative]
Underlying type: struct{MaxUnavailable *k8s.io/apimachinery/pkg/util/intstr.IntOrString “json:“maxUnavailable,omitempty“”; MaxSurge *k8s.io/apimachinery/pkg/util/intstr.IntOrString “json:“maxSurge,omitempty“”; DeletePolicy *string “json:“deletePolicy,omitempty“”}
MachineRollingUpdateDeployment is used to control the desired behavior of rolling update.
Appears in:
MachineSet is the Schema for the machinesets API.
Appears in:
Field Description Default Validation
apiVersion string cluster.x-k8s.io/v1beta1kind string MachineSetmetadata ObjectMeta Refer to Kubernetes API documentation for fields of metadata. Optional: {} spec MachineSetSpec spec is the desired state of MachineSet. Optional: {} status MachineSetStatus status is the observed state of MachineSet. Optional: {}
MachineSetList contains a list of MachineSet.
Field Description Default Validation
apiVersion string cluster.x-k8s.io/v1beta1kind string MachineSetListmetadata ListMeta Refer to Kubernetes API documentation for fields of metadata. Optional: {} items MachineSet arrayitems is the list of MachineSets.
MachineSetSpec defines the desired state of MachineSet.
Appears in:
Field Description Default Validation
clusterName string clusterName is the name of the Cluster this object belongs to. MaxLength: 63 replicas integer replicas is the number of desired replicas. Optional: {} minReadySeconds integer minReadySeconds is the minimum number of seconds for which a Node for a newly created machine should be ready before considering the replica available. Optional: {} deletePolicy string deletePolicy defines the policy used to identify nodes to delete when downscaling. Enum: [Random Newest Oldest] selector LabelSelector selector is a label query over machines that should match the replica count. Required: {} template MachineTemplateSpec template is the object that describes the machine that will be created if Optional: {} machineNamingStrategy MachineNamingStrategy machineNamingStrategy allows changing the naming pattern used when creating Machines. Optional: {}
MachineSetStatus defines the observed state of MachineSet.
Appears in:
Field Description Default Validation
selector string selector is the same as the label selector but in the string format to avoid introspection MaxLength: 4096 replicas integer replicas is the most recently observed number of replicas. Optional: {} fullyLabeledReplicas integer fullyLabeledReplicas is the number of replicas that have labels matching the labels of the machine template of the MachineSet. Optional: {} readyReplicas integer readyReplicas is the number of ready replicas for this MachineSet. A machine is considered ready when the node has been created and is “Ready”. Optional: {} availableReplicas integer availableReplicas is the number of available replicas (ready for at least minReadySeconds) for this MachineSet. Optional: {} observedGeneration integer observedGeneration reflects the generation of the most recently observed MachineSet. Optional: {} failureReason MachineSetStatusError failureReason will be set in the event that there is a terminal problem Optional: {} failureMessage string failureMessage will be set in the event that there is a terminal problem MaxLength: 10240 conditions Conditions conditions defines current service state of the MachineSet. Optional: {} versions StatusVersion arrayversions is the aggregated Kubernetes versions in this MachineSet. MaxItems: 100 v1beta2 MachineSetV1Beta2Status v1beta2 groups all the fields that will be added or modified in MachineSet’s status with the V1Beta2 version. Optional: {}
MachineSetV1Beta2Status groups all the fields that will be added or modified in MachineSetStatus with the V1Beta2 version.
See https://github.com/kubernetes-sigs/cluster-api/blob/main/docs/proposals/20240916-improve-status-in-CAPI-resources.md for more context.
Appears in:
Field Description Default Validation
conditions Condition arrayconditions represents the observations of a MachineSet’s current state. MaxItems: 32 readyReplicas integer readyReplicas is the number of ready replicas for this MachineSet. A machine is considered ready when Machine’s Ready condition is true. Optional: {} availableReplicas integer availableReplicas is the number of available replicas for this MachineSet. A machine is considered available when Machine’s Available condition is true. Optional: {} upToDateReplicas integer upToDateReplicas is the number of up-to-date replicas for this MachineSet. A machine is considered up-to-date when Machine’s UpToDate condition is true. Optional: {}
MachineSpec defines the desired state of Machine.
Appears in:
Field Description Default Validation
clusterName string clusterName is the name of the Cluster this object belongs to. MaxLength: 63 bootstrap Bootstrap bootstrap is a reference to a local struct which encapsulates Required: {} infrastructureRef ObjectReference infrastructureRef is a required reference to a custom resource Required: {} version string version defines the desired Kubernetes version. MaxLength: 256 providerID string providerID is the identification ID of the machine provided by the provider. MaxLength: 512 failureDomain string failureDomain is the failure domain the machine will be created in. MaxLength: 256 readinessGates MachineReadinessGate arrayreadinessGates specifies additional conditions to include when evaluating Machine Ready condition. MaxItems: 32 nodeDrainTimeout Duration nodeDrainTimeout is the total amount of time that the controller will spend on draining a node.kubectl drain --timeout Optional: {} nodeVolumeDetachTimeout Duration nodeVolumeDetachTimeout is the total amount of time that the controller will spend on waiting for all volumes Optional: {} nodeDeletionTimeout Duration nodeDeletionTimeout defines how long the controller will attempt to delete the Node that the Machine Optional: {} taints MachineTaint arraytaints are the node taints that Cluster API will manage. MaxItems: 64
MachineStatus defines the observed state of Machine.
Appears in:
Field Description Default Validation
nodeRef ObjectReference nodeRef will point to the corresponding Node if it exists. Optional: {} nodeInfo NodeSystemInfo nodeInfo is a set of ids/uuids to uniquely identify the node. Optional: {} failureReason MachineStatusError failureReason will be set in the event that there is a terminal problem Optional: {} failureMessage string failureMessage will be set in the event that there is a terminal problem MaxLength: 10240 addresses MachineAddresses addresses is a list of addresses assigned to the machine. Optional: {} phase string phase represents the current phase of machine actuation. Enum: [Pending Provisioning Provisioned Running Deleting Deleted Failed Unknown] bootstrapReady boolean bootstrapReady is the state of the bootstrap provider. Optional: {} infrastructureReady boolean infrastructureReady is the state of the infrastructure provider. Optional: {} observedGeneration integer observedGeneration is the latest generation observed by the controller. Optional: {} conditions Conditions conditions defines current service state of the Machine. Optional: {} deletion MachineDeletionStatus deletion contains information relating to removal of the Machine. Optional: {} v1beta2 MachineV1Beta2Status v1beta2 groups all the fields that will be added or modified in Machine’s status with the V1Beta2 version. Optional: {}
MachineTaint defines a taint equivalent to corev1.Taint, but additionally having a propagation field.
Appears in:
Field Description Default Validation
key string key is the taint key to be applied to a node./. MaxLength: 317 ^([a-z0-9]([-a-z0-9]*[a-z0-9])?(\.[a-z0-9]([-a-z0-9]*[a-z0-9])?)*\/)?([A-Za-z0-9][-A-Za-z0-9_.]*)?[A-Za-z0-9]$ value string value is the taint value corresponding to the taint key. MaxLength: 63 ^(([A-Za-z0-9][-A-Za-z0-9_.]*)?[A-Za-z0-9])?$ effect TaintEffect effect is the effect for the taint. Valid values are NoSchedule, PreferNoSchedule and NoExecute. Enum: [NoSchedule PreferNoSchedule NoExecute] propagation MachineTaintPropagation propagation defines how this taint should be propagated to nodes. Enum: [Always OnInitialization]
Underlying type: string
MachineTaintPropagation defines when a taint should be propagated to nodes.
Validation:
Enum: [Always OnInitialization]
Appears in:
Field Description
AlwaysMachineTaintPropagationAlways means the taint should be continuously reconciled and kept on the node. OnInitializationMachineTaintPropagationOnInitialization means the taint should be set once during initialization and then
MachineTemplateSpec describes the data needed to create a Machine from a template.
Appears in:
Field Description Default Validation
metadata ObjectMeta Refer to Kubernetes API documentation for fields of metadata. Optional: {} spec MachineSpec spec is the specification of the desired behavior of the machine. Optional: {}
MachineV1Beta2Status groups all the fields that will be added or modified in MachineStatus with the V1Beta2 version.
See https://github.com/kubernetes-sigs/cluster-api/blob/main/docs/proposals/20240916-improve-status-in-CAPI-resources.md for more context.
Appears in:
Field Description Default Validation
conditions Condition arrayconditions represents the observations of a Machine’s current state. MaxItems: 32
NetworkRanges represents ranges of network addresses.
Appears in:
Field Description Default Validation
cidrBlocks string array cidrBlocks is a list of CIDR blocks. MaxItems: 100
ObjectMeta is metadata that all persisted resources must have, which includes all objects
users must create. This is a copy of customizable fields from metav1.ObjectMeta.
ObjectMeta is embedded in Machine.Spec, MachineDeployment.Template and MachineSet.Template,
which are not top-level Kubernetes objects. Given that metav1.ObjectMeta has lots of special cases
and read-only fields which end up in the generated CRD validation, having it as a subset simplifies
the API and some issues that can impact user experience.
During the upgrade to controller-tools@v2
for v1alpha2, we noticed a failure would occur running Cluster API test suite against the new CRDs,
specifically spec.metadata.creationTimestamp in body must be of type string: "null".
The investigation showed that controller-tools@v2 behaves differently than its previous version
when handling types from metav1 package.
In more details, we found that embedded (non-top level) types that embedded metav1.ObjectMeta
had validation properties, including for creationTimestamp (metav1.Time).
The metav1.Time type specifies a custom json marshaller that, when IsZero() is true, returns null
which breaks validation because the field isn’t marked as nullable.
In future versions, controller-tools@v2 might allow overriding the type and validation for embedded
types. When that happens, this hack should be revisited.
Appears in:
Field Description Default Validation
labels object (keys:string, values:string) labels is a map of string keys and values that can be used to organize and categorize Optional: {} annotations object (keys:string, values:string) annotations is an unstructured key value map stored with a resource that may be Optional: {}
PatchDefinition defines a patch which is applied to customize the referenced templates.
Appears in:
Field Description Default Validation
selector PatchSelector selector defines on which templates the patch should be applied. Required: {} jsonPatches JSONPatch arrayjsonPatches defines the patches which should be applied on the templates MaxItems: 100
PatchSelector defines on which templates the patch should be applied.
Note: Matching on APIVersion and Kind is mandatory, to enforce that the patches are
written for the correct version. The version of the references in the ClusterClass may
be automatically updated during reconciliation if there is a newer version for the same contract.
Note: The results of selection based on the individual fields are ANDed.
Appears in:
Field Description Default Validation
apiVersion string apiVersion filters templates by apiVersion. MaxLength: 512 kind string kind filters templates by kind. MaxLength: 256 matchResources PatchSelectorMatch matchResources selects templates based on where they are referenced. Required: {}
PatchSelectorMatch selects templates based on where they are referenced.
Note: The selector must match at least one template.
Note: The results of selection based on the individual fields are ORed.
Appears in:
Field Description Default Validation
controlPlane boolean controlPlane selects templates referenced in .spec.ControlPlane. Optional: {} infrastructureCluster boolean infrastructureCluster selects templates referenced in .spec.infrastructure. Optional: {} machineDeploymentClass PatchSelectorMatchMachineDeploymentClass machineDeploymentClass selects templates referenced in specific MachineDeploymentClasses in Optional: {} machinePoolClass PatchSelectorMatchMachinePoolClass machinePoolClass selects templates referenced in specific MachinePoolClasses in Optional: {}
PatchSelectorMatchMachineDeploymentClass selects templates referenced
in specific MachineDeploymentClasses in .spec.workers.machineDeployments.
Appears in:
Field Description Default Validation
names string array names selects templates by class names. MaxItems: 100
PatchSelectorMatchMachinePoolClass selects templates referenced
in specific MachinePoolClasses in .spec.workers.machinePools.
Appears in:
Field Description Default Validation
names string array names selects templates by class names. MaxItems: 100
Underlying type: struct{MaxInFlight *k8s.io/apimachinery/pkg/util/intstr.IntOrString “json:“maxInFlight,omitempty“”}
RemediationStrategy allows to define how the MachineSet can control scaling operations.
Appears in:
StatusUpgradePlanVersion groups upgrade plan version-related status information.
Appears in:
Field Description Default Validation
version string version is the Kubernetes version. MaxLength: 256
StatusVersion groups version-related status information.
Appears in:
Field Description Default Validation
version string version is the Kubernetes version. MaxLength: 256 replicas integer replicas is the number of replicas at this version. Minimum: 1
Topology encapsulates the information of the managed resources.
Appears in:
Field Description Default Validation
class string class is the name of the ClusterClass object to create the topology. MaxLength: 253 classNamespace string classNamespace is the namespace of the ClusterClass that should be used for the topology. MaxLength: 63 ^[a-z0-9]([-a-z0-9]*[a-z0-9])?$ version string version is the Kubernetes version of the cluster. MaxLength: 256 controlPlane ControlPlaneTopology controlPlane describes the cluster control plane. Optional: {} workers WorkersTopology workers encapsulates the different constructs that form the worker nodes Optional: {} variables ClusterVariable arrayvariables can be used to customize the Cluster through MaxItems: 1000
UnhealthyCondition represents a Node condition type and value with a timeout
specified as a duration. When the named condition has been in the given
status for at least the timeout value, a node is considered unhealthy.
Appears in:
Field Description Default Validation
type NodeConditionType type of Node condition MinLength: 1 status ConditionStatus status of the condition, one of True, False, Unknown. MinLength: 1 timeout Duration timeout is the duration that a node must be in a given status for, Required: {}
UnhealthyMachineCondition represents a Machine condition type and value with a timeout
specified as a duration. When the named condition has been in the given
status for at least the timeout value, a machine is considered unhealthy.
Appears in:
Field Description Default Validation
type string type of Machine condition MaxLength: 316 ^([a-z0-9]([-a-z0-9]*[a-z0-9])?(\.[a-z0-9]([-a-z0-9]*[a-z0-9])?)*/)?(([A-Za-z0-9][-A-Za-z0-9_.]*)?[A-Za-z0-9])$ status ConditionStatus status of the condition, one of True, False, Unknown. Enum: [True False Unknown] timeout Duration timeout is the duration that a Machine must be in a given status for, Required: {}
VariableSchema defines the schema of a variable.
Appears in:
Field Description Default Validation
openAPIV3Schema JSONSchemaProps openAPIV3Schema defines the schema of a variable via OpenAPI v3 Required: {}
WorkersClass is a collection of deployment classes.
Appears in:
Field Description Default Validation
machineDeployments MachineDeploymentClass arraymachineDeployments is a list of machine deployment classes that can be used to create MaxItems: 100 machinePools MachinePoolClass arraymachinePools is a list of machine pool classes that can be used to create MaxItems: 100
WorkersStatus groups all the observations about workers current state.
Appears in:
Field Description Default Validation
desiredReplicas integer desiredReplicas is the total number of desired worker machines in this cluster. Optional: {} replicas integer replicas is the total number of worker machines in this cluster. Optional: {} upToDateReplicas integer upToDateReplicas is the number of up-to-date worker machines in this cluster. A machine is considered up-to-date when Machine’s UpToDate condition is true. Optional: {} readyReplicas integer readyReplicas is the total number of ready worker machines in this cluster. A machine is considered ready when Machine’s Ready condition is true. Optional: {} availableReplicas integer availableReplicas is the total number of available worker machines in this cluster. A machine is considered available when Machine’s Available condition is true. Optional: {} versions StatusVersion arrayversions is the aggregated Kubernetes versions in cluster workers. MaxItems: 32 upgradePlan StatusUpgradePlanVersion arrayupgradePlan reports the list of versions that would be applied to the worker objects (all MachineDeployments and MachinePools). MaxItems: 32
WorkersTopology represents the different sets of worker nodes in the cluster.
Appears in:
Field Description Default Validation
machineDeployments MachineDeploymentTopology arraymachineDeployments is a list of machine deployments in the cluster. MaxItems: 2000 machinePools MachinePoolTopology arraymachinePools is a list of machine pools in the cluster. MaxItems: 2000
Package v1beta1 contains API Schema definitions for the kubeadm v1beta1 API group,
Deprecated: This package is deprecated and is going to be removed when support for v1beta1 will be dropped.
KubeadmControlPlane is the Schema for the KubeadmControlPlane API.
Appears in:
Field Description Default Validation
apiVersion string controlplane.cluster.x-k8s.io/v1beta1kind string KubeadmControlPlanemetadata ObjectMeta Refer to Kubernetes API documentation for fields of metadata. Optional: {} spec KubeadmControlPlaneSpec spec is the desired state of KubeadmControlPlane. Optional: {} status KubeadmControlPlaneStatus status is the observed state of KubeadmControlPlane. Optional: {}
KubeadmControlPlaneList contains a list of KubeadmControlPlane.
Field Description Default Validation
apiVersion string controlplane.cluster.x-k8s.io/v1beta1kind string KubeadmControlPlaneListmetadata ListMeta Refer to Kubernetes API documentation for fields of metadata. Optional: {} items KubeadmControlPlane arrayitems is the list of KubeadmControlPlanes.
KubeadmControlPlaneMachineTemplate defines the template for Machines
in a KubeadmControlPlane object.
Appears in:
Field Description Default Validation
metadata ObjectMeta Refer to Kubernetes API documentation for fields of metadata. Optional: {} infrastructureRef ObjectReference infrastructureRef is a required reference to a custom resource Required: {} readinessGates MachineReadinessGate arrayreadinessGates specifies additional conditions to include when evaluating Machine Ready condition; MaxItems: 32 nodeDrainTimeout Duration nodeDrainTimeout is the total amount of time that the controller will spend on draining a controlplane nodekubectl drain --timeout Optional: {} nodeVolumeDetachTimeout Duration nodeVolumeDetachTimeout is the total amount of time that the controller will spend on waiting for all volumes Optional: {} nodeDeletionTimeout Duration nodeDeletionTimeout defines how long the machine controller will attempt to delete the Node that the Machine Optional: {} taints MachineTaint arraytaints are the node taints that Cluster API will manage. MaxItems: 64
KubeadmControlPlaneSpec defines the desired state of KubeadmControlPlane.
Appears in:
Field Description Default Validation
replicas integer replicas is the number of desired machines. Defaults to 1. When stacked etcd is used onlyetcd best practice . Optional: {} version string version defines the desired Kubernetes version. MaxLength: 256 machineTemplate KubeadmControlPlaneMachineTemplate machineTemplate contains information about how machines Required: {} kubeadmConfigSpec KubeadmConfigSpec kubeadmConfigSpec is a KubeadmConfigSpec Required: {} rolloutBefore RolloutBefore rolloutBefore is a field to indicate a rollout should be performed Optional: {} rolloutStrategy RolloutStrategy rolloutStrategy is the RolloutStrategy to use to replace control plane machines with { rollingUpdate:map[maxSurge:1] type:RollingUpdate } Optional: {} remediationStrategy RemediationStrategy remediationStrategy is the RemediationStrategy that controls how control plane machine remediation happens. Optional: {} machineNamingStrategy MachineNamingStrategy machineNamingStrategy allows changing the naming pattern used when creating Machines. Optional: {}
KubeadmControlPlaneStatus defines the observed state of KubeadmControlPlane.
Appears in:
Field Description Default Validation
selector string selector is the label selector in string format to avoid introspection MaxLength: 4096 replicas integer replicas is the total number of non-terminated machines targeted by this control plane Optional: {} version string version represents the minimum Kubernetes version for the control plane machines MaxLength: 256 updatedReplicas integer updatedReplicas is the total number of non-terminated machines targeted by this control plane Optional: {} readyReplicas integer readyReplicas is the total number of fully running and ready control plane machines. Optional: {} unavailableReplicas integer unavailableReplicas is the total number of unavailable machines targeted by this control plane. Optional: {} initialized boolean initialized denotes that the KubeadmControlPlane API Server is initialized and thus Optional: {} ready boolean ready denotes that the KubeadmControlPlane API Server became ready during initial provisioning Optional: {} failureReason KubeadmControlPlaneStatusError failureReason indicates that there is a terminal problem reconciling the Optional: {} failureMessage string failureMessage indicates that there is a terminal problem reconciling the MaxLength: 10240 observedGeneration integer observedGeneration is the latest generation observed by the controller. Optional: {} conditions Conditions conditions defines current service state of the KubeadmControlPlane. Optional: {} lastRemediation LastRemediationStatus lastRemediation stores info about last remediation performed. Optional: {} versions StatusVersion arrayversions is the aggregated Kubernetes versions in this KubeadmControlPlane. MaxItems: 100 v1beta2 KubeadmControlPlaneV1Beta2Status v1beta2 groups all the fields that will be added or modified in KubeadmControlPlane’s status with the V1Beta2 version. Optional: {}
KubeadmControlPlaneTemplate is the Schema for the kubeadmcontrolplanetemplates API.
Appears in:
Field Description Default Validation
apiVersion string controlplane.cluster.x-k8s.io/v1beta1kind string KubeadmControlPlaneTemplatemetadata ObjectMeta Refer to Kubernetes API documentation for fields of metadata. Optional: {} spec KubeadmControlPlaneTemplateSpec spec is the desired state of KubeadmControlPlaneTemplate. Optional: {}
KubeadmControlPlaneTemplateList contains a list of KubeadmControlPlaneTemplate.
Field Description Default Validation
apiVersion string controlplane.cluster.x-k8s.io/v1beta1kind string KubeadmControlPlaneTemplateListmetadata ListMeta Refer to Kubernetes API documentation for fields of metadata. Optional: {} items KubeadmControlPlaneTemplate arrayitems is the list of KubeadmControlPlaneTemplates.
KubeadmControlPlaneTemplateMachineTemplate defines the template for Machines
in a KubeadmControlPlaneTemplate object.
NOTE: KubeadmControlPlaneTemplateMachineTemplate is similar to KubeadmControlPlaneMachineTemplate but
omits ObjectMeta and InfrastructureRef fields. These fields do not make sense on the KubeadmControlPlaneTemplate,
because they are calculated by the Cluster topology reconciler during reconciliation and thus cannot
be configured on the KubeadmControlPlaneTemplate.
Appears in:
Field Description Default Validation
metadata ObjectMeta Refer to Kubernetes API documentation for fields of metadata. Optional: {} nodeDrainTimeout Duration nodeDrainTimeout is the total amount of time that the controller will spend on draining a controlplane nodekubectl drain --timeout Optional: {} nodeVolumeDetachTimeout Duration nodeVolumeDetachTimeout is the total amount of time that the controller will spend on waiting for all volumes Optional: {} nodeDeletionTimeout Duration nodeDeletionTimeout defines how long the machine controller will attempt to delete the Node that the Machine Optional: {} taints MachineTaint arraytaints are the node taints that Cluster API will manage. MaxItems: 64
KubeadmControlPlaneTemplateResource describes the data needed to create a KubeadmControlPlane from a template.
Appears in:
Field Description Default Validation
metadata ObjectMeta Refer to Kubernetes API documentation for fields of metadata. Optional: {} spec KubeadmControlPlaneTemplateResourceSpec spec is the desired state of KubeadmControlPlaneTemplateResource. Required: {}
KubeadmControlPlaneTemplateResourceSpec defines the desired state of KubeadmControlPlane.
NOTE: KubeadmControlPlaneTemplateResourceSpec is similar to KubeadmControlPlaneSpec but
omits Replicas and Version fields. These fields do not make sense on the KubeadmControlPlaneTemplate,
because they are calculated by the Cluster topology reconciler during reconciliation and thus cannot
be configured on the KubeadmControlPlaneTemplate.
Appears in:
Field Description Default Validation
machineTemplate KubeadmControlPlaneTemplateMachineTemplate machineTemplate contains information about how machines Optional: {} kubeadmConfigSpec KubeadmConfigSpec kubeadmConfigSpec is a KubeadmConfigSpec Required: {} rolloutBefore RolloutBefore rolloutBefore is a field to indicate a rollout should be performed Optional: {} rolloutStrategy RolloutStrategy rolloutStrategy is the RolloutStrategy to use to replace control plane machines with { rollingUpdate:map[maxSurge:1] type:RollingUpdate } Optional: {} remediationStrategy RemediationStrategy remediationStrategy is the RemediationStrategy that controls how control plane machine remediation happens. Optional: {} machineNamingStrategy MachineNamingStrategy machineNamingStrategy allows changing the naming pattern used when creating Machines. Optional: {}
KubeadmControlPlaneTemplateSpec defines the desired state of KubeadmControlPlaneTemplate.
Appears in:
KubeadmControlPlaneV1Beta2Status Groups all the fields that will be added or modified in KubeadmControlPlane with the V1Beta2 version.
See https://github.com/kubernetes-sigs/cluster-api/blob/main/docs/proposals/20240916-improve-status-in-CAPI-resources.md for more context.
Appears in:
Field Description Default Validation
conditions Condition arrayconditions represents the observations of a KubeadmControlPlane’s current state. MaxItems: 32 readyReplicas integer readyReplicas is the number of ready replicas for this KubeadmControlPlane. A machine is considered ready when Machine’s Ready condition is true. Optional: {} availableReplicas integer availableReplicas is the number of available replicas targeted by this KubeadmControlPlane. A machine is considered available when Machine’s Available condition is true. Optional: {} upToDateReplicas integer upToDateReplicas is the number of up-to-date replicas targeted by this KubeadmControlPlane. A machine is considered up-to-date when Machine’s UpToDate condition is true. Optional: {}
LastRemediationStatus stores info about last remediation performed.
NOTE: if for any reason information about last remediation are lost, RetryCount is going to restart from 0 and thus
more remediations than expected might happen.
Appears in:
Field Description Default Validation
machine string machine is the machine name of the latest machine being remediated. MaxLength: 253 retryCount integer retryCount used to keep track of remediation retry for the last remediated machine. Required: {}
MachineNamingStrategy allows changing the naming pattern used when creating Machines.
InfraMachines & KubeadmConfigs will use the same name as the corresponding Machines.
Appears in:
Field Description Default Validation
template string template defines the template to use for generating the names of the Machine objects.\{\{ .kubeadmControlPlane.name \}\}-\{\{ .random \}\}..cluster.name, .kubeadmControlPlane.name and .random..cluster.name retrieves the name of the cluster object that owns the Machines being created..kubeadmControlPlane.name retrieves the name of the KubeadmControlPlane object that owns the Machines being created..random is substituted with random alphanumeric string, without vowels, of length 5. This variable is required MaxLength: 256
RemediationStrategy allows to define how control plane machine remediation happens.
Appears in:
Field Description Default Validation
maxRetry integer maxRetry is the Max number of retries while attempting to remediate an unhealthy machine. Optional: {} retryPeriod Duration retryPeriod is the duration that KCP should wait before remediating a machine being created as a replacement Optional: {} minHealthyPeriod Duration minHealthyPeriod defines the duration after which KCP will consider any failure to a machine unrelated Optional: {}
RollingUpdate is used to control the desired behavior of rolling update.
Appears in:
Field Description Default Validation
maxSurge IntOrString maxSurge is the maximum number of control planes that can be scheduled above or under the Optional: {}
RolloutBefore describes when a rollout should be performed on the KCP machines.
Appears in:
Field Description Default Validation
certificatesExpiryDays integer certificatesExpiryDays indicates a rollout needs to be performed if the Optional: {}
RolloutStrategy describes how to replace existing machines
with new ones.
Appears in:
Field Description Default Validation
type RolloutStrategyType type of rollout. Currently the only supported strategy is Enum: [RollingUpdate] rollingUpdate RollingUpdate rollingUpdate is the rolling update config params. Present only if Optional: {}
Underlying type: string
RolloutStrategyType defines the rollout strategies for a KubeadmControlPlane.
Validation:
Appears in:
Field Description
RollingUpdateRollingUpdateStrategyType replaces the old control planes by new one using rolling update
Package v1alpha1 contains API Schema definitions for the exp v1alpha1 IPAM API.
Deprecated: This package is deprecated and is going to be removed when support for v1beta1 will be dropped.
IPAddress is the Schema for the ipaddress API.
Appears in:
Field Description Default Validation
apiVersion string ipam.cluster.x-k8s.io/v1alpha1kind string IPAddressmetadata ObjectMeta Refer to Kubernetes API documentation for fields of metadata. Optional: {} spec IPAddressSpec spec is the desired state of IPAddress. Optional: {}
IPAddressClaim is the Schema for the ipaddressclaim API.
Appears in:
Field Description Default Validation
apiVersion string ipam.cluster.x-k8s.io/v1alpha1kind string IPAddressClaimmetadata ObjectMeta Refer to Kubernetes API documentation for fields of metadata. Optional: {} spec IPAddressClaimSpec spec is the desired state of IPAddressClaim. Optional: {} status IPAddressClaimStatus status is the observed state of IPAddressClaim. Optional: {}
IPAddressClaimList is a list of IPAddressClaims.
Field Description Default Validation
apiVersion string ipam.cluster.x-k8s.io/v1alpha1kind string IPAddressClaimListmetadata ListMeta Refer to Kubernetes API documentation for fields of metadata. Optional: {} items IPAddressClaim arrayitems is the list of IPAddressClaims.
IPAddressClaimSpec is the desired state of an IPAddressClaim.
Appears in:
Field Description Default Validation
poolRef TypedLocalObjectReference poolRef is a reference to the pool from which an IP address should be created. Required: {}
IPAddressClaimStatus is the observed status of a IPAddressClaim.
Appears in:
Field Description Default Validation
addressRef LocalObjectReference addressRef is a reference to the address that was created for this claim. Optional: {} conditions Conditions conditions summarises the current state of the IPAddressClaim Optional: {}
IPAddressList is a list of IPAddress.
Field Description Default Validation
apiVersion string ipam.cluster.x-k8s.io/v1alpha1kind string IPAddressListmetadata ListMeta Refer to Kubernetes API documentation for fields of metadata. Optional: {} items IPAddress arrayitems is the list of IPAddresses.
IPAddressSpec is the desired state of an IPAddress.
Appears in:
Field Description Default Validation
claimRef LocalObjectReference claimRef is a reference to the claim this IPAddress was created for. Required: {} poolRef TypedLocalObjectReference poolRef is a reference to the pool that this IPAddress was created from. Required: {} address string address is the IP address. MaxLength: 39 prefix integer prefix is the prefix of the address. Required: {} gateway string gateway is the network gateway of the network the address is from. MaxLength: 39
Package v1beta1 contains API Schema definitions for the v1beta1 IPAM API.
Deprecated: This package is deprecated and is going to be removed when support for v1beta1 will be dropped.
IPAddress is the Schema for the ipaddress API.
Appears in:
Field Description Default Validation
apiVersion string ipam.cluster.x-k8s.io/v1beta1kind string IPAddressmetadata ObjectMeta Refer to Kubernetes API documentation for fields of metadata. Optional: {} spec IPAddressSpec spec is the desired state of IPAddress. Optional: {}
IPAddressClaim is the Schema for the ipaddressclaim API.
Appears in:
Field Description Default Validation
apiVersion string ipam.cluster.x-k8s.io/v1beta1kind string IPAddressClaimmetadata ObjectMeta Refer to Kubernetes API documentation for fields of metadata. Optional: {} spec IPAddressClaimSpec spec is the desired state of IPAddressClaim. Optional: {} status IPAddressClaimStatus status is the observed state of IPAddressClaim. Optional: {}
IPAddressClaimList is a list of IPAddressClaims.
Field Description Default Validation
apiVersion string ipam.cluster.x-k8s.io/v1beta1kind string IPAddressClaimListmetadata ListMeta Refer to Kubernetes API documentation for fields of metadata. Optional: {} items IPAddressClaim arrayitems is the list of IPAddressClaims.
IPAddressClaimSpec is the desired state of an IPAddressClaim.
Appears in:
Field Description Default Validation
clusterName string clusterName is the name of the Cluster this object belongs to. MaxLength: 63 poolRef TypedLocalObjectReference poolRef is a reference to the pool from which an IP address should be created. Required: {}
IPAddressClaimStatus is the observed status of a IPAddressClaim.
Appears in:
Field Description Default Validation
addressRef LocalObjectReference addressRef is a reference to the address that was created for this claim. Optional: {} conditions Conditions conditions summarises the current state of the IPAddressClaim Optional: {} v1beta2 IPAddressClaimV1Beta2Status v1beta2 groups all the fields that will be added or modified in IPAddressClaim’s status with the V1Beta2 version. Optional: {}
IPAddressClaimV1Beta2Status groups all the fields that will be added or modified in IPAddressClaimStatus with the V1Beta2 version.
See https://github.com/kubernetes-sigs/cluster-api/blob/main/docs/proposals/20240916-improve-status-in-CAPI-resources.md for more context.
Appears in:
Field Description Default Validation
conditions Condition arrayconditions represents the observations of a IPAddressClaim’s current state. MaxItems: 32
IPAddressList is a list of IPAddress.
Field Description Default Validation
apiVersion string ipam.cluster.x-k8s.io/v1beta1kind string IPAddressListmetadata ListMeta Refer to Kubernetes API documentation for fields of metadata. Optional: {} items IPAddress arrayitems is the list of IPAddresses.
IPAddressSpec is the desired state of an IPAddress.
Appears in:
Field Description Default Validation
claimRef LocalObjectReference claimRef is a reference to the claim this IPAddress was created for. Required: {} poolRef TypedLocalObjectReference poolRef is a reference to the pool that this IPAddress was created from. Required: {} address string address is the IP address. MaxLength: 39 prefix integer prefix is the prefix of the address. Required: {} gateway string gateway is the network gateway of the network the address is from. MaxLength: 39
Package v1alpha1 contains the v1alpha1 implementation of ExtensionConfig.
Deprecated: This package is deprecated and is going to be removed when support for v1beta1 will be dropped.
ClientConfig contains the information to make a client
connection with an Extension server.
Appears in:
Field Description Default Validation
url string url gives the location of the Extension server, in standard URL formscheme://host:port/path).url or service must be specified.host should not refer to a service running in the cluster; useservice field instead. MaxLength: 512 service ServiceReference service is a reference to the Kubernetes service for the Extension server.url or service must be specified.service. Optional: {} caBundle integer array caBundle is a PEM encoded CA bundle which will be used to validate the Extension server’s server certificate. MaxLength: 51200
ExtensionConfig is the Schema for the ExtensionConfig API.
Appears in:
Field Description Default Validation
apiVersion string runtime.cluster.x-k8s.io/v1alpha1kind string ExtensionConfigmetadata ObjectMeta Refer to Kubernetes API documentation for fields of metadata. Optional: {} spec ExtensionConfigSpec spec is the desired state of the ExtensionConfig. Optional: {} status ExtensionConfigStatus status is the current state of the ExtensionConfig Optional: {}
ExtensionConfigList contains a list of ExtensionConfig.
Field Description Default Validation
apiVersion string runtime.cluster.x-k8s.io/v1alpha1kind string ExtensionConfigListmetadata ListMeta Refer to Kubernetes API documentation for fields of metadata. Optional: {} items ExtensionConfig arrayitems is the list of ExtensionConfigs.
ExtensionConfigSpec defines the desired state of ExtensionConfig.
Appears in:
Field Description Default Validation
clientConfig ClientConfig clientConfig defines how to communicate with the Extension server. Required: {} namespaceSelector LabelSelector namespaceSelector decides whether to call the hook for an object based Optional: {} settings object (keys:string, values:string) settings defines key value pairs to be passed to all calls Optional: {}
ExtensionConfigStatus defines the observed state of ExtensionConfig.
Appears in:
Field Description Default Validation
handlers ExtensionHandler arrayhandlers defines the current ExtensionHandlers supported by an Extension. MaxItems: 512 conditions Conditions conditions define the current service state of the ExtensionConfig. Optional: {} v1beta2 ExtensionConfigV1Beta2Status v1beta2 groups all the fields that will be added or modified in ExtensionConfig’s status with the V1Beta2 version. Optional: {}
ExtensionConfigV1Beta2Status groups all the fields that will be added or modified in ExtensionConfig with the V1Beta2 version.
See https://github.com/kubernetes-sigs/cluster-api/blob/main/docs/proposals/20240916-improve-status-in-CAPI-resources.md for more context.
Appears in:
Field Description Default Validation
conditions Condition arrayconditions represents the observations of a ExtensionConfig’s current state. MaxItems: 32
ExtensionHandler specifies the details of a handler for a particular runtime hook registered by an Extension server.
Appears in:
Field Description Default Validation
name string name is the unique name of the ExtensionHandler. MaxLength: 512 requestHook GroupVersionHook requestHook defines the versioned runtime hook which this ExtensionHandler serves. Required: {} timeoutSeconds integer timeoutSeconds defines the timeout duration for client calls to the ExtensionHandler. Optional: {} failurePolicy FailurePolicy failurePolicy defines how failures in calls to the ExtensionHandler should be handled by a client. Enum: [Ignore Fail]
Underlying type: string
FailurePolicy specifies how unrecognized errors when calling the ExtensionHandler are handled.
FailurePolicy helps with extensions not working consistently, e.g. due to an intermittent network issue.
The following type of errors are never ignored by FailurePolicy Ignore:
Misconfigurations (e.g. incompatible types)
Extension explicitly returns a Status Failure.
Appears in:
Field Description
IgnoreFailurePolicyIgnore means that an error when calling the extension is ignored. FailFailurePolicyFail means that an error when calling the extension is propagated as an error.
GroupVersionHook defines the runtime hook when the ExtensionHandler is called.
Appears in:
Field Description Default Validation
apiVersion string apiVersion is the group and version of the Hook. MaxLength: 512 hook string hook is the name of the hook. MaxLength: 256
ServiceReference holds a reference to a Kubernetes Service of an Extension server.
Appears in:
Field Description Default Validation
namespace string namespace is the namespace of the service. MaxLength: 63 name string name is the name of the service. MaxLength: 63 path string path is an optional URL path and if present may be any string permissible in MaxLength: 512 port integer port is the port on the service that’s hosting the Extension server. Optional: {}
A | B | C | D | E | H | I | K | L | M | N | O | P | R | S | T | U |W
Services beyond the fundamental components of Kubernetes.
Core Add-ons : Addons that are required to deploy a Kubernetes-conformant cluster: DNS, kube-proxy, CNI.Additional Add-ons : Addons that are not required for a Kubernetes-conformant cluster (e.g. metrics/Heapster, Dashboard).
The process of turning a server into a Kubernetes node. This may involve assembling data to provide when creating the server that backs the Machine, as well as runtime configuration of the software running on that server.
A temporary cluster that is used to provision a Target Management cluster.
Refers to a provider that implements a solution for the bootstrap process.
Bootstrap provider’s interaction with Cluster API is based on what is defined in the Cluster API contract .
See CABPK .
Cluster API Enhancement Proposal - patterned after KEP . See template
Core Cluster API
Cluster API Provider AWS
Cluster API Bootstrap Provider Kubeadm
Cluster API Provider CloudStack
Cluster API Provider Docker
Cluster API Provider DigitalOcean
Cluster API Google Cloud Provider
Cluster API Provider Hetzner
Cluster API Provider Hivelocity
Cluster API Provider Huawei
Cluster API Provider IBM Cloud
Cluster API Operator
Cluster API Provider Akamai (Linode)
Cluster API Provider Metal3
Cluster API Provider metal-stack
Cluster API Provider Nested
Cluster API Provider Nutanix
Cluster API Provider KubeKey
Cluster API Provider KubeSwift
Cluster API Provider Kubevirt
Cluster API Provider OpenStack
Cluster API Provider Outscale
Cluster API Provider Oracle Cloud Infrastructure (OCI)
Cluster API Provider Scaleway
Cluster API Provider Tinkerbell
Cluster API Provider vSphere
Cluster API Provider vcluster
Cluster API Provider VMware Cloud Director
Cluster API Provider Azure
Cluster API IPAM Provider In Cluster
Cluster API IPAM Provider Nutanix
Cluster API IPAM Provider Metal3
Cluster API Runtime Extensions Provider Nutanix
An upgrade sequence that goes from one Kubernetes version to another by passing through a set of intermediate versions.
E.g. upgrading from v1.31.0 (current state) to v1.34.0 (target version) requires
a chained upgrade with the following steps: v1.32.0 (first intermediate version) -> v1.33.0 (second intermediate version) -> v1.34.0 (target version).
The sequence of versions in a chained upgrade is also called upgrade plan .
See also efficient upgrade .
Or Cloud service provider
Refers to an information technology (IT) company that provides computing resources (e.g. AWS, Azure, Google, etc.).
A full Kubernetes deployment. See Management Cluster and Workload Cluster.
A collection of templates that define a topology (control plane and workers) to be used to continuously reconcile one or more Clusters.
See ClusterClass
Or Cluster API project
The Cluster API sub-project of the SIG-cluster-lifecycle. It is also used to refer to the software components, APIs, and community that produce them.
See Core Cluster API , CAPI
The Cluster API execution model, a set of controllers cooperating in managing the Kubernetes cluster lifecycle.
or Kubernetes Cluster Infrastructure
Defines the infrastructure that supports a Kubernetes cluster , like e.g. VPC, security groups, load balancers, etc. Please note that in the context of managed Kubernetes some of those components are going to be provided by the corresponding abstraction for a specific Cloud provider (EKS, OKE, AKS etc), and thus Cluster API should not take care of managing a subset or all those components.
Or Cluster API contract
Defines a set of rules a provider is expected to comply with in order to interact with Cluster API.
Those rules can be in the form of CustomResourceDefinition (CRD) fields and/or expected behaviors to be implemented.
The set of Kubernetes services that form the basis of a cluster. See also https://kubernetes.io/docs/concepts/#kubernetes-control-plane There are two variants:
Self-provisioned : A Kubernetes control plane consisting of pods or machines wholly managed by a single Cluster API deployment.External or Managed : A control plane offered and controlled by some system other than Cluster API (e.g., GKE, AKS, EKS, IKS).
Refers to a provider that implements a solution for the management of a Kubernetes control plane .
Control plane provider’s interaction with Cluster API is based on what is defined in the Cluster API contract .
See KCP .
With “core” Cluster API we refer to the common set of API and controllers that are required to run
any Cluster API provider.
Please note that in the Cluster API code base, side by side of “core” Cluster API components there
is also a limited number of in-tree providers: CABPK , KCP , CAPD .
See Cluster API , CAPI .
Refers to a provider that implements Cluster API core controllers
See Cluster API , CAPI .
The set of controllers in Core Cluster API .
See Cluster API , CAPI .
A feature implementation offered as part of the Cluster API project and maintained by the CAPI core team; For example
KCP is a default implementation for a control plane provider .
A chained upgrade where worker nodes skip some of the intermediate versions,
when allowed by the Kubernetes version skew policy .
When the chained upgrade is also an efficient upgrade, the upgrade plan for worker machines is a subset
of the upgrade plan for control plane machines.
Patch generated by an external component using Runtime SDK . Alternative to inline patch .
A runtime extension that implements a topology mutation hook .
The ability to add more machines based on policy and well-defined metrics. For example, add a machine to a cluster when CPU load average > (X) for a period of time (Y).
see Server
Refers to a provider that implements provisioning of infrastructure/computational resources required by
the Cluster or by Machines (e.g. VMs, networking, etc.).
Infrastructure provider’s interaction with Cluster API is based on what is defined in the Cluster API contract .
Clouds infrastructure providers include AWS, Azure, or Google; while VMware, MAAS, or metal3.io can be defined as bare metal providers.
When there is more than one way to obtain resources from the same infrastructure provider (e.g. EC2 vs. EKS in AWS) each way is referred to as a variant.
For a complete list of providers see Provider Implementations .
A patch defined inline in a ClusterClass . An alternative to an external patch .
Fields which changes would only impact Kubernetes objects or/and controller behaviour
but they won’t mutate in any way provider infrastructure nor the software running on it. In-place mutable fields
are propagated in place by CAPI controllers to avoid the more elaborated mechanics of a replace rollout.
They include metadata, MinReadySeconds, NodeDrainTimeout, NodeVolumeDetachTimeout and NodeDeletionTimeout but are
not limited to be expanded in the future.
Any change to a Machine spec that is performed without deleting the Machine and creating a new one.
Note: changing in-place mutable fields is not considered an in-place update.
see Server
A resource that does not mutate. In Kubernetes we often state the instance of a running pod is immutable or does not change once it is run. In order to make a change, a new pod is run. In the context of Cluster API we often refer to a running instance of a Machine as being immutable, from a Cluster API perspective.
Note: Cluster API also has extensibility points that make it possible to perform in-place updates of machines.
Refers to a provider that allows Cluster API to interact with IPAM solutions.
IPAM provider’s interaction with Cluster API is based on the IPAddressClaim and IPAddress API types.
Or Kubernetes-compliant
A cluster that passes the Kubernetes conformance tests.
Refers to the main Kubernetes git repository or the main Kubernetes project.
Kubeadm Control plane Provider
A Runtime Hook that allows external components to interact with the lifecycle of a Cluster.
See Implementing Lifecycle Hooks
Or Machine Resource
The Custom Resource for Kubernetes that represents a request to have a place to run kubelet.
See also: Server
Perform create, scale, upgrade, or destroy operations on the cluster.
Managed Kubernetes refers to any Kubernetes cluster provisioning and maintenance abstraction, usually exposed as an API, that is natively available in a Cloud provider. For example: EKS , OKE , AKS , GKE , IBM Cloud Kubernetes Service , DOKS , and many more throughout the Kubernetes Cloud Native ecosystem.
See Topology
The cluster where one or more Infrastructure Providers run, and where resources (e.g. Machines) are stored. Typically referred to when you are provisioning multiple workload clusters.
Multi tenancy in Cluster API defines the capability of an infrastructure provider to manage different credentials, each
one of them corresponding to an infrastructure tenant.
Please note that up until v1alpha3 this concept had a different meaning, referring to the capability to run multiple
instances of the same provider, each one with its own credentials; starting from v1alpha4 we are disambiguating the two concepts.
See also Support multiple instances .
A node pool is a group of nodes within a cluster that all have the same configuration.
Or OS
A generically understood combination of a kernel and system-level userspace interface, such as Linux or Windows, as opposed to a particular distribution.
A set of instructions describing modifications to a Kubernetes object. Examples include JSON Patch and JSON Merge Patch.
Pivot is a process for moving the provider components and declared cluster-api resources from a Source Management cluster to a Target Management cluster.
The pivot process is also used for deleting a management cluster and could also be used during an upgrade of the management cluster.
Or Cluster API provider
This term was originally used as abbreviation for Infrastructure provider , but currently it is used
to refer to any project that can be deployed and provides functionality to the Cluster API management Cluster.
See Bootstrap provider , Control plane provider , Core provider ,
Infrastructure provider , IPAM provider Runtime extension provider .
ProviderID is the provider-specific identifier used to correlate Cluster API objects with the
underlying cloud instance. It appears in three resource types: InfrastructureMachine, Machine
(Cluster API core), and Node (workload cluster). CAPI copies the ProviderID from the
InfrastructureMachine to the Machine. The Node’s ProviderID is set by the Cloud Controller Manager
(CCM) or the kubelet.
The format is a URI-like string: <provider>://<provider-specific-identifier>.
Refers to the YAML artifact published as part of the release process for providers ;
it usually includes Custom Resource Definitions (CRDs), Deployments (to run the controller manager), RBAC, etc.
In some cases, the same expression is used to refer to the instances of above components deployed in a management cluster.
See Provider repository
Refers to the location where the YAML for provider components are hosted; usually a provider repository hosts
many version of provider components, one for each released version.
An external component which is part of a system built on top of Cluster API that can handle requests for a specific Runtime Hook.
See Runtime SDK
Refers to a provider that implements one or more runtime extensions .
Runtime Extension provider’s interaction with Cluster API are based on the Open API spec for runtime hooks .
A single, well identified, extension point allowing applications built on top of Cluster API to hook into specific moments of the Cluster API Runtime , e.g. BeforeClusterUpgrade , TopologyMutationHook .
See Runtime SDK
A developer toolkit required to build Runtime Hooks and Runtime Extensions.
See Runtime SDK
Unless otherwise specified, this refers to horizontal scaling.
A control plane node where etcd is colocated with the Kubernetes API server, and
is running as a static pod.
The infrastructure that backs a Machine Resource , typically either a cloud instance, virtual machine, or physical host.
A field in the Cluster object spec that allows defining and managing the shape of the Cluster’s control plane and worker machines from a single point of control. The Cluster’s topology is based on a ClusterClass .
Sometimes it is also referred as a managed topology.
See ClusterClass
A Runtime Hook that allows external components to generate patches for customizing Kubernetes objects that are part of a Cluster topology .
See Topology Mutation
A runtime extension provider that implements Update Lifecycle Hooks .
Is a set of Cluster API Runtime Hooks called when performing the “can update in-place” decision or
when performing an in-place update .
The sequence of intermediate versions ... target version that a Cluster must upgrade to when
performing a chained upgrade .
Notably, the upgrade plan for control plane machines might be a superset of the upgrade plan for
workers machines.
A cluster created by a ClusterAPI controller, which is not a bootstrap cluster, and is meant to be used by end-users, as opposed to by CAPI tooling.
A collection of templates that define a set of worker nodes in the cluster. A ClusterClass contains zero or more WorkerClass definitions.
See ClusterClass
The Cluster API project supports ecosystem growth and extensibility.
As part of this effort, everyone is welcome to add to the list below both providers sponsored
by SIG Cluster Lifecycle as well as providers from other open-source repositories.
Each provider is the responsibility of the respective maintainers and we highly recommend
everyone interested in a specific provider to engage with the corresponding team to show support, share use cases,
learn more about the other users of the same provider.
We also recommend to read provider’s documentation carefully, test it, and perform a proper
due diligence before deciding to use a provider in production, like you will do for any other open source project.
We are deeply thankful to all the providers in the list, because they are a concrete proof
of the liveness of the ecosystem, a relevant part of the history of this community, and a valuable
source of inspiration and ideas for others.
Following are the implementations managed by third-parties adopting the standard cluster-api and/or machine-api being developed here.
Name Port Number Description
diagnostics-addressPort that exposes the metrics, the pprof endpoint and an endpoint to change the log level. This can be customized by setting the --diagnostics-address flag when starting the manager. The default port is 8443. webhook9443Webhook server port. To disable this set --webhook-port flag to 0. health9440Port that exposes the health endpoint. CThis can be customized by setting the --health-addr flag when starting the manager. profilerExpose the pprof profiler. By default is not configured. Can set the --profiler-address flag. e.g. --profiler-address 6060
Note: external providers (e.g. infrastructure, bootstrap, or control-plane) might allocate ports differently, please refer to the respective documentation.
Please refer to our Kubernetes Community Code of Conduct
Read the following guide if you’re interested in contributing to cluster-api.
Contributors who are not used to working in the Kubernetes ecosystem should also take a look at the Kubernetes New Contributor Course.
We’d love to accept your patches! Before we can take them, we have to jump a couple of legal hurdles.
Please fill out either the individual or corporate Contributor License Agreement (CLA). More information about the CLA
and instructions for signing it can be found here .
NOTE
If you’re new to the project and want to help, but don’t know where to start, we have a semi-curated list of issues that
should not need deep knowledge of the system. Have a look and see if anything sounds
interesting .
Before starting to work on the issue, check if the issue has been assigned, if yes, reach out to the assignee.
Alternatively, read some docs on other controllers and try to write your own, file and fix any/all issues that
come up, including gaps in documentation!
If you’re a more experienced contributor, looking at unassigned issues in the next release milestone is a good way to find work that has been prioritized. For example, if the latest minor release is v1.0, the next release milestone is v1.1.
Help and contributions are very welcome in the form of code contributions but also in helping to moderate office hours, triaging issues, fixing/investigating flaky tests, being part of the release team , helping new contributors with their questions, reviewing proposals, etc.
⚠ The project does not follow Go Modules guidelines for compatibility requirements for 1.x semver releases.
Cluster API follows upstream Kubernetes semantic versioning. With the v1 release of our codebase, we guarantee the following:
see Cluster API release support for
more details about supported releases and for considerations that might apply if you are importing Cluster API go modules as a dependency.
Pull Requests against the main branch can be backported using /cherry-pick prow command.
Any backport MUST NOT be breaking for API or behavioral changes.
We usually backport critical bugs or security fixes, changes to support new Kubernetes minor versions (see supported Kubernetes versions ), documentation and test signal improvements. Everything else is considered case by case.
Release branches outside of the standard support period are usually frozen,
although maintainers may allow backports to releases in maintenance mode in specific situations
like CVEs, security, and other critical bug fixes.
API versioning and guarantees are inspired by the Kubernetes deprecation policy
and API change guidelines .
We follow the API guidelines as much as possible adapting them if necessary and on a case-by-case basis to CustomResourceDefinition.
Any command line interface in Cluster API (e.g. clusterctl) share the same versioning schema of the codebase.
CLI guarantees are inspired by Kubernetes deprecation policy for CLI ,
however we allow breaking changes after 8 months or 2 releases (whichever is longer) from deprecation.
Cluster API has two types of branches: the main branch and
release-X branches.
The main branch is where development happens. All the latest and
greatest code, including breaking changes, happens on main.
The release-X branches contain stable, backwards compatible code. On every
major or minor release, a new branch is created. It is from these
branches that minor and patch releases are tagged. In some cases, it may
be necessary to open PRs for bugfixes directly against stable branches, but
this should generally not be the case.
If you haven’t already done so, sign a Contributor License Agreement (see details above).
If working on an issue, signal other contributors that you are actively working on it by assigning it to yourself.
Fork the desired repo, develop and test your code changes.
Submit a pull request.
All code PR must be labeled with one of
⚠️ (:warning:, major or breaking changes)
✨ (:sparkles:, feature additions)
🐛 (:bug:, patch and bugfixes)
📖 (:book:, documentation or proposals)
🌱 (:seedling:, minor or other)
If your PR has multiple commits, you must squash them into a single commit before merging your PR.
Individual commits should not be tagged separately, but will generally be
assumed to match the PR. For instance, if you have a bugfix in with
a breaking change, it’s generally encouraged to submit the bugfix
separately, but if you must put them in one PR, mark the commit
separately.
All changes must be code reviewed. Coding conventions and standards are explained in the official developer
docs . Expect reviewers to request that you
avoid common go style mistakes in your PRs.
The documentation is published in form of a book at: https://cluster-api.sigs.k8s.io
The source for the book is this folder
containing markdown files and we use mdBook to build it into a static
website.
After making changes locally you can run make serve-book which will build the HTML version
and start a web server, so you can preview if the changes render correctly at
http://localhost:3000; the preview auto-updates when changes are detected.
Note: you don’t need to have mdBook installed, make serve-book will ensure
appropriate binaries for mdBook and any used plugins are downloaded into
hack/tools/bin/ directory.
When submitting the PR remember to label it with the 📖 (:book:) icon.
Cluster API release process is described in this document .
The Cluster API Enhancement Proposal is the process this project uses to adopt new features, changes to the APIs, changes to contracts between components, or changes to CLI interfaces.
The template , and accepted proposals live under docs/proposals .
Proposals or requests for enhancements (RFEs) MUST be associated with an issue.
Issues can be placed on the roadmap during planning if there is one or more folks
that can dedicate time to writing a CAEP and/or implementing it after approval.
A proposal SHOULD be introduced and discussed during the weekly community meetings or on the
SIG Cluster Lifecycle mailing list .
Submit and discuss proposals using a collaborative writing platform, preferably Google Docs, share documents with edit permissions with the SIG Cluster Lifecycle mailing list .
A proposal in a Google Doc MUST turn into a Pull Request .
Proposals MUST be merged and in implementable state to be considered part of a major or minor release.
Issue triage in Cluster API follows the best practices of the Kubernetes project while seeking balance with
the different size of this project.
While the maintainers play an important role in the triage process described below, the help of the community is crucial
to ensure that this task is performed timely and be sustainable long term.
Phase Responsible What is required to move forward
Initial triage Maintainers The issue MUST have: priority/* labelkind/* label Triage finalization Everyone There should be consensus on the way forward and enough details for the issue being actionable Triage finalization Maintainers The issue MUST have: triage/accepted labelhelp or good-first-issue label Actionable Everyone Contributors volunteering time to do the work and reviewers/approvers bandwidth
Please note that:
Priority provides an indication to everyone looking at issues.
When assigning priority several factors are taken into consideration, including impact on users, relevance
for the upcoming releases, maturity of the issue (consensus + completeness).
priority/awaiting-more-evidence is used to mark issue where there is not enough info to take a decision for
one of the other priorities values .Priority can change over time, and everyone is welcome to provide constructive feedback about updating an issue’s priority.
Applying a priority label is not a commitment to execute within a certain time frame, because implementation
depends on contributors volunteering time to do the work and on reviewers/approvers bandwidth.
Closing inactive issues which are stuck in the “triage” phases is a crucial task for maintaining an
actionable backlog. Accordingly, the following automation applies to issues in the “triage” or the “refinement” phase:
After 90 days of inactivity, issues will be marked with the lifecycle/stale label
After 30 days of inactivity from when lifecycle/stale was applied, issues will be marked with the lifecycle/rotten label
After 30 days of inactivity from when lifecycle/rotten was applied, issues will be closed.
With this regard, it is important to notice that closed issues are and will always be a highly valuable part of the
knowledge base about the Cluster API project, and they will never go away.
Note:
The automation above does not apply to issues triaged as priority/critical-urgent, priority/important-soon or priority/important-longterm
Maintainers could apply the lifecycle/frozen label if they want to exclude an issue from the automation above
Issues excluded from the automation above will be re-triaged periodically
If you really care about an issue stuck in the “triage” phases, you can engage with the community or
try to figure out what is holding back the issue by yourself, e.g.:
Issue too generic or not yet actionable
Lack of consensus or the issue is not relevant for other contributors
Lack of contributors; in this case, finding ways to help and free up maintainers/other contributors time from other tasks
can really help to unblock your issues.
Issues in the “actionable” state are not subject to the stale/rotten/closed process; however, it is required to re-assess
them periodically given that the project change quickly. Accordingly, the following automation applies to issues
in the “actionable” phase:
After 30 days of inactivity, the triage/accepted label will be removed from issues with priority/critical-urgent
After 90 days of inactivity the triage/accepted label will be removed from issues with priority/important-soon
After 1 year of inactivity the triage/accepted label will be removed from issues without priority/critical-urgent or priority/important-soon
If you really care about an issue stuck in the “actionable” phase, you can try to figure out what is holding back
the issue implementation (usually lack of contributors), engage with the community, find ways to help and free up
maintainers/other contributors time from other tasks, or /assign the issue and send a PR.
When you submit a change to the Cluster API repository as set of validation jobs is automatically executed by
prow and the results report is added to a comment at the end of your PR.
Some jobs run linters or unit test, and in case of failures, you can repeat the same operation locally using make test lint [etc..]
in order to investigate and potential issues. Prow logs usually provide hints about the make target you should use
(there might be more than one command that needs to be run).
End-to-end (E2E) jobs create real Kubernetes clusters by building Cluster API artifacts with the latest changes.
In case of E2E test failures, usually it’s required to access the “Artifacts” link on the top of the prow logs page to triage the problem.
The artifact folder contains:
A folder with the clusterctl local repository used for the test, where you can find components yaml and cluster templates.
A folder with logs for all the clusters created during the test. Following logs/info are available:
Controller logs (only if the cluster is a management cluster).
Dump of the Cluster API resources (only if the cluster is a management cluster).
Machine logs (only if the cluster is a workload cluster)
In case you want to run E2E test locally, please refer to the Testing guide. All our e2e test jobs (and also all our other jobs) can be found in k8s.io/test-infra .
Parts of the following content have been adapted from https://google.github.io/eng-practices/review.
Any Kubernetes organization member can leave reviews and /lgtm a pull request.
Code reviews should generally look at:
Design : Is the code well-designed and consistent with the rest of the system?Functionality : Does the code behave as the author (or linked issue) intended? Is the way the code behaves good for its users?Complexity : Could the code be made simpler? Would another developer be able to easily understand and use this code when they come across it in the future?Tests : Does the code have correct and well-designed tests?Naming : Did the developer choose clear names for variable, types, methods, functions, etc.?Comments : Are the comments clear and useful? Do they explain why rather than what?Documentation : Did the developer also update relevant documentation?
See Code Review in Cluster API for a more focused list of review items.
Please see the Kubernetes community document on pull
requests for more information about the merge
process.
A PR is approved by one of the project maintainers and owners after reviews.
Approvals should be the very last action a maintainer takes on a pull request.
Open issues to report bugs, or discuss minor feature implementation.
Each new issue will be automatically labeled as needs-triage; after being triaged by the maintainers the label
will be removed and replaced by one of the following:
triage/accepted: Indicates an issue or PR is ready to be actively worked on.triage/duplicate: Indicates an issue is a duplicate of another open issue.triage/needs-information: Indicates an issue needs more information in order to work on it.triage/not-reproducible: Indicates an issue can not be reproduced as described.triage/unresolved: Indicates an issue that can not or will not be resolved.
For big feature, API and contract amendments, we follow the CAEP process as outlined below.
Proof of concepts, code experiments, or other initiatives can live under the exp folder or behind a feature gate.
Experiments SHOULD not modify any of the publicly exposed APIs (e.g. CRDs).
Experiments SHOULD not modify any existing CRD types outside the experimental API group(s).
Experiments SHOULD not modify any existing command line contracts.
Experiments MUST not cause any breaking changes to existing (non-experimental) Go APIs.
Experiments SHOULD introduce utility helpers in the go APIs for experiments that cross multiple components
and require support from bootstrap, control plane, or infrastructure providers.
Experiments follow a strict lifecycle: Alpha -> Beta prior to Graduation.
Alpha-stage experiments:
SHOULD not be enabled by default and any feature gates MUST be marked as ‘Alpha’
MUST be associated with a CAEP that is merged and in at least a provisional state
MAY be considered inactive and marked as deprecated if the following does not happen within the course of 1 minor release cycle:
Transition to Beta-stage
Active development towards progressing to Beta-stage
Either direct or downstream user evaluation
Any deprecated Alpha-stage experiment MAY be removed in the next minor release.
Beta-stage experiments:
SHOULD be enabled by default, and any feature gates MUST be marked as ‘Beta’
MUST be associated with a CAEP that is at least in the experimental state
MUST support conversions for any type changes
MUST remain backwards compatible unless updates are coinciding with a breaking Cluster API release
MAY be considered inactive and marked as deprecated if the following does not happen within the course of 1 minor release cycle:
Graduate
Active development towards Graduation
Either direct or downstream user consumption
Any deprecated Beta-stage experiment MAY be removed after being deprecated for an entire minor release.
Experiment Graduation MUST coincide with a breaking Cluster API release
Experiment Graduation checklist:
Breaking changes are generally allowed in the main branch, as this is the branch used to develop the next minor
release of Cluster API.
There may be times, however, when main is closed for breaking changes. This is likely to happen as we near the
release of a new minor version.
Breaking changes are not allowed in release branches, as these represent minor versions that have already been released.
These versions have consumers who expect the APIs, behaviors, etc. to remain stable during the lifetime of the patch
stream for the minor release.
Examples of breaking changes include:
Removing or renaming a field in a CRD
Removing or renaming a CRD
Removing or renaming an exported constant, variable, type, or function
Updating the version of critical libraries such as controller-runtime, client-go, apimachinery, etc.
Some version updates may be acceptable, for picking up bug fixes, but maintainers must exercise caution when
reviewing.
There may, at times, need to be exceptions where breaking changes are allowed in release branches. These are at the
discretion of the project’s maintainers, and must be carefully considered before merging. An example of an allowed
breaking change might be a fix for a behavioral bug that was released in an initial minor version (such as v0.3.0).
Cluster API follows the license policy of the CNCF . This sets limits on which
licenses dependencies and other artifacts use. For go dependencies only dependencies listed in the go.mod are considered dependencies. This is in line with how dependencies are reviewed in Kubernetes .
This project follows the Kubernetes API conventions .
We enforce the API conventions via kube-api-linter .
The corresponding configuration field can be found here .
Minor additions to the conventions are listed below.
All our CRD objects should have the following additionalPrinterColumns order (if the respective field exists in the CRD):
Namespace (added automatically)
Name (added automatically)
ClusterClass and/or Cluster owning this resource
Available or Ready condition
Replica-related fields
Other fields for -o wide (fields with priority 1 are only shown with -o wide and not per default)
Paused (only shows with -o wide)
Phase
Age (mandatory field for all CRDs)
Version
NOTE kubebuilder:printcolumn annotation on root objects. For examples, please see the ./api package.
Examples:
kubectl get kubeadmcontrolplane
NAMESPACE NAME INITIALIZED API SERVER AVAILABLE REPLICAS READY UPDATED UNAVAILABLE AGE VERSION
quick-start-d5ufye quick-start-ntysk0-control-plane true true 1 1 1 2m44s v1.23.3
kubectl get machinedeployment
NAMESPACE NAME CLUSTER REPLICAS READY UPDATED UNAVAILABLE PHASE AGE VERSION
quick-start-d5ufye quick-start-ntysk0-md-0 quick-start-ntysk0 1 1 1 ScalingUp 3m28s v1.23.3
To gain viewing permissions to google docs in this project, please join either the
kubernetes-dev or
sig-cluster-lifecycle google group.
Anyone may comment on issues and submit reviews for pull requests. However, in order to be assigned an issue or pull
request, you must be a member of the Kubernetes SIGs GitHub organization.
If you are a Kubernetes GitHub organization member, you are eligible for membership in the Kubernetes SIGs GitHub
organization and can request membership by opening an
issue
against the kubernetes/org repo.
However, if you are a member of the related Kubernetes GitHub organizations but not of the Kubernetes org, you
will need explicit sponsorship for your membership request. You can read more about Kubernetes membership and
sponsorship here .
Cluster API maintainers can assign you an issue or pull request by leaving a /assign <your Github ID> comment on the
issue or pull request.
New contributors are welcomed to the community by existing members, helped with PR workflow, and directed to relevant documentation and communication channels.
We are also committed in helping people willing to do so in stepping up through the contributor ladder and this paragraph describes how we are trying to make this to happen.
As the project adoption increases and the codebase keeps growing, we’re trying to break down ownership into self-driven subareas of interest.
Requirements from the Kubernetes community membership guidelines apply for reviewers, maintainers and any member of these subareas.
Whenever you meet requisites for taking responsibilities in a subarea, the following procedure should be followed:
Submit a PR.
Propose at community meeting.
Get positive feedback and +1s in the PR and wait one week lazy consensus after agreement.
As of today there are following OWNERS files/Owner groups defining sub areas:
To help newcomers to the project in implementing better PRs given the knowledge of what will be evaluated
during the review.
To help contributors in stepping up as a reviewer given a common understanding of what are the most relevant
things to be evaluated during the review.
IMPORTANT: improving and maintaining this document is a collaborative effort, so we are encouraging constructive
feedback and suggestions.
(from Code Review Developer Guide - Google )
“A code review is a process where someone other than the author(s) of a piece of code examines that code”
Within the context of cluster API the following design items should be carefully evaluated when reviewing a PR:
In CAPI most of the coding activities happen in controllers, and in order to make robust controllers,
we should strive for implementing reentrant code.
A reentrant code can be interrupted in the middle of its execution and then safely be called again
(”re-entered”); this concept, applied to Kubernetes controllers, means that a controller should be capable
of recovering from interruptions, observe the current state of things, and act accordingly. e.g.
We should not rely on flags/conditions from previous reconciliations since we are the controller
setting the conditions. Instead, we should detect the status of things through introspection at
every reconciliation and act accordingly.
It is acceptable to rely on status flags/conditions that we’ve previously set as part
of the current reconciliation.
It is acceptable to rely on status flags/conditions set by other controllers.
NOTE: An important use case for reentrancy is the move operation, where Cluster API objects gets moved
to a different management cluster and the controller running on the target cluster has to
rebuild the object status from scratch by observing the current state of the underlying infrastructure.
The API defines the main contract with the Cluster API users. As most of the APIs in Kubernetes,
each API version encompasses a set of guarantees to the user in terms of support window, stability,
and upgradability.
This makes API design a critical part of Cluster API development and usually:
Breaking/major API changes should go through the CAEP process and be strictly synchronized with the major
release cadence.
Non-breaking/minor API changes can go in minor releases; non-breaking changes are generally:
additive in nature
default to pre-existing behavior
optional as part of the API contract
On top of that, following API design considerations apply.
The Kubernetes API-machinery that is used for API serialization is build on top of three
technologies, most specifically:
JSON serialization
Open-API (for CRDs)
the go type system
One of the areas where the interaction between those technologies is critical in the handling of optional
values in the API; also the usage of nested slices might lead to problems in case of concurrent
edits of the object.
Cluster API leverages the owner ref chain of objects for several tasks, so it is crucial to evaluate the
impacts of any change that can impact this area. Above all:
The delete operation leverages on the owner ref chain for ensuring the cleanup of all the resources when
a cluster is deleted;
clusterctl move uses the owner ref chain for determining which object to move and the create/delete order.
The Cluster API rules define a set of rules/conventions the different provider authors should follow in
order to implement providers that can interact with the core Cluster API controllers, as
documented here and here .
By extension, the Cluster API contract includes all the util methods that Cluster API exposes for
making the development of providers simpler and consistent (e.g. everything under /util or in /test/framework);
documentation of the utility is available here .
The Cluster API contract is linked to the version of the API (e.g. v1beta1 Contract), and it is expected to
provide the same set of guarantees in terms of support window, stability, and upgradability.
This makes any change that can impact the Cluster API contract critical and usually:
Breaking/major contract changes should go through the CAEP process and be strictly synchronized with the major
release cadence.
Non-breaking/minor changes can go in minor releases; non-breaking changes are generally:
Additive in nature
Default to pre-existing behavior
Optional as part of the API contract
While developing controllers in Cluster API a key requirement is to add logging to observe the system and
to help troubleshooting issues.
Testing plays a crucial role in ensuring the long term maintainability of the project.
In Cluster API we are committed to have a good test coverage and also to have a nice and consistent style in implementing
tests. For more information see testing Cluster API .
This paragraph documents the general rules defining how we determine Cluster API supported releases.
A Cluster API release correspond to a release in the GitHub repository
for this project, and the corresponding images published in the Kubernetes docker registry.
For the sake of this document, the most important artifacts included in a Cluster API release are:
The Cluster API Core provider image
The Kubeadm Bootstrap provider image
The Kubeadm Control Plane provider image
The clusterctl binary
The Cluster API team will release a new Cluster API version approximately every four months (three releases each year).
See release cycle and release calendars for more details about Cluster API releases management.
The Cluster API team actively supports the latest two minor releases (N, N-1); support in this context means that we:
Have CI signal with E2E tests, unit tests, CVE scans etc.
Accept bug fixes, perform golang or dependency bumps, etc.
Periodically cut patch releases
On top of supporting the N and N-1 releases, the Cluster API team also maintains a partial CI signal for the Cluster API N-2 releases
in case we have to do an emergency patch release. Please note that:
Even if a subset of the CI signal for the N-2 branch is preserved, the N-2 branch is considered in maintenance mode and
no change is back-ported proactively.
Security scans will be disabled (this signal does not make sense considering that CVE are not going to be fixed proactively)
If there is a need for an emergency patch, e.g. to fix a critical issue, please bring this up to maintainers
and it will be considered on a case-by-case basis.
All considered, each Cluster API minor release is supported for a period of roughly 12 months:
The first eight months of this timeframe will be considered the standard support period for a minor release.
The next four months the minor release will be considered in maintenance mode.
At the end of the four-month maintenance mode period, the minor release will be considered EOL (end of life) and
cherry picks to the associated branch are to be closed soon afterwards.
The table below documents support matrix for Cluster API versions (versions older than v1.0 omitted).
Minor Release Status Supported Until (including maintenance mode)
v1.14.x Standard support period in maintenance mode when v1.16.0 will be released, EOL when v1.17.0 will be released v1.13.x Standard support period in maintenance mode when v1.15.0 will be released, EOL when v1.16.0 will be released v1.12.x Standard support period Maintenance mode since 2026-08-18 - v1.14.0 release date, EOL when v1.15.0 will be released v1.11.x EOL EOL since 2026-08-18 - v1.14.0 release date v1.10.x EOL EOL since 2026-04-21 - v1.13.0 release date v1.9.x EOL EOL since 2025-12-18 - v1.12.0 release date v1.8.x EOL EOL since 2025-08-12 - v1.11.0 release date v1.7.x EOL EOL since 2025-04-22 - v1.10.0 release date v1.6.x EOL EOL since 2024-12-10 - v1.9.0 release date v1.5.x EOL EOL since 2024-08-12 - v1.8.0 release date v1.4.x EOL EOL since 2024-04-16 - v1.7.0 release date v1.3.x EOL EOL since 2023-12-05 - v1.6.0 release date v1.2.x EOL EOL since 2023-07-25 - v1.5.0 release date v1.1.x EOL EOL since 2023-03-28 - v1.4.0 release date v1.0.x EOL EOL since 2022-12-01 - v1.3.0 release date
When importing Cluster API go modules as a dependency, you MUST consider any Cluster API behaviour that is not defined
by an API field or by a well-defined extension point, as a Cluster API internal implementation detail, and internal
implementation details can change at any time.
Accordingly, in order to not expose users of projects importing Cluster API go modules as a dependency to the risk
that issue arises when one of the Cluster API internal behavior changes, you MUST NOT rely on any Cluster API
internal behaviours.
Please note that this applies to any public go func or types; As a only and notable exception, maintainers
are committed to avoid as much as possible breaking changes within the same minor release for the following packages:
/util/*
/cmd/clusterctl/client
The Cluster API maintainers welcome feedback and contributions to improve project’s extensibility point,
please open an issue on the Cluster API repo or add an item to the agenda in the Cluster API community meeting .
Forks of the CLuster API project are not recommended, instead, Cluster API maintainers welcome feedback and contributions
to improve project’s extensibility point, please open an issue on the Cluster API repo or add an item
to the agenda in the Cluster API community meeting .
If a user still wants to fork this project, please note that it is up to the user to validate if the fork works
properly and maintainers will not provide any support or guarantee on these kind of integrations/usage.
Cluster API supports at maximum n-3 minor version skip upgrades.
For example, if you are running Cluster API v1.6.x, you can upgrade up to Cluster API v1.9.x skipping intermediate
minor versions (v1.6 is v1.9 minus three minor versions).
Upgrades outside from version older n-3 might lead to a management cluster in a non-functional state.
Cluster API does not support version downgrades.
Each Cluster API release can support one or more API versions.
An API version is determined from the GroupVersion defined in the top-level api/ package of a specific Cluster API release, and it is used
in the apiVersion field of Cluster API custom resources.
An API version is considered deprecated when a new API version is published.
API deprecation and removal follow the Kubernetes Deprecation Policy ;
Cluster API maintainers might decide to support API versions longer than what is defined in the Kubernetes policy.
API Version Status Supported Until
v1beta2 Supported at least 9 months or 3 minor releases after a newer API version will be released v1beta1 Deprecated Deprecated since CAPI v1.11; in v1.16, April 2027 v1beta1 will stop to be served
See 11920 for details about the v1beta1 removal plan.
Considering the complexity that multiple API versions imply both for users and maintainers, the Cluster API project
allows evolving API types in existing API versions.
As a consequence, the project is not required to introduce new API versions frequently, and when this is necessary,
the project aims to not have more than two supported API versions at the same time. Also, multiple API versions
will exist only for a limited time according to Kubernetes deprecation guidelines.
When a change is applied to an existing API version, compatibility must be ensured.
If more API versions co-exist when one of those API changes is introduced, as a general rule the change will
be backported to all API versions (including deprecated versions) and automatic conversion will be implemented.
It is also worth to notice that even if this approach aligns with Kubernetes best practices, users and applications
interacting with Cluster API objects should adopt a set of recommendations to avoid common issues and pitfalls:
YAML files should be kept in sync with the latest supported API version, both if applied manually or with GitOps tools.
If an application is interacting with Cluster API objects programmatically, e.g. using client-go or the controller-runtime client,
it is recommended to use the exact API types that Cluster API uses (import types from the same version).
In order to mitigate issues when a client lags behind in adopting the new API types, it is strongly recommended to
use Patch instead of Update, because Update will entirely replace an object thus dropping API fields that don’t exist
in older API types.
Please also note that issues might happen more frequently when:
The version of the API types used by clients is significantly older than the API types used by Cluster API
In the same environment there are multiple clients with different versions acting on the same API object and especially
if they are acting on fields of type array (Merge Patch has limitations in this case).
We noticed that usage of server side apply in environments with multiple API versions might lead to issues
(see e.g. https://github.com/kubernetes/kubernetes/issues/136919).
We are working with the Kubernetes community to get this issue fixed (https://github.com/kubernetes/kubernetes/pull/136949)
and we’ve put mitigations in place (https://github.com/kubernetes-sigs/cluster-api/pull/13338).
We welcome additional help from Cluster API users to further validate the proper functioning of the system
under these circumstances, report issues, and to ensure consensus to get these issues fixed.
Note: Removal of a deprecated APIVersion in Kubernetes can cause issues with garbage collection by the kube-controller-manager.
This means that some objects which rely on garbage collection for cleanup - e.g. MachineSets and their descendent objects,
like Machines and InfrastructureMachines, may not be cleaned up properly if those objects were created with an APIVersion
which is no longer served.
To avoid these issues it’s advised to ensure a restart of the kube-controller-manager is done after upgrading to a version
of Cluster API which drops support for an APIVersion - e.g. v1.5 and v1.6.
This can be accomplished with any Kubernetes control-plane rollout, including a Kubernetes version upgrade, or by manually
stopping and restarting the kube-controller-manager.
Each Cluster API contract version defines a set of rules a provider is expected to comply with to interact with a specific Cluster API release.
Those rules can be in the form of CustomResourceDefinition (CRD) fields and/or expected behaviors to be implemented.
See provider contracts
Each Cluster API release supports one contract version, and by convention the supported contract version matches
the newest API version in the same Cluster API release.
A contract version might be temporarily compatible with older contract versions to ease the transition of providers to
a new supported version; compatibility for older contract versions will be dropped when the older contract version is EOL.
Unlike API versions, in Cluster API there will always be only one contract version, the supported contract version.
Compatibility with older contract versions, when implemented, is only intended to ease the transition for providers,
and it will be considered in a very limited set of operations e.g.
You can init a management cluster with a core provider implementing the v1beta2 contract and an
infrastructure provider still implementing the v1beta1 contract (v1beta1 is temporarily compatible with v1beta2).
You can temporarily have a management cluster with a core provider implementing the v1beta2 contract and an
infrastructure provider still implementing the v1beta1 contract, you can update both of them to newer versions
(v1beta1 is temporarily compatible with v1beta2).
A version of clusterctl implementing the v1beta2 contract cannot init a cluster with a core provider implementing
the v1beta1 contract (v1beta1 is deprecated).
A version of clusterctl implementing the v1beta2 contract cannot perform upgrades when the target version core provider
will be implementing the v1beta1 contract (v1beta1 is deprecated).
A core provider implementing the v1beta2 contract can work with an infrastructure provider still implementing the
v1beta1 contract and reporting status.ready on InfraCluster or InfraMachines (v1beta1 is temporarily compatible with v1beta2).
Also, might be that in future compatibility will be subject to limitations (e.g. compatibility only for infrastructure
providers of an older contract version) e.g.
A core provider implementing the v1beta2 contract will still read status.failureReason and status.failureMessae
from an infrastructure provider still implementing the v1beta1 contract, but those info won’t be considered
anymore by controllers as terminal failures nor trigger machine remediation (v1beta1 compatibility has some limitations).
Contract Version Compatible with contract versions Status Supported Until
v1beta2 v1beta1 (temporarily) Supported After a newer API contract will be released v1beta1 Deprecated Deprecated since CAPI v1.11; in v1.16, April 2027 compatibility with the v1beta1 contract will be considered EOL
See 11920 for details about the v1beta1 removal plan.
When running a Cluster API release, all the provider installed in the same management cluster MUST
implement the CustomResourceDefinition (CRD) fields and/or expected behaviors defined by the release’s contract version.
As a corollary, provider’s version number and provider’s API version number are not required to match Cluster API versions.
The Cluster API command line tool, clusterctl, will take care of ensuring all the providers are on the
same contract version both during init and upgrade of a management cluster.
This paragraph documents the general rules defining how the Cluster API team determines supported Kubernetes versions for every
Cluster API release.
When a new Cluster API release is cut, we will document the Kubernetes version compatibility matrix the release
has been tested with in the table below.
Each Cluster API minor release supports (when it’s initially created):
Four Kubernetes minor releases for the management cluster (N - N-3)
Six Kubernetes minor releases for the workload cluster (N - N-5)
When a new Kubernetes minor release is available, the Cluster API team will try to support it in upcoming Cluster API
patch releases, thus:
extending the support matrix for the latest supported Cluster API minor release to:
Five Kubernetes minor releases for the management cluster (N - N-4)
Seven Kubernetes minor releases for the workload cluster (N - N-6)
extending the support matrix for the Cluster API minor release before that to: (this will be only done for Kubernetes >= v1.36)
Six Kubernetes minor releases for the management cluster (N - N-5)
Eight Kubernetes minor releases for the workload cluster (N - N-7)
Please note that we will try to support the new Kubernetes release, there is no guarantee
that we will be able to backport the required changes as they might be breaking.
Example:
When Cluster API v1.7.0 is released it will support:
v1.26.x to v1.29.x for the management cluster
v1.24.x to v1.29.x for the workload cluster
When Kubernetes 1.30 is released: v1.7.x will support:
v1.26.x to v1.30.x for the management cluster
v1.24.x to v1.30.x for the workload cluster
When Kubernetes 1.31 is released: v1.7.x will support:
v1.26.x to v1.31.x for the management cluster
v1.24.x to v1.31.x for the workload cluster
Cluster API support for older Kubernetes version is not a replacement/alternative for upstream Kubernetes support policies!
Support for versions of Kubernetes which itself are out of support is limited to “Cluster API can start a Cluster with this Kubernetes version”
and “Cluster API can upgrade to the next Kubernetes version”; it does not include any extended support to Kubernetes itself.
See Kubernetes version Support and Cluster API deployment model
to understand how the way you deploy Cluster API might affect the Kubernetes version support matrix for a Cluster.
On a final comment, let’s praise all the contributors keeping care of such a wide support matrix.
If someone is looking for opportunities to help with the project, this is definitely an area where additional hands
and eyes will be more than welcome and greatly beneficial to the entire community.
Standard Kubernetes version Skew Policy
defines the maximum version skew supported between various Kubernetes components within a single cluster.
Notably, version skew between various Kubernetes components also define constraints to be observed
by Cluster API, Cluster API providers or Cluster API users when performing Kubernetes version upgrades.
In some cases, also Cluster API and/or Cluster API providers are defining additional version skew constraints. For instance:
If you are using kubeadm as a bootstrapper, you must abide to the kubeadm skew policy .
If you are using image builder, all the Kubernetes components on a single machine are of the same version
If your Cluster has a defined topology, with Cluster.spec.topology set and referencing a ClusterClass,
Cluster API enforces a single Kubernetes version for all the machines in the cluster.
The following table defines the support matrix for the Cluster API core provider.
See Cluster API release support and Kubernetes versions support .
v1.12, Maintenance Mode v1.13 v1.14
Kubernetes v1.29 ✓ (only workload) Kubernetes v1.30 ✓ (only workload) ✓ (only workload) Kubernetes v1.31 ✓ ✓ (only workload) ✓ (only workload) Kubernetes v1.32 ✓ ✓ ✓ (only workload) Kubernetes v1.33 ✓ ✓ ✓ Kubernetes v1.34 ✓ ✓ ✓ Kubernetes v1.35 ✓ >= v1.12.1 ✓ ✓ Kubernetes v1.36 ✓ >= v1.12.8 ✓ >= v1.13.1 ✓
See also Kubernetes version specific notes .
Cluster API is tested with upstream, fully conformant, Kubernetes releases.
It might be possible to use Cluster API also with non conformant Kubernetes releases, but it is up to users
to validate if this works and the project does not provide any support or guarantees for these kind of deployments.
For each version of the Cluster API core provider, there is a corresponding version of the Kubeadm Bootstrap provider.
The Kubeadm Bootstrap provider also follows the same support rules defined in Cluster API release support
and Kubernetes versions support .
As a consequence, the support matrix for the Kubeadm Bootstrap provider is the same as the one
defined for the Cluster API Core provider .
When creating new machines, the Kubeadm Bootstrap provider generates kubeadm init/join configuration files
using the kubeadm API version recommended for the target Kubernetes version.
kubeadm API Version
Kubernetes >= v1.31 v1beta4 Kubernetes v1.22 .. v1.30 v1beta3
For each version of the Cluster API core provider, there is a corresponding version of the Kubeadm Control Plane provider.
The Kubeadm Control Plane provider also follows the same support rules defined in Cluster API release support
and Kubernetes versions support .
As a consequence, the support matrix for the Kubeadm Control Plane provider is the same as the one
defined for the Cluster API Core provider .
The Kubeadm Control Plane requires the Kubeadm Bootstrap provider of the same version.
The Kubeadm Control Plane provider communicates with the API server and etcd members of every Workload Cluster whose control plane it owns.
All the Cluster API Kubeadm Control Plane providers currently supported are using etcd v3 API when communicating with etcd.
Each version of the Kubeadm Control Plane can upgrade up to a max CoreDNS version.
Notably, the Max CoreDNS version could change also with Cluster API patch releases.
The version depends on the version of the corefile-migration library.
To look up the max supported CoreDNS version of a specific Cluster API version:
Look up the corefile-migration version in the CAPI top-level go.mod file, e.g. github.com/coredns/corefile-migration v1.0.31
Look up the highest supported CoreDNS version, e.g. in https://github.com/coredns/corefile-migration/blob/v1.0.31/migration/versions.go#L32
Cluster API has a vibrant ecosystem of awesome providers maintained by independent teams and hosted outside of
the Cluster API GitHub repository .
To understand the list of supported versions for a specific provider, its own Kubernetes support matrix, supported API versions,
supported contract version and specific skip upgrade rules, please see its documentation. Please refer to providers list
In general, if a provider version M says it is compatible with Cluster API version N, then it MUST be compatible
with a subset of the Kubernetes versions supported by Cluster API version N.
It is strongly recommended to always use the latest patch version of clusterctl to get all the fixes/latest changes.
In case of upgrades, clusterctl should be upgraded first and then used to upgrade all the other components.
The most common deployment model for Cluster API assumes all providers are running on the Management Cluster and managing the lifecycle
of a set of separate Workload clusters.
“All providers” includes: the core provider, a Bootstrap provider, a Control Plane provider (optional),
and at least one infrastructure provider.
In this scenario, the Kubernetes version of the Management and Workload Clusters are allowed to be different.
Additionally, Management Clusters and Workload Clusters can be upgraded independently and in any order.
In another deployment model for Cluster API, the Cluster API providers are used not only to manage the
lifecycle of separate Workload clusters, but also to manage the lifecycle of the Management cluster itself.
This cluster is also referred to as a “self-hosted” cluster.
The Kubernetes version of the “self-hosted” cluster is limited to the Kubernetes version currently supported
for the Management clusters.
1.36 :
Kubeadm Bootstrap provider:
The ControlPlaneKubeletLocalMode feature gate graduated to GA and has been removed in Kubernetes v1.36. CAPI will no longer set this feature gate explicitly for Kubernetes 1.36+. For Kubernetes versions 1.31-1.35, CAPI continues to set it automatically to ensure kubelet continues working during control plane upgrades.
1.31 :
All providers:
It is not possible anymore to continuously apply CRDs that are setting caBundle to an invalid value (in our case Cg==). Instead of setting a dummy value the caBundle field should be dropped (#10972 ).
Kubeadm Bootstrap provider:
kubeadm dropped the control-plane update-status phase which was used in ExperimentalRetryJoin (#10983 ).kubeadm introduced the experimental ControlPlaneKubeletLocalMode feature gate which will be automatically enabled by CAPI for upgrades to v1.31 to not cause network disruptions (#10947 ).
1.29 :
In-tree cloud providers are now switched off by default. Please use DisableCloudProviders and DisableKubeletCloudCredentialProvider feature flags if you still need this functionality. (https://github.com/kubernetes/kubernetes/pull/117503)